6 Advanced AdSense Optimization Tips for increased ad Revenue


So, we've been talking a bit about AdSense lately. Yesterday, we talked about how AdSense now offers free video ad serving. But to be more specific, we are here to talk about AdSense tips to optimize your ads and increase your revenue. Are you utilizing all the potential of your AdSense ads to make money? If you feel that there are still some untapped potential in them, you might want to think over your AdSense strategy again. A few days back, we shared some basic tips for optimizing your AdSense ads. Today, we shall continue on with some more advanced tips you should tally with your blog, and see if you're applying them or not.


1. Find out what your best performing ad unit is


Google AdSense will always load the best performing ad unit on your site first. So if the connection between your server and the user is slow, and if all ads aren't loaded, then this ad unit will have the highest chance of getting loaded. So to take advantage of this, you need to place the code for that ad unit first in your HTML source.


This is easy. To do it, you simple have to navigate to your beginning body tag, and then create a div tag right underneath it, and insert the code for the ad unit in that div. Here's how;


<body>

<div id="ad1">

Insert the code for the ad unit here</div>


2. Sort out crawl errors


If the AdSense crawler can't properly crawl your pages, your ad units might return irrelevant ads. If you want the most accurate and useful ads, you should check to see if you don't have any crawl errors. You can do this by logging into your account, and going into Account Settings. You will find if you have any crawl errors for any of your websites there.


Crawl errors


Check this Google article on how to fix crawl errors.


3. User experience


The internet is so filled up with information now, that no matter what content you crate, chances are that it has already been made in one way or another. So what would diffrentiate your content with that of your competitors? Your website's user experience will, because that is one of the few chances you have of getting a headstart.


When a user lands on your page, you only have a few seconds to make an impression, something which you can only do with a good user experience. Good user eperience features include fast load speed, good layout of your content, nice color schemes, interactive interface with an easy navigation, quick links, and so on.


4. Use Google Plus more


Creating and maintaining a Google Plus page is the key to success now, whether you like it or not. It can be used to share your videos, posts, pictures, and more. People can +1 them, which is basically a recommendation for others to check your posts out. Google apparantly wants you to use its social network more often. And if you want success, that's just what you'll have to do.


5. Use DFP


Yes, we talked about it yesterday.You might be using other ad networks alongside AdSense on your site. Doubleclick For Publishers (DFP) is a Google-hosted tool that helps streamline the process, and makes it easy to serve ads fromdifferent ad networks. It gives you a vast array of features, such as the free video ad serving feature we talked about yesterday.


6. Go mobile


Last, but not least, make your website mobile! You can create and serve multiple versions of your site, depending upon the user agent client that requests the data. The market is growing rapidly, and it'd be a good idea to capitalize on this opportunity, and convert visitors into bucks.


That's it for now. Try implementing all of these tips. If you run into any problems, feel free to ask in the comments below. Peace :)

Video ad serving is now available in DFP Small Business for free!


Video ads

Using videos in your content is considered as one of the most effective presentation technique. It helps with visual aids, and makes it easier for the listener audience group to grasp your message. Indeed, serving videos is one of the effective ways of attracing traffic. And just like other content such as text and images, videos have great revenue potential. This means, that if you have a substantial video viewership, you can use that traffic to earn revenue for you through ads. And generally speaking, video ads sometimes tend to perform better on the revenue side when we compare equal amounts of traffic for video content, and simple text/image content. Google understands this, which is why it has been working on video ad serving for some time. And now, it has finally announced its video ad serving feature, and a free and unlimited video ad serving trial offer to DFP Small Business publishers.


Wait, hold on! Say what? I know that some of you might have gotten lost. Worry not. We'll try to explain. Just like you can put up ads in your content (you can spot many on this very page), you can also put up ads in your videos (provided that you upload any). Video ads tend to perform better, because your audience can connect better with a visual presentation with audio and video. So they are more likely to click on it. Google has taken advantage of this opportunity, and released this video ad serving feature that will allow you to add AdSense ads to your videos. 


What can you expect?


With this new feature, you can upload and transcode video ad assets into a variety of formats. You can also display pre-roll, post-roll, or mid-roll in-stream ads for maximum effect. However, you should be careful about how many ads you put up. Mid-roll ads (ads in the middle of a video) are annoying. Post-roll and pre-roll ads seem to work best. But then again, that might not be applicable to your blog.


You can manage your video ads alongside your normal mobile and desktop ads in DFP Small Businesses. However, before you can access these management tools and features, you need to integrate with some video technology platforms to ensure easy implementation and optimal playback. (follow the link to find out more).


Free, unlimited video ad serving!


This video ad-serving feature is free for up to 400,000 impressions per month. But until the 30th of April this year, Google will offer you an unlimited trial offer, so that you can serve as many ads as you can, free of cost. After this trial ends, and if the impressions hit 400,000+, there'll be a noinal charge on CPM basis.


Remember, this is for DFP Small Businesses. If you would like to sign up, you can do so at this signup page. If you have further questions, feel free to ask. Create a DFP Small Business, and get busy monetizing :)


4 Immediate Actions you must take if your Website is Hacked


Recovering hacked website


Has your website been hacked? It's not uncommon to see sites getting hacked these days. Even large websites with lots of protection can get hacked. Indeed, it's usually the large and popular websites that are prone to hacking. Security is a major problem these days. And if your site gets hacked, it can get damaged in a number of ways. You could either lose all your data, or your site could lose its ranking due to a malicious software installed. So while you can do backups and stuff, you cannot prevent someone from hacking into your site. So if your site gets hacked, there are some recommended actions you should take to get it back.


How to tell if your website is hacked?


You can confirm that your website has been hacked by visintg Google Webmaster Tools. The Google Webmaster Central will let you know if there's malicious activity going on on your site, or if it has been infected with a virus that might harm other users. As a result, Google removes your site from search results until the virus has been removed. So you should check your Webmaster Tools to check for any problems that may arise, and to repair the damage done as soon as possible.


4 things to do when your site is hacked


1. Take your website down


Yep, take it down. I know it's kinda harsh, but it is the fisrt thing you should do ethically. Because if it's not taken down, it might effect other websites as well. You might want to contact your web host for this, because other sites on their system might get infected as well.


Also, change ALL of your passwords. Your site might have multiple users, or you might be using multiple FTP accounts, and so on. Change passwords for each and every account. And also monitor all of your accounts, because in all likelihood, the hacker might have created new accounts in order to make a back-door for himself.


2. Check out the nature of the attack


With regards to a hack-attempt or a virus attack, it's best to fisrt judge the nature of the attack, and then act accordingly. Your first stop should be Google Diagnostics page, which will give you information about any virus or malware present on your site. To do this, just use this URL (www.google.com/safebrowsing/diagnostic?site=yoursite.com), and replace the yoursite.com part with your site's address. After that, there's a checklist you should perform.


  • Check your Google Webmaster Tools for any messages regarding the virus. You can also see pages with malware by going into Health >> Malware. Delete those pages if necessary. Hackers usually create new pages for malicious purposes.

  • Do a complete scan of your computer. Check to see if there isn't any virus disguised as an image (it happens!). This is one of the easiest way to hack someone. Also, check what extensions your browser is using, and delete all the unnecessary ones.

  • Use the Fetch as Google in Webmaster Tools to detect other pages with virus, and use the Link Removal Tool to hide those pages down temorarily from users and search engines, so they won't be served to users.


3. Getting rid of hacked content


Now that you know what and where the problem is, it's time now to get rid of it. Use Google Webmaster Tool's Malware page to see what pages host malware, and delete them. If you have a backup of your content, then you might want to delete all your content, and then restoring it, which should hopefully get you rid of the viruses. You can always check with Google Safebrowsing diagnostics, and Malware page to see if there's still some malicious activity left.


You should also update the management system you're running your website on, such as WordPress etc. Also update any plugins, or third party software you have on your site.


4. Tell Google you're good to go again


Once you're sure that all the viruses and malwares have been removed from your site, you should ask Google to review your sit again. To do this, go into Webmaster Tools, and click on Health >> Malware, and then click on Request a review. Google will review you site again, and remove the warning if it finds the site clean.


Google Webmaster Tools Malware detector


Remember. This method only removes that malware warning that is displayed to users. If the hacker has been spamming, you might come under a penalty. To fix that, you will need to file a reconsideration  request to Google. Red our article on how to do this


Hope this tutorial helps. If there are any questions, do let us know. And keep reading :)

Add Facebook Activity Feed Plugin To Blogger

facebook activity feed for blogger

Aren't all BlogSpot blogs still missing this extra ordinary traffic boosting plugin? We just added Facebook activity feed plugin to our sidebar because nothing plays well in increasing a website's pageviews then Facebook's massive number of over 1 Billion registered users. This plugin displays posts and also recommends new stories which are liked by your visitor's friends. Thus it builds social engagement and attracts readers to dig into your website more to find out what their friends liked. If you are using Facebook recommendations bar in your sites then you will be pleased to know that this plugin also displays recommendations along with recent likes based on social activity made on your pages. Indeed a must to-add-widget from us to all of you who have not yet utilized this widget!

Lets add it to your blogger blogs in just few simple steps. The demo can be seen on our sidebar under the title "Hottest Now!"


Add it to blogger

The installation guide is kept extremely simple so just follow these easy steps:

  1. Go To Blogger > Template
  2. Backup your template
  3. click Edit HTML
  4. Optional step: If you have a Facebook comments plugin or Recommendations bar installed on your blog then you may skip to step#5 instead.

Search for the following tag inside your template:

<body>


or simply search for

<body

  Just below this body tag paste the following JavaScript SDK code:


<div id="fb-root"></div>

<script>(function(d, s, id) {


  var js, fjs = d.getElementsByTagName(s)[0];


  if (d.getElementById(id)) return;


  js = d.createElement(s); js.id = id;


  js.src = "//connect.facebook.net/en_US/all.js#xfbml=1";


  fjs.parentNode.insertBefore(js, fjs);


}(document, 'script', 'facebook-jssdk'));</script>


  Save your template.


      5.  Next go to Blogger > Layout


      6. Click add a gadget and choose HTML/JavaScript widget


      7. Inside your HTML/JavaScript widget paste the following HTML5 code:


<div class="fb-activity" data-site="http://www.MyBloggerTricks.com" data-width="300" data-height="450" data-border-color="#ffffff" data-header="false" data-recommendations="true"></div>


Make these changes:


  • Replace http://www.MyBloggerTricks.com  with your website URL. For BlogSpot blogs it should have the following structure: http://your-blog-domain.blogspot.com


  • I have set width to 300 pixels (300)and height to 450 pixels (450). Adjust them according to your blog layouts only if alignment changes are required. Increase height if you want to display more stories inside the plugin.


  • In order to hide the blue border across the plugin, I have set the border to white. If your sidebar has a different colored background then adjust the background color by editing: #ffffff    Tip: Use our color generator tool


  • Friends likes appear above and recommended posts appear below that as bolded titles. If in case you don't want the plugin to display recommended stories then you can turn off recommendations by replacing true with false 


      8.  Save your widget and all done!


    Visit your blogs to see it working just fine. :)


Need help?


Adding this widget is surely easy but still if you encountered any troubles just post your query below and I would love to reply back.


The widget can also be controlled via your Facebook account by adding an application ID inside the JavaScript SDK code but we avoided making things complex.


I just hope this plugins adds some more traffic spice to your current growth and improves current page impressions. Wish you more success and tons of valuable traffic. Peace and blessings buddies! :)

Google Image Search Now displays MetaData!


New Google Image Search

When it comes to image search, Google is considered by many as having the best technology at it's back-end. Google's expertise in the area can be fathomed from the fact that it can search for text within images in your Google Drive storage. But that's something only Google Drive users get. We are talking about the mainstream users here, most of whom prefer Google's image search over other search engines such as Yahoo or Bing. And not without reason. Google performs some of the most accurate image searches of all. And according to latest news, Google is now releasing a new revamped structure for its image search, improving its performance, and making the image's MetaData now visible to searchers!


What's new with Google Image search?


Google has redesigned the interface for image search to bring a better experience to its users. This design overhaul includes a repositioning of the images into an inline panel, which is fast and easily accessible, and is attractive at the same time. You can use your keyboard to flip through images, much like in a digital gallery. And if you want to go back to previous search results, you can simply scroll down and start again.


Another big change (which is significant for webmasters, we'll shortly discuss why) is that, an image's Metadata is displayed right next to it in search results. So now, users don't need to open up a new tab or redirect to another page to another page to see information about the image.


There's also a lot more information about the image available right on the search results, such as the image size, the domain it comes from, and the page it is hosted on. Both the domain and the page links are clickable, so that users have a lot more ease when browsing through images and going over to their source. According to Google, this has improved the Click-Through-Rate (CTR) for images overall.


Another big improvement is the removal of the source page from the background of an image. This wasn't really necessary, so Google has removed it, and given a link to the source page instead. This not only makes the images load up faster, it also reduces the load on the host server, hence preventing bandwidth issues.


So, what does this mean for webmasters?


With the introduction of these new changes, one thing's for certain: they will incline users more towards image-searching. Google already says that these new changes have increased the overall CTR for images. And this trend is bound to alleviate. So, what exactly does this mean for webmasters?


First of all, webmasters will now need to concentrate a lot more on optimizing their images. Tagging images has become much more important, because the ALT title and descriptions are now accissible to users right on the search page. So if your images are not properly tagged, users will see those images as incomplete, and will move on to other images. Read this post on tagging images to learn more about driving traffic.


Read the post carefully, and create valuable metadata (tags and description). This will help your images get a high rank in search results, as well as ensure a good click through rate for your images, hence giving you more traffic.


Note: This service is being introduced, and will take a few more days to be implemented fully. So if you don't see any changes, just give it a couple days or so. And stay tuned for more updates. Cheers :)

Recipe SEO - Need Help?

Need help in SEO?
Hey welcome!

We warmly welcome you to our 24/7 Free SEO Help and support forum. Here you can find solutions to all your SEO problems no matter how big or small they be without paying a penny. You are also allowed to help the community here if you are sure enough with your proposed solution.

You are inside kitchen#1. If you are new here please first read:

What type of questions you may ask?
You are most welcomed to ask Chef LoOny as many questions as you can related to the following categories or similar:
  1. Google, Bing and Yahoo webmaster account issues
  2. Blogger Search Preferences settings
  3. Sitemap Submission issues
  4. Robot.txt entries
  5. Indexing, 404 and crawl errors
  6. Queries related to link attributes such as alt="", rel="nofollow", rel="author" etc.
  7. Meta tags 
  8. Keyword stuffing and density
  9. Meta redirects and 301 redirects
  10. All things seo!
How long to wait for a reply?
If you have carefully followed our comment structure rules and comment policy, expect a reply in no more than 24 hours.
 
Note:  Subscribers will be paid more attention and treated exceptionally. if you are not an MBT subscriber, then fill up the simple form below and verify your email in order to avail our generous hospitality in many ways with free goodies, gifts and tons of free resources. one time subscription only.
Join over 40k happy MBT readers now!
Comment Structure:
Your comment must include the following information in order to receive a quick response.:
  1. Mention your full name
  2. Mention your blog URL as text and not as hyperlink
  3. Describe your problem in a precise way
Comment Policy:
Following comments will be deleted no matter how important the query be:
  1. Off Topic Questions - questions not related to this kitchen section
  2. Blog Promotion - you may not advertise your blogs or forums
  3. Signature Links - keep your hyperlinks out of the forum!
Lets go cooking with Chef LoOny!

How to Backup your FeedBurner Email Subscribers List Safely?


Backup FeedBurner


FeedBurner is a widely-used email subscription service, and unless you're on a premium service such as Aweber, chances are that you are using FeedBurner as well. For some, FeedBurner might be everything they need. But for more advanced bloggers out there, some premium services seem to offer a lot more features. And the fact that FeedBurner ran into problems a couple or so months ago doesn't go very well in its favor either. Whatever the case though, it is always a good idea to back things up. Whether you want to move your subscribers to another service, or you just want to make a backup, you will need to download your FeedBurner subscriber list. Here, we'll tell you how to backup your FeedBurner Email Subscribers list.


FeedBurner isn't so renowned with reason. It has many features to offer, such as subscription management, email branding, customizable delivery and communication preferences, and a lot more. You can view and sort your subscriber list, activate/deactivate and delete individual emails, and receive emails when people unsubscribe. Besides, it has the export option, so you can export your list to excel or .csv format.


Downloading your FeedBurner email subscribers


To start off, log into your FeedBurner account. FeedBurner previously had problems displaying subscriber counts, but it seems to be all right for most people now. Just click on the blog name for which you want to backup your subscriber list.


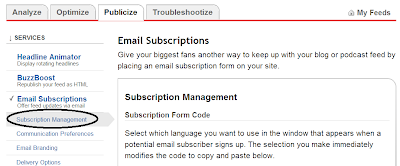
You will then be directed to a dashboard. Click on the Publicize tab in your dashboard.


Publicize


Under the publicize tab, you will see an option for Email Subscriptions in the left sidebar. Once you click it, you will see some further options. Now click on Subscription Management.


Subscription management


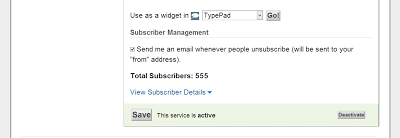
Now, you can see the number of your email subscribers. When you first log into FeedBurner, what you see is the total number of your subscribers for both email and RSS combined. But what you need is just your email subscribers' list, and not RSS subscribers' list. On the Subscription Management page, if you scroll down all the way to the bottom, you will see the number of your Total Subscribers, which only counts your email subscribers.


total subscribers


If you click on the View Subscriber Details option (shown in the picture above), you will options to export the list.


Just click on Export: CSV, and you're done! You will be prompted to save a file, which contains all your email subscribers. You can do whatever with this file; either store it on your computer, or upload it to a cloud storage, your call.


In the meantime, if you have questions, feel free to ask. Good luck :)

6 Ways To Optimize AdSense Ads To Increase Revenue


Yesterday, we talked about some things you should consider before starting off your blog in 2013, and in that, we discusses about some SEO-related things. For a lot of blogs out there, the major purpose is to make money, So today, we'll carry on the idea, and talk about Google AdSense. For beginners as well as advanced users, the start of a new year would be a good time to start thinking about your AdSense campaign. Are you making the most out of your ads? Now would be a good time to review your ad performance, and make changes accordingly. So here, we'll provide you with a checklist of 6 things you can do to optimize AdSense and make the most out of your ads.


1. Are you utilizing your ad spots?


This is the first questions you should be asking yourself. AdSense won't allow you to add as many ad units as you like. But are you even utilizing all the ad-spots that it does allow? For every page on your website, AdSense will only let you place three AdSense for content units. These vary in size, so you can utilize the best possible locations your ads can fit in. But you can only place one 300x600 ad unit. Apart from this, you can use three text-ad units, and two AdSense for for search boxes units. Before placing all these ad-units though, take some time to consider whether you have a sizable quality content to ad unit ratio. It just doesn't make sense if all the ad spots have been used, but there is no actual content on that page.


2. Take a look at your ad sizes


Generally speaking, wide ad units tend to perform better than tall ones. For example, the 728x90, 336x280, and 300x250 ad sizes are usually the highest performers. You should try on multiple ad sizes, and find out for yourself what works best for you. The ad size should also correspond to the placement of your content. For example, a tall and thin ad-unit doesn't make sense within a written post.


3. Use text and images too


Usually, publishers just focus on image ads, and forget about the other options available. Adding text ads is a good idea as well, because they compete with the image ad units for the same space. Using a combination of text and image ads can help you earn a lot more.


4. Add search boxes


As mentioned above, image ads are not the only thing in the world. AdSense will allow you two AdSense for search boxes units per page as well. They let you place a custom search engine on your site to provide users with web search. And you might earn from relevant ads on the search results page.


5. Make your ad units accessible


Pay special attention to where you actually place your ad units. They should complement, and fit in with your content. And also, users should be able to easily identify and access them. Generally, ads should be above-the-fold. Google offers a lot of guidelines to help you place your ads.


6. Check out color combinations


Last, but not the least, use trial and error, and play around with various color schemes and ad styles. They can play a big part in how much revenue you earn. There are three strategies you can choose from. Blend, Compliment, and contrast. Compliment is normal placement, where ad units are used within content, and are distinguishable. Blending ad units into content means using the same colors, so that it is hard to distinguish the ad unit. Contrast means you use contrasting colors that scream out an ad-unit's presence. You can use any of those, as long as you follow the guidelines from Google.


That was it for now. Stay tuned for more on AdSense. For any questions, please use the comments section below. Peace :)

Launching Service: Vector Face Art


Mohammad Mustafa Ahmedzai

Can you recognize this man up here? Yup that's me! ;p Colored in almost just black and white. We are glad to introduce today yet another additional service being offered by STC Network. Apart from the huge list of services we offer like designing icons, logos and web templates, we have stepped into Vector Face Designing. An art that is a mixture of limited flavors of colors that combine to produce a compelling digital image. Whether it be you, your pet or your company's CEO, just submit his photo to us and get him an artistic digital Personality!

A vector image as you may know could be resized to any dimension, small or big, without any loss in picture quality. Company CEOs, webmasters, internet marketers could use these images in promoting their campaigns by giving it a more personal touch.

What Makes it different?

Traditional JPEG, GIF, PNG computer graphic formats can not be resized to bigger sizes because they involve pixel loss problems. A JPEG if stretched would loose its color quality and would look dull and blurred. On contrary a vector image is easily printable and could easily be resized to as big a resolution as you want. So be it your Large sized PanaFlex Banners for local street advertisement or your T-shirts or Standard Ad Banners for your website, the Vector Image would blend in just perfectly.

Tools used:

When it comes to art, we take you to Abdul Rahman Majeedi, our company's senior Graphic Designer. The images displayed on this post are a gift from Abdul Rahman for my engagement. Can't thank you [Abdul Rahman] enough man! :)

To produce a Vector image we make use of the following tools:

  • WACOM Graphic Tablet
  • Adobe Illustrator CS5
  • Corel Draw

Pricing Details:

Our Price quotes for all services depend on the quality and depth of the order placed. If you wish to place an order the early possible, kindly contact us via the services page.

Your Views?

I guess we have now a clear vector photo to use in our promotional campaigns coming this year. Always wanted a personal touch in banners and power point presentations, I have now a good way to say it loudly: "I Blog for living!" ;)

I just hope you find this service useful. I would really appreciate a feedback on the imagery being displayed today. Your valuable reviews would surely help us a lot in improving things more. About those Delicious Kitchen Recipes? Stay tuned! We have a lot to share this month. Peace and blessings buddies. =)

From this:

Mohammad Mustafa Photo

To This:


blogging for living

Introducing Pro Blogger's Kitchen!

A Blogger's Kitchen

As a single watchman of your entire website, you often fail to reach your blog audience in every single post. With growing readership, comes a great responsibility. The reason people subscribe you is because they love your work and they expect a lot of help from you. In my case, I found it almost impossible to do justice with readers' queries. I fail to reach every single  reader because dozens of comments are posted every day. It takes a lot of time to load each page and post a response. Sometimes replying comments takes more than 2 hours. Therefore we thought of a way that could significantly help just not us but everyone of you in the way you help out and reach your blog readers. To counter this growing author-reader communication gap the idea of a Kitchen hit my mind!

What Exactly is a Blogger's Kitchen?

Of course a kitchen is a place where you cook delicious recipes and it's a place which every member of the family loves to visit! Similarly a Pro blogger's kitchen would consist of a combination of posts where each post would address a separate [Topic] recipe! Confused ? let me explain:

Your blog is made up of categories that describe your niche. For example here at MBT our main categories/recipes are:

  1. SEO
  2. SMO
  3. Web Hosting
  4. Template Customization
  5. Copyrights Violation
  6. Advertising networks

Our readers often have several questions in mind and each question deserve an answer but unfortunately due to tough schedule, we often fail to address every single problem. To help out all such visitors with their queries and to interact more actively with our readers, we are introducing the idea of a Kitchen with recipes. We will publish a total of 5-7 Posts, where each post would have a specific Topic/Recipe. Readers would be allowed to ask questions related to that topic alone. Off-topic questions will be straight forwardly deleted and never answered. We will be answering questions posted in these 5-7 recipe posts on daily basis. The priority of such questions would be even higher than the client emails that we receive daily. No question would be left unanswered and spammers would be strictly treated. Comments with irrelevant content and signature links will be deleted and only those comments would be replied that are related to the topic of the kitchen. It would be more like an Open Question/Answer forum. These recipe posts will have a lifetime free help and consultancy support!

Why are we so excited about this new strategy?

Innovation and creativity is at its boom in blogosphere these days. Traditional blogging techniques of a dull black and grey text content is no more a hobby of interest. Readers demand both unique and quality content as well as 24/7 help and support forum.

Previously bloggers would often create a forum to help their readers but forums for me at least requires more careful watch as compared to a blog and is Spammers favorite party spot. After carefully monitoring the suggestions received by my fellow blog mates, I dropped the idea of a forum and have started the idea of such kitchen with recipes that will surely change the way a blog author communicate with his audience. Related questions on one page would help both the commentator and the guest with tones of new ideas and troubleshooting techniques. With such platform, we can really hope to help more and more people resulting in an ever growing referral readership. Happy readers means growing traffic, backlinks, page impressions, pageviews and a happy lucrative income!

How to set up your Blog's kitchen?

Your kitchen should be based on your core blog categories that define the overall purpose of your blog. Create at most 5-7 such Recipes [Question/Answer Posts] and  inform your readers to ask for quick help and support through these kitchen doorways only. Do visit these posts once every 24 hours and make sure you reply each and every comment.

Write down strict rules for commenting because they really help to foster a healthy discussion and saves time.

How would such a Kitchen Outstand you from others?

What readers like most is free help and suggestions rather than daily dose of new posts. If you are only posting on daily basis but not interacting with your readers then you are actually doing nothing unique! Start getting more creative with your work and let your readers trust you more and more. A healthy communication between an author and visitor guarantee far bigger surprises than your expectations. Kindly stop building traffic alone and instead start building readers, verily your loyal readers are your true treasure.

Our Kitchen Recipes

Following is the complete list of Question/Answer forums we will be publishing:

1. Questions & Answers » Recipe: SEO
2. Questions & Answers » Recipe: SMO
3. Questions & Answers » Recipe: Web Hosting
4. Questions & Answers » Recipe: Template Customization
5. Questions & Answers » Recipe: Google AdSense
6. Questions & Answers » Recipe: Copyrights Violation

I will be publishing each of these recipes one by one and would keep your informed through the notification bar.

Recipe Description:

1. Recipe: SEO

All questions related to on-page and off-page optimization from your webmaster account, robot meta tags, robot.text entries, link attributes till your Blogger search preferences settings would be discussed here. Complete technical help related to all your search engine optimization problems would be provided in this forum.

2. Recipe: SMO

SMO stands for social media optimization. If plugins such us Pinterest, Facebook Like buttons, Google+ buttons are not picking the right thumbnail image or description snippet etc. then you can find solutions to all your problems here. You can also ask questions related to installing or customizing MBT "Social Sharing" plugins and widgets here.

3. Recipe: Web Hosting

All your Hostgator or Godaddy problems would be solved here. Complete help will be provide to solve technical errors related to DNS settings, cPanel, phpMyAdmin, Domain hosting, file storage, Database Backup, sub domain creation and what not!

4. Recipe: Template Customization

If you are using MBT Template or any widget and need help related to its customization or debugging, then this is the place where you should contact us. All web designing stuff here!

5. Recipe: Google AdSense

AdSense being the first source of earning for any newbie blogger therefore causes a lot of troubles to some.  If you have any questions related to Adsense Policy, Ad display limitations, Best performing Ad locations and formats, adsense TOS violation etc. then you must join the party here.

6. Recipe: Copyrights Violation

Has someone stolen your content and not compromising? Or if you are confused which act of yours could cause you great troubles, then this is the place where you may clear all your doubts and learn effective ways of punching the violator the TRUE way!


Comment Policy

Following comments will be deleted or marked as spam:

  1. OFF TOPIC questions
  2. Blog promotion
  3. Signature links with irrelevant feedback like "Thank you" , "Great work" etc. with no sensible question.

Simple and straight!

Want any Recipe to be included?

I have covered almost all categories that describe MBT. Details of all such recipes would be further given in their respective posts. If in case you think I have missed any important category then please do us a favor and suggest your proposed recipes which should be included in the list.

Ready to start cooking?

I hope this new idea may help all of us to turn our blogs into more interesting and productive community.  For all our dedicated readers, whose comments were never replied, now you have a good reason to start hitting us with as many queries as possible. It would be my greatest pleasure to help you all without any favor in return.

So have you started thinking of your very own kitchen? Do you have any other creative ideas to execute this plan much more effectively? Kindly post your queries and help us fulfill this purpose with great responsibility. Keep good care of yourselves buddies. Peace and blessings always! :)


For spammers:
If you just want to thank us or say great post, then that cute little dustbin awaits your comment! :>

Template Customization - Salahuddin Ayubi

Salahuddin Ayubi Blogger Template


Template:

Salahuddin Ayubi

Layout:

Two Columns

Size: 32.0 KB
Compatibility: IE9+, All
License:  Creative Commons Attribution-NonCommercial


Demo      Download

Template Description:

I have already discussed in detail the important features for SEO, Social Media and Plugins. To read about why this template is so different please read the following article:

Easy Customization

Lets begin with important things that you would need to change the look of your template and edit important sections.

Note: You may not share or red-distribute the codes shared below without consulting us. All resources below are protected by DMCA and are sole property of STC Network.

1. Subscription box

subscription box

Copy and Paste The following code inside HTML/JavaScript widget for the subscribe box:

<style>

    #salahuddin-ayubi {

        border: 0;

        margin-bottom: 10px;

        margin: 0 auto;

            width:300px;

    }


    #email-news-subscribe .email-box{

        padding: 5px 5px;

        font-family: "Arial","Helvetica",sans-serif;

       height:38px;}

    #email-news-subscribe .email-box input.email{

        background:#FFFFFF;

        border: 1px solid #dedede;

        color: #999;

        padding: 7px 10px 8px 10px;

        -moz-border-radius: 3px;

        -webkit-border-radius: 3px;

        -o-border-radius: 3px;

        -ms-border-radius: 3px;

        -khtml-border-radius: 3px;

        border-radius: 3px;

        border-image: initial;

        font-family: "Arial","Helvetica",sans-serif;} 

    #email-news-subscribe .email-box input.email:focus{color:#333} 


#email-news-subscribe .email-box input.subscribe{

        background: -moz-linear-gradient(center top,#666 0,#333 100%);

        background: -webkit-gradient(linear,left top,left bottom,color-stop(0,#666),color-stop(1,#333));


        font-family: "Arial","Helvetica",sans-serif;

        border-radius:3px;

        -moz-border-radius:3px;

        -webkit-border-radius:3px;

        border:1px solid #333;

        color:white;


        padding:7px 14px;

        margin-left:3px;

        font-weight:bold;

        font-size:12px;

        cursor:pointer;

        border-image: initial;}


    #email-news-subscribe .email-box input.subscribe:hover{


        background-image:-moz-linear-gradient(top,#333,#666);

        background-image:-webkit-gradient(linear,left top,left bottom,from(#333),to(#666));

        filter:progid:DXImageTransform.Microsoft.Gradient(startColorStr=#ffffff,endColorStr=#ebebeb);

        outline:0;-moz-box-shadow:0 0 3px #999;

        -webkit-box-shadow:0 0 3px #999;

        box-shadow:0 0 3px #999


        -pie-background:linear-gradient(270deg,#ffda4d,#ff9b00);

        border-radius:3px;

        -moz-border-radius:3px;

        -webkit-border-radius:3px;

        border:1px solid #333;

        color:#FFFFFF;

     } 


    #other-social-bar {

        padding: 0px;

        overflow: hidden;

           height:37px;

         margin-top:-8px;

    }

    #other-social-bar ul {list-style: none outside none; padding-left: 4px;}


    #other-social-bar .other-follow {

        float: left;

        overflow: hidden;

        padding:5px;

        width: 270px;}

    #other-social-bar .other-follow ul {

        list-style: none outside none;

        padding-left: 4px;}

    #other-social-bar .other-follow li {


        display:inline;

        border:0;

      }


    #other-social-bar .other-follow li a {

        font-size: 12px;

        color:#666;

        font-weight: bold; font-family:arial;

        display:inline;

        }

    #other-social-bar .other-follow li.my-rss {

        background: url('https://blogger.googleusercontent.com/img/b/R29vZ2xl/AVvXsEjCpt6eBk-Bku34sTOurOR4IKRX0s9lceqT10QaTuZ9EuLyZ-iCCpyOvakPDEWXeZmvJ4t6WLUyQHRz1P4p8BMxs2NoPznVtVZTaW_euC09RcO-1c69Ecpy-q5kM_JDSpAdo94-dTeqX4A/s400/rss-16x16.png') no-repeat transparent;

        line-height: 1;

        padding: 0px 3px 1px 20px;

        width: 60px;

        margin-bottom:0px;

            margin-left:5px;}


    #other-social-bar .other-follow li.my-rss a, #other-social-bar .other-follow li.my-twitter a, #other-social-bar .other-follow li.my-gplus a{

    text-decoration:none;

    }

    #other-social-bar .other-follow li.my-rss a:hover, #other-social-bar .other-follow li.my-twitter a:hover, #other-social-bar .other-follow li.my-gplus a:hover{

    text-decoration:underline;

    }

    #other-social-bar .other-follow li.my-twitter {

        background: url('https://blogger.googleusercontent.com/img/b/R29vZ2xl/AVvXsEinQQE33M8vzXVkZaCiIG8oWV9Rg6ux6y8_eRjKpTEgfB1HVmpxWeF-DFe49Rz7whlsQ0RNBAzB_wdnUwuA5MORA1B94eUlsqk_LXlHzgFECyeAjQLXSUG9pWZMfcZkQZsye-b3ZjbRSdw/s400/twitter%2527.png') no-repeat transparent;

        line-height: 1;

        padding: 0px 3px 1px 20px;

        width: 60px;

        margin-bottom:0px;}

    #other-social-bar .other-follow li.my-gplus {

        background: url(https://blogger.googleusercontent.com/img/b/R29vZ2xl/AVvXsEgz8pTSX0j9JGLPy_nRitUi1xBusTo2jwapi_3Zk90H88Xvlqs8VaI2hs7vu7ByHNya37r4wSBbWgILOIiX9Vqa1i3wjmBV9Nu6LnSGfGmBfwFRqDyERJ2Ak5ejrDLCqke6ab3K77n4OxE/s400/gplus-16x16.png) no-repeat transparent;

        line-height: 1;

        width: 60px;

        padding: 0px 3px 1px 20px;

        margin-bottom:0px;}


.emailicon {

    background: url("https://blogger.googleusercontent.com/img/b/R29vZ2xl/AVvXsEiKuviJT4dGLknCtxdFi-pL4c5CvLOt0kJrjRzyu5vGnEQs-P-EH5P4fY4t9V72s1exJIZ95IgjLXNzY9n53HsPQUJI4XxmGILzieyLzXwJmmW4EgZgMUxdJaXy9dyspphaBAGAihkHN5xI/s400/MBT-RSS-FEED.gif") no-repeat scroll 0px 2px transparent;

     padding: 0px 20px 0px 95px;

    min-height:100px;

    margin: 0px;

    width: 183px;

    line-height: 20px;

    vertical-align: middle;

    font-size: 14px;

    color: rgb(51, 51, 51);

}


.emailicon p {

color:#FF8604;

font-size: 20px;

font-weight: normal;

font-family:  impact; 

padding:40 0px 10px 0px;

margin:0;

padding-top: 20px;

line-height: 25px;

text-shadow: 0px 1px 0px #fff, 0px 2px 0px #C6C6C6;

}

    </style>

    <!--[if IE]>

    <style>

    #email-news-subscribe .email-box input.subscribe{

        background: #333;

        }

    </style>

    <![endif]-->


<div id="salahuddin-ayubi" >


<div class="emailicon"><p>Subscribe to our Free Email Updates! </p></div>

<div id="email-news-subscribe">

<div class="email-box"> <form action="http://feedburner.google.com/fb/a/mailverify" method="post" target="popupwindow" onsubmit="window.openundefined'http://feedburner.google.com/fb/a/mailverify?uri=tntbystc', 'popupwindow', 'scrollbars=yes,width=550,height=520');return true">

<input gtbfieldid="10" class="email" type="text" style="width: 160px; font-size: 12px;" id="email" name="email"value="Enter your email here..." onblur="if (this.value == &#39;&#39;) {this.value = &#39;Enter your email here...&#39;;}" onfocus="if (this.value == &#39;Enter your email here...&#39;) {this.value = &#39;&#39;;}" type="text" />


<input type="hidden" value="tntbystc" name="uri" /> <input type="hidden" name="loc" value="en_US" /> <input class="subscribe" name="commit" type="submit" value="Subscribe" /> </form> </div> </div>

<div id="other-social-bar">

<ul class="other-follow">

<li class="my-rss"> <a rel="nofollow" title="RSS" href="http://feeds.feedburner.com/tntbystc" target="_blank">RSS Feed</a> </li>

<li class="my-twitter"> <a rel="nofollow" title="twitter" rel="author" href="http://twitter.com/mybloggertricks"  target="_blank">Twitter</a> </li>

<li class="my-gplus"> <a rel="nofollow" title="Google Plus" rel="author" href=https://plus.google.com/1111214334130358474387 target="_blank">Google Plus</a> </li>

</ul>

</div>

</div>

  • Replace tntbystc with your Feedburner title

  • Replace the bolded sections with your twitter and Google+ username details

Note: There is also an Email icon in the sharing widget that appears at the bottom of post. To replace its link with your feedburner Email Subscription link kindly find and replace this: (You will find this link inside your template)

http://feedburner.google.com/fb/a/mailverify?uri=TntByStc

2. Top Menu

Pagelist menu

These tabs can easily be adjusted in two ways. 1. either from layout section  2. or from Pages window.

To drag, add, delete or update the tabs, simply go to Blogger > Pages

From here you can add, delete pages and you can also drag the tabs to shift their locations.


3. Main Menu

Main MenuTo edit links simply search for the following code inside your template:

<div id='botmenu'>


Just below it you will see a list of li tags where you can insert URL and title for your tabs. To create a sub menu transform your code in the following way:

From this:

<li><a href='TAB URL'>TAB TITLE</a></li>


To this:

<li><a href='TAB URL'>TAB TITLE</a>

<span class='sf-sub-indicator'/>

<ul class='sub-menu' style='display: none; visibility: hidden;'>


    <li><a href='Subpage url'>Subpage 1</a></li>

    <li><a href='Subpage url'>Subpage 2</a></li>

    <li><a href='Subpage url'>Subpage 3</a></li>

    <li><a href='Subpage url'>Subpage 4</a></li>


</ul>

</li>

I added Jquery easing effect and transition on mouse hover along with smooth drop down effect. All these effects would work only if you add the yellow highlighted codes.

4. Footer Menu

Footer Menu

To edit the menu at the bottom, simply find this code inside your template:

<ul id='footer-navigation'>

<li><a href='#'>Home</a></li>

<li><a href='#'>Typography</a></li>

<li><a href='#'>Sitemap</a></li>

<li><a href='#'>Services</a></li>

<li><a href='#'>Contact</a></li>

</ul>


Now editing the links would of course be a piece of cake for you all.

5. Blogger Notification Bar

attention grabber

To update the announcement text inside the sticky top bar, find this code:

<body>

You will then see the following code jst below the bode tag:

<div class='openbloggernotification' id='bloggernotificationWrap' style='display: block; margin-top: 0px;'><div id='bloggernotification'>

Download this Blogger Template by  <a class='link' href='http://www.mybloggertricks.com' target='_blank'>Clicking Here!</a>

<span id='closebloggernotification'/></div><span id='openbloggernotification' style='top: -6px;'><span/></span></div>

You may replace the bolded text with any message you wish to display to your readers.

6. Author Image

To replace the author image appearing just below post title and also at the bottom of post. Please find and replace the following image link with yours.

https://lh4.googleusercontent.com/-f8qSqNLtpBU/AAAAAAAAAAI/AAAAAAAAGQY/Sl371AuVYfM/s250-c-k/photo.jpg

Note: Your image can be of any size but make sure it is at most 30 X 30 in size.

7. Author Info

author box

To edit the title and author description kindly find this code:

<div id='about-author'>

You can then edit the details below it.

8. Archive Calendar

To add the archive widget kindly add an archive widget like your normally do from the layout section and then give it the following settings:

archive calendar settings


9. Multi Tabs

Jquery multi tabs

You can add widgets to the multi tab easily from the layout section but you will manually need to edit its titles from the template section. After you have added your widgets kindly edit their titles by finding this code:

<ul class='MBT-tabs MBT-tabs-widget-MBT-id'>

<li><a href='#widget-MBT-id1'>Latest Posts</a></li>

<li><a href='#widget-MBT-id2'>Video</a></li>

<li><a href='#widget-MBT-id3'>Recent Comments</a></li>

</ul>


You may now set these titles to your preferred widget titles.

10. About Author

To add your picture and some info about your self at the footer, you may paste the following code inside the HTML/Javascript widget in order to make the widget look as perfect as it looks in the demo:

<!--[if !IE]> -->

<style>

#profilemohammad{

border:2px solid #888; margin:2px 5px 0px 0px; padding:2px;

}

#profilemohammad:hover {

border:2px solid #ccc;

cursor:pointer;

}


.opacity  {

opacity: 0.5;

margin-left: 50px;

-moz-transition: all 0.5s ease-out; 

-o-transition: all 0.5s ease-out; 

-webkit-transition: all 0.5s ease-out; 

-ms-transition: all 0.5s ease-out; 

transition: all 0.5s ease-out;

-moz-transform: rotate(7deg); 

-o-transform: rotate(7deg); 

-webkit-transform: rotate(7deg); 

-ms-transform: rotate(7deg); 

transform: rotate(7deg); 

filter: progid:DXImageTransform.Microsoft.Matrix(

                    M11=0.9961946980917455, M12=-0.08715574274765817, M21=0.08715574274765817, M22=0.9961946980917455, sizingMethod='auto expand');

zoom: 1; 

}

.opacity:hover  {

opacity: 1;

margin-left: 0px;

-moz-transform: rotate(0deg); 

-o-transform: rotate(0deg); 

-webkit-transform: rotate(0deg); 

-ms-transform: rotate(0deg); 

transform: rotate(0deg); 

filter: progid:DXImageTransform.Microsoft.Matrix(

                    M11=1, M12=0, M21=0, M22=1, sizingMethod='auto expand');

zoom: 1;

-moz-box-shadow: 1px 1px 4px #000;

-webkit-box-shadow: 1px 1px 4px #000;

box-shadow: 1px 1px 4px #000;

}


</style>

   <![endif]-->


<style>

#profilemohammad{

border:2px solid #888; margin:2px 5px 0px 0px; padding:2px;

}

#profilemohammad:hover {

border:2px solid #ccc;

cursor:pointer;

}

.opacity  {

opacity: 0.5;

-moz-transition: all 0.5s ease-out; 

-o-transition: all 0.5s ease-out; 

-webkit-transition: all 0.5s ease-out; 

-ms-transition: all 0.5s ease-out; 

transition: all 0.5s ease-out;

zoom: 1; 

}

.opacity:hover  {

opacity: 1;

zoom: 1;

-moz-box-shadow: 1px 1px 4px #000;

-webkit-box-shadow: 1px 1px 4px #000;

box-shadow: 1px 1px 4px #000;

}

</style>


<img class="opacity" id="profilemohammad" src="https://blogger.googleusercontent.com/img/b/R29vZ2xl/AVvXsEiu5YyzmkE5hXXoCVgdQOYA1qHOBLukf-2KnZI_kAv_PDj1-aFRIA_inhtO5TaZZB5EE3rsWivc-UHOA8461JQ6F1NQRNebA5BZGmUmLGjx7VFvTTCZAj4iX2_lxK_fXiJ2u9uvKMbz_etq/s1600/mohammadmustafa.jpg" align="left"/>

Hi! I am Mohammad, a certified SEO Consultant, Pro Blogger, Computer Engineer and an addicted Web Developer.

<a style="color:#888;" href="http://www.mybloggertricks.com/2008/06/something-about-me.html">Read More..</a>  <br/> </![endif]-->


  • Replace the yellow highlighted image link with your photo link

  • Replace the info text with anything you wish to write about yourself, your blog and your profession.

  • Replace the Read More link with the url of your About Page.

You May Read: Design a Professional Looking About us page

11. 468 X 60 Ad Banner

To Add your banner inside the Top right header section, Please paste the following code inside the Ad widget by going to layout:

<a href='#' target='_blank'><img width="468px" height="60px" alt='banner' src='https://blogger.googleusercontent.com/img/b/R29vZ2xl/AVvXsEhyTl80o8W8pUsau9kKGs1e-Ckk4ll5trHymZrcqF1SldyyYFNtptET4EvGJ1UDjEnrmBLPLx86mKr27XnCMIMUE_1YmG1nFh0m9tpej3Exg8XohrQYOdeOn4W9Xb5mDRcNnneV3rXK1zf8/s400/header-banner.png'/></a>

Replace the above image link with the image link of your banner and replace the # sign with Banner Link.

Anything left?

I just hope I have covered the details of almost every part. If you got yourself into any trouble just do not panic, bring a cup of coffee on your table and start posting your queries on this page. Technical queries will always be discussed here. We hope you find this little effort useful. My personal suggestion is that if you are really serious about SEO and blogging then Salahuddin Ayubi and coming new MBT designs are what you must try out. Care less about Fancy colors and animations and value more the core structure and SEO value of a template. Coming MBT designs are the best when compared to several designs available online that offer just design value and are unfortunately poorly coded inside that badly impacts search value. Yes truth hurts!

Another good news is arriving so stay tuned! Peace and blessings buddies! :)