Showing posts with label Blogger Tips And Tricks. Show all posts

How To Remove Swipe "next" And "previous" From Blogger Mobile Site

Have you swiped next or back while surfing your blog's mobile site on your phone? If yes then you might have wished to remove this thing from your blog because sometime it is swiped next or back without intention and it is a negative thing for your user experience. Mostly it happens if your mobile site page e.g a post has a html table or it has a big image because of with content is bulging out of your main post body which causes the user to swipe next or back without intention and if it happens 2-3 times the visitor just leave and stop visiting your blog. May be they don't leave but it is not a good visitor experience. I personally don't like swiping pages without next.

how-to-remove-swipe-next-and-previous-from-blogger-mobile-siteAnyway, suppose your visitor is reading a long story on your blog page on his mobile and he is in the middle of the page and just swipe to next page although he doesn't want to do so but by mistake he did it so now he has to go back and scroll to the middle and find where he was? so he will definitely not like it. Because most of the mobile sites do not have this feature so everybody don't know about it so this mistake occurs often on blogger sites. So to avoid this bad user experience you can remove it.

Unfortunately it is not known that how blogger add this swipe next and back because you don't find any script for it in blogger templates so we have to add a script to remove this swiping rather than to remove a script.

So in this post I am going to show you step by step how to remove swipe next and back from blogger mobile site. In my next post I will show you how to add sticky next and back buttons in your blogger mobile site so that if a user wants he can go to next or previous post by intention without any mistake.

How To Remove Swipe "next" And "previous" From Blogger Mobile Site?

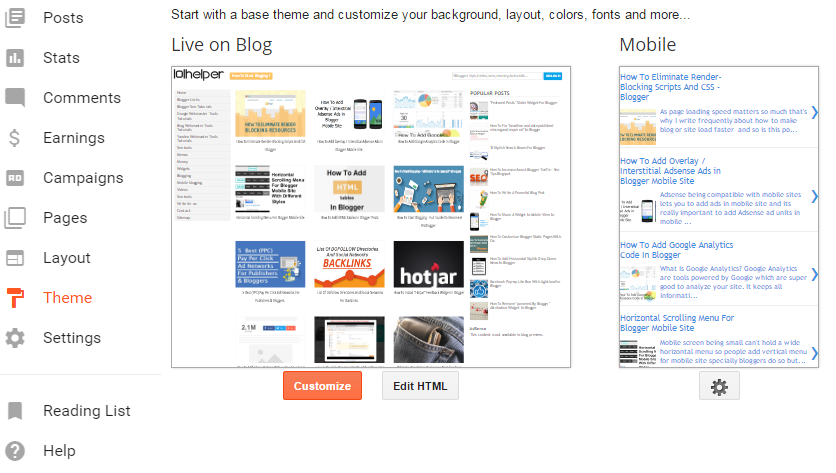
Step 1: Go to blogger > Theme > Click on Edit HTML.

how-to-edit-html-in-blogger-template-theme

Step 2: Click in your theme code and use CTRL+F to open theme search box.

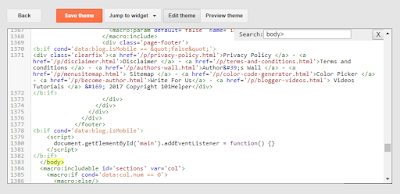
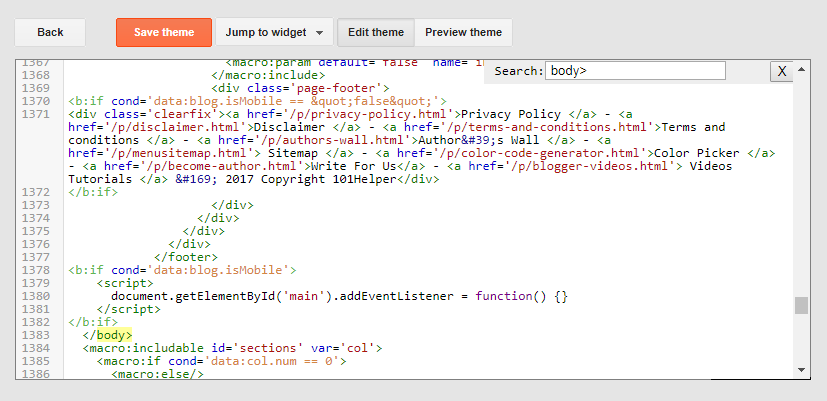
Step 3: Search for </body>.

Step 4: Copy below code and paste it above </body>.

<b:if cond='data:blog.isMobile'>
    <script>
      document.getElementById('main').addEventListener = function() {}
    </script>
</b:if>

add-javascript-in-blogger-theme-template

Step 5: Save your theme and visit your site on your phone, swipe next or back and see its removed!


I know it is not a long post and just simple 5 steps post but many people ask how to do it so I decided to do a post on it. If you like it share it with others and if you don't leave a comment below.

Thanks for visiting 101Helper. Follow oon Google+ or Pinterest and like on Facebook for updates.

Search keywords: How To Remove Swipe "next" And "previous" From Blogger Mobile Site, add next and prev button in blogger, remove swipe from blogspot mobile,how to modify blogger mobile template,blogger mobile template help,101helper mobile blogging

Disadvantages Of Buying Custom Domain For Blogger


As you know that 101Helper was upgraded to the101helper.com some months ago and then it was again degraded to blogspot, the reason for this was that custom domain doesn't give you things that you expect and so it is not good to buy a custom domain in my opinion. So this post is on request and I am going to share my experience of why I upgraded 101helper to the101helper.com and why I degraded it back. I hope that if you are also thinking of upgrading your domain, you might get some advice from this post.

So the main goal to buy a domain is to:

1. Boost traffic.
2. Increase earnings.
3. Get popular and improve ranking.
4. Make a brand.

etc.

But actually you don't always get all the things mentioned above for example if you think you can increase your traffic after buying a domain then its wrong, reality is that after buying a domain you lose the traffic which you have gained. And similar to that if you lost your traffic you will ultimately lose your ranking, earnings etc. So here are the reasons to avoid buying a domain.

1. Its not free:

Everybody knows that buying a domain is not for free, although there are some domain name providers that give you a discount but still you have to pay atleast $10 to buy a domain. There are some fake offers too like HOSTGATER says buy a domain for $0.01 but when you come to register they ask you to pay $20 or more for two years or whatever.

I purchased my first domain at Ipage and no doubt there service was good, always available to help but they were also lying at the time of buying domain like the offer "Get $100 in Google adwords after spending $25" and when I asked them about this offer they told me that this offer is available for USA only while at the time of purchasing domain they didn't tell the truth.

Similar to Ipage other domain registrars also use these fake tricks to get more customers as I mentioned Hostgator above.

2. Rank, Shares, Backlinks Lose:

When a blogger blog is upgraded to a custom domain Alexa and other ranking websites do not include the backlinks and shares of old blog so you get traffic from these sources but the rank and backlinks you got for the blog are no more. Also Alexa forgets the old blog after sometime so you lose everything.

3. Fake Pageviews:

I am not sure about all the domain providers but when I upgraded 101Helper to the101helper.com I saw a dramatic increase in my traffic but the sources were unknown and blogger was unable to track the viewing source. So I got 2000 to 3000 pageviews but ad-views were just 600 because it was real traffic.

4. Ad networks Lose:

Some ad networks like Google Adsense, Yahoo Gemini and Content.ad do not accept new domains easily and review site again and reject it so if you have a blog and got approved for Adsense or Content.ad are you upgrade to a domain, you'll be not allowed to show their ads until you get approved and the approval process starts again and its almost impossible to get approved for the new domain. Even after specifying that its the upgraded version of the same blog you are unable to use the same account and network. So it is a very big lose I guess.

5. Search Rankings:

After upgrading to custom domain "search ranking"  is also lost. It means if your blog is on first page of search results it may go to 5th or 7th page of search results or it may even disappear and take months to re-appear again and the hard work you did to get you blog to top of search results is wasted. So if your blog is appearing on 1st or 2nd page of search results for a keyword then buying a domain would be a bad choice and your competitors will get a good chance to replace you.


6. Search Engine Results Intermixed:

You might have heard this first time but when a blogger blog is upgraded to a custom domain the search engine is confused and show mixed results and it happened with 101Helper also. When I upgraded to a custom domain, everything was fine for a month because Google, Bing and Yandex were busy in replacing old links with new domain links but after a month I found that my mobile site links with "?m=1" suffix were showing up in the desktop version of Google and I tried to fix it with Webmaster tools but unfortunately I was unsuccessful in doing so.

So visitors were viewing mobile site on desktop or desktop site on mobile which was bad for user experience and I was loosing traffic because of it.

7. Post Preview Feature Lose:

Blogger is the easiest platform for blogging and it has many features and among them a feature is that you can Preview a post while editing it or writing it or adding any ad inside it. But when a blog is upgraded to a custom domain this feature is lost (in my case it was lost) and when preview button is clicked, the whole page is crashed and nothing works so you have to close the whole browser while writing a post and it becomes very difficult to edit or write a post.

8. Encrypted Page(HTTPS) Feature Lose:

This is another feature which is lost after upgrading to a custom domain, it tells visitors that the page they are viewing is secure. So to get this feature back you have to pay for it and the amount they get for this feature is more then the domain price! So its better to get this feature for free.

9. Your Information Is Available to Everyone:

This is another thing that made me stop using custom domain which is they ask you the info and allow public to view it and to secure this info they again ask you to pay.

10. You Don't Have Full Control:

Blogger gives you full control over your blog but domain providers don't. Such as you can't make changes in your DNS in case of mine I was not able to do so. So I  had to go to support everytime I wanted to make changes in DNS. And when I asked them to let me control my domain's DNS they said you are not allowed to do so, first buy a hosting (not domain) which was of $30 and then you will be allowed to make changes in DNS.

11. Fake Offers To Get Customers:

As I mentioned above many registrars like Hostgator and Ipage have fake offers in their promo pages and banners e.g free adwords credit, seo marketing tools, FTP features(upload files), Email sending feature. All these offers are just to attract visitors and these are just tricks to get more customers and sell their packages.

Confusions And Wrong Concepts

Ad Networks Approve Custom Domains:

You might have read alot of posts on other blogs and websites that some ad networks like Google Adsense is approved when you have a custom domain which is absolutely a wrong concept. The reason for this confusion is these bloggers and website owners actually want to refer you to domain providers and get commissions.

PageRank Increase Slowly With Subdomains:

Almost all bloggers favoring custom domains write in their posts that buying a custom domain is the first requirement to gain a good rank which is again a very wrong concept because you can check many sites which are registered for years but rank is not that good.

More Shares And Followers:

Another wrong thing that I have read in some blogs and websites is that your post social media shares get increased along with your social followers when you have a custom domain which is again a wrong concept and the reality is that if you have a good, helpful, meaningful content that people like they will surely share, bookmark and read your content and also they will follow you because they like your content and they don't want to miss more content in future.

Reputation:

This is also a wrong concept that if you have a custom domain then you have a good reputation because I have seen many blogs which have better design, more followers and more readers than websites. So if you thing that purchasing a custom domain is going to help your reputation then its wrong!

Conclusion:

I am not against domain registrars, I am just sharing my experience. Although some people get success by upgrading to Domain but if you are starting a new website then you should start it from domain and not from blogger because it takes a long time and hard work to make a successful blog and then after upgrading you don't get full of it. So in my opinion if you want to start a domain later after success in blogging then its not good choice. Also if you are beginning a website then choose the best domain provider and also your website should have a topic that will rock otherwise you can't get success in websites.

If you have any questions or any suggestion or opinion please feel free to share it with me and others by leaving a comment below. Thanks for visiting 101Helper.

Search keywords: disadvantages of buying a domain, pros and cons of purchasing domain,things to consider before buying domain name,reasons not to buy a custom domain for blogger,hostgator,ipage
How To Make Mobile Section For Gadgets In Layout In Blogger

How-To-Make-Mobile-section-For-Gadgets-in-Layout-In-Blogger
As predicted by Google that from now people will read blogs and sites more from phones rather than from desktop that's why everyone should make their mobile site and maintain it to get maximum traffic not from only desktop but also from mobile. It is also good to get mobile traffic because it can increase your earnings from both Adsense and Appnext. Specially mobile traffic is best for Appnext.

Making mobile site is not easy in a platform like blogger because everyone is not able to do it as its not easy to code and also most methods don't work in blogger. So I frequently write about making mobile site for blogger blogs to make it easier for other bloggers to make their own mobile site.


So in this post I am going to teach you how to make sections for mobile gadgets in blogger layout. So follow below steps to make sections for your mobile gadgets.

Step 1: Go to blogger > login to your account and navigate to Theme.

Step 2: Click on Edit Html to begin editing your blog theme to make sections for mobile gadgets.

how-to-edit-blogger-theme

Step 3: Search for below code by using CTRL+F:
<b:section class='header' id='header'

You will find this code:
<b:section class='header' id='header' maxwidgets='1' name='Header' showaddelement='no'>
<b:widget id='Header1' locked='true' title='Horizontal scroll menu (Header)' type='Header'>....</b:widget>
</b:section>

how-to-make-mobile-section-in-blogger

Step 4: Now just after above code paste below code and save your template.
<b:section id='mobile-section-1'>
</b:section>

Step 5: Go to layout to see your mobile gadget section.

You will find your gadget section below header section in layout but if you want you can make another one in the footer by the above method, all you need to do is to paste below code above </html> in your template.


<b:section id='mobile-footer-section'>
</b:section>

how-to-make-footer-section-for-mobile-gadgets-in-blogger

Important Note: Although you can make unlimited sections for your blog's mobile site but you will need to enable each gadget you add in these sections for mobile only. So after adding a gadget in mobile section of your blog go to your template and add mobile='yes' after locked='false' in your gadget code as shown in below image. For details about how to enable a gadget for mobile device only read How To Show A Widget In Mobile View In Blogger

how-to-show-a-gadget-only-in-mobile-blogger

Don't for get to give us feedback about this post, if you have any questions ask me in comments. Share this post with other bloggers. Thanks for visiting 101Helper.

Search Keywords: how to show gadget in blogger mobile site, how to make separate section for mobile gadgets in blogger, how to edit layout in blogger, make header and footer section for mobile site in blogger

How To Hide Ads And Gadgets On Error Pages In Blogger

404-error-message-adsense-blogger

Before explaining about hiding things on error pages, i am going to tell you why do you need to do so? Its because Ad networks like Good Adsense and Adhitz both prohibit showing ads on pages which are empty or on error pages and reason for not showing gadgets in error pages is that nobody needs them and these gadgets makeerror pages look ugly and error pages also load slowly so visitors are unable to leave page until the page is loaded completely so it's necessary to hide gadgets and ads on error pages.

In this post i will show you how to hide any ad or gadget on error page.


Step 1: Go to Blogger Dashboard and open template / theme.

how-to-hide-ads-and-gadgets-in-blogger-error-pages

Step 2: Edit Html.
hide-ads-on-error-pages-in-blogger

Step 3: Now find the gadget in which you have added your ad code or if you have added your code directly to your template e.g below </head> or above </body>.


Step 4: After finding your ad code gadget or ad code, copy below code.

<b:if cond='data:blog.pageType != &quot;error_page&quot;'>

Step 5: Paste this code above your ad code if you have added code directly to your template and in case of gadget paste the copied code below this line:

<b:includable id='main'>

As shown in below image:

how-to-gide-google-ads-in-error-pages-in-blogger

Step 6: Add below piece of code at the end of your code and above </b:includable> in case of gadget as shown in above image.

</b:if>

Step 7: Save your theme / template and you are done.

To check if your code is working fine, open any url of your post and add any wrong characters to it and view it, your gadgets or ads which you have hidden will not show on error pages.

What else can you do with above code?

A special thing about this code is that you can hide unwanted gadgets on error pages and also you can use it reversely by making a small change in it. Then it will start showing content on error pages only like if you want to show an error message or a search box to your visitors who accidentally reach an error page to let them search your site and find what they are looking for. So here is the reverse effect code:

<b:if cond='data:blog.pageType = = &quot;error_page&quot;'>

Also don't forget to close it with the same ending code: </b:if>

Your final code should be like this in both cases:

<b:if cond='data:blog.pageType = = &quot;error_page&quot;'>
My Content / Ad Code
</b:if>

If you have any confusion or problem ask me in comments or contact.

Thanks for visiting 101Helper.

Search Keywords: how to hide gadgets and ads on error pages in blogger,how to hide gadgets in 404 error pages blogger, how to hide google adsense ads in blogger error pages,how to show error message on 404 error pages in blogger,101helper blogger tricks

How To Eliminate Render-Blocking Scripts And CSS - Blogger

eliminate-render-blocking-javascript-css


As page loading speed matters so much that's why I write frequently about how to make blog or site load faster and so is this post about and I am writing this post on request of a visitor to help him and also those who also have this problem in their blogs. So let me start with intro of what is render blocking scripts and CSS.

What Is Render-Blocking Scripts And CSS ?

Render blocking script is usually a script from any external source which is called by using a <srcipt src="...../files/style.css"/> tag and the problem lies in the URL or storage of the javascript file. Some common problems with external scripts are:

1. The URL which contains the Javascript file is redirecting to multiple URLs and then reach the Javascript file.

2. The URL which contains the Javascript file responds slowly due to server error.

3. The URL which contains the Javascript file sometimes does not respond due to down server status.

Similar to Javascript files, there are some CSS files which are stored externally have the same problems as mentioned above.

How To Identify Render-Blocking Scripts 

To identify render blocking script or css you need to use PageSpeed Insights. It will show you which scripts and css files are blocking and making your page load slow.

how-to-eliminate-render-blocking-scripts-css-in-blogger

How To Remove Render-Blocking Scripts And CSS From Blogger

Step 1: Find render-blocking scripts by using Google PageSpeed Insights as shown in the above image.

Step 2: Go to blogger dashboard > Template > Edit Html.

how-to-edit-template-in-blogger

Step 3: Search for that script or CSS using CTRL+F in the code which you found to be blocking in the PageSpeed Insights tool.

Step 4: Do following things:

For Javascript:

1. Add "Defer" Tag:

A defer tag is a tag which stops the script from loading and loads it when the whole page contents are loaded completely so it improves page loading speed. To add defer tag to your javascript simply add defer='defer' as showing in below example:

<script defer="defer" src="...file/code.js"/>

2. Add External Javascript Internally:

If you see that javascript loading on your blog is redirecting or taking time to load than add the code above </head> in your template or shift it to another host like GitHub.

 Recommended:  How To Store Blogger Codes On Github To Speed Up Blog ?

3. Remove Blocking Code:

If you do above things and still see that the script is blocking then remove that script or copy it and add it in the Layout as a gadget.

 Recommended:  How To Add Or Remove Gadgets In Blogger ?

4. Use "async" Tag:

This tag tells the page that the code which is asynchronised will be executed when it is available and will not be executed when not available so it minimizes page loading speed. To add async tag to your code simply add async='async' because blogger doesn't accept async alone. Here is a sample:

<script async="async" src="...file/code.js"/>


For CSS:

1. Add CSS in <head>:

If you have CSS code stored externally but you are loading it in body by using below code:

<link href="...file/code.css" rel="stylesheet" type="text/css"/>

Simply move it below <head> in your template

2. Use Github:

If your hosting is not responding in time or have many redirects(as in GOOGLE DRIVE) then use Githun to store your codes.

 Recommended:  How To Store Blogger Codes On Github To Speed Up Blog ?

Step 5: Save your template and you are done successfully.

What To Do For Internal Blocking Javacript Or CSS ?

If you have any internal codes which are blocking your pages then remove them because you can't modify them to get work and also avoid such scripts because they are coded by inexperienced bloggers.

Final Words:

By following above steps you can remove blocking javascript and css but if you need the codes and you want to keep them but minimize the loading speed then don't remove the codes but store them on github or in the layout. You may not see any improvement in the Google PageSpeed Insights tool but there will be surely some improvement which you will observe while loading your page.

I hope this post was helpful to you, if not ask me about it. Thanks for visiting 101Helper. Like us on Facebook and never miss a post.

Search keywords: How To Eliminate Render-Blocking Scripts And CSS - Blogger, Blogger blog page loading speed, how to remove blocking scripts and css from blogger blog,how to speed up blog,how to minimize page loading speed in blogger

How To Add Google Analytics Code In Blogger

GoogleAnalytics-blogger
What Is Google Analytics?

Google Analytics are tools powered by Google which are super good to analyze your site. It keeps all information about your site e.g where your visitors are coming from, what is the country of your visitor, How much time is your visitor spending on your site, What is the behavior of your visitor etc. So with the help of Google Analytics you can keep every info about your site or blog and use it to improve your earnings and to make your site or blog better.

Why Should I Use Google Analytics?

The answer is simple and obvious, you can use Google Analytics to improve your site and earnings.

How can I increase my earnings using Google Analytics? Well, for example you have an interstitial ad which shows up after 10 seconds and overlays your content and you can see that your visitors are aware about your ad and they are smart :p  and when the ad shows up they simply close it and use your site for free without paying you a cent then you can know with the help of Google Analytics that exactly how much time your visitors are spending on your site so for instance your visitor is spending 2 mins on your site or blog then you can show your ad after 20 sec or after 40 sec so your visitor won't understand when the ad is going to show up so you will get more clicks and hence your earnings will increase.

How to improve your blog or site using Google Analytics? Let me share another example to explain how can your improve your site and user experience with the help of Google Analytics. So for example you have a blog and you have installed a "Pop Up Page Take Over Follow Buttons" in your blog using Hellobar then you can set the perfect time for the pop up to show up in the due time and make a good user experience. Moreover you can also plan timings of slideout and Newsletter to show up when your visitor is on your site so with the help of Google Analytics you can manage your dynamic widgets and get benefit of them.

How To Use Google Analytics For Blogger?

Step 1: Add your blog to Google Analytics.

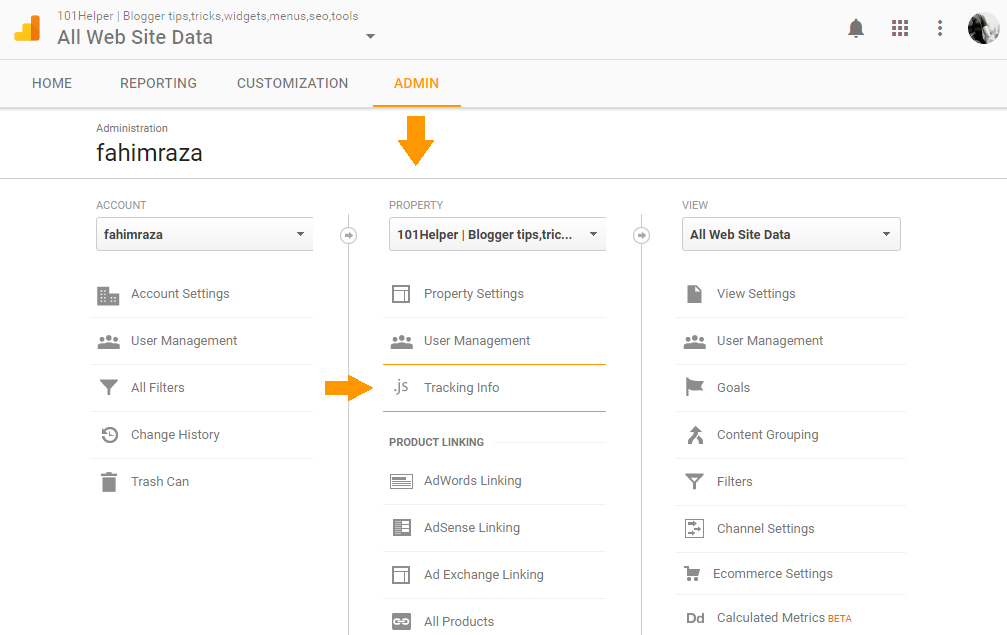
Step 2: Go to ADMIN in Google Analytics and select a property to get its analytics.

Step 3: Select Tracking Info > Tracking Code.


how-to-use-google-analytics-for-blogger

Step 4: Copy the Tracking ID or Website tracking code, its your choice you can copy the tracking ID or Website tracking code.

how-to-add-google-analytics-code-in-blogger

Step 5:  Follow below steps if you have copied website tracking code or scroll below to add tracking ID in your blog.

How to add Google Analytics website tracking code in blogger?

  • Go to Blogger > Template > Edit HTML and search for </head>
  • Paste your copied code above it.
  • Save your template and you are done.

  • How to add Google Analytics website tracking ID in blogger?

  • Go to Blogger > Settings > Other > Google Analytics.
  • Paste your tracking ID.
    how-to-add-tracking-id-in-blogger-google-analytics
  • Click on Save settings button on top right of the page and you are done.


  • That's it, you are done successfully. If you have any question ask me in comments or contact me.

    Follow us on social networks, thanks for visiting 101Helper.

    Search keywords: How To Add Google Analytics Code In Blogger, Google Analytics website tracking ID,Google Analytics website tracking code in blogger,what is Google anlytics,how to use google analytics,how to improve user experience and earnings with google analytics.

    How To Add HTML Tables In Blogger Posts

    HTML tables are simple tables which gives a summery of something and are mostly used by those bloggers who own blogs about money so they show there content e.g info about ad networks in the form of tables. But not all bloggers know how to add HTML tables in blog posts and blogger does not have any option to create HTML tables so it can be added only manually. And that's actually the reason of writing this post. In this post I will share with you how to create an HTML table and add it in your blog posts. I will show you only simple one because there are a number of types of HTML tables and I can't share each and every type of HTML table so I will share a simple HTML table with text Like this!So lets get started!

    How To Add HTML Table In Blogger Posts?

    Step 1: Copy code of HTML table from below:

    <style>
    #mytable{
    width:100%
    }
    #mytable, th, td {
        border: 1px solid black;
        border-collapse: collapse;
    }
    #mytable th, #mytable td {
        padding: 5px;
        text-align: left;
    }
    </style>
    <table id="mytable">
      <tr>
        <th>Firstname</th>
        <th>Lastname</th>
        <th>Age</th>
      </tr>
      <tr>
        <td>Jill</td>
        <td>Smith</td>
        <td>50</td>
      </tr>
      <tr>
        <td>Eve</td>
        <td>Jackson</td>
        <td>94</td>
      </tr>
      <tr>
        <td>John</td>
        <td>Doe</td>
        <td>80</td>
      </tr>
    </table>

    Step 2: Go to blogger > Posts > Edit a post Or Create a new post.

    Step 3: Switch to Html view of the post editor and paste the copied code after a certain text or in the beginning of the post or after an image, where ever you want to show your HTML table in the post.

    how to switch to HTML editor In blogger.png

    Step 4: Make changes according to your choices and publish your post to see your HTML table.

    Understanding The HTML Table Code:
    html table blogger


    After adding above code for HTML Table, you need to make changes in the text and the table code and for that you need to understand the code because without it you can't add a new row in your table and can't add custom info in the rows and columns of your table. so read out below to know what the code is doing.

    Here is the CSS code of your table:

    <style>
    #mytable{
    width:100%
    }
    #mytable, th, td {
        border: 1px solid black;
        border-collapse: collapse;
    }
    #mytable th, #mytable td {
        padding: 5px;
        text-align: left;
    }
    </style>

    It gives your table the borders for each row and column and if you want, you can add your own decorations to your table for example to add a background color you need to add this:

    background: yellow;

    You have to add above piece of code in this part of code:

    #mytable{
    width:100%;
    background: yellow;
    }

    Now its time to make changes in the info which is added in your table's row and columns. Here is the overall code for your table:

    <table id="mytable">
      <tr>
        <th>Firstname</th>
        <th>Lastname</th> 
        <th>Age</th>
      </tr>
      <tr>
        <td>Jill</td>
        <td>Smith</td>
        <td>50</td>
      </tr>
      <tr>
        <td>Eve</td>
        <td>Jackson</td>
        <td>94</td>
      </tr>
      <tr>
        <td>John</td>
        <td>Doe</td>
        <td>80</td>
      </tr>
    </table>

    In this code blue one is the first row of your table, orange is the second, green is the third and yellow is the fourth row of your table. Now you can change text according to your choices.

    To add a new row you need to add a simple piece of code below the yellow one, here is the simple piece of code that is need to be added for new row:

    <tr>
        <td>Jill</td>
        <td>Smith</td>
        <td>50</td>
      </tr>

    For more HTML tables visit w3schools. Or search for online HTML table generator and create one for you.

    I hope you found this post helpful. If you have any question ask me in comments or contact me. Thanks for visiting 101Helper.

    Search Keywords: How to add HTML Table in blogger posts, html tables with rows and columns for blogger, how to add html table in blogger with CSS style, show content in table form in blogger posts.

    How To Add Twitter Cards In Blogger

    twitter cards in blogger blogspot blogs tutorial 101helper

    You might be thinking, why I am posting about Twitter again because I have recently created a post about Twitter follow box and before that I have also created some posts about twitter like Twitter animated bird gadget and some other posts. But the reason which made me to write another post related to twitter is something new and interesting that is "Twitter Cards".

    You might have heard about it. If you know about Twitter Cards then you are good at Twitter marketing and you must be getting good traffic from twitter.

    So this post is about Twitter cards, How to add Twitter cards in blogger, what is its significance, What are types of twitter cards and everything about Twitter cards.
    So let me start from:

    What A Twitter Card Is?

    Twitter cards are a kind of optimizations which makes your tweets more living. With twitter cards you are able to add images, videos and media experiences in your tweets. You just need to add some Html code in your template and after that when someone tweets your post, the tweet will carry post image or video so making your tweets more living.

    Significance Of Using Twitter Cards:

    Twitter cards have following significance:

    1. Twitter cards add images, videos, GIF's and other media to your tweets.
    2. Twitter cards make your tweets more attractive.
    3. Boost your twitter engagement, people view your tweets and visit your links.
    4. Ultimately you get more traffic from twitter.
    5. Unique tweets with twitter cards bring you more followers too!
    6. After embedding tweets tweeted with twitter cards they have an amazing look so you will definitely get noticed by your visitors so you will get more and more followers.

    Types Of Twitter Cards:

    1. Summery Card: Summery card contains title, description, thumbnail and twitter account info. All the info is gathered from the post it is tweeted. Take a look of summery card below.

    twitter summery card in blogger

    2. Summery Card With Large Image: It is same as summery card with a little difference of large image unlike small image a in summery card. The large image is so prominent that such tweet will definitely get response of users. I have a demo of it too, take a look below.

    summery twitter card with large image blogger


    3. App Card: An app card contains info about your site's mobile app with a Download button which directly takes you to App store. So this card is good for those who have apps for their site. This card has different looks for mobile and desktop, you can take a look below.

    twitter mobile android,ios app card blogger

    4. Player Card: A card which provides tweets with videos, audio, images, GIF's and other media. This card is best for sites with media content like videos or audio(mp3). You can take a look below.

    player card twitter blogger tutorial

    How To Add Twitter Cards In Blogger?

    1. Summery Card:

    To install twitter summery card in your blog include the code given below in your template after <head>
    <b:if cond='data:blog.pageType == &quot;item&quot;'>
    <meta content='summary' name='twitter:card'/>
    <meta content='@101helperblog' name='twitter:site'/>
    <meta expr:content='data:blog.pageName' name='twitter:title'/>
    <meta expr:content='data:blog.metaDescription' name='twitter:description'/>
    <meta expr:content='data:post.firstImageUrl' name='twitter:image'/>

    Replace @101helperblog with your blog's twitter ID. You can check if your card is working fine or no by either tweeting your post or by using Twitter Card Validator.

    2. Summery Card With Large Image:

    Copy the below code and paste it in your template after <head> and save your template.
    <b:if cond='data:blog.pageType == &quot;item&quot;'>
    <meta name="twitter:card" content="summary_large_image"/>
    <meta name="twitter:site" content="@101helperblog"/>
    <meta name="twitter:creator" content="@101helperblog"/>
    <meta name="twitter:title" expr:content='data:blog.pageName'/>
    <meta name="twitter:description" expr:content='data:blog.metaDescription'/>
    <meta name="twitter:image" expr:content='data:post.firstImageUrl'/>
    </b:if>

    Replace @101helperblog with your's(twitter:creator) and your blog's(twitter:site) twitter ID.

    3. App Card:

    This card is not for everyone because I don't think that bloggers have ios app. But maybe those who buy a domain later after successful blogging, the may create ios app. So this card is for those who have ios app and they want to increase their downloads. Simple include the below code in your template just after <head>.
    <meta name="twitter:card" content="app"/>
    <meta name="twitter:site" content="@TwitterDev"/>
    <meta name="twitter:description" content="Cannonball is the fun way to create and share stories and poems on your phone. Start with a beautiful image from the gallery, then choose words to complete the story and share it with friends."/>
    <meta name="twitter:app:country" content="US"/>
    <meta name="twitter:app:name:iphone" content="Cannonball"/>
    <meta name="twitter:app:id:iphone" content="929750075"/>
    <meta name="twitter:app:url:iphone" content="cannonball://poem/5149e249222f9e600a7540ef"/>
    <meta name="twitter:app:name:ipad" content="Cannonball"/>
    <meta name="twitter:app:id:ipad" content="929750075"/>
    <meta name="twitter:app:url:ipad" content="cannonball://poem/5149e249222f9e600a7540ef"/>
    <meta name="twitter:app:name:googleplay" content="Cannonball"/>
    <meta name="twitter:app:id:googleplay" content="io.fabric.samples.cannonball"/>
    <meta name="twitter:app:url:googleplay" content="http://cannonball.fabric.io/poem/5149e249222f9e600a7540ef"/>

    After adding this code in your site or blog below <head> make following changes.
    1. <meta name="twitter:card" content="app"/>
    2. <meta name="twitter:site" content="YOUR SITE'S TWITTER ID"/>
    3. <meta name="twitter:description" content="SITE DESCRIPTON"/>
    4. <meta name="twitter:app:country" content="APP COUNTRY"/>
    5. <meta name="twitter:app:name:iphone" content="YOUR APP'S IPHONE NAME"/>
    6. <meta name="twitter:app:id:iphone" content="YOUR APP ID FOR IPHONE"/>
    7. <meta name="twitter:app:url:iphone" content="YOUR APP'S IPHONE URL E.G: cannonball://poem/5149e249222f9e600a7540ef"/>
    8. <meta name="twitter:app:name:ipad" content="YOUR APP'S IPHONE NAME"/>
    9. <meta name="twitter:app:id:ipad" content="YOUR APP ID FOR IPAD"/>
    10. <meta name="twitter:app:url:ipad" content="YOUR APP'S IPAD URL E.G: cannonball://poem/5149e249222f9e600a7540ef"/>
    11. <meta name="twitter:app:name:googleplay" content="YOUR APP'S GOOGLEPLAY NAME"/>
    12. <meta name="twitter:app:id:googleplay" content="YOUR APP'S GOOGLEPLAY ID E.G: io.fabric.samples.cannonball"/>
    13. <meta name="twitter:app:url:googleplay" content="YOUR APP'S GOOGLEPLAY URL E.G: http://cannonball.fabric.io/poem/5149e249222f9e600a7540ef"/>

    4. Player Card:

    Player card is for those sites which have videos or audio content. If you have a blogger having video content then you can install this card in your blog. Just copy the below code and paste it in each of your post's Html editor not in text editor or in template. After pasting the code below just make changes according to your needs. If you have videos hosted on youtube then you don't need this card because Youtube has installed the cards, you don't need to install player card.
    <meta content='text/html; charset=UTF-8' http-equiv='Content-Type'/>
    <meta name="twitter:card" content="player"/>
    <meta name="twitter:site" content="@TWITTER ID"/>
    <meta name="twitter:title" content="TITLE OF VIDEO"/>
    <meta name="twitter:description" content="DESCRIPTION OF VIDEO"/>
    <meta name="twitter:image" content="IMAGE URL FOR VIDEO"/>
    <meta name="twitter:player" content="PAGE URL CONTAINING VIDEO"/>
    <meta name="twitter:player:width" content="480"/>
    <meta name="twitter:player:height" content="480"/>
    <meta name="twitter:player:stream" content="URL OF VIDEO E.G: Yourvideo.com/video.mp4"/>
    <meta name="twitter:player:stream:content_type" content="video/mp4"/>
    <meta name="twitter:player:stream" content="http://devimages.apple.com/iphone/samples/bipbop/gear1/prog_index.m3u8"/>
     <meta name="twitter:player:stream:content_type" content="video/mp4;codecs=&quot;avc1.42E01E1, mp4a.40.2"/>

    One more thing about this card that after implantation of code you need to request Twitter for approval. So go to Twitter Card Validator to first confirm that your card is implanted correctly or no and after that you have to send request for approval.

    After validating your player card you will see following page, click on Request Approval.

    how to request twitter for player card approval

    Fill up the form and send request and wait for approval!

    how to request twitter for player card approval 101helper

    NOTE: Include the above code only once in a page for a video. Also use https for every link you add inside meta tags. Otherwise you won't get your player card approved!

    I hope you found this post helpful. I have used all the meta tags in my template to check if they are working fine or no and I found every tag working fine. But if you have any problem ask me or if you have any info about Twitter Cards share it with me so that I can add it in this post.

    Thank you very much for visiting 101Helper, do visit again. Share us with your fiends and co-bloggers or webmasters. Follow us on social networks to stay updated.

    Search Tags: twitter cards in blogger,twitter app,player,summery cards in blogger or website,info about twitter meta tags,optimize blogger blog for twitter,get traffic from twiiter,twitter cards blogspot

    How To Set Custom Post Title And Logo In Feedburner Emails


    Feedburner is used by every blogger to send mails to their subscribers and hence its optimization is very important to let subscribers get maximum of it. Though I haven't shared much about feedburner except how to set it up. So I decided to share a new thing in feedburner that will benefit you.

    Its setting up custom title for posts because without optimization all the mails sent from a blog have the same blog title having url of the post so subscribers mostly don't open the post even after receiving the mail because they haven't known the name of the post so they don't get interest in that mail. So it is not beneficial in anyway because you send mails to your subscribers but you don't get any response. Also I will show you how to put your logo in emails, it will tell visitors that this email is from your blog because logo is the identity of a site or blog.

    So in this post I am going to show you how to enable custom post title in feedburner and how to put your blog's logo in emails. Follow simple steps mentioned below!

    How To Set Custom Post Title In Feedburner Emails?

    Step 1: Go to feedburner and open your blog's RSS feed.

    how to add title in feedburner emails

    Learn: How To Set Up An Rss Feed For Your Blogger Blog

    Step 2: Navigate to Publicize > Email Subscriptions Email Branding.

    Step 3: Paste ${latestItemTitle} in the Email subject/title input area.


    Step 4: Scroll down the page and click on Save button.

    How To Set Blog Logo In Feedburner Emails?

    To put your blog's logo in your emails you need to upload it and get its link because you have to provide a link to your logo in feedburner. So upload your logo and get its link. I suggest to upload it in a page of your blog then after uploading switch to Html editor and get the link of logo. After uploading and getting link you can delete the page you don't need to keep it because your logo is stored in blogger.

    After getting link of your logo follow below steps:

    Step 1: Go to Feedburner > Your Feed Publicize > Email Subscriptions Email Branding.

    Step 2: Paste your logo link in the input area of Logo URL.

    how to add logo in feedburner emails - 101helper

    Step 3: Scroll down the page and click on save to finish.

    I hope this post was helpful to you, You can customize look of your emails on the same page(Email Branding). You can change the title's font and its size as well as color of both body text and title.

    If you have any suggestion or question, ask me in comments.

    Search Tags: how to add logo in feedburner emails, how to add custom post title in feedburner emails,separate post titles for feedburner emails,how to use feedburner for blogger,how to setup feedburner for blogger, 101helper blogging tutorials.

    How To Index Blogger Posts Faster

    How To Index Blogger Posts Faster

    Every new blogger want to increase blog traffic fast, for this you need to index your blog fast.Indexing a new blog can take two weeks or more normally but we can fasten this process by simple tricks.Actually this process include two steps.In first step google bot collect information of your posts and add it in search index box.Once your posts will index google bot start crawling your blog.

    Google bot is very busy because billions of people update their blog daily and even hourly and it can not index all of them simultaneously but today i will show you how to speed up this process.

    How Google And Other search engines finds your blog?

    You have to submit your blog or site's sitemap to webmaster tools to tell search engines that you have a site or blog and you want it to index your blog and its content. So after submitting sitemap to search engines, they crawl your blog or site and index its pages which are allowed to be indexed


    Submit sitemap:


    Sitemap is very important thing, it provide more information to Google and other search engine site crawlers that are bots to crawl and index your blog. It is a kind of notification to search engines about already publish post on your blog. When a sitemap is submitted to search engine it starts showing only submitted posts.


    Posts You Might Need To Read:
    1. How To Submit Blogger Sitemap To Google
    2. How To Submit Blogger Sitemap To Yandex
    3. How To Submit Blogger Sitemap To Bing
    Ping your blog:

    Actually many newbies do not know about blogger seo and how search engine works and hence fails to get traffic. Pinging your blog tell search engine that your blog is updated and it helps to index your blog fast. You can ping your blog daily there is no limit but it is recommended to ping when you update your blog with fresh content.


    You can ping your blog at https://pingomatic.com/

    Fetch as google:


    Use "Fetch As Google" in Google webmaster tools and Bing webmaster tools
     to submit your new posts and exclude those which you don't want to be indexed. You can find this tool in Google webmasters tools and Bing webmaster tools, I am not sure about Yandex. It will help to index your posts quickly.
    Share your content:

    Also share your new posts on social media. It also helps you to get targeted traffic, pining posts tp pinterest or making a video related to post and give related link in the description will bring you targeted traffic as well as boost indexing process. A blog which have all posts shared more on social media is considered as an active blog and crawling of new posts is faster than other blogs.


    Submit blog to directories:


    Submitting your blog to directories is very beneficial in indexing a new blog. There are paid as well as free directories available online. Dmoz is one of the very popular, human edited directory and its free, you can submit your blog to it and find other directories on Google!


    Try out these tips, once your blog is indexed you will see the difference in your traffic. Do not rush and keep patience.


    Search tags: how to index blog posts fast,how to submit blog to google, bing, yandex, how to boost traffic website,how to submit posts to search engines fast,101 helper blogger tutorials,seo tips 101helper

    How To Use Google Fonts In Blogger Blogs

    how to use custom google web fonts in blogger

    Font is one of the things that makes a site look great. A font gives your writing skills a style which impress your readers therefore choosing best fonts for site is really important. Especially in-case of fashion blogs font style is very important. Blogger has many built-in fonts but these are too common because everyone is using one or more of them, for example for titles they use a different font and for post body they use a different font so to a unique font for your blog you have to call it from some external source and then apply it in your blog. So this post is to teach you how to use custom fonts in blogger blogs. I will use Google fonts but you can use fonts from other websites also by following steps below. I am using Google fonts below they don't have any negative impact on page loading speed.


    Follow below mentioned steps to use Google fonts in your blog.

    Step 1: Go to Google Fonts

    Step 2: Search for a font in Google fonts and click on the quick use icon as shown in below image(I am choosing Kimberly Geswein).

    how to use google fonts in blogger blogs

    Step 3: Scroll down to step 3 where you will see a code as shown in below image.

    google styish fonts for blogger

    Step 4: Copy the code given in the box.

    Step 5: Go to blogger dashboard > template and click on Edit Html.

    how to edit html in blogger

    Step 6: Below <head> paste the code you just copied.

    how to use google fonts in blogger blogs 101helper

    Note: Make sure to close the tag of code you just pasted like this(highlighted with yellow color!):

    <link href='https://fonts.googleapis.com/css?family=Shadows+Into+Light' rel='stylesheet' type='text/css'  / >

    Step 7: Search for below piece of code in your template by using Ctrl+F.

    <Group description="Page Text" selector="body">

    You will find some codes similar to this below the above piece of code:

    <Variable name="body.font" description="Font" type="font"
             default="normal normal 12px Arial, Tahoma, Helvetica, FreeSans, sans-serif" value="normal normal 12px Yanone Kaffeesatz"/>
         <Variable name="body.text.color" description="Text Color" type="color" default="#222222" value="#666666"/>

    Now all you have to do is to find value="........" in the codes you found and replace the font name with the name of the font which you want to apply to your page text. Make sure to use accurate name otherwise it will not work. You can find the accurate name of your font on the Google font page from where you copied the font code as shown in below image:

    use google fonts in blogger

    Step 8: Click on save template and you are done.

    CSS Code For Different Titles:

    After following above part of this post you might have default font for your blog title, post titles and gadgets which could only be modified with Css so following are the css codes for different titles(blog title,post titles,gadgets) which are to be included above ]]></b:skin> in your template.

    For Post Titles:

    .post-title.entry-title {font-family:Your font name;}

    For Blog Title:

    .Header h1 {font-family:Your font name;}

    For Gadgets Title:

    div.widget > h2, div.widget h2.title {font-family:Your font name;}

    Replace Your font name with your font name which you have imported from Google

    I hope you found this post helpful, if not ask me in comments. Follow and subscribe for latest post news. Thanks for visiting 101Helper. Keep visiting us.

    Search Tags: Google fonts in blogger,stylish fonts blogger, how to add web fonts to blogger, use custom fonts blogspot, upload stylish fonts to blogger blogs,how to change font in blogger,101 helper blogging tutorials,101helper