How to Add AdSense Page-level ads in Blogspot

Recently, page-level ads were made available for blogspot bloggers and webmasters which means that you can now display AdSense Ads right on your mobile templates. You can now monetize your efforts on the templates as you do with mobile apps thanks to the Google Admob Ads.

Why Choose AdSense Page-level ads?

There are a number of reasons why you choose page-level ads from AdSense to bolster your revenue stream.
  • Increase Revenues
  • Provide Better User Experience
  • Two New Formats
  • Doesn't Count Against 3 Ad Limit
  • Optimized and Responsive to Mobile Needs

Page-level Ad Formats

Today, the two types of page-level ads available include Anchors which are ads places at the bottom of the screen and Vignettes which are full screen ads that work similar to Admob's Interstitial adverts.
Vignettes tend to be more effective for mobile advertising.

how to add adsense page-level ads in blogspot

How to Setup Page-Level Ads in Blogspot Blogs

The good news is that you can install these ads from AdSense fairly quickly and easily thanks to the process which guides you through.

1. Log into your AdSense Account
2. Click on this link
3. Click the two toggle buttons to switch on "Anchor/overlay ads" and "Vignette ads"

enable adsense page-level ads in blogger

4. Scroll down and click the "Get Code" button

enable adsense page-level ads in blogger

5. Copy the code

google adsense page-level ads code

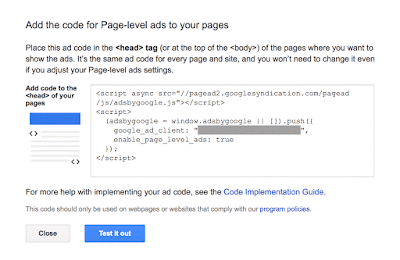
6. Go to Blogger, then Template and Backup your Template
7. Click the 'Edit HTML' button and search for the </head> tag
8. Paste the page-level ad code above the </head> tag

Note: You will also need to replace the attribute async with async="async" in order to help complete the process, otherwise Blogger will give you an error message. Once you have completed these steps, all you need to do is save it to your template.

Test Page-level ads in your Blogger template

After installation, get out your mobile device so you can test the AdSense page-level ads and see if they are working correctly. You will need to be a visitor to your site in order to check out the ads.
  • Type #googleads at the end of the URL so you can access them
  • Select the ad format from the tabbed box that will appear above the body of the blog
  • Check out the ads
You will get to see the ads in action before the public does so that you can tell if they are working fine. If you are impressed with what you see, then it is ready to go. However, if you see something that you want to change or if the ads are not present, you'll need to start over again.

The Effectiveness of Page-level ads

Since October, 2015 when these ads were first rolled out the effectiveness that they have demonstrated is considerable. Today, the ads have been used in countries all over the world and they continue to impress. For those who have already used these mobile ads on WordPress or other blogger blogs you can see just how effective they have been in terms of reaching all of your visitors. In addition, the effect on your revenue may be considerable depending on the popularity of your blog.

In the end, AdSense page-level ads are remarkably effective for mobile use and will help you build a stronger income base for your blog.
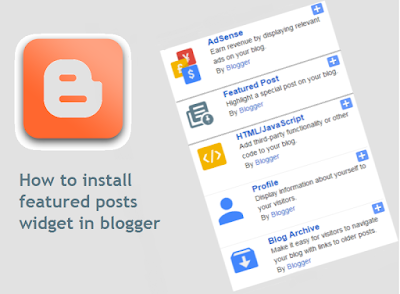
How to Fix Mixed Content Errors in Blogspot Blogs

With HTTPS now automatic in Blogger the benefits have been considerable. However, there are some issues that are now facing bloggers thanks to this change in policy and one of the most common is mixed content errors.

What are mixed content errors?

This is when a web page becomes secured by SSL, but it contains both secure HTTPS and also the non-secure HTTP which is usually links, scripts, style sheets, video, and images. This results in browser errors that negatively affect the performance of your website and cause security issues. This means that source codes such as template, layout gadget, and post and paste may be causing the issues in the HTML side of the equation.

http to https

How to identify mixed content errors?

This is a fairly straightforward process that you can use through Google Chrome:

1. Visit blog using HTTPS, for example - https://yourblog.blogspot.com
2. Access the Chrome Menu at the top-right of your browser window and go to "More Tools" > "Developer Tools" and switch to the "Console" tab or use the CTRL + SHIFT + J keys to open the JavaScript console
3. Look in the Console for mixed content errors which will look similar to these:

mixed content, chrome console

Examples of mixed content errors include, but are not limited to the following:

- Insecure Script Request
- Insecure Image Request
- Insecure URL Request

You should list all unsecured URLs and visit the other pages on your blog to check for other mixed content errors.

Fix the mixed content errors in a Blogger template

To fix the errors encountered which may be found in the template or layout, you will need to do the following:

1. Go to Blogger and select your blog, then click on "Template" and press the "Edit HTML" button
2. Click anywhere in the code area and press CTRL + F to search for http://

http:// to https:// blogger

3. Replace all http:// prefixes with https://

Verify that the new URLs using the HTTPS addresses work by opening them in a new window on your browser. If the links you are receiving provide the same results, then you can Save Template.

To check for layout errors:

Go to Blogger and click on 'Layout' > check for any HTML/JavaScript gadget and click 'Edit' on each gadget. Replace all http:// prefixes with https:// then verify that they are working and hit Save.

Fix the mixed content errors in Blogger posts and pages

To check for post and page errors, do the following:

1. Log into your Blogger Dashboard and select your blog, then click on 'Posts' or 'Pages' and select any post or page > hit the "Edit" link below the Post/Page title.

2. Once the Post editor opens, switch to the "HTML" tab and press CTRL + F keys to look for http:// prefixes. After you found them, replace http:// with https://

fix mixed content errrors

Be sure to verify that the new link works by opening up your browser and testing them. After you've tested them, hit Update.

Update to the Blogger post editor to fix mixed content

To find and fix mixed content errors automatically, Blogger has released a warning tool that alerts you to possible mixed content issues in your posts. All you need to do is go to "Edit" inside a post, switch to the "HTML" tab and hit the Update button. All of the errors will be presented along with the ability to fix them. Once they have been corrected, hit Update.

mixed content error

In the end, fixing these types of errors will greatly improve the performance of your blog, particularly when it comes to pages that may have this particular issue with mixed content generating errors. It also applies to custom domains as well as long as you have an SSL certificate. All it takes is a few minutes and you can greatly improve your blog site that has been impeded with mixed content errors.

How To Use Dynamic Description To Boost Traffic From Search Engines

seo optimization tutorials 101helper blogger

Post description and blog description are very important, not because it tells visitors about your blog or post content because nobody reads it, I am talking about me, I don't read description of a site... Don't know about you :P . To me blog or post description both are just a way to show posts and blog on search engines. Because I use keywords in description so that search engines show my blog when someone types a relevant keyword which is present in my description.

But what if you are using best keywords and still you get only fewer views or no views from search engines? if its happening with you then it means that the description that you are using is not having keywords which visitors are searching, so you need to find these keywords and replace them with existing ones.

One best way that you can use to find best keywods for your content is to use Google Trends. You can guess keywords too, which you think vistors can use to search but accurate keywords are those which you will find in Google Trends.

Another way to find best keywords is to find similar sites to your site which have good traffic and grab the keywords that they are using and put them in your site. It will not cause a © copyright issue.

So Dynamic Description is description that is variable and changes according yo demand. For example I have post about blogger templates and I created it in 2016 and in description I wrote "best blogger templates 2016" and now its 2017 and the visitors are searching for "best blogger templates 2017" now I may get my blog indexed in 3rd or 4th page of search engine results but there are more changes that other sites having 2017 In there description will get indexed on first page. So I need to update my description to get my blog indexed on the first page.

You have to change your blog or post description frequently to get + positive results. So dynamic description is a way to increase yraffic from search engines. And if you get traffic from search engines, it means you are a successful blogger!

One last thing that I am going to tell you in this post is that if you change description again and again, you will need to wait for atleast 1 week to let search engines crawl your site and update the description. Which will definitely take alot of time  because you will not get the best results from first changes but you might need to change description several times until you get some + positive results. So I brought a simple solution for this, now you don't have to wait for a week but you can set a time after which search engine robots will recrawl your site.

So you can change, watch results and see if its improving your traffic or not.

The solution for fast crawling is a meta tag mentioned below. You need to put it in your blog's template below <head> and set the time after which robots will crawl your site again.

<meta name="revisit-after" content="1 days"/>


Remember that too much crawling of a site is not good so you need to change your description between given time and look for + positive results. After getting more traffic remove the meta tag.

I hope you found this post meaningful. If you have any doubt, questions, suggestion and want to send us feedback, please leave a comment below.

Read others posts and don't forget to share atleast one post.

Thanks for visiting 101Helper, do visit again!

Search Tags: How to get more traffic from search engines, how to use description to boost traffic in blogger, how to update blogger blog faster in search engines, increase organic traffic to blog, Seo optimization tutorials blogger

Automatic Featured Posts Slider Widget for Blogger

Anyone with a blog wants readers to stay rather than move on to another. It's not being selfish but after someone has read one post, you'd definitely want them to read another, right? After all, isn't it one of the tenets of SEO to make people stay longer on your blog if it has to have a fighting chance at the rankings game?

The question now is: how exactly do you entice them to read a few more of your blog posts?

First off, you don't know exactly what brought a reader to your site. Well, you sort of do, if you have Google Analytics and all that. But that's beside the point. It wouldn't be productive for you to stare at GA the entire day hoping that it will tell you that yes, someone has been perusing your blog.

The point being driven at here is that you have to offer more on your blog. It's not enough that you get traffic from search engines and other sites; you also have to add some extras that will entice visitors to stay longer.

How exactly do you do that?

The Tactics of Persuading Users to Stay

Bloggers have employed a variety of tactics to persuade readers to stay. For one, they load the sidebar with widgets for Popular Posts, for example. Of course, it would be in the interest of your readers to know which other posts on your blog are gaining traction. Maybe those pieces are of interest to them as well. As a result, you've got one surefire way of making readers stay.

Now, what if you want to highlight Featured Posts, for example? Let's say that your blog has been around for a number of years and in that span, it has produced some great content that received quite the number of shares, likes, +1s, comments on so on. Wouldn't that be the kind of post you want featured? Unless your reader was looking for that topic specifically, there's little chance that they might uncover that gem if you don't bring it to their attention.

Thankfully, it's quite possible to add a Featured Posts slider for Blogger. And if you don't know how to make one yourself, this is exactly what this post is for. Here's an awesome Featured Posts slider widget that you can use on your blog.


How to Add Featured Posts Slider Widget in Blogger

1. Go to 'Layout' > click the 'Add a gadget' link in the sidebar area and select 'HTML/JavaScript' gadget from the pop-up window.

2. Add the code below inside the empty box:
<style type="text/css">
ul.featured-widget-list,ul.featured-widget-list li{margin:0;padding:0;list-style:none;position:relative }ul.featured-widget-list li{display:none}ul.featured-widget-list li:nth-child(1){display:block;line-height:0}ul.featured-widget-list img{border:0;width:100%;height:auto}ul.featured-widget-list .featuredbg{width:100%;height:100%;position:absolute;z-index:2;left:0;top:0;opacity:.6;background-image:url(https://blogger.googleusercontent.com/img/b/R29vZ2xl/AVvXsEjpb9xoZWB_ShrELvp3hSAWUF9waDzuNZCSFtNuhXFJ_8e2zyp0DzjjNk9eB0IsCYV6wI0xE3YmrMo8hiORtCk63pG-VsAAeDmo93Q5OuL809nO6x6b6kFfdZTGKpoqx1MwLYLKDxocdYE/s400/overlay-bg.png);background-position:0% 100%;background-repeat:repeat-x}ul.featured-widget-list .featuredbg:hover{opacity:.1}ul.featured-widget-list h5{position:absolute;left:0;right:0;text-align:center;bottom:10px;z-index:2;color:#fff;margin:0;text-transform: capitalize;padding:10px 20px;line-height:1.9em;letter-spacing:0.3px;font: 600 16px 'Abel', sans-serif;overflow:hidden}ul.featured-widget-list li:hover h5{bottom:30px}ul.featured-widget-list .featured-meta{font: 11px 'Abel', sans-serif;letter-spacing:0.3px;position:absolute;bottom:0;left:0;right:0;text-align:center;z-index:2;color:#fff;opacity:0}ul.featured-widget-list h5, ul.featured-widget-list .featured-meta {-webkit-transition: all 0.3s;-moz-transition: all 0.3s;-o-transition: all 0.3s;transition: all 0.3s;}ul.featured-widget-list li:hover .featured-meta{bottom:20px;opacity:1}.feat-buttons{position:absolute;top:50%;left:0;z-index:5;width:100%}
.feat-buttons a{text-indent:-9999px;margin:0 7px;width:15px;height:15px;padding:5px;background:#000;-ms-filter:"progid:DXImageTransform.Microsoft.Alpha(Opacity=60)";filter: alpha(opacity=60);-moz-opacity:0.6;-khtml-opacity:0.6;opacity:0.6;position:relative;-webkit-border-radius: 50%;-moz-border-radius: 50%;border-radius: 50%;}.feat-prev{float:left;}.feat-next{float:right;}.feat-buttons a.feat-prev::before, .feat-buttons a.feat-next::before{content:"";width:0;height:0;border-width:6px 7px;border-style:solid;border-color:transparent #fff transparent transparent;position:absolute;top:50%;margin-top:-6px;margin-left:-11px;left:50%}
.feat-buttons a.feat-next::before{border-color:transparent transparent transparent #fff;margin-left:-3px}
</style>
<div id="featuredbwidget"></div>
<link href='https://fonts.googleapis.com/css?family=Abel' rel='stylesheet' type='text/css'/>
<script src="http://ajax.googleapis.com/ajax/libs/jquery/1.8.0/jquery.min.js" type="text/javascript"></script>
<script type='text/javascript'>
//<![CDATA[
featuredbwidget({
listURL:"https://helplogger.blogspot.com/",
featuredNum:9,
listbyLabel:false,
feathumbSize:350,
interval:3000,
autoplay:true,
featuredID:"#featuredbwidget"
});
function featuredbwidget(a){(function(e){var h={listURL:"",featuredNum:3,featuredID:"",feathumbSize:300,interval:5000,autoplay:false,loadingFeatured:"nextfeatured",pBlank:"https://blogger.googleusercontent.com/img/b/R29vZ2xl/AVvXsEiKKaTwBLokJJY8ygp_4IvBSA8FCWIVe05p9rIpIObSG-76wOVyKbtlPGYwgNp6_9rWRneZvq2oIzs8hirlL2Y2dla3P_J8rErfEw5lNDmzinrbMMLTP_RK-T2S-YKmNdeme0vQuLOAPUc/s500/no-image.png",byMonth:["Jan","Feb","Mar","Apr","May","Jun","Jul","Aug","Sep","Oct","Nov","Dec"],listbyLabel:false};h=e.extend({},h,a);var g=e(h.featuredID);var d=h.featuredNum*200;g.html('<div class="featslider"><ul class="featured-widget-list"></ul><div class="feat-buttons"><a href="#" class="feat-prev">Prev</a><a href="#" class="feat-next">Next</a></div></div>');var f=function(w){var q,k,m,u,x,p,t,v,r,l="",s=w.feed.entry;for(var o=0;o<s.length;o++){for(var n=0;n<s[o].link.length;n++){if(s[o].link[n].rel=="alternate"){q=s[o].link[n].href;break}}if("media$thumbnail" in s[o]){u=s[o].media$thumbnail.url.replace(/\/s[0-9]+\-c/g,"/s"+h.feathumbSize+"-c")}else{u=h.pBlank.replace(/\/s[0-9]+(\-c|\/)/,"/s"+h.feathumbSize+"$1")}k=s[o].title.$t;r=s[o].published.$t.substring(0,10);m=s[o].author[0].name.$t;x=r.substring(0,4);p=r.substring(5,7);t=r.substring(8,10);v=h.byMonth[parseInt(p,10)-1];l+='<li><a href="'+q+'"><div class="featuredbg"></div><img class="featuredthumb" src="'+u+'"/><h5>'+k+'</h5></a><div class="featured-meta"><span class="fdate"><span class="fday">'+t+'</span> <span class="fmonth">'+v+'</span> <span class="fyear">'+x+'</span></span> - <span class="fauthor">'+m+"</span></div></li>"}e("ul",g).append(l).addClass(h.loadingFeatured)};var c=function(){e(h.featuredID+" .feat-next").click()};var b=function(){e.get((h.listURL===""?window.location.protocol+"//"+window.location.host:h.listURL)+"/feeds/posts/summary"+(h.listbyLabel===false?"":"/-/"+h.listbyLabel)+"?max-results="+h.featuredNum+"&orderby=published&alt=json-in-script",f,"jsonp");setTimeout(function(){e(h.featuredID+" .feat-prev").click(function(){e(h.featuredID+" .featslider li:first").before(e(h.featuredID+" .featslider li:last"));return false});e(h.featuredID+" .feat-next").click(function(){e(h.featuredID+" .featslider li:last").after(e(h.featuredID+" .featslider li:first"));return false});if(h.autoplay){var i=h.interval;var j=setInterval(c,i);e(h.featuredID+" .featslider li:first").before(e(h.featuredID+" .featslider li:last"));e(h.featuredID+" .featslider").hover(function(){clearInterval(j)},function(){j=setInterval(c,i)})}e("ul",g).removeClass(h.loadingFeatured)},d)};e(document).ready(b)})(jQuery)};
//]]>
</script>

Automatic Featured Posts Slider Settings

  • listURL - replace "https://helplogger.blogspot.com/" with your blog URL
  • featuredNum - add the number of posts to display in the slider
  • listbyLabel - if you want to display posts by category / label, such as the tag fashion, it will be written as listbyLabel: "fashion"
  • feathumbSize - the size or dimension of the image in pixels
  • interval - time taken to change the slides position in milliseconds
  • autoplay - replace true with false if you don't want the slides to change automatically.
3. Once you are done with the settings, click the 'Save' button.

Now, this code is for a slider widget which means that instead of just a random list of Featured Posts, you get to display them with images (if they have one) and you can include effects too. You can also control how many slides should be shown because it just wouldn't be prudent to feature your entire oeuvre, right?

Plus, being a slider widget, it adds a nice little visual to your site. And we all know how visuals are important in enticing people to stay, don't we?

How To Set Custom Post Title And Logo In Feedburner Emails


Feedburner is used by every blogger to send mails to their subscribers and hence its optimization is very important to let subscribers get maximum of it. Though I haven't shared much about feedburner except how to set it up. So I decided to share a new thing in feedburner that will benefit you.

Its setting up custom title for posts because without optimization all the mails sent from a blog have the same blog title having url of the post so subscribers mostly don't open the post even after receiving the mail because they haven't known the name of the post so they don't get interest in that mail. So it is not beneficial in anyway because you send mails to your subscribers but you don't get any response. Also I will show you how to put your logo in emails, it will tell visitors that this email is from your blog because logo is the identity of a site or blog.

So in this post I am going to show you how to enable custom post title in feedburner and how to put your blog's logo in emails. Follow simple steps mentioned below!

How To Set Custom Post Title In Feedburner Emails?

Step 1: Go to feedburner and open your blog's RSS feed.

how to add title in feedburner emails

Learn: How To Set Up An Rss Feed For Your Blogger Blog

Step 2: Navigate to Publicize > Email Subscriptions Email Branding.

Step 3: Paste ${latestItemTitle} in the Email subject/title input area.


Step 4: Scroll down the page and click on Save button.

How To Set Blog Logo In Feedburner Emails?

To put your blog's logo in your emails you need to upload it and get its link because you have to provide a link to your logo in feedburner. So upload your logo and get its link. I suggest to upload it in a page of your blog then after uploading switch to Html editor and get the link of logo. After uploading and getting link you can delete the page you don't need to keep it because your logo is stored in blogger.

After getting link of your logo follow below steps:

Step 1: Go to Feedburner > Your Feed Publicize > Email Subscriptions Email Branding.

Step 2: Paste your logo link in the input area of Logo URL.

how to add logo in feedburner emails - 101helper

Step 3: Scroll down the page and click on save to finish.

I hope this post was helpful to you, You can customize look of your emails on the same page(Email Branding). You can change the title's font and its size as well as color of both body text and title.

If you have any suggestion or question, ask me in comments.

Search Tags: how to add logo in feedburner emails, how to add custom post title in feedburner emails,separate post titles for feedburner emails,how to use feedburner for blogger,how to setup feedburner for blogger, 101helper blogging tutorials.

How To Add Vertical Featured Post Slider In Blogspot

vertical featured posts widget for blogger

Featured posts sliders are no doubt used very much by people and some people who know javascipt and css are creating better and better featured post sliders. The reason for using featured post slider is to increase page views and also add a professional look to site but the basic purpose is to increase page views by choosing older posts or best posts and show them to visitors because older posts are mostly hidden from visitors as they are not you can say not in front so featured posts slider brings it in front and makes it alive. Featured posts slider is important thats why Blogger has also recently added it in gadgets in layout.

In this post I have brought you something that you cant't find in other sites, I hope you will like it. Its a vertical slider, though you need to add links, image links and name of the post but its really cool. The main purpose of this post is to share code of this amazing slider with you not the steps of installing it because steps are very easy if you are familiar with Blogging.

WATCH A LIVE DEMO

Similar Posts That You Might Like:


How To Add Vertical Featured Post Slider In Blogspot?

Follow below steps to add vertical related posts widget in your blog.

Step 1: Go to blogger dashboard and navigate to Layout.

Step 2: Click on Add a gadget in sidebar.

Step 3: Choose Html/Javascript.

Step 4: Copy below code and paste it in Html/Javascript window.

<script type="text/javascript">
    $(document).ready( function($) {
        $('#news').vertigo();  
    });
</script>
<script>
(function($) {
$.fn.vertigo = function(options) {

$(this).addClass("vertigo");
var list = $('.vertigo li');
var totallist = list.length;

$(this).after('<a href="javascript:" class="btn-pre"><p><</p></a> <a href="javascript:" class="btn-next"><p>></p></a>');
$('.vertigo li').each(function(i) {
$(this).addClass("item"+(i+1));
});

var total = 1;

// Settings
var settings = $.extend({
play  : true,
timer : 15000
}, options);

if ( settings.play ) {
var playx = settings.play;
}
if ( settings.timer ) {
var timerx = settings.timer;
}

if(playx == true){
setInterval(function() {

if ( total <= (totallist - 1)) {
var nlisth = $('.item'+total).outerHeight();
$('.vertigo li').animate({'top':'-='+nlisth+'px'});
total++;
//console.log(total);
}
}, timerx);
}

$('.btn-pre').click(function(){
var plisth = $('.item'+(total-1)).outerHeight();
if ( total !== 1 && total <= totallist) {
total--;
$('.vertigo li').animate({'top':'+='+plisth+'px'});
}
});

$('.btn-next').click(function(){
var nlisth = $('.item'+total).outerHeight();
if ( total <= (totallist - 1)) {
total++;
$('.vertigo li').animate({'top':'-='+nlisth+'px'});
}
});

}

return false;

}(jQuery));
</script>
<div id="container">
<ul id="news">
<li><a href="/2015/03/slide-in-menu-for-blogger.html"><img src="https://blogger.googleusercontent.com/img/b/R29vZ2xl/AVvXsEi0znE38e6sLUWylM_96axzkcazQMqqpipNqgexRTPRYGrp7A6BfQXZalMgZ0PZNjuU_Z4mNnSn6t4v3WYabXrwIxFO0KmpRFxrKdzJe6QU9nMVuDPL2VVPtl4t0V1KgadU-AOyl2E9R8Q/s1600/Slide+in+menu+for+blogger.png"/>Slide In Menu For Blogger</a></li>
<li><a href="/2015/04/how-to-submit-blogger-sitemap-to-yandex.html" target="_blank"><img src="https://blogger.googleusercontent.com/img/b/R29vZ2xl/AVvXsEgwf3KwxFaeJT9t-S4bYxjPlvZj-LJ_eK4q15ynzkDOy-ECkdA34xFG58FQxPVenQEWxNSL7jFEtqQzAdBUSy6HW0RvtpcTRx3ZLM7XfCZ5jk9trf6pNNz7LuDBt6MYVjSTECItvDcbhr0/s1600/yandex-logo.png"/>How To Submit Blogger Sitemap To Yandex</a></li>
<li><a href="http://101helper.blogspot.com/2015/03/how-to-get-your-blog-to-top-of-search.html" target="_blank"><img src="https://blogger.googleusercontent.com/img/b/R29vZ2xl/AVvXsEhoUHG9PtHFhNTLOkYI_MATCAH2TM8Jm6arHZa4XhHdHgthiAKEnAeRHFghJCCkMen3k4DPI6syU97ytAoZ6m17s61ASUIAXjXwDmGglE4ZAKnUqcNJsaBq7IfFp5EFaDbz5WB8Bl2QEoY/s1600/how+to+get+your+blog+on+top+of+the+search+results.jpg"/>Get your blog to top of search results</a></li>
<li><a href="/2014/08/how-to-add-vertical-related-posts.html" target="_blank"><img src="https://blogger.googleusercontent.com/img/b/R29vZ2xl/AVvXsEiPD3EgxmmohlJenNCW_1KKotlmhTFDJNNRkLVdX4nOzU3WizjztUS2waFZ1Y2cbMfDo4yav55aAoNOS7-VJX9H9lnDp0TuC2yo83Mi_FQZoEqoDfZNz6dn_wbxqdjZtYc6TSTQER9FtMI/s1600/V_inline-content.gif"/>Vertical Related Posts Widget For Blogger Desktop And Mobile Site</a></li>
<li><a href="/2014/10/numbered-navigation-widget-for-blogger.html" target="_blank"><img src="https://blogger.googleusercontent.com/img/b/R29vZ2xl/AVvXsEgDdVXdzpA3E4pMzrP38ClGFaERAQRgRgW8arGRJdXWANVafus5amKHlr-jWEr6rsyXV00V2tRaR90B-JqXaJX7pWVsA9yp2J1bqi4BuOWChEc5prLpMgVkdF8iwZzYqKvx12OLzlAmreM/s1600/numbered+navigation+for+blogger.jpg"/>
Numbered Navigation Widget For Blogger</a></li>
<li><a href="/2015/06/how-to-customize-blogger-static-pages-CSS.html" target="_blank"><img src="https://blogger.googleusercontent.com/img/b/R29vZ2xl/AVvXsEjd1KzvsxIfAS8EJh50JUeVrPIwObgDZg_jJPJt_e1UrZ7yTS9IZc6UFe3IA-6Ilw27XVczHkOtDHHvTnCyOKrwNvOZydW3gYdq4vILvX9mJHEipWu47dlynLqFEpVz4xVQ3YmmyKonykk/s400/how+to+customize+blogger+static+pages+with+css.png"/>How To Customize Blogger Static Pages With CSS</a></li>
<li><a href="/2014/08/how-to-design-contact-form-for-blogger.html" target="_blank"><img src="https://blogger.googleusercontent.com/img/b/R29vZ2xl/AVvXsEgU6kwqzHP3HK0XhcRIj5R7-1wfIXiExY4JCkBzldeFbB9W2JPDAo3Mx8x-ivQSPlnFgKcajHKZ_9aEVOgsIGRWCyMf2rZniujyKyvkNFFQzHq7Vam4xK2aSpxrXbOaPUhgelf8JAjZtnc/s1600/blogger-contact-form%5B2%5D.png"/>
How To Design Contact Form For Blogger Contact Page</a></li>
</ul>
</div>
<style>
#container {
    height: 350px;
    overflow: hidden;
    width: 270px;
    margin: 0;
}
#news {
    margin: 0 auto;
    bottom: 5px;
    position: relative;
}
.vertigo li {
    list-style: none;
    padding: 13px 0px;
    display: inline-block;
    width: 260px;
    position: relative;
    right: 10px;
}
.vertigo li img {
    float: left;
    margin-right: 10px;
    height: 75px;
    width: 80px;
    border-radius: 5px;
    border: 1px solid #ddd;
}
.vertigo li p{
margin:0px;
text-align: justify;
}
.vertigo li a {
text-decoration: none;
color:#6F6F6F;
}
.btn-pre p, .btn-next p {
    color: #bbb;
    font-size: 19px;
    margin: 0;
    text-align: center;
    width: 27px;
    background: #fff;
}
a.btn-next {
    position: absolute;
    bottom: -40px;
    right: -10px;
    border: 1px solid #bbb;
    text-decoration: none;
    color: #bbb;
}
a.btn-pre {
    position: absolute;
    border: 1px solid #bbb;
    right: 30px;
    bottom: -40px;
    text-decoration: none;
}
</style>

Step 5: Click on save to finish.


How To Customize Vertical Featured Post Slider?

Replacing links, text, image links:

Replace green colored links with your post links, yellow colored links with your post image links and red colored titles with your post titles.

How to make changes in auto-play?

Autoplay is enabled and the set time is 15 seconds(15000) if you want to disable it or want to change time of auto play make changes in this part of code:

// Settings
var settings = $.extend({
play  : true,
timer : 15000
}, options);

If you want to disable autoplay replace true with false after the play text.

To set time enter your custom time in place of 15000, 15000 means 15 seconds, 20000 means 20 seconds, 10000 means 10 seconds.

How to add a new slide?

You need to add this piece of code to add new slide:

<li><a href="YOUR POST LINK HERE" target="_blank"><img src="YOUR IMAGE LINK HERE"/>YOUR TITLE HERE</a></li>

Add the code below this piece of code:

}(jQuery));
</script>
<div id="container">
<ul id="news">
<-----Paste Here----->

You hope you enjoyed this widget, please share your views about this post in comments. Thanks for visiting 101Helper.

Search Tags:

featured post widget for blogger, vertical featured post widget for blogger, auto-play responsive widget for blogger, jquery post slider for blogspot, multiple posts slider for blogger, 101helper blogger gadgets