How to Get a Disabled Gmail Account Back

It can be a frustrating experience when you find your Gmail account is no longer active. Having your Gmail account disabled means losing access to the products by Google that were linked. There are several reasons why your account may have been ended that are mostly due to the Terms of Service policies by Google itself. So, if you have violated one more of the polices either intentionally or not, you can find yourself with a disabled Gmail account.

Adding to the frustration is that Google will often disable the account with no warning. However, the good news is that there are simple methods for getting your account back online.

Gmail Account Temporarily Disabled

This is generally the easiest to overcome as Google believes that your account may be compromised. To rectify the situation, you will be asked to provide your mobile number or recover email identification. If you do either, they will send you a text message that will allow you to access your account quickly. You will need to do so within a 48-hour period otherwise it will become more difficult to get back your account.

Gmail Account Disabled Due To Perceived ToS Violation

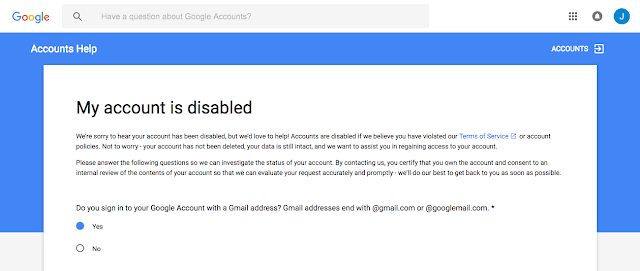
If your Gmail account disabled included a terms of service (ToS) violation warning, then you will need to fill out their contact form so the process of getting your Gmail account back can begin. You should read the ToS thoroughly so that the violation will not happen again and provide the email address. If you do not get a response, repeat the step every two days until you do.

gmail account disabled
Gmail account disabled - Google contact form screenshot

Once they have responded, the next step should be to get your Gmail back so that you can gain automatic access to all the Google products including AdSense. You can also visit the help forum where you can open a 'Gmail account disabled' topic. Just focus on the Gmail account itself first as that is the key to the rest of your Google services. You'll want to discuss the issues that you are facing and why this needs to be resolved as quickly as possible. If the Top Contributor pings your thread to the staff at Google, then you should expect your account to be back online in 48 hours or two business days.

Gmail Account Disabled Due To Serious ToS Violations

If the Gmail account disabled was due to a serious violation of the Terms of Service agreement, as well as the Google policies that oversee your account, then you will have considerable difficulty in getting your account back. Such violations would include your AdSense account being involved in click fraud, for example. Serious violations that are clear will make it virtually impossible for your account to be restored.

If what happened was not considered a serious violation, then you should be able to get your account up and running within 24 to 48 hours depending on the circumstances. It pays however, to keep all your important data and information outside of your Google accounts in case of getting a Gmail account disabled result. By protecting yourself, the impact will be easier to handle until you can get your account back online.

5 Best Custom Blogger Contact Form Widgets

In the past, adding a custom contact form for Blogger was quite a complex process, and many bloggers were forced to use third party websites. However, even after Blogger launched its own contact form gadget, it was still considered as highly inadequate. This is because the official gadget would only be implemented on the footer the sidebar. Most bloggers preferred having a separate blogger contact form placed on its own page to make their blogs appear well arranged and more professional as well.

Having a well laid-out Blogger contact form is very important. This is the tool that visitors, companies, and brands can use to contact you and it is simply a must-have feature for every blogger. If you are not comfortable with sharing your main email address directly on your blog, then a custom Blogger contact form offers an effective way in which people can easily reach you.
5 Best Custom Blogger Contact Form Widgets

Why you should use a Blogger Contact Form?

If you are still stuck on third party providers, you should definitely consider switching to the official custom contact form for Blogger since it has various unique benefits, like:
  • Messages are delivered immediately - As the blog administrator, you will receive a message immediately the visitor clicks send.
  • Reliable - It is the official form developed by Blogger, which makes it more trustworthy and reliable way to initiate contact as compared to using third-party services.
  • Questions - The contact form offers a platform for your visitors to ask specific questions that they might have regarding the blog you wrote or your business in general. It can be an excellent way of capturing leads and even lead to conversions if you are selling a certain product or service.
  • Feedback - Visitors can easily comment on your blog by leaving their feedback through your contact form. This feedback can help you determine which post to do next or what areas to address based on the visitors' comments.
  • Information or service request - For those who are using the blog as a way of marketing a product or service, potential clients can use the custom contact form for Blogger to reach out and request additional information.

How to Add Blogger Contact Form Gadget

Before adding a custom Blogger contact form to a static page, we need to add the default contact form in the blog's sidebar to make it functional:

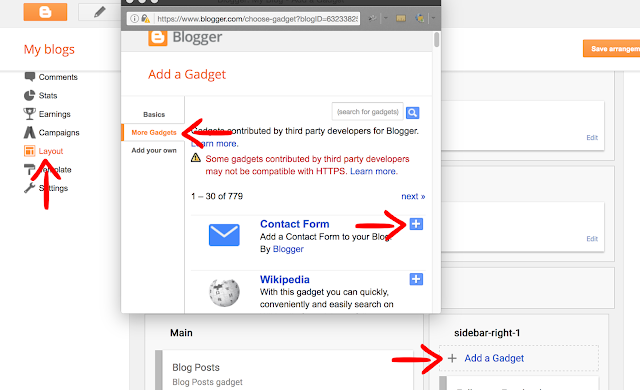
1. Log into your Blogger dashboard and go to "Layout" > click on the "Add a gadget" link on the page elements area.

2. Select "More Gadgets" below the "Basics" tab and click the "+" button to add the Contact Form Gadget.

blogger contact form

Hiding Blogger Contact Form from the Sidebar

Once the contact form has been added, next step is to hide it so that it will appear only in the static page.

1. Go to "Template" and press the "Edit HTML" button. Once the code editor opens, click anywhere inside the code area and press CTRL + F keys (or Command + F for mac) to open the search box.

2. Type or paste the following tag inside the search box and hit Enter to find it:
]]></b:skin>
3. Just above the ]]></b:skin> tag, add this CSS code:
#ContactForm1{display: none !important;}
4. Click the "Save template" button on the upper left side and view your blog. The contact form widget should be gone.

Adding Custom Blogger Contact Form in a Static Page

Finally, now that we enabled the functionality of the contact form, let's add a custom contact form in our Blogger blog...

1. Go to "Pages" and click the "New page" button. If you already have a Contact us page, just click the "Edit" link below the page title.

2. Once the Page editor opens, fill up the page title with Contact/Contact Us or any title you want to show. It is recommended doing this before anything in order to make the permalink SEO friendly.

3. Click on the HTML tab as there we will add the code to make the custom Blogger contact form work. On the right site, change the Page settings to hide ("Don't allow" or "Don't allow, hide existing") the reader comments, then click the "Done" button:

contact static page

4. Below are 5 custom Blogger contact form styles. Pick your favorite and copy the code provided, then paste the code inside the HTML box of your page editor:


Simple Contact Form
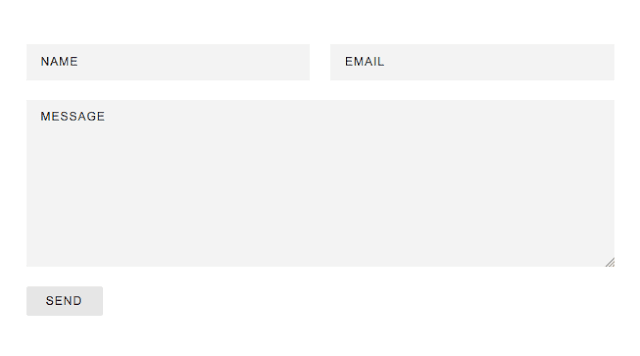
custom blogger contact form

<style type="text/css">
.contact-form-widget{margin-left:auto;margin-right:auto;width:600px;max-width:100%;padding:40px 0}.contactf-name,.contactf-email{float:left;width:48.25%}.contactf-name{margin-right:3.5%}.contact-form-name,.contact-form-email,.contact-form-email-message,.contact-form-name:hover,.contact-form-name:focus,.contact-form-email:hover,.contact-form-email:focus,.contact-form-email-message:hover,.contact-form-email-message:focus{width:100%;max-width:100%;margin:0 0 20px;padding:10px 15px;font-size:12px;letter-spacing:1px;color:#444;background:#F3F3F3;border:medium none;-webkit-box-shadow:none;-moz-box-shadow:none;box-shadow:none}.contact-form-name,.contact-form-email{height:37px}.contact-form-email-message{height:170px}.contact-form-button-submit,.contact-form-button-submit:hover{width:13%;height:30px;font:normal 12px Arial;letter-spacing:1px;color:#444;display:block;outline:none;margin-bottom:20px;text-align:center;background:#E6E6E6;border:0;cursor:pointer}.contact-form-button-submit:active{outline:none;-webkit-box-shadow:none;box-shadow:none}.contact-form-cross{border:medium none!important;box-shadow:none!important;padding:0!important;height:11px !important;width:11px !important;}
</style>

<div class="widget ContactForm" id="ContactForm22"><div class="contact-form-widget"><div class="form"><form name="contact-form"><div class="contactf-name"><input class="contact-form-name" id="ContactForm1_contact-form-name" name="name" size="30" type="text" value="NAME" onblur='if (this.value == "") {this.value = "NAME";}' onfocus='if (this.value == "NAME") {this.value = "";}'  /></div><div class="contactf-email"><input class="contact-form-email" id="ContactForm1_contact-form-email" name="email" size="30" type="text" value="EMAIL" onblur='if (this.value == "") {this.value = "EMAIL";}' onfocus='if (this.value == "EMAIL") {this.value = "";}'/></div><div style="clear:both"></div><div class="contactf-message"><textarea class="contact-form-email-message" cols="25" id="ContactForm1_contact-form-email-message" name="email-message" rows="5" value="MESSAGE" onblur='if (this.value == "") {this.value = "MESSAGE";}' onfocus='if (this.value == "MESSAGE") {this.value = "";}'></textarea></div><input class="contact-form-button contact-form-button-submit" id="ContactForm1_contact-form-submit" type="button" value="SEND" /><div class="contact-form-error-message" id="ContactForm1_contact-form-error-message"></div><div class="contact-form-success-message" id="ContactForm1_contact-form-success-message"></div></form></div></div></div>

Contact form with CSS rainbow divider

colorful contact form for Blogger

<style type="text/css">
.contact-form-widget{margin-left:auto;margin-right:auto;width:600px;max-width:100%;padding:0}hr{position:relative;height:.75em;border:0;overflow:hidden;margin:0}hr:before{content:"";display:block;position:absolute;top:0;left:0;height:.75em;width:5.1em;background:#C4DD83;box-shadow:5em 0 0 0 #F4FCC9,10em 0 0 0 #FDCD78,15em 0 0 0 #ED786F,20em 0 0 0 #D99DBF,25em 0 0 0 #C39EDC,30em 0 0 0 #679DE2,35em 0 0 0 #62C2E3,40em 0 0 0 #F4FCC9,45em 0 0 0 #FDCD78,50em 0 0 0 #ED786F,55em 0 0 0 #D99DBF,60em 0 0 0 #C39EDC}.contactf-name,.contactf-email{float:left;width:49.25%}.contactf-name{margin-right:1.5%}.contact-form-name,.contact-form-email,.contact-form-email-message,.contact-form-name:hover,.contact-form-name:focus,.contact-form-email:hover,.contact-form-email:focus,.contact-form-email-message:hover,.contact-form-email-message:focus{width:100%;max-width:100%;margin:25px 0 0;padding:10px;font-size:15px;color:#ccc;border-color:#E8E8E8;border-width:2px 2px 4px;-webkit-box-shadow:none;-moz-box-shadow:none;box-shadow:none}.contact-form-name,.contact-form-email{height:40px}.contact-form-email-message{height:100px}.contact-form-button-submit,.contact-form-button-submit:hover{margin-top:25px;width:100%;height:40px;font-size:15px;color:#fff;text-align:center;text-shadow:0 1px 2px rgba(0,0,0,0.25);background:#EE786F;border:0;border-bottom:2px solid #D4685C;outline:none;cursor:pointer;-webkit-box-shadow:inset 0 -2px #D4685C;box-shadow:inset 0 -2px #D4685C}.contact-form-button-submit:active{top:1px;outline:none;-webkit-box-shadow:none;box-shadow:none}.contact-form-cross{border:medium none !important;box-shadow:none !important;padding:0 !important;height:11px !important;width:11px !important;}
</style>
<div class="widget ContactForm" id="ContactForm22"><div class="contact-form-widget"><hr><div class="form"><form name="contact-form"><div class="contactf-name"><input class="contact-form-name" id="ContactForm1_contact-form-name" name="Name" size="30" type="text" value="Name" onblur='if (this.value == "") {this.value = "Name";}' onfocus='if (this.value == "Name") {this.value = "";}'/></div><div class="contactf-email"><input class="contact-form-email" id="ContactForm1_contact-form-email" name="E-mail address" size="30" type="text" value="E-mail address" onblur='if (this.value == "") {this.value = "E-mail address";}' onfocus='if (this.value == "E-mail address") {this.value = "";}'/></div><div style="clear:both"></div><div class="contactf-message"><textarea class="contact-form-email-message" cols="25" id="ContactForm1_contact-form-email-message" name="Type your message here..." rows="5" type="text" value="Type your message here..." onblur='if (this.value == "") {this.value = "Type your message here...";}' onfocus='if (this.value == "Type your message here...") {this.value = "";}'></textarea><input class="contact-form-button contact-form-button-submit" id="ContactForm1_contact-form-submit" type="button" value="Send Message" /><div class="contact-form-error-message" id="ContactForm1_contact-form-error-message"></div><div class="contact-form-success-message" id="ContactForm1_contact-form-success-message"></div></div></form></div></div></div>

Blogger Contact Form with CSS Ribbon
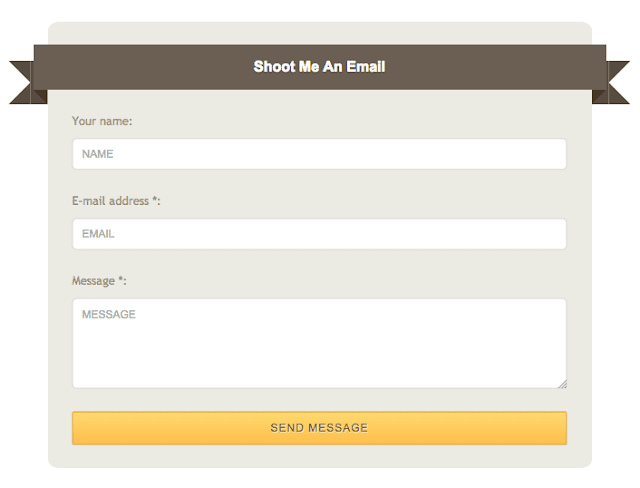
contact form with ribbon

<style type="text/css">
.widget.ContactForm{z-index:1}.contact-form-widget{margin-left:auto;margin-right:auto;width:600px;max-width:100%;padding:25px 0;background:#EBEBE3;-webkit-border-radius:2%;-moz-border-radius:2%;border-radius:2%}.contact-form-widget .form{width:91%;margin:0 auto}.ribbon{font:16px Arial;text-transform:capitalize;text-shadow:0 1px 2px rgba(0,0,0,0.25);position:relative;background:#6B5F53;color:#fff;text-align:center;padding:1em 2em;margin:0 -16px}.ribbon:before,.ribbon:after{content:"";position:absolute;display:block;bottom:-1em;border:1.5em solid #584C40;z-index:-1}.ribbon:before{left:-1.7em;border-right-width:1.2em;border-left-color:transparent}.ribbon:after{right:-1.7em;border-left-width:1.2em;border-right-color:transparent}.ribbon .ribbon-content:before,.ribbon .ribbon-content:after{content:"";position:absolute;display:block;border-style:solid;border-color:#42362A transparent transparent;bottom:-1em}.ribbon .ribbon-content:before{left:0;border-width:1em 0 0 1em}.ribbon .ribbon-content:after{right:0;border-width:1em 1em 0 0}.contactf-name,.contactf-email,.contactf-message{text-align:left;margin-top:25px;color:#a1937b;font-size:13px}.contactf-name,.contactf-email{float:left;width:100%}.contact-form-name,.contact-form-email,.contact-form-email-message,.contact-form-name:hover,.contact-form-name:focus,.contact-form-email:hover,.contact-form-email:focus,.contact-form-email-message:hover,.contact-form-email-message:focus{width:100%;max-width:100%;margin:10px 0 0;padding:10px;font-size:12px;color:#aaa;border-color:#DBD6D1;border-width:1px;box-shadow:none;-webkit-border-radius:5px;-moz-border-radius:5px;border-radius:5px}.contact-form-name,.contact-form-email{height:35px}.contact-form-email-message{height:100px}.contact-form-button-submit,.contact-form-button-submit:hover{margin-top:25px;width:100%;height:37px;font:normal 12px Arial;outline:none;letter-spacing:1px;color:#fff;text-align:center;cursor:pointer;text-shadow:1px 1px 0 #ffe8b2;color:#7c5d1b;border:1px solid #d6a437;background:#febd4b;background:-webkit-gradient(linear,0 0,0 100%,from(#fed970) to(#febd4b));background:-webkit-linear-gradient(#fed970,#febd4b);background:-moz-linear-gradient(#fed970,#febd4b);background:-ms-linear-gradient(#fed970,#febd4b);background:-o-linear-gradient(#fed970,#febd4b);background:linear-gradient(#fed970,#febd4b);-pie-background:linear-gradient(#fed970,#febd4b)}.contact-form-button-submit:active{color:#7c5d1b;border:1px solid #d6a437;background:#febd4b;background:-webkit-gradient(linear,0 0,0 100%,from(#febd4b) to(#fed970));background:-webkit-linear-gradient(#febd4b,#fed970);background:-moz-linear-gradient(#febd4b,#fed970);background:-ms-linear-gradient(#febd4b,#fed970);background:-o-linear-gradient(#febd4b,#fed970);background:linear-gradient(#febd4b,#fed970);-pie-background:linear-gradient(#febd4b,#fed970)}.contact-form-cross{border:medium none!important;box-shadow:none!important;padding:0!important;height:11px !important;width:11px !important;}
</style>
<div class="widget ContactForm" id="ContactForm22"><div class="contact-form-widget"><h2 class="ribbon"><strong class="ribbon-content">Shoot Me an Email</strong></h2><div class="form"><form name="contact-form"><div class="contactf-name">Your name:<input class="contact-form-name" id="ContactForm1_contact-form-name" name="Name" size="30" type="text" value="Name" onblur='if (this.value == "") {this.value = "Name";}' onfocus='if (this.value == "Name") {this.value = "";}'  /></div><div class="contactf-email">E-mail address *:<input class="contact-form-email" id="ContactForm1_contact-form-email" name="E-mail address" size="30" type="text" value="E-mail address" onblur='if (this.value == "") {this.value = "E-mail address";}' onfocus='if (this.value == "E-mail address") {this.value = "";}'/></div><div style="clear:both"></div><div class="contactf-message">Message *:<textarea class="contact-form-email-message" cols="25" id="ContactForm1_contact-form-email-message" name="Type your message here..." rows="5" value="" placeholder="Type your message here..." value="Type your message here..." onblur='if (this.value == "") {this.value = "Type your message here...";}' onfocus='if (this.value == "Type your message here...") {this.value = "";}'></textarea><input class="contact-form-button contact-form-button-submit" id="ContactForm1_contact-form-submit" type="button" value="SEND MESSAGE" /><div class="contact-form-error-message" id="ContactForm1_contact-form-error-message"></div><div class="contact-form-success-message" id="ContactForm1_contact-form-success-message"></div></div></form></div></div></div>

Minimal Contact Form

minimal contact form for Blogger

<style type="text/css">
.contact-form-widget{margin-left:auto;margin-right:auto;width:600px;max-width:100%;padding:25px;background:#fff}.contact-title{text-align:center;font:41px fantasy;color:#121212;margin-bottom:25px}.contactf-name,.contactf-email{float:left;width:47%}.contactf-name{margin-right:6%}.name-icon img,.email-icon img{background:transparent!important;border:medium none!important;box-shadow:none!important;padding:11px 0!important;width:16px !important;height:16px !important;}.name-icon,.email-icon{position:absolute;z-index:1}.contact-form-name,.contact-form-email,.contact-form-email-message,.contact-form-name:hover,.contact-form-name:focus,.contact-form-email:hover,.contact-form-email:focus,.contact-form-email-message:hover,.contact-form-email-message:focus{width:100%;max-width:100%;margin:0 0 25px;padding:10px 10px 10px 25px;font:bold 16px cursive;text-shadow:0 1px 2px #ddd;color:#121212;background:transparent!important;border-color:#121212;border-width:0 0 2.5px;-webkit-box-shadow:none;-moz-box-shadow:none;box-shadow:none}.contact-form-name,.contact-form-email{height:40px}.contact-form-email-message,.contact-form-email-message:hover,.contact-form-email-message:focus{padding:10px!important}.contact-form-email-message{height:150px;border-width:2.5px!important}.contact-form-button-submit,.contact-form-button-submit:hover{background:#121212!important;width:30%;height:37px;font:bold 13px "Lucida Grande";letter-spacing:2px;color:#fff;text-align:center;border:medium none;cursor:pointer;display:block;margin:0 auto;outline:none}.contact-form-cross{border:medium none!important;box-shadow:none!important;padding:0!important;width:11px !important;height:11px !important;}
</style>
<div class="widget ContactForm" id="ContactForm22"><div class="contact-form-widget"><h2 class="contact-title">Get in touch.</h2><div class="form"><form name="contact-form"><div class="contactf-name"><div class="name-icon"><img src="https://blogger.googleusercontent.com/img/b/R29vZ2xl/AVvXsEie8AmFJUXNBxOLGf0J6p0jbOy2ikxKO4h6O9qHDABb8GppIItOH1a8Bd7gwxtDSJMH8TeNKp3BW369mITS_-DFmvxyUmxZdili2ZFsCWFJ4flDEpBmaHki23tItSMS1u0YRx8MRUBnXJXp/s1600/avatar%25281%2529.png" width="16" height="16" /></div><input class="contact-form-name" id="ContactForm1_contact-form-name" name="Name" size="30" type="text" value="Name" onblur='if (this.value == "") {this.value = "Name";}' onfocus='if (this.value == "Name") {this.value = "";}'  /></div><div class="contactf-email"><div class="email-icon"><img src="https://blogger.googleusercontent.com/img/b/R29vZ2xl/AVvXsEii6lajfCShiTmxJawxzyaUdPuEa56hDMPJH2VOiFrpAKcgnTsz7os-RDrzoSO-GSDgFnSEkWaE1lQi0_yEDHPPTKxEwxW53UWNGIMQHQ5koxcHhMVI0t_6Z3tCBTyXwK71aAPMlr9Fa3A8/s1600/envelope%25281%2529.png" width="16" height="16" /></div><input class="contact-form-email" id="ContactForm1_contact-form-email" name="E-mail address" size="30" type="text" value="E-mail address" onblur='if (this.value == "") {this.value = "E-mail address";}' onfocus='if (this.value == "E-mail address") {this.value = "";}'/></div><div style="clear:both"></div><div class="contactf-message"><textarea class="contact-form-email-message" cols="25" id="ContactForm1_contact-form-email-message" name="Type your message here..." rows="5" value="Type your message here..." onblur='if (this.value == "") {this.value = "Type your message here...";}' onfocus='if (this.value == "Type your message here...") {this.value = "";}'></textarea><input class="contact-form-button contact-form-button-submit" id="ContactForm1_contact-form-submit" type="button" value="SEND" /><div class="contact-form-error-message" id="ContactForm1_contact-form-error-message"></div><div class="contact-form-success-message" id="ContactForm1_contact-form-success-message"></div></div></form></div></div></div>

Contact form with speech bubble


<style type="text/css">
.contact-form-widget{margin-left:auto;margin-right:auto;width:600px;max-width:100%}.contactf-name,.contactf-email{float:left;width:50%}.contact-form-name,.contact-form-email,.contact-form-email-message,.contact-form-name:hover,.contact-form-name:focus,.contact-form-email:hover,.contact-form-email:focus,.contact-form-email-message:hover,.contact-form-email-message:focus{width:100%;max-width:100%;margin:0 0 15px;padding:10px;font-size:14px;color:#777;background:#E2DEDB;border:1px solid #CBC7C4;-webkit-box-shadow:none;-moz-box-shadow:none;box-shadow:none;-webkit-border-radius:20px;-moz-border-radius:20px;border-radius:20px}.contact-form-name,.contact-form-email{height:33px}.contact-form-email-message{height:130px}.contactf-message{position:relative}.contactf-message:after,.contactf-message:before{border-bottom:50px solid transparent;border-left:80px solid #E2DEDB;bottom:-32px;content:'';position:absolute;right:50%;margin-right:-100px}.contactf-message:before{border-left:80px solid #CBC7C4;bottom:-34px;right:50.3%;margin-right:-101px}.cbluebutton{margin-top:25px;width:30%;height:35px;float:right;font-size:15px;color:#fff;display:inline-block;text-align:center;background:linear-gradient(to bottom,#339ad9 0%,#224bbc 100%);box-shadow:0 1px 1px rgba(34,75,188,0.5);border:0;-webkit-border-radius:20px;-moz-border-radius:20px;border-radius:20px}.cbluebutton span .contact-form-button-submit{background:linear-gradient(to bottom,#52b1e2 0%,#397fd0 100%);font:bold 16px "Helvetica Neue",sans-serif;height:35px;width:100%;color:#FFF;text-shadow:0 1px 1px #224BBC;display:inline-block;box-shadow:0 1px 1px rgba(255,255,255,0.3) inset;cursor:pointer;outline:none;-webkit-border-radius:20px;-moz-border-radius:20px;border-radius:20px}.contact-form-button-submit:active{top:1px;outline:none;-webkit-box-shadow:none;box-shadow:none}.contact-form-cross{border:medium none!important;box-shadow:none!important;padding:0!important;width:11px !important;height:11px !important;}
</style>
<div class="widget ContactForm" id="ContactForm22"><div class="contact-form-widget"><div class="form"><form name="contact-form"><div class="contactf-message"><textarea class="contact-form-email-message" cols="25" id="ContactForm1_contact-form-email-message" name="Message" rows="5" value="Message" onblur='if (this.value == "") {this.value = "Message";}' onfocus='if (this.value == "Message") {this.value = "";}'></textarea></div><div class="cbluebutton"><span><input class="contact-form-button contact-form-button-submit" id="ContactForm1_contact-form-submit" type="button" value="Send" /></span></div><div class="contactf-name"><input class="contact-form-name" id="ContactForm1_contact-form-name" name="name" size="30" type="text" value="Name" onblur='if (this.value == "") {this.value = "Name";}' onfocus='if (this.value == "Name") {this.value = "";}'  /></div><div class="contactf-email"><input class="contact-form-email" id="ContactForm1_contact-form-email" name="email" size="30" type="text" value="E-mail" onblur='if (this.value == "") {this.value = "E-mail";}' onfocus='if (this.value == "E-mail") {this.value = "";}'/></div><div style="clear:both"></div><div class="contact-form-error-message" id="ContactForm1_contact-form-error-message"></div><div class="contact-form-success-message" id="ContactForm1_contact-form-success-message"></div></div></form></div></div>

5. After you added the code, click the "Publish" button on the upper right side. Now you should be able to see the Blogger contact form live on your static page. To ensure that everything works fine, you can send a message as a test. The message should be delivered to your inbox in a matter of seconds, just make sure that you're checking the email that you're using with your Blogger account.

Frequently Asked Questions about the Custom Contact Form for Blogger

Where do the messages go?

Once a visitor asks a question or sends feedback through the Blogger contact form, it is instantly delivered to the email associated with your Blogger account. If a blog has several administrators, then all the individual administrators will receive the comments or questions asked by the visitor.

What is the benefit of using a separate "Contact Us" page?

Even though it all comes down to your personal preferences, your blog will look more professional if it has a separate page for the custom contact form for Blogger. It gives you credibility and also offers you the chance to add a specific call to action in the new "Contact Us" page.

Is it possible to add extra fields?

Unfortunately, no. You can't add custom fields such as website, phone number or mailing address since Blogger uses special tags in order to transfer data. In any case, the default fields are well laid-out and will help you to get the basic information you need about your visitors.

I have installed the Blogger contact form, but it is not working. What could be the problem?

There are several reasons why you may be having trouble setting up your contact form. The simplest way to troubleshoot is to countercheck the email you linked to the blog and also reinstall the form again.

Ultimately, by using the custom Blogger contact form you gain from consistency in the type of information you request and also reduce spam since you will not have to display your email directly on the blog.
How To Start Blogging - Full Guide To Become A ProBlogger

How-to-start-blog-101helper


There is nothing new which I am going to tell you about blogging in this post. Its just a path for those who are new to blogging and in this post I will tell you how to start blogging, how to build audience, how to choose niche for your blog, how to get your blog on search engines, how to start earning and how to become a professional blogger. So we have following topics in this post.

Topics(You Can Jump To Certain Topic By Clicking On It):

1. How to choose niche / Topic for my blog?

2. What should I choose as blogging platform(Wordpress Or Blogger)?

3. How to create / start a blog ?

4. How to build audience for my blog ?

- Social audience

- Webmaster tools

- Search engine optimization

- Email audience

5. How to earn money from my blog ?

6. How to upgrade my blog to domain ?

1. How to choose niche / Topic for my blog?

Choosing a niche for your blog is actually the base on which your blog will stand. In case of any mistake you can't be a successful blogger. So before creating a blog you need to decide what you should blog about.

To choose a niche for your blog first you need to search what trending on internet or blog about what you know. For example if you know about how to make money online, start blogging about it. It will surely bring you a big audience. Furthermore if you know about cooking then you can start blogging about cooking and share your recipes with others.

Also if you know about programming you can start a blog about it. But the thing is you must know about the thing about which you are going to start blogging.

So the bottom line is start blogging about something you know or what is trending but first know about it.

2. What should I choose as blogging platform(Wordpress Or Blogger)

Before we judge whether we choose wordpress or blogger for blogging let me share features of both:

Features of blogger:

  • The first feature of blogger is overview where you can see latest updates of your blog such as comments, today page views, total posts, followers and a graph which shows your traffic stats.
  • The second one is post where you can see how many posts are in draft or published. You can edit them here.
  • After posts other option is comments which shows you how many comments you have approved to show and how many are spam.
  • The fourth is Google+ where you can manage where to share your updates whether on your on profile or any page you created on Google+.
  • After Google+ there is another option of stats which describes your blog's traffic briefly. It shows today's traffic, yesterday's traffic, Last month page views, all the time traffic, countries of visitors, the pages they have visited and traffic sources.
  • Other option is earnings, if you have a Google AdSense account your earnings will show up here.
  • A new feature is also added which is campaigns where you can create ads of your posts which will show up in Google searches. It is very easy way to increase your blog traffic but its worth.
  • After campaigns there is a layout option where you can change favicon of your blog, select a navigation bar, add description,title or image to header, edit blog posts settings and add or remove a gadget to your blog. 
  • After layout there is Template option with which you can customize or edit your blog template and can choose another template for your blog.
  • After all options there is a last and very important option of settings which helps you to control posts and comments settings, basic settings, search preferences, language, time zone, date and other.

Features of Wordpress:

  • Build a blog, a full website, or a combo. Personal blog, portfolio, business site — it’s up to you.
  • Start free. Upgrade for advanced customizing or business tools. Or stay free!
  • Add a custom domain to carve out your own space on the web, and manage it right from WordPress.com.
  • Over 25% of the web runs on WordPress. WordPress.com is home to everyone from brand-new bloggers to Time, CNN, TechCrunch, and more.
  • Choose from hundreds of customizable themes, with new additions weekly.
  • Create a mobile-friendly site with a click, or choose from a wide selection of responsive themes that look great everywhere.
  • Get friendly, expert help — our team of Happiness Engineers is standing by.
  • Support is available 24-7 via email and our community forums. For folks with an upgraded plan, Happiness Engineers are available via live chat for real-time assistance.
  • Wordpress's editor is fast, intuitive, and saves your work every few seconds, so you never miss a word.
  • Drag-and-drop images into posts and pages. Create designer-worthy photo galleries. Embed audio, video, and more.
  • Update your site from anywhere with mobile and desktop apps for iOS, Android, Mac, Windows, and Linux systems.
  • Whatever you create on WordPress.com is yours alone. Export your content at any time
  • Automatically send new posts to Twitter, Facebook, and more, and add social tools to help readers share their favorites.
  • Make it easy for new fans to find you with built-in SEO. All you have to do is publish.
  • Learn more about your visitors — where they’re from, what they read, when they visit — with rich, easy-to-read stats.
All the above features are from wordpress.

But In my opinion blogger is better than wordpress. So I would prefer blogger to wordpress because of its easy interface and so much popularity.


3. How to create / start a blog ?

Its very easy to start a blog using blogger. All you need is a gmail account. Here are the steps to create your first blog. You can watch a video too!


(1). Create a Gmail account first and build your profile.

(2). Now go to https://www.blogger.com and sign in to your account.


(3). After signing in you will see below page.


How to create a blog or site on blogger | 101Helper

(4). Click New blog to create blog,when you click it a popup window will open as shown below.


How to create a blog or site on blogger | 101Helper

(5). Now give a title to your blog which will be the name of your blog, and select a url or web link for it. Sometimes your desired urls are not available. Take care of having a title similar to blog's url as it will be helpful for seo( search engine optimization). For example your blog's title is 101Helper then select a similar link as I selected https://www.101helper.blogspot.com

(6). Below the Address option you can see Template which means how your blog will look? there are many templates such as simple, Dynamic, picture windows, Awesome inc, Travel etc. Select one of them which you like, I prefer simple as it looks good.

(7). After filling and selecting your choices click Create blog! Congratulations! your blog is created and ready to use.

4. How to build audience for my blog ?

This is the hard part of blogging because no matter how useful your content is, how meaningful posts are you writing, how better are your writing skills, you can't build a big audience is a day or in a month because it may take a month, 6 months or a whole year. Because building audience doesn't entirely depend on your content because even if you have golden content in your blog you can never get big audience until your posts are social, bookmarked, indexed in search engine results.

So to get a big audience you need to do following things.

- Social audience

To build social audience you need a platform so create a Facebook page, Twitter profile, Google+ page and other social profile if you need them.

After creating your profiles on social networks, share every post of your blog on your social profiles and ask your visitors to like your page, follow you on twitter or Google+ or Pinterest.

You can use gadgets for this, here are some which can bring you followers which really want to read your blog posts.

For Facebook Likes:

➥ Facebook Pop-up Like Box With Lightbox For Blogger

➥ How To Add Facebook Page Plugin/Like Box In Blogger

➥ Animated Slideout Facebook Follow/like Box For Blogger

➥ How To Add Pop Up Page Take Over Follow Buttons In Blogger


For Twitter Followers:

➥ How To Add Twitter Follow Box In Blogger Blog

➥ How To Add Pop Up Page Take Over Follow Buttons In Blogger

➥ Twitter Flying Bird For Blogger

For Google+ Followers:

You can generate your own Google+ follow button as well as you can add Google+ Follow box in your layout.

➥ How To Create Google+ Page And Connect It To Blogger

➥ Social Follow Box Slider Widget For Blogger

For more follow buttons, follow boxes you can search 101Helper!

- Webmaster tools

Webmaster tools are really really important to build a big audience because it is the way by which you tell search engines to send there robots to your blog, scan your site, get your post titles, description, images and links and show them in the search results when a proper keyword is searched by someone.

Here is a picture which will tell you what actually webmaster tools are.

what-are-webmaster-tools

So after creating your blog your first step should be submitting your blog's sitemap to all webmaster tools e.g Google, Bing and Yandex.

Here are some posts that you might like to read:

➥ How To Blogger Sitemap To Google Webmaster Tools

➥ How To Submit Blogger Sitemap To Bing Webmaster Tools

➥ How To Submit Blogger Sitemap To Yandex

- Search engine optimization

After submitting your site to webmaster tools you need to optmize your posts and blog for search engines. Get a seo friendly template for your blog and install it or read out search engine optimizations tutorials to make your blog ready for search engines.

➥ Blogger Seo Tutorals

- Email audience

Growing your email subscribers list can increase your blog's traffic and also promotes your blog. So you should have a feed burner's feed for your site or you can use MailChimp for your blog and send your subscribers emails about your new posts. Here are some posts that I want you to read for email audience.

➥ How To Set Up An Rss Feed For Your Blogger Blog

Later, after setting RSS feed for your blog, you can let your visitors to subscribe to your news letter for new posts.

➥ Email Subscription Widget With Follow Buttons For Blogger

➥ How To Add E-mail Subscription Gadget In Blogger


5. How to earn money from my blog ?

how-to-make-money-blogging

Well most of blogger start blogging just to earn money but I recommend not to add a single ad in your blog until you have at least 150 page views per day because if you have less traffic but still you have ads on your blog, you will not earn good and this will decrease your interest in blogging and at a time you will quite blogging because you will start thinking its a waste of time. So I advice you not to add ads in your blog until you get 150 page views per day.

And after having atleast 150 page views per day you can start earning money from your blog. But the point is "Traffic is money" so never place pop up ads because people never visit a blog which have so many pop up ads. You can install interstitial ads and slider ads etc.

To start earning money read:

➥ How To Earn Money From Blogger Blog

For more tutorials about money go here

6. How to upgrade my blog to domain ?

upgrade-to-com-blogger


Every blogger has a question when he is having success in blogging that "should I upgrade to a domain ?" because most of bloggers think that after upgrading to a domain you can get more traffic and earn more money but this is a wrong concept so the answer is obvious that if your blog is doing well don't upgrade and if you are going to upgrade then start from a domain, don't start blog because the time that you spent on your blog is wasted when you upgrade to domain because you have backlinks from other blogs and social networks and all these are not wasted but they are not of that value that would be when you have a blog not domain.

So in my opinion I advice you to avoid upgrading. But if you still want to upgrade to a domain, follow any of the tutorial on other blogs.

I hope you like this post and you found what you came for. If you have any problem or something is missing in this post you can share it with me in comments below or by contacting me.

Thanks for visiting 101Helper. Share this post with your friends and other bloggers.

Search keywords: How to start a blog, how to create a blog, blogger or wordpress benefits,how to start blogging steps,how to create a free website, how to become a problogger,newbies to blogging,blogger guide,how to use blogspot.

5 Best Pay Per Click(PPC) Ad Networks For Publishers & Bloggers

payperclick-adnetworks-blogger

Although I usually don't write about best ad networks for publishers because everybody has its own opinion about ad networks, some like PPC ad networks and some like eCPM ad networks and some like both, but actually everybody is concerned with the rates and payouts. In my opinion PPC ad networks are better but if you get enough clicks on your ads but eCPM is also good if you have a good traffic.

So in this post I am going to share 5 best PPC (Pay Per Click) ad neworks with you.

1. Adhitz

Adhitz is number 1 because it has a high rate for many countries like US, UK, Canada, Germany and many more. Ads are well optimized and doesn't effect page loading speed unless page is overloaded by many ads. Adhitz allows only 4 ads per page. Also both image and text ads are available.

Although adhitz comes on number in best PPC ad-networks but its payout threshold is high thats why it is not liked by all publishers and bloggers. Another bad thing about adhitz is that its not available in some countries like Nigeria.

Adhitz-ad-rates-for-different-countries

Payment Methods:

1. Paypal - $25
2. Payza - $50

Also payout fee is also applicable which is $1.50 so if you have $25 in your account and you are going to request for a payout, you will get $23.50 in your account.

Ad types:

Adhitz have both image and text ads for publishers and advertisers.

Don't miss >> How To Earn Money From Adhitz In Blogger

2. BitVertiser
how-to-earn-money-from-bidvertiser
BitVertiser is also a PPC ad network. But like Adhitz it doesn't only allow text and image ads but Pop-Ups too. It is easy to get approval, no minimum traffic needed, no domain required. Also BitVertiser allow you to refer other publishers and advertisers to double or triple your earnings.

Ad types:                     Payment Methods:

- Pop Up ads                            - Paypal ($10)
- Image ads.
- Text Ads.

Sign up Now

3. Propeller Ads

Payment Methods:

$100 Via Wire Transfer, Payoneer, Payza.

Ad Types:

OnClick Ads, Video Ads, Mobile Ads on CPM, CPA, CPL and CPC bases.


Sign up Now

4. Revenuehits
Revenuehits also pays for clicks. And its easy to get clicks on revenuehits ads because revenue hits have pop-ups as well as mobile dialog ads. Particularly mobile ads get more clicks and become reason for good earnings so I recommend you to add revenuehits mobile ads.

Payment Methods:

- Paypal ($20)
- Payoneer ($20)
- Wire ($500)

Ad Types:

Display Ads, Text Ads, Pop up/under, Bounce ads

Sign up Now

Don't Miss >> How To Earn Money With Revenue Hits In Blogger


5. Clicksor:

Clicksor_Logo-101helperMinimum Payout:

$50 through check or PayPal.

Ad Types:

In-text and contextual banner ads, Pop under and other text based ads.


Other PPC(Pay Per Click) Ad Networks:

- Google Adsense.
- Media.Net Ads.
- Yahoo! Gemini Ads.
- Infolinks.
- Adseterra.
- Adblade.
- Adcash.
- Adclickmedia.

And many more...

Some of the above ad networks are hard to get approval.

I hope you found this post helpful. If not or you have any suggestion you can leave a comment below. Share it with others and help us spread 101Helper.

Thanks for visiting.

❤ Happy Blogging !

Search keywords: PPC ad networks, pay per click ads for blogger,best ppc ad networks for publishers,5  Best (PPC)Pay Per Click Ad Networks For Publishers & Bloggers,ppc ad networks review 2016,101helper earn money blogging.

List Of Dofollow Directories And Social Networks For Backlinks

increase traffic with high pr backlinks

Its always a problem for bloggers to get Dofollow backlinks because there are only a few websites and blogs that allow dofollow backlinks. So bloggers usually start guest blogging which is a great way to get dofollow backlinks. But the problem is not everyone can guest blog and there are not too many blogs and website which allow or accept guest posts. So I brought you lists of social networks and online directories where you can submit your website or blog links and ultimately improve your blog or site rank within a week. Remember that there is no way to get thousands of backlinks with good page rank in a minute or in an hour, so you need to submit your site to all the directories and social networks manually and one by one.

Though, if you want you can submit your site or blog to about +30 directories and all domains of Google bu using Link Submitter in our SEO TOOLS.

Dofollow Directories List

       
Directory URLPage Rank
http://freetrialcc.com 8
http://urldirecting.com 8
http://www.highrankdirectory.com 7
http://www.sitepromotiondirectory.com 7
http://www.abc-directory.com 7
http://ecesummit.com 7
http://www.multiele.com 7
http://www.digitalfree.net 7
http://www.nbrooks.me 7
http://www.viyeu.asia 7
http://www.boltsa.org 7
http://www.siteswebdirectory.com 6
http://www.marketinginternetdirectory.com 6
http://www.usalistingdirectory.com 6
http://www.dizila.com 6
http://www.ukinternetdirectory.net 6
http://www.gmawebdirectory.com 6
http://promotebusinessdirectory.com 6
http://usgeo.org 6
http://thefocus.org 6
http://ourss.org 6
http://www.vip7star.com 6
http://www.pjcg.net 6
http://kul.li 6
http://a1webdirectory.org 5
http://www.somuch.com 5
http://www.jayde.com 5
http://obln.org 5
http://www.splut.com 5
http://lignol.net 5
http://bellesa.me 5
http://www.gainweb.org 4
http://www.1websdirectory.com 4
http://www.247webdirectory.com 4
http://www.onlinesociety.org 4
http://www.w3catalog.com 4
http://www.nonar.com 4
http://www.submitlinkurl.com 4
http://www.picktu.com 4
http://9sites.net 4
http://www.prolinkdirectory.com 4
http://ananar.com 4
http://www.acewebdirectory.com 4
http://www.happal.com 4
http://www.momsdirectory.net 4
http://www.livepopular.com 4
http://addbusiness.net 4
http://baikalglobal.com 4
http://www.directory-free.com 4
http://pegasusdirectory.com 4
http://bedwan.com 4
http://www.tsection.com 4


Dofollow Social Networks List


Social Networks Page Rank
https://plus.google.com/ 9
http://www.pinterest.com/ 9
http://www.reddit.com/ 8
https://delicious.com/ 8
http://www.stumbleupon.com/ 8
https://www.tumblr.com/ 8
http://www.fark.com/ 7
http://www.scoop.it/ 7
http://slashdot.org/ 7
http://www.bibsonomy.org/ 7
http://www.diigo.com 7
http://www.webseoexpertservices.com/ 7
http://www.newsvine.com/ 7
http://blinklist.com 6
http://www.dzone.com/ 6
http://www.folkd.com/ 6
http://www.bizsugar.com/ 5
http://www.arizonavalueshuttle.org 5
http://www.iesa.co 5
http://youmob.com/ 4
http://qqpipi.com/ 4
http://aixindashi.org 4
http://www.careep.org/ 4
http://www.activaging.org/ 4
http://registertovotetoday.com 4
http://www.activaging.org 4
http://www.careep.org 4
http://www.digitalnatives.co/ 4
http://www.gpone.info 4
http://www.ptquiz.com 4
http://www.usefulenglish.net 4
http://www.airpim.biz/ 4
www.youmob.com 4
http://www.bookmark4you.com/ 4
http://blokube.com/ 3
http://aperfectimage.info/ 3
http://cabaneduvelan.info 3
http://bestouyagames.info/ 3
http://bynu.info/ 3
http://chaoticcoding.info/ 3
http://cocosislandsnews.info 3
http://desert-dwellers.info/ 3
http://guter-punkt.info/ 3
http://jayrigby.info 3
http://jazbomb.info 3
http://jordaninfo.info 3
http://punteglias.info/ 3
http://midascareteam.info 3
http://saintpierreandmiquelonnews.info 3
http://salbithuette.info/ 3
http://sendgift.info/ 3
http://wildernessact.info 3
http://www.emolinks.com 3
http://skinnybikiniswimwear.info 3
http://theineptowl.info/ 3
http://yemle.com 3
http://x-drl.info/ 3
http://www.yemle.com/ 3
http://freeticketopen.com/ 3
http://www.akonter.com/ 2
http://www.indofeed.com/ 2
http://www.addthismark.com/ 2
http://3-peace.info/ 2
http://addthismark.com/ 2
http://epinex.biz/ 2
http://transd.info/ 2
http://what-is-internet.info 2
http://www.braniewo.net/ 2
http://www.postolia.com/ 2
http://milocalbuilder.com/ 2
http://www.indofeed.com/ 2
http://sociopost.com/ 2
bookmarkindonesia.com 2
http://www.sociopost.com/ 2
http://6buk.com/ 1
http://coolpot.com/ 1
http://www.freesbmblog.info/ 1
http://www.socialbookmarknow.info/ 1
http://www.bookmarkinghost.info/ 1
http://www.followmenow.info/ 1
http://www.votetags.info/ 1
http://www.onlinewebmarks.com/ 1
http://www.greateststory.info/ 1
http://www.socialbookmarkzone.info/ 1
http://www.a2zbookmarking.com/ 1
http://www.bookmarkwiki.com/ 1
http://www.newsciti.com/ 1
http://www.bookmarkgroups.com/ 1
http://www.a1bookmarks.com/ 1
http://www.votetags.info/ 1
http://www.bookmarkfeeds.com/ 1
http://1look4.com/ 1
http://bookmarkingbase.com/ 1
http://www.popzu.com/ 1
http://fortunetelleroracle.com/ 1
http://www.windowly.com/ 1
http://999central.com/ 1
http://1look4.com/ 1
http://bloggalot.com/ 1
http://bookmarkbay.com 1
http://grupoprofesional.info/ 1
http://sfcsf.org/ 1
http://simitrustlaw.info/ 1
http://www.sluft.com/ 1
http://www.bookmarkfeed.com/ 1
http://coolpot.com/ 1
http://mettablog.com/ 1
http://6buk.com/ 1
http://social.wikitechguru.com/ 1
http://www.freesbmblog.info/ 1
http://www.bookmarkinghost.info/ 1
http://www.followmenow.info/ 1
http://www.socialbookmarknow.info/ 1
http://www.greateststory.info/ 1
http://www.sscaspirants.com/ 1
http://www.fulldoze.com/ 1
http://uslocalbusiness.com/ 1
http://www.businesscyclone.com/ 1
http://www.americansview.com/ 1
http://www.uscommon.com/ 1
http://www.watchdogarea.com/ 1

If any link is not working, please help me know. If you know about any directory or social network which provide dofollow backlinks then please let me know. I hope you like this post and found it helpful. Share it with your friends!

Search Keywords: Top 10 Dofollow Social Media Sites For Backlinks, Dofollow Social Bookmarking Sites 2016, Top 10 Social Media Sites to Get Dofollow Links,get dofollow backlinks for blogger blog, how to get dofollow backlinks, pr 6,7,8,5,4,1,2 backlinks for websites,submit site to directories and social networks

How To Install "HotJar" Feedback Widget In Blogger

how-to-install-hotjar-feedback-widget-in-blogger

Most of blogger think why should I add a feedback widget in my blog, it is not of any use, it will slow down my site, I don't need it because i just own a blog not a big website so I don't need to get feedback of my visitors etc. But its absolutely wrong. Feedback widget is very important whether you own just a blog or a big website. Its because it will tell you about your blog's content, design and how users are experiencing your blog and how can you improve your blog's content and design if something is not liked by visitors.
Because your blog is for your visitors and they spend their time on your blog and visit your blog, its your responsibility to provide them such a good content and design that they never get any difficult and visit your blog again and again and also share it with others. But as I mentioned people will like your blog only when you improve your content, improve your design, improve user experience. And to improve your blog you need to know what are those things that are affecting your site and the only way to know that is to talk to your visitors because they know better than you about how they want the content to be and how the design should be.

So feedback widget is very very important to get feedback from your visitors and improve your site. So in this post I am going to show you how to install "HotJar" feedback widgets in blogger. And after installing this widget you will be able to get response from your visitors about your site and if there is something that is affecting your site you can fix it and improve your site.

First let me tell you something about Hotjar and after that I will show you how to use HotJar in your blog.

Plans And Pricing:

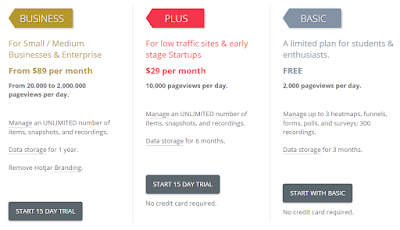
Starting with plans and pricing, HotJar allows your to upgrade to a plus or business account which starts from $29 to $89 but it also allow users to use their services for free within some limitations. You can read more about it in the image given below.

hotjar-feedback-surveys-polls-widgets-for-websites-blogs

Features Of HotJar Widgets:

After discussing about plans and pricing,  let me tell you about features of HotJar widgets:
  • It is available for free for small blogs and for big websites. Premium services are also available.
  • With Real time analytics get responses from visitors in seconds.
  • Easy to install, easy to use and easy to manage widgets.
  • You can install both Feeback polls and Survey widgets.
  • 100% customizable widgets. 
  • No render scripts and doesn't affect site loading speed.
  • Cookies managing.
  • Optimized for mobile phones.
  • Can be used for other platform like wordpress, Joomla, Weebly etc.
  • Add more than one website per account.

How To Create A HotJar Account ?

STEP 1: Go to HotJar and click on Try it for free !

STEP 2: Fill in your Full name and Email address and click on Let's get started.

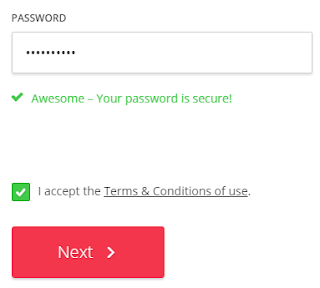
STEP 3: Type your password, make sure to use:

One lower character.
One UPPER character.
One special character e.g ! @ # $
One number.

And your password should be of 8 minimum characters.

STEP 4: Check the Terms and Conditions box and click on Next.

how-to-create-hotjar-account

STEP 4: Select your roll as other and choose "NO" where you are asked "WILL YOU USE THIS ACCOUNT TO MANAGE CLIENTS ?" and finally type your blog's name and click on Next.

how-to-use-hotjar

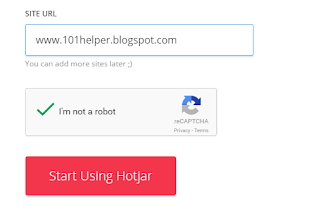
STEP 5: Type your blog or site URL and prove you are Human and Start using HotJar !

hotjar-feedback-widgets-for-blogger-wordpress

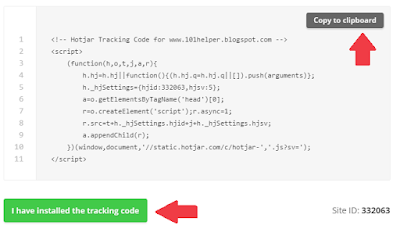
This was it. Now you can create your first feedback widget with HotJar. But its time to add the tracking code in your blog's template. So click on Copy To Clipboard and go to blogger > Template > Edit Html and just above <head/> paste the copied code.

how-to-create-a-hotjar-account

Final Step!Click on the green button shown in image image and Verify Installation.

verify-hotjar-account


How To Create Feedback Widget With HotJar For Blogger ?

Well its quite easy to use HotJar, though it seems difficult but its same as Addthis or Hellobar.

Follow below steps to create your first Feedback widget using HotJar.

STEP 1: Login to your HotJar account.

STEP 2: Click on Polls in the menu on left side.

STEP 3: Click on + New Poll button.

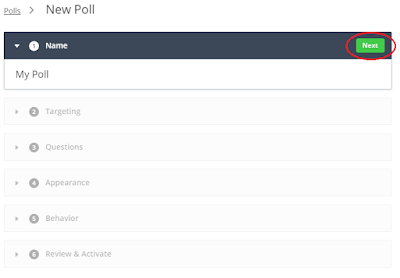
STEP 4: Type name of your Poll and click on Next.

how-to-create-feedback-widget-for-blogger

STEP 5: Set Targeting Rules e.g on which devices you want to show your feedback widget and on which devices and pages you want to hide it.

how-to-set-targetting-in-hotjar-widgets

For more specificity click on "On page I specify" and choose any option which you want. For instance if you want to hide your feedback widget in static pages e.g contact, about, sitemap then choose "URL CONTAINS" and after that type "/p" in the text box as shown in below image:

how-to-set-specificity-in-hotjar-widgets.png

Click on the Next button to proceed...

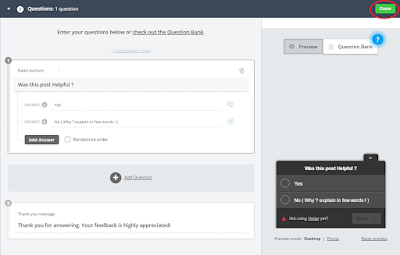
STEP 6: Type a question which you want to ask your visitors. As an example I am asking "Was this post Helpful ?".

In the next question there are options which are asking for email address of visitors so that you can get back to them about the problem they are facing on your blog.

You can delete this question by clicking on the remove icon. You can also add more questions and options. You can see a live preview of your widget on the page.

After customizations proceed to next step by clicking on Done button.

how-to-add-survey-widget-to-blogger

STEP 7: Later steps are Appearance of your widget, Behavior of your widget and final one is to activate your widget. You can do these steps easily so I am not showing them here.

how-to-use-hotjar-for-blogspot.png


I hope you found this post helpful,  if you have any problem related to this post or other posts contact me or ask me in comments.

What Else Can You Do With HotJar ?

HotJar is not only a feedback plugin but you can do alot of other things with Hotjar. Here are the things which you can do with HotJar:

HeatMaps: Its definitely a new thing that you must haven't heard before. Heatmaps are actually a way to record where on your pages do visitors mostly click. So you can place your ads there.

Visitor's Screen Recording: Its also a new thing in the world of analytics and Google also do not allow you to record your visitor's screen. But its in a limit, you can record your visitor's only when they are on your blog or website. So you can see what they are doing on your site. You can use these recordings to improve your site as well as you can place your ads in the most clickable areas of your page. You can do alot of things with recordings.

Surveys: Its already mentioned above that with HotJar you can get survey from your visitors about anything. You just need to create your widget as you created by following above tutorial.

Forms: You can create forms with Hotjar too.

Don't miss: How To Design Contact Form For Blogger Contact Page

Recruiters: You can design and setup responsive forms and let your visitors to sign up in your website as an author or anything else.

Search Keywords: How to add feedback widget in blogger, how to add survey widget in blogger, how to record visitors screen, how to know where visitors click on your website page, how to track visitors click on page live, how to add hotjar plugin in blogger,101helper.