Showing posts with label Bugs and Errors. Show all posts

Open Live Writer: Fix Blogger Login Errors

Fix All Blogger errors inside Open Live WriterCongratulations! You can now successfully connect Open Live Writer to Google Blogger.

Windows Live Writer's clone, the Open Live Writer (OLW), was officially updated yesterday with Google's OAuth 2 modern authentication system. The Blogger accounts login errors or credential connection issues have been fixed and solved. Some bugs still exist when it comes to multiple blog posting, post formatting and assigning labels to your posts. We have figured some tweaks to troubleshoot all these minor errors to make sure you connect your BlogSpot blog with Open Live Writer correctly without facing any future troubles.

This is our first blogger post published with Open Live Writer! =)

Note: Click the Button below to see full list of topics under discussion.

OLW Topics List

1. Fix Login Connection Errors

The Volunteers at Microsoft has released a new version of OLW that has fixed the connection issue. OLW now works fine with Google Blogger v3. I have included below the direct link to the team's frequently updated setup copy called "Nightly" which contains several unrelased features that you can try out. Download the latest version from the link below:

During the installation you will now see a separate option entitled as "Google Blogger"

Blogger Option in Open Live Writer

 Note: I will publish a detailed post on how to setup Blogger with OLW correctly in next 24 hours.

2. Fix Remote Server Errors

OLW will publish your first post without errors but sooner as you try to publish a second post or Close OLW and the reopen it to publish a new post, you will encounter the following error during publishing:

The remote server returned an error: (403) Forbidden.


The remote server error is caused because OLW is not able to remember your blog account's password. To fix this issue follow these steps:

1 Go To File > Options > Accounts

Open Live Writer Options

2 Select your preferred 'Blog' and then click Edit
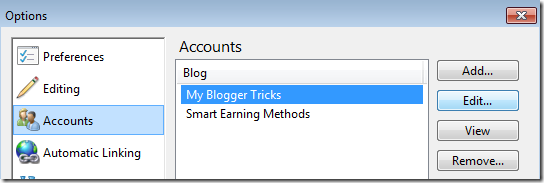
Select your Blog

3 You will observe that the Password field is empty or set to null. You
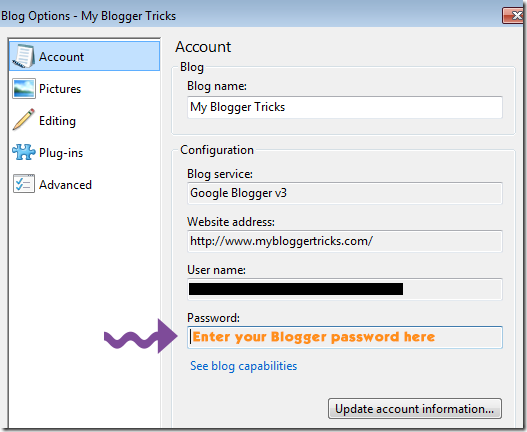
Empty Password Field

4 Click the button "Update account information"

5 Enter your Gmail password inside the password box and also check "Remember my password".
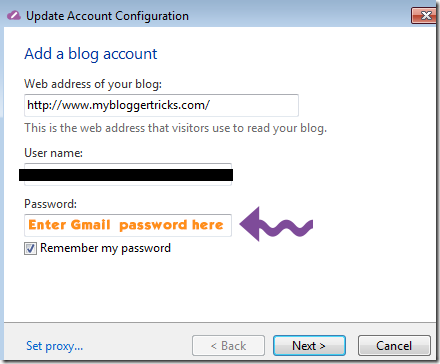
add password again

6 Hit "Next" and your blog theme will be updated!

Thus this stops the server errors from promoting again and OLW will remember each time what your blog password is.

Note: If you encounter this error again then it means you had not chosen the option "Remember my password". Repeat the process again to sort it properly.

3. Fix Label Issue

Note: The Label option is only available in the Nightly download copy that we shared above. It is not present in the official release copy. Therefore you may download OLW using the link we provided above.

Windows Live Writer has a tagger tool, on clicking which all your blog labels are displayed inside a drop down menu. You can then select a Label easily to set your post categories.

blog category list

WLW also helps you easily add new categories or labels in blogger.

add a category


But in Open Live Writer you need to manually add or set the Labels for your blogspot post. There exists no automatic way to display full category list for blogger although it exists for Wordpress and other platforms. However there is an easy old traditional work around to apply labels to your post inside OLW.

OLW displays this old-school "Category Box" above your blog post.

category field

(a) Set category in OLW for your blogger blog

Blogger labels are case sensitive, any mistake in uppercase and lowercase letters could lead to error but OLW has handled this problem quite smartly. You don't need to bother about letter casing while assigning labels to your posts in OLW.

For example if your blogger label is "Affiliate Marketing" , you can easily set this label to your post inside OLW by writing "affiliate marketing" or even "affiLiatE MARKETING" , no matter what you write as long as the spelling is correct, OLW will assign the label correctly.

To set multiple labels to a blog post, comma separate labels inside the "Category box" . As shown below:
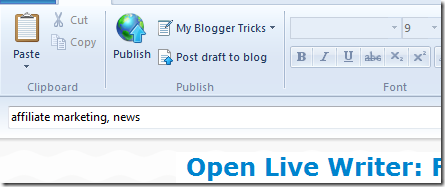
adding labels

(b) Add New Labels To Your Blog using OLW

You can also create new labels inside Open Live Writer to assign to your blog posts.

Simply write down your new Label inside the "Category Box" and publish your post to Blogger! That's it.

creating new label

Bingo! New Label created and added successfully to your blog post!

4. Fix Formatting Errors

Just Like WLW, Open Live Writer also makes unnecessary editing changes by replacing hyphens with dash, double quotes with smart quotes, test smileys with graphical emoticons and so on. This creates a serious formatting error in your code if you share scripts or HTML inside your blog posts as tutorials. To fix these errors do this.

1. Go To File > Options > Editing.

2. You may uncheck all these boxes. Especially the first two.

Uncheck all editing options

3. Done!

Need Help?

This was a quick post to help you troubleshoot some of the most common errors blogger users are encountering currently. I hope this post proves helpful for most of you. Let me know if you need any help with regard to any part of the tutorial above. What other errors could you report? Are you facing any error that we have not discussed above. Kindly let us know so that we may include it in the list above. Start posting happily now during these holidays with your new Blogging friend i.e. Open Live Writer. =)

2 ways To Fix XML Parsing Errors in Blogger

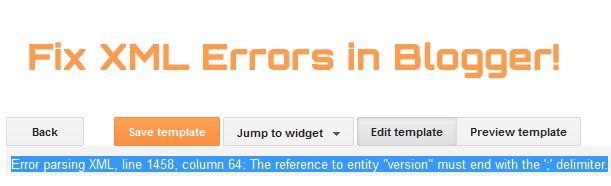
fix XML errors in blogger editorMost often when you insert a Facebook JavaScript or AdSense JavaScript in your blogger template editor, you often come across XML Parsing errors that prompts and says "The reference to entity "version" must end with the ';' delimiter." Blogger blogs are coded in XHTML and  XML is quite strict in following correct syntax formatting than HTML. XML is surely unforgiving in this case. Blogger interprets all your document as XML rather than as HTML. XML is PCDATA (Parsed Character Data) by default which means that XML parsers will normally parse all the text in a document. As a result when we insert JavaScript inside blogspot templates, all script inside the JavaScript tags is treated as a text and due to the presence of some illegal special characters like "<" , ">" and "&" , you often face the following error:


Error parsing XML, line 1458, column 64: The reference to entity "version" must end with the ';' delimiter.

error parsing xml in blogger

What are the special characters in XML that causes error?

XML is a human readable form of textual data. It parses all the text in a document and gives errors for the following 5 special characters:

  1. (<)  - less than

  2. (&) - ampersand

  3. (>) - greater than

  4. (")  - double-quote

  5. (')  - apostrophe or single-quote

The following three are more crucial:
  • "<" will generate an error because the parser interprets it as the start of a new element.
  • ">" will generate an error because the parser interprets it as the end of a start-tag or an end-tag
  • "&" will generate an error because the parser interprets it as the start of a character entity.

Two ways to fix XML errors in Blogger

XML errors can be avoided by using two methods:

  1. Use CDATA
  2. Escape HTML entities


1. Use CDATA

The term CDATA refers to (Unparsed) Character Data which is used about text data that should not be parsed by the XML parser. To avoid errors, all script code is enclosed inside a CDATA section. Everything inside a CDATA section including the 5 special characters is ignored by the parser.

A CDATA section starts with "<![CDATA[" and ends with "]]>":

Next time when you add your Facebook code, enclose it inside CDATA as shown below:

<script>
//<![CDATA[

(function(d, s, id) {
  var js, fjs = d.getElementsByTagName(s)[0];
  if (d.getElementById(id)) return;
  js = d.createElement(s); js.id = id;
  js.src = "//connect.facebook.net/en_US/sdk.js#xfbml=1&version=v2.3&appId=";
  fjs.parentNode.insertBefore(js, fjs);
}(document, 'script', 'facebook-jssdk'));


//]]>
</script>

All your script code will exists inside the CDATA and blogger editor will not parse the script code and thus wont give any errors.

The reason why Facebook script gives errors in blogger is due to the presence of a special character (&) that is used before the variable "version" as highlighted in the code above. "&" will generate an error because the XML parser interprets it as the start of a character entity and thus it prompts an error that says:

The reference to entity "version" must end with the ';' delimiter.


2. Escape HTML entities

Another simple method is to escape all 5 special characters and instead use the legal characters as alternatives to the above 5.

  • Replace < with &lt;
  • Replace  > with &gt;
  • Replace  "  with &quot;
  • Replace  '  with &#039;
  • Replace  & with &amp;

PS: Note how every alternative character set ends with a delimiter (;)

This method will help you encode your AdSense code and paste it inside your template without errors. It will also help you paste HTML code inside blogger comments!

This method is also called as HTML encoding and we have built a Special tool for this purpose to help you encode HTML characters with ease.

Need Help?

I hope now you will be able to add social media plugins and third party scripts inside your blogger templates without any errors. Do let me know if you need any further assistance or clarification on any point. Would love to give a hand buddies! =)

Twitter Button adds a horizontal scrollbar to the page - [FIX]

twitter follow button causing horizontal scrollingRecently more and more people are experiencing problems with poor social media plugin UI. Twitter Follow button despite being mobile responsive messes up the site design by adding a long Horizontal Scrollbar to the bottom of the page temporarily for a few seconds and then it disappears. The Follow button is forcing the entire webpage to scroll horizontally. You might have seen a long green scrollbar at the bottom of our blog too. Upon debugging the site I found that the scrollbar was actually caused by the Twitter hub.html frame that renders within our site.

According to its developer benward the positioning of the hub frame is purely vertical (negatively positioned above the top of the page) however for some reasons we found that the webpage is forced to change its width dimensions. I have a simple fix for this bug that will prevent the Hub Iframe from exceeding a specified Parent container width size.

Prevent Hub Iframe From Causing a Horizontal Scrollbar

I am sharing the steps for blogspot blogs. The method described below is a standard procedure that applies to all platforms.

1 Go To Blogger > Template > Backup your Template

2 Click Edit HTML

3 Paste the following Style just above ]]></b:skin>

Simple Enclose your twitter Follow button Code inside the following Parent container

.twitterButtonFixmbt {position:absolute; overflow:hidden; max-width:300px;}

4 Save your template


Now enclose your twitter button code inside these Div tags

<div class="twitterButtonFixmbt ">

ADD Twitter Follow button code or Tweet button code here

</div>

That's it!

How it works?

I have enforced a maximum width of 300px and you can surely change it as per your container width. The position absolute and overflow properties along with max-width will make sure the Iframe doesn't exceed the prescribed Parent Dimensions.

Let me know if you needed any help. Peace and blessings buddies :)

Drawbacks of JQuery Lazy Load Plugin For Posts and Images

Lazy Load For blogger blogsJquery and CSS3 has enabled front end developers and even designers to create amazing effects but unless you check the compatibility of the code, never play with such plugins and tools because there are still people who don't use JavaScript in their browsers and your blog will look no less than a mess to them. This effects both your readership and blog pageviews. We are observing a growing trend of Jquery implementation on both Blogger and Wordpress blogs. A Famous known plugin is Lazy Load for images (inspired from Yahoo plugin) and Lazy Load for blogger posts (Also called infinite scrolling). Lazy load for images delays loading of images in long web pages and makes the page load faster, on the other hand Infinite Scrolling plugin for Blogger keeps on loading posts as you scroll down the page just like you scroll down to load more tweets in twitter.

Note: Jquery is a library of JavaScript which is a simplified version JavaScript. It simplfies calling complex functions and saves time.

Most of MBT readers often complain why we don't publish such plugins and why we don't write tutorials on blogger Dynamic Views. The answer is simple, we are very careful when we suggest widgets and resources to our readers and we will never encourage them to apply a script on their blog that may cause harm to them in one way or the other. Even a Google employee himself commented on our post when we openly discouraged readers not to apply Dynamic views unless they are willing to accept its pitfalls behind the attractive AJAX look.

One of the bitter truth is that blogs using Dynamic views don't even load if JavaScript is disabled on a page! Imagine those thousands of views that you might be loosing because of using a Jquery script that does not take care of what-to-do if-JavaScript disabled scenarios. Today I will talk from development perspective and I really recommend that you read and understand this post clearly and clear your doubts.

How to view your blog by disabling JavaScript?

In order to check if your blog at least is loadable and provides fair interface to your visitors with JavaScript-disabled browsers, I will guide you by giving several examples. Lets take an example of the Gmail blog which uses the Jquery Easy Load effect and also runs on a Dynamic Theme.

What did you observe?

You observed a lazy loading effect as you kept on scrolling down. The posts kept on loading infinitely. Interesting isn't it? But now lets viist the same blog with JavaScript enabled.

Disable JavaScript:

For simplicity I am assuming you are using Google Chrome Browser. Following these steps to disable JavaScript in chrome.

  1. Go To Settings
  2. Click Advanced Settings
  3. Click Content settings under Privacy
  4. Then inside the popup window you will find an option to turn Off  JavaScript as shown in the image below:

Turn Off JavaScript in chrome

   5. Hit the Done button

Now visit the same Gmail blog again. Refresh the page and tell me what do you see?

You see a blank page! This explains everything to you. In Custom Blogger templates which are using Infinite Scrolling effect and if JavaScript is disabled by user then only the first post or second post will display and the remaining posts wont even show up on your homepage . Consequences are such that you lose precious Page Views.

What would you see on blogs where Image Lazy load effect is used?

You will see only first image or second image being displayed the other image wont event appear. If the plugin developer was clever enough to set conditional statements for JavaScript Disabled browsers, all your images will display just fine else your readers would be lost with no image being displayed.

When and How to use JQuery?

With all that being said, we leave the decision on you whether you wish to use this trending Loading effect for your blogger posts/image or not, but at least this explains now why we don't write tutorials on such tools.

You can surely add Jquery to add some cool effects to your blog design as long as the object using it loads fine even if JavaScript is disabled. Normally you can use JavaScript to create widgets like Recent comments, Popular Posts, Related Posts etc. because even if they don't load, they will at least not return a blank Page or effect your pageviews.

If you are developer then I recommend to add conditions to how your code may react in case of No JavaScript support. Instead of using just the display:none property in your stylesheet also add an extra div section for your object and control its behaviour using JQuery. Follow this Psedudo code:

If JavaScript Supported

Do this

Else

If JavaScript not supported

Do this

Now you would wonder how to check whether a browser supports JavaScript or not. If a browser supports it then it will surely execute the code else it wont. So if you don't want a div section to display when Jquery is supported simply add display:none property to it using Jquery AddClass() function. This Jquery function won't execute if JavaScript is disabled and thus the div section will show up correctly on screen  but this div section will not display if Javascript is enabled because the Addclass() function will execute and hide it on screen. That's how I personally handle this problem. You can surely apply different logics.

An Honest Advice:

The number of internet users are turning into publishers at a fastest rate, therefore you must be careful when applying a tutorial to your blog and extra careful when the tutorial talks of Jquery and SEO. I am observing baseless SEO tips coming from new bloggers that causes more harm to blogs at long term then a short term relief. Almost every new blogger has started sharing his own ideas of SEO and writing codes. This is surely encouraging but on the other side incorrect knowledge has caused several blogs to be hit by Google penalties such as Panda and Penguin. Be extra careful whom you read and follow. I am here for any help you may need and wish to hear your views on this topic. Wish you good health and peace buddies. :)

The same problem is seen with latest GooglePlus comments Plugin!

Fix Duplicate Meta Description Error in Posts and Homepage

Duplicate meta descriptionsThis is a quick post on a crawling error that was causing issues for most of you. For over a year we were all scratching our heads on why Blogger is showing two meta descriptions for homepage and post pages. Webmaster tools shows duplicate meta description error for blogger homepage and individual item pages that are posts. If you view your blog's source file then you will find two meta descriptions for the same page. One below <head> tag and one just above <title> tag. This double occurrence of meta tags for description appeared when blogger introduced Search preferences last year that offered blogspot users to insert dynamic description for every post they publish. This option is present inside Blogger's Post editor as "Search Description".

How to fix duplicate Description error?

Last year we shared the code that will install dynamic search description option even in custom templates. If you are using that code then its extremely easy to fix the error. If in case you have not yet added that code or you use Blogger Template's styles then you may simply add the code I will share in today's tutorial.

Follow these easy steps:

  1. Go To Blogger > Template
  2. Backup your template
  3. Click Edit HTML
  4. Search for the following code:

<b:if cond='data:blog.metaDescription != &quot;&quot;'>
  <meta expr:content='data:blog.metaDescription' name='description'/>
</b:if>

  Note: If you can not find this code then do not panic and skip this step and follow step#5.

    5.  Now replace the above code with following set of codes:


<b:if cond='data:blog.pageType != &quot;index&quot;'>
      <b:if cond='data:blog.pageType != &quot;item&quot; and data:blog.pageType != &quot;static_page&quot;'>
        <b:if cond='data:blog.metaDescription != &quot;&quot;'>
          <meta expr:content='data:blog.metaDescription' name='description'/>
        </b:if>
     </b:if>
    </b:if>

Note: For those of you who could not find the code in step#4, then you may simply copy the above code (in step#5) and paste it just below <head>

  • The purple code will disable duplicate occurrences on homepage and Search/Archive pages
  • The green code will disable duplicate occurrences on Post Pages and Static pages
       6.  Save your template and you are all done!Now visit your homepage or any post page and click CTRL + U to check its source file. You will find only one occurrence of meta description. :)  

Need help?

I hope this improvement will further optimize your blogspot code structure and will help robots to better crawl and index your content. Please let me know if you needed any help. A great surprise is coming for those who live in our city. We are coming in public again with several new business strategies and ideas. Would love to see you guys this time. Peace and blessings buddies :)

Copied Text ending with #sthash in Blogger - Fix

removing copynshareJust recently many readers complained that copying text from BlogSpot and wordpress blogs is resulting with some text ending with a "- See more at:" string followed by the URL of the page or A unique #hashtag is appended to your URL. The same problem was present with our blogs too. Many readers complained that the tutorials are no more working. This problem is occurring due to the latest integration of CopynShare addon of ShareThis plugin in Blogger blogs. If you are using any widget powered by sharethis or using our Floating Share bar then you must be experiencing the same problem. Follow this simple tutorial to disable or uninstall the CopyNshare widget from your wordpress or blogger blog.

What is CopyNshare?

Just like Tynt Publisher tool that tracks social activity on your site, ShareThis team introduced CopyNShare widget using which you can track all the sharing that occurs when a user copies and pastes your website’s URL or content. Blogspot domains copied were ending with #sthash and some random extension like dpbs or dpuf.

Uninstall CopyNShare in Blogger

In order to keep using ShareThis sharing counters but deactivate the tracking feature then you must follow these easy steps:

  1. Go To Blogger > Template
  2. Backup your template
  3. Tick the box "Expand widgets templates"
  4. Search for the following similar code:

<script type='text/javascript'>stLight.options({publisher: "xxxxxxxxxxx-xx-xxxx"});</script>

or simply find this:

stLight.options

Now replace this entire script with the following code:

<script type='text/javascript'>stLight.options({onhover:false , doNotHash: true, doNotCopy: true, hashAddressBar: false});</script>


   5.  Save your template and you are all done!

Now your readers will not see a - see more text added to content copied from your blog.


Disable CopyNShare in Wordpress

In wordpress the steps are much easier.

  1. Go To Plugins > ShareThis
  2. Simply uncheck the option that says "Enable CopyNShare Beta"

copyNshare settings

For more details on enabling or disabling extra features linked with ShareThis plugin please read: Installing Sharethis on Wordpress

How this works?

In the above script for ShareThis light options I simply inserted some variables which are:

  1. doNotHash: true
  2. doNotCopy: true
  3. hashAddressBar: false
  • doNotHash: This variable is set to true so that no attribution link is added to content copied from your blog. If in case in future you would like the tracking feature to work again then simply set it to false.
  • doNotCopy: Disables the pasting of "See more: yourURL.com#SThashtag" after a user copies-and-pastes text
  • hashAddressBar: This will deactivate the tracking of URL copying.

As simple as that. Let me know if you needed more help. Apologies for the inconvenience caused to all our readers who were finding it difficult to apply our scripts due to this uninvited feature. I am extremely busy these days but I had to publish a fix to this bug in order to make things more comfortable. Peace and blessings buddies :)

Note: I have updated the Floating bar widget and all plugins that needed an update.

Wordpress 3.5 Upgrade Errors: Forgot to Backup?

wordpress upgrade errorsWordpress version 3.5 recently got released and just like always, many webmasters are striking their heads against the wall due to newly introduced database errors. Wordpress emphasize greatly to backup your database before making any change but most often we forget to backup and click the Upgrade button in hurry- what follows next is a horrible nightmare for those who are not well versed with MySQL database management and error recognition. I recently got into the same trouble while updating our sister blog i.e. Smart Earning Methods.  I forgot to backup the database! Fortunately we receive schedule backups on our Email daily and this was no less than a blessing. The site I updated to WP 3.5, got messed up with plenty of Query errors all pointing to the plugin directory.

As a PHP developer, fortunately it was easy debugging these errors and restoring the database back to its normal working mode. We would share some tips here that will help you in fixing such errors no matter how big or small your problem be, the tips are enough to put your site back to work even if it gets hijacked or entire database gets deleted or crashed.


Things To do Before Upgrading Wordpress


1. Always Take Backup of Database Manually

There are several ways to take wordpress backup. The simplest and best way is to do it manually i.e. Through PHPMyAdmin. I never rely on plugins when it comes to Database and I suggest the same for everyone. However for schedule daily backups, I do make use of a plugin called WordPress Database Backup.

To backup your database through PHPMyAdmin there could be no better tutorial then the one given by the Wordpress Folks themselves:

2. Email the Backup Copy To your Gmail, Hotmail or Yahoo Account

In order to ensure the backup you saved does not get infected while it stays in your hard drive. Its always wise to take two backups and store them on different locations. I normally keep one online using Gmail and one on my hard drive. You can either use the plugin I suggested in step#1 for Scheduling backups to email you the backup file or you can manually email yourself a copy of the backup you saved in step#1.

That's all!

Summary:

*Take backup of your Wordpress Database through PHPMyAdmin and save the same copy both online and offline.


Things To do After Upgrading Wordpress
Update Plugins!

Before even visiting your website to see how it looks after the update you must first update the plugins in you installed. Plugins with available updates would be clearly visible in the notification bar. Simply go to Plugins Tab and tick the check boxes next to all plugins and then select update from the drop down menu and hit Apply. All done! Visit your blog site now to see it working just fine. :)

update plugins


Fighting Plugin Errors

Its very common to see several MySQL errors displaying on your Homepage or Post Pages just after you make the update. This often happens because most Plugins also require compatibility update whenever a new version of Wordpress is released. Most often the developers fail to update their plugins in the wordpress repository. As a result when the new version is rolled out, plugins that aren't updated would fail to function properly and therefore you would see several errors on your screen. These errors look like the following:


Call to undefined function deactivate_plugins() in

/home/xxxx/public_html/xxxxxxxx.com/wp-content/plugins/commentluv/commentluv.php on line 56

The above error occurred for Commentluv plugin. The name of the plugin will be clearly mentioned in your errors and that's what you need to note down. A Plugin error will contain the Plugin  string.

Simply not down the plugin name and go to Plugins Tab to deactivate it. Once it is deactivated/disabled visit your site to find it working just fine. Repeat this process for every single plugin that may be causing issues.

Fighting Database Crash and Hackers

Probably this is the worst nightmare for those who often limit backup to database alone. there are two important things to backup when we talk of safety. They are:

1. Backing Up your Entire Wordpress Site

A database only includes your posts, comments, archives, categories, tags and other configuration data. It never saves the following most important media on your site,

  1. WordPress Core Installation
  2. Plugins
  3. Themes
  4. Images and Files
  5. JavaScript and PHP scripts
  6. Static Web Pages

So imagine a webmaster who sleeps peacefully every night thinking he is all safe because he keeps a daily backup of his database but in fact he is the one who is truly shattered when his site gets hijacked by unwelcomed intruders. He may succeed in saving a copy of the database but what about the site's images, JavaScript, PHP and stylesheets which are the rich elements that give true shape and color to the site?

Therefore you must always keep a backup of this rich media on your hard drive. There are several ways of backing up your entire wordpress site. I wont mention them here because there are several tutorials already written on this topic. The best tutorial so far being the following:

Your webhosting company keeps a backup of your site but you are never sure how fresh that backup copy is. Therefore to be on the safe side always run a Site backup at least once a week. It surely take hours to complete even with FTP, depending on your site size! :)

2. Backing Up Database

A database is the collection of all your site records in the form of tables. Its saves your posts, pages, comments, categories and other related data in well organized collections of tables. When you update, delete or insert any stuff in your wordpress site you are only running queries at front end in MYSQL database using your dashboard as the interface.

Backing up database means keeping a copy of all such important information of your site in a safe folder. A Database never contains your site images, stylesheets, scripts or other resources, it only saves text based records of your site.

We already discussed how to backup database manually using PHPMyAdmin.

Are you safe now?

Well if you have a backup copy of both site and database, then of course you can relax and enjoy your cup of coffee even if the site gets hacked by a moron!


Questions?

If you recently trouble-shooted yourself with any such mishap then feel free to post your query below and I would try my best to respond promptly. I just hope your online journey continues without bugs and errors. Happy wordpress 3.5 experience to all. Peace and blessings buddies! :)

Thumbnail Image Fix For Pinterest Buttons in Blogger

thumbnail issues in pinterestPinterest as you all know is the new social media network introduced just this year that has slowly attracted fair amount of traffic and is grooming daily thanks to publishers and community members. We introduced various codes on how to add a Pinterest pin it button to your webpages but due to server side errors the JavaScript code introduced by pinterest for Firefox and Chrome is not functioning for the past one month. So We fetched a new code using AddThis servers and designed a custom Pinterest counter that works just like the original pinterest button. I also managed to write a simple XHTML code for the original pinterest button which will fetch the correct thumbnail image out of your BlogSpot blog and will work just fine without a description or blank thumbnail image problem. Lets check these fresh codes which works just fine. I will also update the old tutorials today.


Live Demo


The Original Pinterest Pin it button

The following code will work just fine on any blogger blog.

<a class='pin-it-button' count-layout='vertical' expr:href='&quot;http://pinterest.com/pin/create/button/?url=&quot; + data:post.url + &quot;&amp;description=&quot; + data:post.title +  &quot;&amp;media=&quot; + data:post.thumbnailUrl'>Pin It</a>
<script src='http://assets.pinterest.com/js/pinit.js' type='text/javascript'/>

Here are some regions to give you an idea of how the code works:

  • data:post.url will fetch the Page Link/URL - Retrieved using url variable
  • data:post.title will fetch Blog post title - Retrieved using description variable
  • data:post.thumbnailUrl will fetch a 72 x 72 image thumbnail of your post. The is the data attributed provided by blogger which is often used while displaying the Mobile version of your blog on smartphones or iPad or Samsung Galaxy Tablet. The image surely looks small but this is the only allowed attribute we can use at this moment. I tried a lot to write a script that may force increase the size but the codes were not accepted by strict xml rules of blogger editor. Therefore this method will only display a 72x72 pixel wide image unlike the second method which displays large thumbnails. - Retrieved using the media variable

Enough of code syntax and literature , time to add it to blogger. Kindly link back to this page if you wish to share the above code with your readers. This code is released first time, therefore an attribution link would be enough a favour.  Follow these steps:

  1. Go To Blogger > Template
  2. Backup/restore your template
  3. Click the Edit HTML button
  4. Click Proceed
  5. Click the box "Expand Widget Templates"
  6. Search for this code:

<data:post.body/>

  Now if you wish to add the pinterest button below blog post titles then paste the code in step#7 just above the code in step#6 else if you wish to display the button at the bottom of posts then add the code in step#7 just below step#6 code.

      7.  Choose the code for your preferred size button and paste it inside your template as guided in step#6

For horizontal counter Use this code:

Paste the code below justhorizontal pin it

<b:if cond='data:blog.pageType == &quot;item&quot;'>

<a class='pin-it-button' count-layout='horizontal' expr:href='&quot;http://pinterest.com/pin/create/button/?url=&quot; + data:post.url + &quot;&amp;description=&quot; + data:post.title + &quot;&amp;media=&quot; + data:post.thumbnailUrl'>Pin It</a>
<script src='http://assets.pinterest.com/js/pinit.js' type='text/javascript'/>

</b:if>

For Vertical counter Use this code:

vertical pinterest counter

<b:if cond='data:blog.pageType == &quot;item&quot;'>

<a class='pin-it-button' count-layout='vertical' expr:href='&quot;http://pinterest.com/pin/create/button/?url=&quot; + data:post.url + &quot;&amp;description=&quot; + data:post.title + &quot;&amp;media=&quot; + data:post.thumbnailUrl'>Pin It</a>
<script src='http://assets.pinterest.com/js/pinit.js' type='text/javascript'/>

</b:if>

     8.   Save your template and all done!

Custom Pin it Counter

For that kindly proceed to this tutorial:

New to Pinterest?

If you have no idea what pinterest is and how to pull out traffic from it to your blog then please read the following delicious tutorials:

Need Help?

If you encountered any problem during installation of the codes then feel free to let me know. I just hope this code and the previous update may help you with the best pinterest experience ever. People will surely now repin your posts once they see fancy thumbnails appearing in your board. Peace and blessings buddies. :)

How can you Contact Blogger Team for Real help?


blogger Team HelpIf you are a blogger or looking up for blogging to choose it as your career then Google has some real good news for you. Blogger has always provided its users, all the opportunities to express their point of views, meanwhile learning a great deal online. Taking a deeper look and conducting a detailed survey on the problems and queries of its users, Blogger team has recently announced its availability and contact procedure with its users. Knowing that, you can now feel free to present your queries to the team and can hope to get some fast results.


Blogger- The Team


There is no doubt about the popularity as well as the effectiveness of the products that are been offered by Blogger. It has also been noticed that the team is keen to counter the user issues in no time and has established an efficient Global team, all dedicated to ensure that no compromises are made over the quality of product.


When To Contact Blogger Team


Blogging is an interesting domain where a blogger never gets perfect in his business, as something new is leaking in to the market now and then. In these circumstances, there are all possibilities to have some problems arising. If you go through the forums and take a general look on the most occurring issues, you would find that the bloggers might find themselves in a difficult situation in the following scenarios:


1) When planning to make an upgrade to a custom domain


2) Feel like giving a new look to their blog


3) Where to start it off


4) Difficulty in building a considerable readership


5) A sudden drop in the blog’s stable traffic.


6) No relevant Ads been Offered by Google AdSense


In short, there are much more than this when you feel like actually contacting the team to let the team know about your problem that might be a specific one for you, in your case. However, it is a dilemma that many bloggers, although earning with their blogs, find it hard to basically how and where to start a proper communication with team. It seems like Blogger has heard it all and has developed helpful resources that can help the users in learning about the latest features. Not only this, but you can now report your queries with blogger, and can also post your questions where the blogger support Team and Top Contributors can help you in tracking down some worth following answers.


Blogger Help Center


Blogger Help Center is where you can find all the latest news about the features been lined up and leaked out recently, knowing all about the dashboard activities and much more.


.


Google Feedback


Blogger welcomes your feedback truly. Therefore if you have a good problem to report, new ideas to share, or have some valuable suggestions to give, never hesitate! Sending a feedback is much easier and all you need to do is to click the gear icon in the dashboard to fill a feedback form.


Blogger Product Forum


It is essentially important for the bloggers to be a part of active communities that are related to their niche. Blogger Product Forum is an official community been offered by Blogger where you would find Blogger Support staff, and Top Contributors who are always ready to listen you and help you out completely.


Abuse Reporting Form


Coming across to an unethical stuff and abusive content is something that a blogger must be prepared for. Luckily, Blogger Team is smart enough to provide some remedies for this too. With Abuse Reporting Forms. you can report abusive content and ask for special help from the team. For details, Visit Google’s Terms of Service and/or Content Policy.


In brief, Things are pretty easy with Blogger, We recommend you to start exploring the support tools that are offered by the team to facilitate you.


Best Wishes,


How To Restore a Deleted Blog in Blogger?


delete-blogger-blogSometimes we take decisions without giving a second thought and this leads us to trouble and we regret on what we did and wish to undo what you did in hurry. Blogger provides all users to import, export or to permanently delete their BlogSpot blogs. Suppose you deleted a blog and seconds later you realized that the deleted blog contained some important information inside posts and widgets. How to undo what you did or how to restore your blog and get it back? Fortunately Google provides a 90 days restoration option. Deleted blogs can be restored within 90 days after which they are removed forever from your blogger account. The post today will share how to restore your blog before the three months temporary limit is exceeded.




How to delete a blog?


  1. Go To blogger


  2. Click the Settings link under the chosen blog


  3. While in Basic page you will see an option of Blog Tools. This tool gives you three options. You can either import, export or delete a blog.


  4. First choose the Export blog option so that you may keep a backup copy of your blog incase you needed it. Specify a location and save the xml file.


  5. After you have exported the blog now you can Choose to Delete blog


delete blog


     5.   You will be asked again if you wish to delete your blog and made assured if you wish to export your blog before deleting. Do export your blog if you have not already done.


Choose Delete This Blog and you are all done!


delete this blog


Restore a deleted Blog


Now when you have deleted your blog. May be you paid a second thought and decided to retrieve/restore your blog. Don't worry we can surely do that if you have not exceeded the 90 days limit. Do this:


  1. Go to your blogger Dashboard


  2. Below all your blogs you will find a link that says "Show all". Blogger hides the deleted blogs on your dashboard in order to reappear them simply click the "Show all" link.


  3. Then you will be able to see your deleted blog


image


     4.    Click Undelete this blog


undelete this blog


      5.   Your blog will be restored in seconds! :)


Things you Must do while Deleting a Blog


1) Backup all your widget codes


You should do this mainly for HTML/JavaScript widgets. Because these widgets contain important codes.


2) Export all your posts.


If in case you didn't restored your blog within 90 days then it will be permanently deleted so it is better that you keep the backup in your hard drive. You can then import your blog whenever you wish using the same method as described above.


Hope this little help proves useful for most of you. Happy day! :>

Disable Lightbox View The Correct way

Update: Lightbox Effect is Offcially Disabled by Blogger. No Worries now.


Yesterday I shared a short code that somehow helped to deactivate and remove the lightbox view for images appearing on blogger blogs. However some of the technical problems linked with it was that you were asked to paste the code just below the closing body tag and technically speaking that is against W3C standards. This was one reason why some widgets and Adsense ads got effected and did not display correctly. I have found a much better way of dealing with this problem brought by blogger team and it is really easy to implement. So kindly delete the previous code that I earlier shared and follow this new one.


Disable Lightbox view in Blogger Easily


  1. Go To Blogger > Design

  2. Choose HTML/JavaScript Widget

  3. Paste the following code inside it


<script type="text/javascript">
//<![CDATA[
var lightboxIsDead = false;
function killLightboxundefined) {
if undefinedlightboxIsDead) return;
lightboxIsDead = true;
var images = document.getElementsByTagNameundefined'img');
for undefinedvar i = 0 ; i < images.length ; ++i) {
images[i].parentNode.innerHTML = images[i].parentNode.innerHTML;
}
}

if undefineddocument.addEventListener) {
document.addEventListenerundefined'DOMContentLoaded', killLightbox, false);
} else {
document.attachEventundefined'onDOMContentLoaded', killLightbox);
window.attachEventundefined'onload', killLightbox);
}
//]]>
</script>

     4.  Save the widget and drag the widget anywhere to the bottom

     5.   you are all done!


Now this was a much neater and cleaner way. Which will work without disturbing the flow of other gadget on your blog. Happy blogging. enjoy! :)


Code Credits:Englishjavadrinker


How To Disable Lightbox View For Blogger Images?

Update: Lightbox Effect is Offcially Disabled by Blogger. No Worries now. Try a more correct way

lightbox view in bloggerBlogger just announced today that they have now automatically added Lightbox view effect to all blogs by default. Now when you click on your images or photos, a wide black I frame window opens that fades the page in the background and shows you the image in foreground without leaving the page. Lightbox is also called as Greybox or thickbox. It is a cool image effect that you have seen widely used everywhere especially on Facebook and Google+. But for some people like me this effect has turned into a headache. Even the read more buttons on my blog when clicked popped in a new window instead of taking the user to the full post page. So of course there must be a way to disable it completely in your blogs and if you wish to apply it with complete control then you may add this effect manually by reading any tutorial found online on Lightbox view.

How to disable Lightbox view?

After digging into the CSS bundle link from the source file of my test blog, I managed to find the CSS class that enabled this effect and tried adding the display none property to the class but it badly effected the over all appearance of images everywhere.

Following is the CSS Link for lightbox

http://www.blogger.com/static/v1/widgets/3353720152-widget_css_lightbox_bundle.css


Following is the Javascript that activates the effect


_WidgetManager._RegisterWidget('_BlogView', new _WidgetInfo('Blog1', 'main', null, document.getElementById('Blog1'), {'cmtInteractionsEnabled': false, 'showBacklinks': true, 'postId': '5886606793797837055', 'lightboxEnabled': true, 'lightboxModuleUrl': 'http://www.blogger.com/static/v1/jsbin/3312549355-lbx.js'}, 'displayModeFull'));


I tried calling the javascript and switched the lightboxEnabled command to false but it didn't work. It may sound funny to you all but yes I need help from you all here. If anyone of you knows how to override this function then please let me know because javascript is what I lack in my skills. So this post today ends for the first time as a question from me to you all. Any help is appreciated.


PS: I have posted my question to blogger team and I am sure they will provide us with a good solution.


UPDATED: SOLUTION FOUND CLICK HERE


There is still one solution


If you don't want the lightbox feature for a specific image then simply add the target="_blank" tag just after the image img tag. See the following example


Click it and you will find lightbox effect works here


Click it and you will find that bingo no effects is applied!


This is what I find as somehow helpful in controlling the image view. I am sure Blogger team will come up with a more effective solution soon.


Solution Found!


As mentioned earlier the only problem I faced was in calling the JavaScript function and even after calling it correctly I was not able to disable the effect. Thanks to EnglishJavaDrinker I just get to know that instead of adding the JavaScript above </head> we must add it between <body> and </head> which sounds really weird but it is working just perfectly!


Do this in order to disable the effect:


  1. Go To blogger > Design > Edit HTML


  2. Backup your template


  3. Search for </body>


  4. Paste the following code just below </body>


<script type='text/javascript'>

document.getElementById(&#39;main&#39;).innerHTML = document.getElementById(&#39;main&#39;).innerHTML.replace(&quot;&#39;lightboxEnabled&#39;: true,&quot;,&quot;&#39;lightboxEnabled&#39;: false,&quot;);


</script>


     5.  Save your template and you are all done!


I hope this will be helpful to all those who wish to get rid of this annoying effect unfortunately brought by blogger in a really wrong way. Peace and blessings pals! :)

Remove Blogger Sitemap Errors In Google Webmaster

Remove sitemap errors

Most tutorial do tell how to submit a blogger sitemap to Google but unfortunately they often fail to mention the correct way. You are still seeing feed proxy errors on your webmaster tool account because Google spiders are getting confused by the sitemap that you submitted. BlogSpot blogs come with Atom Feeds and RSS feeds by default. But since these feed technologies are of low quality therefore we often switch to Feedburner. In blogger Feed settings page we often redirect our default atom feeds to this latest well developed feedburner feeds.

That is where the problem arises. Because when you submit your BlogSpot sitemap to Google you are not telling Google that you updated the feeds and this confuses the robots. When robots indexes your sitemap they get confused by finding a redirection to another feed (feedburner) and this causes the errors on your dashboard.

How To Correctly Submit Blogger Sitemap?

I have written a detailed tutorial last year which discusses every single detail in simple words. The purpose of this post was to draw the attention of new MBT readers to this issue. Please read the tutorial below to remove all errors and help Google better crawl and index your blog.

What is a Sitemap?

Sitemap in simple terms is the text version of all your posts published so far. They come with xml extension. Inn short it gives tell search engines what content to crawl. When you write a new post your sitemap updates and this update pings Google to come and crawl your blog.

Is your Blog slowing down due to MyBlogLog Termination?

mybloglog-terminatedI was facing blog load time issues this week so I started looking at codes that were causing the problem. After a lot of trial and error I finally found the code responsible for slowing down the site load time. It was the code snippet provided by Mybloglog. I was confused as why it was behaving like this because being a yahoo service Mybloglog server’s should be fast in response as it is a social networking platform for bloggers provided by Yahoo. But then I read on Wikipedia that On February 24, 2011 Yahoo announced that the MyBlogLog service would be terminated on May 24, 2011. The code snippet was not causing problems till the end of July but it caused me great troubles in August. Since MyBloglog is no more so there is no use of keeping its code on your templates. Delete the code so that your blog may load at better speed.


Remove MyBlogLog Code From Your Templates

  1. Inside your templates search for track.mybloglog.com
  2. You will find it enclosed in a similar code like this one,

<script src='http://track.mybloglog.com/js/jsserv.php?mblID=2009033019163361' type='text/javascript'/>
 

   3.    Remove this entire code and save your template.

   4.    You are done!

Your blog will now load at a much better speed because now the browser doesn’t need to load or look for mybloglog code. Keep your blogs healthy and stay healthy. Peace out!. :>