Jquery On-click Pop Up Light Box Video Player For Blogger

Jquery on-click pop up light box video player for blogger

Showing videos in a pop up light box like blogger lightbox images is really cool and it boosts video views too so I decided to share this cool stuff with you. In this post I am going to show you how to add pop up light box video player in blogger but before that I want to tell u that its a different player so can't just get embed code of your video and paste it and start showing pop up.
This player works in a different way so first you need to add code of this player in your blog and after that you need to add ID of a Youtube video. Remember that it can't play other videos like Dailymotion. Only vimeo and YouTube videos can be played with this player.

And to play a video you need to add its id first whether you want to play a Youtube video or Vimeo video, in both cases you need its id.

So in this post I will show you how to add pop up light box YouTube or vimeo video player and how to get id of a Youtube or vimeo video.

Features Of Pop Up Video Player:

1. Its free of cost.

2. Doesn't slowdown your blog, no render blocking scripts.

3. Easy to install.

4. Can play both YouTube or Vimeo videos.

5. Stylish and responsive design.


How To Add Pop Up Light Box Video Player In Blogger ?

Step 1: Go to blogger and login to your account.

Step 2: Open Layout of your blog.

Step 3: Click on Add a gadget and choose HTML/JAVASCRIPT.

Step 4: Copy code given below and paste it in to HTML/JAVASCRIPT window.

For YouTube Videos:
<link rel="stylesheet" type="text/css" href="https://rawgit.com/fahimraza/FK/master/vplayer.css" />
<div id="jquery-script-menu">
<a rel="nofollow" href="Javascript:" class="link-lightbox" data-videoid="YOUR VIDEO ID" data-videosite="youtube"><img src="https://i.ytimg.com/vi/0mFXo88pyaU/hqdefault.jpg"/></a><br />
<script type="text/javascript" src="http://ajax.googleapis.com/ajax/libs/jquery/1.11.1/jquery.min.js"></script>
<script type="text/javascript" src="https://rawgit.com/fahimraza/FK/master/vplayer.js"></script></div>

For Vimeo Videos:
<link rel="stylesheet" type="text/css" href="https://rawgit.com/fahimraza/FK/master/vplayer.css" />
<div id="jquery-script-menu">
<a rel="nofollow" href="Javascript:" class="link-lightbox" data-videoid="YOUR VIDEO ID" data-videosite="vimeo"><img src="https://i.ytimg.com/vi/0mFXo88pyaU/hqdefault.jpg"/></a><br />
<script type="text/javascript" src="http://ajax.googleapis.com/ajax/libs/jquery/1.11.1/jquery.min.js"></script>
<script type="text/javascript" src="https://rawgit.com/fahimraza/FK/master/vplayer.js"></script></div>


Step 5: Replace "YOUR VIDEO ID" with ID of video which you want to play in pop up.

How To Get ID Of A Youtube Video ?

Open a YouTube video and get the final elements from its URL like below is the URL of a video and the highlighted part of the link after "v=" is its ID

https://www.youtube.com/watch?v=0mFXo88pyaU

0mFXo88pyaU is the ID of this video.

How To Get ID Of A Vimeo Video ?

Similar to YouTube video ID, Vimeo also have video ID in its URL, Like this:

https://vimeo.com/188471047

188471047 is ID of this video.

Step 6: Save your gadget and you are done.

How To Customize Video Player ?

You can show your video's thumbnail which when clicked will show the pop up or you can show some text like "watch this amazing video" both of these will play role of a trigger.

To add your video's thumbnail replace https://i.ytimg.com/vi/0mFXo88pyaU/hqdefault.jpg with your video's thumbnail link.

To show text Replace this piece of code with your text:

<img src="https://i.ytimg.com/vi/0mFXo88pyaU/hqdefault.jpg"/>

Replace YOUR VIDEO ID with your video ID.

I hope you loved this post, if not and you want to give any suggestion, feel free to contact us or leave a comment below. Your feedback is really valuable!

Thanks for visiting 101Helper.  Happy Blogging!

Search Keywords: Jquery on-click pop up light box video player for blogger, Popup video player, pop up youtube video player, pop up vimeo video player, how to create a video player with jquery, jQuery YouTube Popup Player Plugin
What Are Top Online Businesses That Can Keep Your Pockets Full Every Time?


With the gloomy economy surrounding us from every end, there has never come a better time when people are in need of extra check, or even better a more assured source of income; this is without making a big investment up front. Thanks to the power of Internet today we do have some amazing business opportunities that can consistently keep our pocket full along with taking care of our mortgages, utilities and all other regular expenses.

Many tend to be wary with even the very thought of working on Internet as they believe online businesses can only be run by tech wizards, which is absolutely not true. Let us take a look at 5 top businesses that can be carried out online to make sure we never run short of money.

ebay-earn-moneyEBay: This is one of the biggest online marketplaces in the world but it is also a bit more than that. It makes it extremely easy for commoner to start their own online business. One can actually open a new account on eBay and start making decent money right within few hours. You can literally sell right about anything that you are not using and is no more functional to you. But to actually make a business out of it you should be leveraging products that can be sold over and again.


professional-blogging-earn-moneyProfessional Blogging: This is good for those who are deeply interested in one or more subjects, and love to write about their expertise. Blogs are like journals that are read by hundreds of thousands of people online. You can always have your own personal blog but when you write articles about something in particular then chances of financial gains are much higher. You can start blogging on right about everything, be it photography, technology, environment, health, cars and bikes or entertainment, so long as you can churn out unique, and interesting-to-read contents.
Information Marketing: This is the age of information and it is Internet that gives us the right medium for exchanging know- how for a decent money. You can share information related to different subjects like playing golf, shooting movies, fishing, and playing guitar and much more. You can share information that can come from your expertise, career, interest or hobbies and the same can give you good money as well.

Yahoo! Store: Though this business option is quite similar to eBay, it can be said that is gives more store-like experience in true sense. With this, you can have your own retail outlet but won’t have to give rent or manage employees. Neither will you have to worry about utilities nor any other expenses related to a regular brick-and-mortar store. The best part is that it can as hand-on as you want to be as there are drop-shippers that do most of your work.


Affiliate Marketing: This is probably the laziest way of making money as it doesn’t need you to have any kind of product, make any sale or have any kind of interaction with any possible customers. This is actually more of a referral business. All you need to do is send people to the websites that are already set up for paying affiliate fees after a sale is done. And, the affiliate payout could go $100+ per sale for a simple web hosting sale, and several hundred dollars for some of the expensive products.

 ⇨ Earn money from affiliate marketing in Blogger. 

Search Keywords: What Are Top Online Businesses That Can Keep Your Pockets Full Every Time? earn money from affiliate marketing, earn money from ebay, how to start professional blogging, make money tutorials blogger.

How To Remove Unwanted Or Broken Links From Google Search Results

how-to-remove-bad-broken-links-from-google-search-results

After a long time I am writing a post about Google webmaster tools. Its because its important to share this information with you guys. The thing which I want to share with you is that after submitting a site to Google webmaster tools, we sometimes find some URL's which are broken and doesn't reach to a content rich page and it is bad for your site because too many broken links will lead to a spammy image of your site and that's not good for your site because it may be removed from search results for ever.

Moreover if you set 404 not found redirects it may solve the problem but it will be a temporary solution and also too many 404 not found redirects will also be considered as a spam web page. So In this post I am going to tell you how to remove unwanted and useless links of your blog from Google search results using Google webmaster tools.

How to remove useless/unwanted  urls from Google search results using webmaster tools?

Follow below steps:

1. Go to Google Webmaster Tools and Select a site which you have submitted to Google and you are getting too many broken links for it.

how-to-remove-urls-from-google-search-results

2. In the search console go to Google Index > Remove URL's.

remove unwanted urls from google search results

3. Click on Temporary hide and type the link which you want to remove from search results and click on Continue.

how-to-remove-links-from-google-search-webmaster-tools

4. Select "Temporarily hide page from search results and remove from cache" and click on submit request.

remove-links-from-google-search-webmaster-tools

This is it. I hope you found this post helpful. For more webmaster tools go HERE
Search Kewords: How to remove unwanted links from Google search results,webmaster tools tutorials for blogger,how to hide links from google search results,remove broken 404 urls from search results

CSS Rollover Image Effect - Change Image on Hover

Rollover image is a design feature where an image changes when your mouse hovers over it. Think of a light bulb that turns on and off when you move your mouse cursor into that area of a page. When a page is loading, rollover images are preloaded into it to ensure that the rollover effect is displayed quickly.

This used to be implemented using JavaScript, which is fairly easy with just a small amount of script involved. To make rollover images functional, onmouseover and onmouseout attributes are used to a link tag. The code is then added to a blog gadget or into a new post. It proved to have a number of disadvantages, however, which is why many web developers are using a CSS-only method.

css rollover image

How to create a rollover image using CSS

Here is how to implement a rollover image using CSS. Before getting started, we need to have two images ready, one in its initial/static state as well as its rollover state.

The Image

Place both the static and rollover image in one file and make sure that the rollover image is placed on top of the static one. To achieve the rollover effect, we'll write a code to display the static image and crop the hover image, so that only one image state is displayed at a time.

For this tutorial, we'll use the following as a CSS rollover image.

html rollover image

Creating an HTML Anchor Element for our Image

Instead of adding the image file in a <img> tag, we'll display it as a background image of an </a> (anchor) tag. Here's the HTML that we need to add:
<a class="rolloverimage" href="#URL">Rollover Image</a>
Note: if you want to make the image clickable, replace #URL with the url of the webpage where you want the link to point to.

Using CSS to Set a Background Image

To create the mouseover image effect, we'll use the :hover CSS pseudo-class. Then, we'll use the background-position property and set the values to 0 0 to move the background image to the upper left corner which will create the rollover effect.
<style type="text/css">
.rolloverimage{
display: block;
width: 56px;
height: 90px;
background: url('https://blogger.googleusercontent.com/img/b/R29vZ2xl/AVvXsEjCszr4gVbeXW8Cj9_1upFGyHVpTlMalnePCQvO9fq7EeDjyaeh_QY_quTBNNiaw3XeKLP5n2s0a_psCaPzvyrMm5ieF-2ykFBv9PqxJZsWScy8A4KPUdl4EAv_HOBwIsbOHLeuLlz7RjQe/s180/rollover-image-light-bulb-on-off.png') bottom;
text-indent: -99999px;
}
.rolloverimage:hover{
background-position: 0 0;
}
</style>
Note: Replace the text in blue with the url of your image file. Please pay attention on the width and height values marked in red, these should be different depending on your file, where the height value is for only one image and not the entire image file!

The result

Hover your mouse cursor over the light bulb to see the rollover image effect in action:

Rollover Image

Adding Rollover Image to Blogger

To add the rollover image as a gadget: copy both the HTML/CSS codes and go to 'Layout', click on the 'Add a Gadget' link > select HTML/JavaScript, then paste the codes in the 'Content' box.

Or, if you want to add it inside one of your posts, when you create a New Post, switch to the 'HTML' tab and paste the codes inside the empty box.

And this is how you make images swap on mouseover using CSS. Enjoy!

How To Add 125X125 Ad-space In Blogger Sidebar


Ad-spaces are always useful because they let you show ads in a different way rather than simple ads. 125X125 ad-space is even more useful than ordinary ad spaces because it lets you to show 4 ads at a time and all ads could be of different ad networks so you earn from all networks. It also adds a star to your site design so your site looks more professional. Also 125X125 ad-space compress your ads in a small area so if you want you can show 8 ads by just consuming ad space of 2 square ads, hence it is a beneficial thing.

So here is a quick post about how to add 125X125 ad-space in blogger sidebar. I will share two types of ad-spaces one for showing ads of any ad network and one for personal ad campaigns in which you need to add your advertisers ad image url and target url.

So lets begin!

How to add 125X125 Ad-space in blogger sidebar ?

Step 1: Go to Blogger Dashboard and open Layout.

Step 2: Click on add a gadget in right or left sidebar.

Step 3: Choose Html/Javascript.

Step 4: Copy code of ad space from below by your choice.

CODE FOR PERSONAL ADVERTISEMENTS:

<div id="ad-case">
<ul>
<li><a href="YOUR SPONSOR LINK HERE"><img src="YOUR SPONSOR IMAGE HERE"/></a></li>
</ul>
</div>
<style>
#ad-case li { position: relative; float: left; margin-right: 10px; list-style: none; padding: 0; margin-bottom: 10px; }
#ad-case { width: 400px; position: relative; }
#ad-case img { width: 125px; height: 125px; border: 0; padding: 0; }
#ad-case ul { padding: 0; line-height: 1.4; margin: 0; }
</style>

CODE FOR AD NETWORKS ADVERTISEMENTS:

<div id="ad-case">
<ul>
<li>YOUR 125X125 AD CODE HERE</li>
</ul>
</div>
<style>
#ad-case li { position: relative; float: left; margin-right: 10px; list-style: none; padding: 0; margin-bottom: 10px; border: 1px solid #ddd; }
#ad-case { width: 400px; position: relative; }
#ad-case ul { padding: 0; line-height: 1.4; margin: 0; }
</style>

Step 5: Replace ad code text with your ad codes or add your advertiser's ad's image and link.

Customization:

You can increase number of ad spaces by increasing each:

<li><a href="YOUR SPONSOR LINK HERE"><img src="YOUR SPONSOR IMAGE HERE"/></a></li> for personal ads

<li>YOUR 125X125 AD CODE HERE</li> for ad network ads.

I hope you found this post helpful, if not leave a comment or contact me.

Thanks for visiting 101Helper, Happy Blogging !

Search Keywords:

How to Create 125 X 125 Ad Space in Your Blog Sidebar

Add 125x125 Ad Slots To Your Blogger/BlogSpot Blog

Add 125x125 Advertise Here Banner Ads For Blogger

Advertise Here 125x125 Ad Banner Widget For Blogger

How to Create a Static Home Page in Blogger

When it comes to home pages, most websites can be divided into two: static and non-static. As their name implies, static home pages stay permanent no matter how many times the website is updated, while non-static home pages reflect the changes that are made to the site and show the latest posts first.

The latter has become well-known nowadays due to the rising popularity of personal and even corporate blogs. However, there are still many people who prefer static home pages because it makes their websites look more organized and professional. It also gives them more control over the readers' experience on their site and helps them create stronger brand awareness through the uniform message that their home page presents.

Fortunately, if you own a Blogger site and want to make your home page static, you'll find that creating one isn't as difficult as it seems. You can create a static home page in Blogger by taking these steps:

static pages in Blogger

1. Create your static home page

The first thing you should do is to create a new page for your blog. This will serve as your static home page but, for now, it will look and act like any other page in your site.

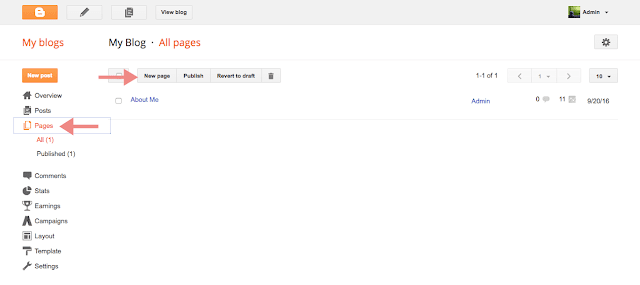
To make this page, you'll need to go to the main menu of the Blogger dashboard and click on the "Pages" option on the left side on the screen. Doing this will lead you to the "All Pages" menu window. Here, click on the "New Page" button and you'll enter an editor that looks similar to the Blogger Post editor that you use when publishing a new blog post.

static home page

At the top box, enter the title that you want for this page - in this case, let's call it the "Welcome" page. In the larger text box, type the content that you want to appear on your home page; this can be a paragraph, or two about yourself or your business and what your site is all about.


Once you're done, click "Publish". The window will return to the main "All Pages" menu, and you'll see the new "Welcome" page you've created. Copy the URL of the "Welcome" page since you'll need it later on. To do this, right click on the 'View' link and select 'Copy Link Location' from the menu.


2. Redirect the default home page to the static one

Once your "Welcome" page is up, the next thing you should do is to change Blogger's default homepage. This involves redirecting from your site's original home page to the static homepage that you've created so it would be the first thing that people see when they visit your website.

Related: How to Set Custom Redirects in Blogger

To do this, you'll need to go to main Blogger editor menu, click on "Settings" on the left side of the screen, and choose "Search Preferences". Under the "Errors and redirections" section, you'll see the "Custom Redirects" option with an "Edit" link beside it. Click on the "Edit" link to open another window, where you'll see two boxes named "From" (with your blog's URL beside it) and "To".


In the "From" box, enter only a forward slash symbol "/". In the "To" box, paste the URL that you copied earlier and add the latter part of the URL of the "Welcome" page. For instance, the page's URL of our demo blog is static-home-page.blogspot.com/welcome.html, so we'll remove the "http://static-home-page.blogspot.com" address and add only "/p/welcome.html" in the "To:" box. The "/p" signifies that it's a static page.


Next, check the little box beside "Permanent", click on the "Save" text link, and press the "Save changes" button. Doing these will redirect your site's main URL to its new static home page. Access your blog on a separate browser to see if it works.


3. Make tabs for your site

If you're not planning to make tabs visible in your blog, you can stop at Step #2. But, if you want your site to have tabs that indicate the home page, the main blog page, and other pages you may have (such as the FAQs and Contact Us pages), you'll need to take another step.

Why is this important? Basically, when visible tabs are enabled in your site, they will show that you have two existing pages: the default home page and the new "Welcome" page you've created - both of which redirect to the same static page. This can be confusing for your readers and may even affect your search engine rankings.

To fix this, you first need to enable tabs by going to the "Layout" menu item and click on the "Add a Gadget" link. You can choose to add it below your blog header or sidebar. In many cases, it's advisable to add it below blog's header since they're more visible and give your website a sleek, professional look.


Once the pop-up window opens, scroll down and click on the 'Pages' link:


This will open another window named "Configure Page List". Here, under the "Pages to show" section, you'll see the default home page and your new static homepage with small boxes beside them. Uncheck the box beside the default home page to hide it from view, check the pages that you want to display in the menu and then click on the "Save" button to save the changes.


You can stop at this point but, if you want, you can also create a specific tab that will lead to your main blog post page. To do this, edit the "Pages" gadget that you just saved and click "+ Add external link".


On the new window that would open, enter the title you'd like for the page (such as "Blog") along with /index.html web address, then hit "Save Link" and click the "Save" button on the "Configure Page List" window.


Now, view your site and you will see the pages menu containing the "Welcome" page and "Blog" tabs. To see how this works, you can also visit our demo blog. Enjoy!

Final Note

Having a static home page can be beneficial for your blog. Follow the steps above now to create a static home page in Blogger!

How To Find RSS Feeds Of Blogger Blog

How to find RSS feeds of blogger blog

RSS feed is a source of latest posts in a blog or website. It contains a bunch of text with some summery from a post, its title, category, publish date etc. RSS feeds are required sometimes for some gadgets like recent post widget and sometimes it is need to submit RSS feed to certain websites which index your blog or site post on there site or promote your site's post so they require a link to your site to get all the latest info from your site once otherwise it will take a lot of time to index posts.
Other uses of RSS feed is in submitting posts to Google or Bing via Webmaster tools.

So here is a quick guide to get Feed URLs for a blogger blog.

Blogger Feeds URLS

FULL SITE FEED:

Atom 1.0: http://[blogname].blogspot.com/feeds/posts/default
RSS 2.0: http://[blogname].blogspot.com/feeds/posts/default?alt=rss

FULL SITE COMMENTS-ONLY FEED:

Atom 1.0: http://[blogname].blogspot.com/feeds/comments/default
RSS 2.0: http://[blogname].blogspot.com/feeds/comments/default?alt=rss

LABEL-SPECIFIC SITE FEED:

Atom 1.0: http://[blogname].blogspot.com/feeds/posts/default/-/Label name here

RSS 2.0: http://[blogname].blogspot.com/feeds/posts/default/-/Label name here?alt=rss

INDIVIDUAL POST COMMENT FEED:

Atom 1.0: http://[blogname].blogspot.com/feeds/<postId>/comments/default
RSS 2.0: http://[blogname].blogspot.com/feeds/postId/comments/default?alt=rss

The same feed URLS are true for custom domains so if you have upgraded to a custom domain you can use your custom domain URL in place of [blogname].blogspot.com

Search Keywords: blogger rss feed url, Finding your Blogs Feed Url, How to Find Your Blog's RSS Feed URL, How to Get the RSS Feed URL From a blogspot blog, feed urls blogger, feedburner blogger tutorials, blogger feed