Showing posts with label Related posts widget blogger. Show all posts

Related Posts Slide Out Gadget For Blogger


"Slide out related posts gadget" is a gadget powered by addthis which works on jquery. It is one of the most important gadget that is very beneficial for those who have a very low traffic. This gadget slides up when a page is scrolled down and on every page it shows a different recommendation so every post is shown one by one which boosts your traffic stats. One more special thing about this gadget is that it doesn't affect your blogs speed. Moreover you can see analytics of  your slide out gadget which shows you "how many click you have got" on your recommendations. So you have a full information about your traffic stats. This gadget is available for both mobile sites and desktop sites. So now you can add this gadget in your mobile site as well as desktop site and start boosting your traffic.

In this post I will show you how to install slide out related posts widget  in blogger. Let us start adding it desktop first.

How To Add Related Posts Slide Out Gadget In Blogger Desktop Site?

This gadget is very easy to install. You can do it in just a few minutes. All you need is anAddthis account. So first signup for an Addthis account and after that follow below steps.

Step 1: Sign up for an Addthis account and sign in to your account.

Step 2: Click on TOOLS.

slide-out-related-posts-widget-blogger-101helper

Step 3: Scroll down to Recommended Content section and click on What's Next on the right side.

related-posts-slide-out-gadget-blogger-mobile

Step 4: Give a title to your slide out gadget that will appear above the post name and select theme of your slide out gadget.


<------------ Optional Part Of Post-------------->

Your gadget is almost ready but if you want you can make some customizations like:

(1). Hiding this gadget on specific pages of your blog.
(2). Position of gadget(left or right).
(3). Responsive width(width after which the gadget should slide up when page is scrolled).

So to make such customizations click on "Show more options"


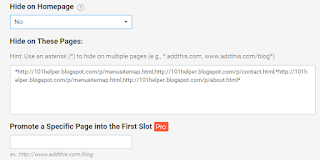
To hide the slide out on Homepage select No option below it. And if you want to hide this slide out in certain pages then move to Hide On These Pages and add the links of these pages between * if you want to hide it on multiple pages then separate the links by come(,).

Below it there is an option to promote a specific page into the first slot but you can use this feature only if you have Pro(Premium) account.


latest-blogger-gadgets-101helper.blogspot

The next option is Responsive Width which is the width in pixels after which the gadget would slide up when a user scrolls down your page. Set the desired width by typing it.

And the last option is Offset which decides whether the related post slide out will be shown on right side or left side. Choose the desired option, you can see a preview of your gadget above.

slide-out-related-posts-widget-blogger-free

<------------ Optional Part Of Post Ends-------------->


Step 5: Copy the code and click on Activate.

slide-out-related-posts-widget-blogger-free

Congratulations! your gadget is activated now you have to install it in your blog.

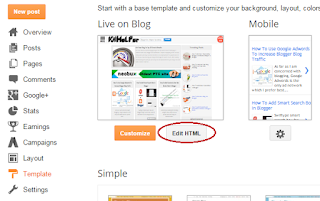
Step 6: Go to blogger dashboard, navigate to template and click on Edit Html.

Edit-html-blogger

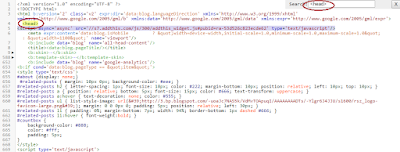
Step 7: Click inside your code and search for <head> by using Ctrl+F.

Step 8: Just below it paste the copied code.

how-to-use-blogger-template

Step 9: Click on save template and you are done.

How To Add Related Posts Slide Out Gadget In Blogger Mobile Site?


Step 1: Login to your Addthis account and navigate to tools as show above.

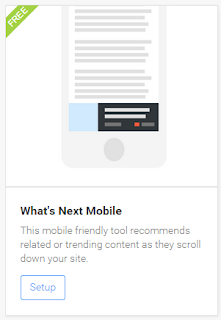
Step 2: Scroll to the end of the page and find What's Next Mobile.

slide-out-related-posts-widget-blogger-mobile

Step 3: Click on Setup and choose the desired options for your gadget e.g theme, title etc as shown above.

Must Read: Click on activate and you are done. If you have already added this gadget in your desktop them you don't have to follow next steps because you have already added the Addthis code to your blog. But if you haven't added Addthis code in your blog them follow next step!

Step 4: Copy the code and go to blogger > template and click on Edit Html.

How-to-edit-html-in-blogger

Step 5: Click inside the code and search for <head> by using Ctrl+F.

how-to-use-blogger-template

Step 6: Just below it paste the copied code and save your template as shown in above image.

If the gadget fails to appear in your blog's mobile site then go to template and switch your blog's mobile template from simple to custom.

how-to-create-mobile-site-blogger

If the widget still fails to appear in your mobile then optimize your blog's mobile site for phones or hire us to optimize it for you.

I hope this gadget was helpful to you and it didn't waste your time. Please share it with others and subscribe for latest blogger tutorial news. Share your views about this post in comments below. Thanks for visiting 101Helper.

Search Tags: Slide out related posts gadget for blogger, blogger mobile site gadgets, 101helper blogger tutorials, Related Posts Slide Out gadget For Blogger,New blogger widgets,Addthis tutorials for  blogger.

Link/text Only Related Posts Widget For Blogger With 6 Different Styles

simple-related-posts-widget-for-blogger-style

"Simple Related Posts Widget For Blogger" is the most frequently searched on search engines because it is a very important gadget for blogger. It helps visitors to reach more posts on your blog and hence it helps you to multiply your traffic. Related posts widget plays a role of internal linker as it link one post with other so it has a great impact on your traffic as well as seo. Because internal linking is a part of off-page seo. As this gadget is so important for blogger therefore some websites are also formed which provides related posts plugin for your blog but if a website's plugin is used then it may slow down your blog which is not good.
People wish to add related posts widget to multiply their traffic but without affecting there blog's speed so most of the bloggers use simple/link/text only related post widget because it doesn't slow down blog and boost traffic.

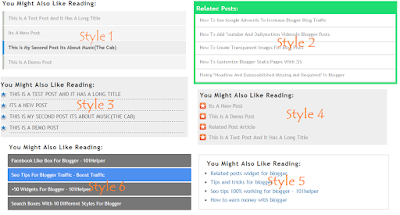
I also recommend to use simple/link only related posts widget because thumbnails loads so slow and visitors hate slow loading. I have shared many types of related posts widgets for blogger and in this post I am back with simple/link only related posts widget with 6 different styles.

I hope you will like this post. I would like to know how was this post so leave a comment below the post. To add this widget in your blog and start multiplying your traffic follow below steps:

Click Here To Add Simple Related Posts Widget In Blogger Mobile Site!

Step 1: Go to blogger dashboard.

Step 2: Navigate to template and click on edit html.


Step 3: Search for </head>.


Step 4: Copy code of desired related posts widget from below and paste it above </head>.

Style 1:


<b:if cond='data:blog.pageType == &quot;item&quot;'>
<style type='text/css'>
#related-posts {margin: 10px 5px;}
#related-posts h2 {letter-spacing: 1px;font-size: 18px; color: #222;margin-bottom: 15px;position: relative;left: 5px; top: 10px;}
#related-posts a {font-size: 14px; color: #999;text-transform: capitalize;}
#related-posts a:hover {text-decoration: none;color: #555;}
#related-posts ul {list-style-type: none; margin: 0 0 0px 0;padding: 5px;}
#related-posts ul {list-style-type: none;}
#about { float: right; font-size: 12px; }
#related-posts li {padding: 12px;border-bottom: 2px solid #fff;border-left: 5px solid #BCC2B9;background-color: #F4F4F4;}
#related-posts li:hover {background: #F4F4F4;font-weight:bold;background-color: #eee;border-left: 5px solid #188DD7;}
</style>
<script type='text/javascript'>
  var relatedpoststitle=&quot;You Might Also Like Reading:&quot;;
</script>
<script src='https://rawgit.com/101Helper/docs/master/related-post.js' type='text/javascript'/>
</b:if>

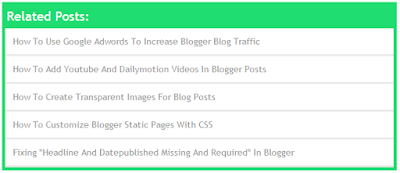
Style 2:


related-posts-widget-for-blogger-style-2

<b:if cond='data:blog.pageType == &quot;item&quot;'>
<style type='text/css'>
#related-posts {margin: 13px 5px;background-color: #20DD71;}
#related-posts h2 {color: #FFFFFF;margin-bottom: 13px;left: 7px;top: 10px;font-family: Trebuchet ms;}
#related-posts a {font-size: 14px;color: #999;text-transform: capitalize;}
#related-posts a:hover {text-decoration: none;color: #555;}
#about { float: right; font-size: 12px; }
#related-posts ul {list-style-type: none;margin: 0 0 0px 0;padding: 5px;}
#related-posts li {padding: 12px;border-bottom: 3px solid #eaeaea;background-color: #FFFFFF;}
</style>
<script type='text/javascript'>
  var relatedpoststitle=&quot;Related Posts:&quot;;
</script>
<script src='https://rawgit.com/101Helper/docs/master/related-post.js' type='text/javascript'/>

</b:if>

Style 3:


<b:if cond='data:blog.pageType == &quot;item&quot;'><style type='text/css'>
#about { float: right; font-size: 12px; }
#related-posts {margin: 10px 0px;background-color: #eee;margin-bottom: 40px;}
#related-posts h2 {letter-spacing: 1px;font-size: 18px;color: #222;margin-bottom: 10px;position: relative;left: 10px;top: 10px;}
#related-posts a {position: relative;bottom: 4px;font-size: 15px;color: #999;text-transform: capitalize;}
#related-posts a:hover {text-decoration: none;color: #555;}
#related-posts ul {list-style-image: url('https://blogger.googleusercontent.com/img/b/R29vZ2xl/AVvXsEg-ve35Rnk7MWFeuwKlMpK66sgQ2oYc4c6MbgXS1Hk8lRAucNUXfXigyz4MUMVB_y3dh_a-TS0oSIHl0lbTjdRX2VoBxNn8K_q7WXtvflozrgwbNgfeRpgrmPaoOS4czTY5E5KP1x8Q8tU/s1600/rsz_1rsz_icon256.png');margin: 0 0 0px 0;padding: 5px;position: relative;left: 30px;}
#related-posts li {width: 94%;}
#related-posts li:hover {font-weight:bold;}
</style>
<script type='text/javascript'>
  var relatedpoststitle=&quot;You Might Also Like Reading:&quot;;
</script>
<script src='https://rawgit.com/101Helper/docs/master/related-post.js' type='text/javascript'/>
</b:if>

Style 4:


related-posts-widget-for-blogger-style-4

<b:if cond='data:blog.pageType == &quot;item&quot;'>
<style type='text/css'>
#about { float: right; font-size: 12px; }
#related-posts { margin: 10px 0px; background-color: #eee; position: relative; margin-bottom: 40px; }
#related-posts h2 { letter-spacing: 1px; font-size: 18px; color: #222; margin-bottom: 10px; position: relative; left: 10px; top: 10px; }
#related-posts a { position: relative; bottom: 5px; font-size: 15px; color: #666; text-transform: uppercase; }
#related-posts a:hover { text-decoration: none; color: #555; }
#related-posts ul { list-style-image: url(&#39;https://blogger.googleusercontent.com/img/b/R29vZ2xl/AVvXsEiCKN68f6JfL4C14CQAjFkkSLyUQL0zCmFgDJyAwX80Fs4hmOzVW7ipvAHaAIIphKqVA1f6HzR0V_c6jVRcAOq1ooi6RckUL46uJx9vZYfzqjQ4obX6a6xHv68NH3W95iH58Q96ob8mpaU/s1600/rsz_logo-favicon-large.png&#39;); margin: 0 0 0px 0; padding: 5px; position: relative; left: 30px; }
#related-posts li { padding: 0%; margin-bottom: 7px; width: 94%; border-bottom: 1px dashed #666; }
#related-posts li:hover { font-weight:bold; }
</style>
<script type='text/javascript'>
  var relatedpoststitle=&quot;You Might Also Like Reading:&quot;;
</script>
<script src='https://rawgit.com/101Helper/docs/master/related-post.js' type='text/javascript'/>
</b:if>

Style 5: 


<b:if cond='data:blog.pageType == &quot;item&quot;'>
<style type='text/css'>
#related-posts h2 {letter-spacing: 1px;font-size: 18px; color: #222;margin-bottom: 15px;position: relative;left: 5px; top: 15px;}
#related-posts a {font-size: 14px; color: #fff;text-transform: capitalize;text-decoration:none;}
#related-posts ul {list-style-type: none; margin: 0 0 0px 0;padding: 5px;}
#related-posts li {border-radius: 2px;padding: 10px;margin-top: 3px;background-color: #777777;    border: 1px solid #777777;}
#about { float: right; font-size: 12px; }
#related-posts li:hover {background: #F4F4F4;border: 1px solid #3079ED;background-color: #4D90F0;}
#related-posts { padding-bottom: 45px; }
</style>
<script type='text/javascript'>
  var relatedpoststitle=&quot;You Might Also Like Reading:&quot;;
</script>
<script src='https://rawgit.com/101Helper/docs/master/related-post.js' type='text/javascript'/>

</b:if>

Style 6:


<b:if cond='data:blog.pageType == &quot;item&quot;'>
<style type='text/css'>
#related-posts { padding-bottom: 45px; }
#related-posts h2 {letter-spacing: 1px;font-size: 18px; color: #222;margin-bottom: 15px;position: relative;left: 5px; top: 12px;}
#related-posts li {font-size: 15px;}
#about { float: right; font-size: 12px; }
#related-posts a,a:hover {text-decoration:none;color: #2288bb;}
</style>
<script type='text/javascript'>
  var relatedpoststitle=&quot;You Might Also Like Reading:&quot;;
</script>
<script src='https://rawgit.com/101Helper/docs/master/related-post.js' type='text/javascript'/>
</b:if>

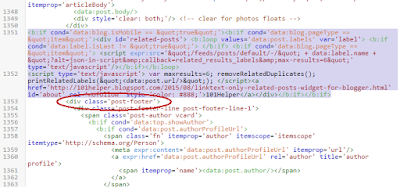
Step 5: Now search for below piece of code:

<div class='post-footer'>

Step 6: Copy below code and paste it just above the above code:

<b:if cond='data:blog.pageType == &quot;item&quot;'><div id='related-posts'> <b:loop values='data:post.labels' var='label'> <b:if cond='data:label.isLast != &quot;true&quot;'> </b:if> <b:if cond='data:blog.pageType == &quot;item&quot;'> <script expr:src='&quot;/feeds/posts/default/-/&quot; + data:label.name + &quot;?alt=json-in-script&amp;callback=related_results_labels&amp;max-results=6&quot;' type='text/javascript'/></b:if></b:loop>
<script type='text/javascript'> var maxresults=6; removeRelatedDuplicates(); printRelatedLabels(&quot;<data:post.url/>&quot;); </script><a href="http://101helper.blogspot.com/2015/08/linktext-only-related-posts-widget-for-blogger.html" id="about"  style="color: #888;">101Helper</a></div></b:if>

You may find <div class='post-footer'> several times but you have to paste above code above the second one.


Step 7: Click on save template and you are done!

Note: Make sure to label every post of your blog otherwise this widget will not work.

Customization:

Number of posts:

To change number of posts change 6 with desired number of posts in maxresults=6

Title of related posts:

To change title of your related posts widget just replace "You Might Also Like Reading" with your desired title.

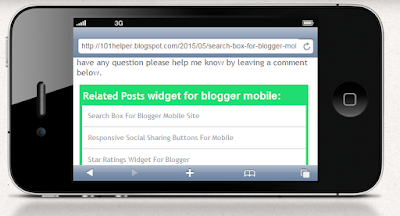
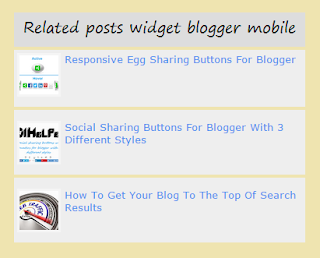
How To Show Simple Related Posts Widget In Blogger Mobile Site Under Posts?

related-posts-widget-for-blogger-mobile-site

If you are wishing to show show a simple related posts widget below your posts in mobile view too then follow below steps. Don't worry it won't effect your mobile site speed! You don't need to follow all steps again, once you have installed this widget in your desktop site then you just have to use the code of step 6 with a little bit changes(I have made). So follow below steps


Step 1: Optimize your blog for mobiles first (Use Custom Blogger Mobile Template).

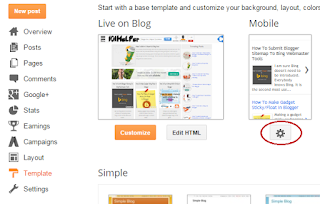
To use blogger custom template go to Blogger Dashboard > Template > Click on Blogger Mobile Settings Icon as shown in below picture.

how-to-use-blogger-mobile-custom-template

Now switch your mobile template to Custom.

how-to-use-blogger-mobile-custom-template-101helper

Step 2: Copy below code:

<b:if cond='data:blog.isMobile == &quot;true&quot;'><b:if cond='data:blog.pageType == &quot;item&quot;'><div id='related-posts'> <b:loop values='data:post.labels' var='label'> <b:if cond='data:label.isLast != &quot;true&quot;'> </b:if> <b:if cond='data:blog.pageType == &quot;item&quot;'> <script expr:src='&quot;/feeds/posts/default/-/&quot; + data:label.name + &quot;?alt=json-in-script&amp;callback=related_results_labels&amp;max-results=6&quot;' type='text/javascript'/></b:if></b:loop>
<script type='text/javascript'> var maxresults=6; removeRelatedDuplicates(); printRelatedLabels(&quot;<data:post.url/>&quot;); </script><a href="http://101helper.blogspot.com/2015/08/linktext-only-related-posts-widget-for-blogger.html" id="about" style="color: #888;">101Helper</a></div></b:if></b:if>

Step 3: Go to template > Edit Html and find below piece of code in your template:

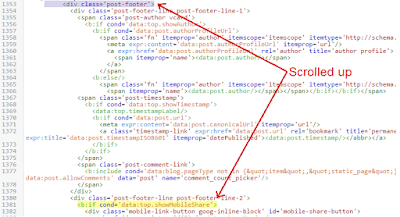
<b:if cond='data:top.showMobileShare'>


how-to-add-related-posts-widget-in-blogger-101helper

Step 4: After finding <b:if cond='data:top.showMobileShare'> scroll a little bit up and find below code:

<div class='post-footer'>

related-posts-widget-for-blogger-mobile-site-101helper

Step 5: Just above paste the copied code(step 2).

how-to-add-related-posts-widget-in-blogger-101helper

Step 6: Click on save and you are done!

I hope you like this post and it was helpful to you. If you have any question ask me in comments. Share this post and help others. Follow and subscribe for latest blogging tutorials, gadgets, widgets, tips and tricks. Thanks for visiting 101Helper.

Search tags: Simple related posts widget blogger,Related posts widget for blogger,stylish related posts widget,links,text only related posts widget,101helper blogger gadgets

Related Posts Widget For Blogger Mobile

related posts widget for blogger mobile 101helper

A very important factor of off page seo is internal linking, it means to inter link other posts with the post you write. Internal linking is good for seo as well as it increases your page views because it is the way by which visitors reach to your posts. Internal linking is of two types one is to mention links of older posts in new post and the second is to add a related, recentrecommendation or featured posts widget in your blog. It helps visitors to reach to more posts and read them. Related post widget is most popular in desktop sites but now you can add related posts widget in your blogger mobile site to engage your mobile visitors to your blog. So in this post I will show you how to add related posts widget in blogger mobile site.

You can see a live demo of this widget in my blog either in your smartphone or on desktop. Just visit my blog's mobile site by this link 101helper.blogspot.com/?m=1

Before we start, first optimize your blog's mobile site by reading this post. After optimizing your blog for mobiles just follow below steps to add related posts widget in your blog(mobile site).

Also Read: Text Only/Links Only Related Posts Widget For Blogger Mobile Site.

Step 1: Go to blogger dashboard and navigate to layout > add a gadget > Html/javascript.

Step 2: Copy code of mobile related posts widget from below:


Step 3: Paste the copied code into Html/javascript and click on save.

Step 4: Grab the newly added gadget(related post mobile widget) and drop it at the bottom in the layout page. As shown in below image.


related posts widget for mobile


Widget Not Appearing In Mobile Site?

If the related post widget fails to show in your blog's mobile site then follow below steps.

Step 1: Go to blogger dashboard, navigate to template and click on Edit Html.


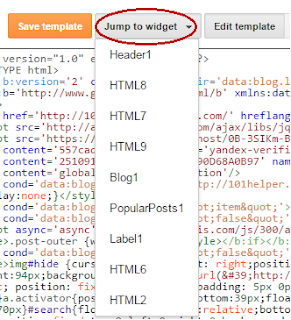
Step 2: Jump to the widget(related posts mobile) by its id or find it by using Ctrl+F

how-to-jump-to-a-gadget-in-blogger

Step 3: Search for a line similar to this:

<b:widget id='HTML7' locked='false' title='' type='HTML'>

Step 4: Add this piece of code mobile='only' before locked='false' like this:

<b:widget id='HTML7' mobile='only' locked='false' title='' type='HTML'>

Step 5: Click on save template and you are done. Open your template and scroll to the end to see your related posts widget!

I hope this widget is working fine on your blog, if you are facing any problem tell me by leaving a comment below. Follow and subscribe to get latest news about blogger widgets.

Search Tags: Related Posts Widget For Blogger Mobile,blogger widgets and gadget,related posts widget,random posts,featured posts,thumbnails,text only,blogger widgets

Engageya Recommendation/Related Post Widget For Blogger

Related posts widget for blogger/wordpress

Content recommendation is the best way to boost your blog traffic. There are so many ways to show recommended content is a blog such as related posts widget, popular post widget, random posts widget etc. Content recommendation doesn't limit to just widgets but internal linking is also a type of recommendation and it helps to make a seo friendly blog. Content recommendation widgets can be found on internet in a huge quantity and a number of content amplification websites provide recommendation widgets like shareholic, outbrain, linkwithin, addthis etc. A new content amplification website is also introduced which is Engageya and this post is about how to use recommendation widgets powered by Engageya. Engageya has more than 7 types of content recommendation widgets and it also lets its users to join their publisher program and be publisher to earn money via showing recommended content from other websites. So in this post I will show you how to use Engageya recommended content widgets in blogger. 

Features of Engageya:
  • It is free of cost you don't need to pay for it, all you need is to register first before using widgets.
  • Engageya provides more than 7 recommendation widgets.
  • It lets you to earn money by joining publisher program.
  • Engageya has options for advertisers also, users can advertise their content.
  • It lets its users to promote their Facebook fan page for free, so now you can promote your Facebook fan page and get more likes for free.
  • It provides report graphs for every click you get on your posts.
  • You can use more than one type of recommended content widgets at the same time.
  • Engageya content recommendation widgets works on Blogger, wordpress, joomla, weebly or any other domain.
  • Widgets have a cool, decent and stylish look!
  • You can customize link color, rows of recommended content and text above widget.
  • You can use an account for more than 1 websites.
Types of recommended content widgets:

Engageya has more than 7 types of widgets, you can see a summery below:

(1). Round thumbnails:

This widget shows recommended content with round thumbnails which has stylish effect that when an image is hovered it fades away. You have option to show either one or two rows of recommendations. See a demo of round thumbnails recommended content widget below:

Engageya recommendations widget for blogger

(2). Square thumbnails(simple):

Square thumbnails recommended content widget has small square images without any effect. It is the most simple recommended content widget among all. You can see a screenshot below:

Related posts widget for blogger with thumbnails | 101helper

The image size is 100x100, good for those blogs which have less space for widgets.

(3). Square thumbnails with hover effect:

This widget is same as above one with the only difference of hover effect and a divider between each story. You can take a look below:

Responsive related posts widget for blogger with thumbnails | 101helper

(4). Square thumbnails with fixed color:

This widget has a stylish look and the image size is 120x120 with a hover fade out effect too. It is an alternative of shareholic related posts widget and looks somehow like that. You can take a look of this widget below:

Stylish related posts widget for blogger with thumbnails | 101helper

There are more square thumbnails and rectangular thumbnails related content widgets also but these have large images, so I am not sharing all of them because they are as above widgets with the only difference of large thumbnails. So sign up at Engageya to see all of them.

(5). Text only(bullet list):

Engageya provides text recommended content widgets also is different styles among which the most simple is this one. It shows on text without any hover effect you can see a demo in below image:

Related posts widget for blogger without thumbnails | 101helper

(6). Text only with hover effect:

This gadget also shows only links without thumbnails but it has a hover effect. It is not simpler than the above one both of these gadgets show only text. You can take a look below! I have change its color from black to blue. You can also change color of text at the time of installing this gadget.

Text only Related posts widget for blogger | 101helper

(7). Text only slide-in:

This gadget slides out when the page loads. It shows only text and you have options to set background color of the widget, text color and also header of the gadget. You can see a demo of this gadget is below animated image:

Slide-out related posts widget for blogger | 101helper

(8). Slide-in with large thumbnails:

This gadget slides-in and shows large square thumbnails of posts with a slideshow and next/previous buttons. See below image for demo:

Slide-out related posts widget for blogger | 101helper
  
You can find this widget with more kinds also like slide-in with background images and a title and description floating on it and a slide-in widget with small images, title and description.  

How to use Engageya recommended content widget in blogger?

Using Engageya recommendation widgets in blogger is very easy, all you need is to follow below mentioned steps and an Engageya account. 

(1). First of all you need an Engageya account to use any of the above recommendation widgets so register a free account at Engageya

(2). Log-in to your Engageya account and go to widget builder by using this link http://www.engageya.com/widgets/new/ or simply click on my widgets and select create a new widget.

(3). On the widget building page first name your widget and beside it select style of recommendation widget which you want to add in your blog.


How to use Engageya recommended content widget in blogger?

You can see an option beside widgets having title "website" here you can add more than one websites to your account.

(4). After selecting desired style and giving name to your widget its time to change font color, the default color is green to change it click on the arrow beside color option and choose a desired color. If you want to add a specific color to it just enter its code and you are done. How to get code of a color? 


How to use Engageya recommended content widget in blogger?

Click on apply after changing the color.

(5). After font color change the header line with desired text e.g related posts or you may also like.

(6). Select a site below header text and after that choose recommendation type, if you wish to show partner content to earn money check it or choose only "related content from your blog"

(6). After selecting recommendation type choose category of your blog and below it select platform as blogger. If you want to promote your facebook page for free then after selecting platform enter your fanpage link.

How to use Engageya recommended content widget in blogger?

(7). Click on install widget, it will take you to instructions page, close it and go to my widgets.

How to use Engageya recommended content widget in blogger?

(8). Click on Install widget, it you will take you to install widget page, here click on edit template and replace the code with below piece of code.

<b:includable id='main'><b:if cond='data:blog.pageType == &quot;item&quot;'><data:content/></b:if></b:includable>


How to use Engageya recommended content widget in blogger?

(9). Click on Add widget and you are done.

If you skip step 8 and try to add this gadget directly to your blog it will appear in homepage below each posts, so don't skip step 8.

Hope you like this post, if you have any question feel free to ask me in comments below. Follow and subscribe to get latest updates about blogger gadgets. Share this post with others and help me spread 101Helper.

Search tags: Engageya recommendations widget for blogger, related posts widget for blogger,related posts widget for blogger with thumbnails,related posts widget for blogger without thumbnails, round thumbnails related posts widget for blogger, related posts slide-out widget for blogger, 101Helper blogger related posts widget for blogger, recommended content widget for blogger and wordpress, Earn money gadget for blogger, earn money by related posts widget in blogger.

Floating Social Sharing Bar For Blogger

Floating social sharing bar for blogger | 101Helper social sharing buttons for blogger


Social sharing is a good way to drive traffic to a blog or website therefore social buttons are used in blogs and websites to get shares, tweets, pins and so on to spread blog or webpages. Blogger has built-in share buttons below each post, but now a days people use to add floating buttons in blogs because its trending and is helpful to share posts easily and quickly. Floating buttons are in both vertical and horizontal styles but the most popular one is vertical style, so people usually use vertical floating share buttons in blogs but horizontal floating buttons are also used to help visitors share posts without scrolling to the end of the post as share buttons float with scrolling page as the visitor scrolls.
I have shared smooth vertical flaoting share buttons gadget before and in this post I am sharing Floating social sharing bar. You can see a demo in below image, hope you like it:

Floating social sharing bar for blogger | 101Helper social sharing buttons for blogger

To add this gadget below post title in every post of your blog follow below steps:

Step 1: Go to blogger dashboard and choose the blog in which you want to add this gadget.

Step 2: Select template in the menu on left side and click on Edit Html.

Step 3: Click anywhere inside the code box and search for </head> by using Ctrl+F on your keyboard. 

Step 4: Copy the below code and paste it just below </head>:

<script src='http://ajax.googleapis.com/ajax/libs/jquery/1.7.1/jquery.min.js' type='text/javascript'/>

<script type='text/javascript'>
//<![CDATA[
$(function() {
var $movesbuttons = $("#floating-social-buttons"),
$window = $(window),
offset = $movesbuttons.offset();
$window.scroll(function() {
if ($window.scrollTop() > offset.top) {
$movesbuttons.css({'position' : 'fixed', 'width' : '625px', 'top' : '0px'});
} else {
$movesbuttons.css({'position' : 'absolute', 'top' : 'auto'});
}
});
});
//]]>
</script>

Step 5: Search for ]]></b:skin> by using Ctrl+F on your keyboard and just above it paste the below code:


#floating-social-buttons {
padding: 6px 0px 12px;
position: absolute;
background: #F6F6F6;
border-bottom: 1px solid #DEDEDE;
width: 625px;
height: 18px;
z-index: 10;
}
.floating-social-buttons {
margin-left: 5px !important; 
}
.floating-social-buttons li {
float: left;
margin-left: 5px;
list-style:none;
}

Step 6: Now search for <div class='post-header'>, make sure to search 2 times and paste the below code below the second <div class='post-header'>:

 <b:if cond='data:blog.pageType == &quot;item&quot;'>
<div style='padding:5px 0 35px 0;clear:both;'>
<div id='floating-social-buttons'>
<ul class='floating-social-buttons' style='     position: absolute;     left: 135px; '>
<p style='     position: absolute;     top: -13px;     left: -132px; font-size: 16px;'>SHARING IS CARING:</p>
<li><iframe allowTransparency='true' expr:src='&quot;http://www.facebook.com/plugins/like.php?href=&quot; + data:post.url+ &quot;&amp;layout=button_count&amp;show_faces=false&amp;width=100&amp;height=25&amp;action=like&amp;font=tahoma&amp;colorscheme=light&quot;' frameborder='0' scrolling='no' style='border:none; overflow:hidden; width:100px; height:25px;'/></li>

<li><a class='twitter-share-button' data-lang='en' href='https://twitter.com/share'>Tweet</a><script src='//platform.twitter.com/widgets.js' type='text/javascript'/></li>

<li><script src='http://apis.google.com/js/plusone.js' type='text/javascript'/><g:plusone expr:href='data:post.url' size='medium'/></li>

<li><a class='pin-it-button' count-layout='horizontal' expr:href='&quot;http://pinterest.com/pin/create/button/?url=&quot; + data:post.url + &quot;&amp;media=&quot; + data:post.thumbnailUrl + &quot;&amp;description=&quot; + data:post.snippet' style='margin:0 10px 5px 0;'>Pin It</a> <script src='http://assets.pinterest.com/js/pinit.js' type='text/javascript'/></li>

<li style='     margin-left: 20px; '><script src='//platform.linkedin.com/in.js' type='text/javascript'> lang: en_US</script>
<script data-counter='right' type='IN/Share'/></li>

</ul>
</div>
</div>
</b:if>

Step 7: Click on save template and you are done successfully.

Customization: 
  • If you wish to change width of the bar increase or decrease number in pieces of codes highlighted in step 4 and step 5.
  • If you want to change title(SHARING IS CARING:) Replace it with desired title is code used in step 6.
Make sure to change width in both pieces of codes used in step 4 and 5 otherwise with will remain same.

If you have any question related to this post or this gadget is not working is your blog ask me in comments. Follow and subscribe to get latest updates about blogger gadgets, tips, tricks, menus, tutorials, seo etc. Share this post with others and help me spread 101Helper.

Search tags: Add social media buttons below titles in blogger, Social buttons for blogger, floating social buttons, horizontal share buttons, share bar for blogger, Floating social sharing bar for blogger, how to add floating buttons in blogger, 101Helper gadgets for blogger.