How Has Google's Mobile Friendly Update Affected Websites?


Mobilegeddon


Last week, Google started rolling out a new mobile friendly update to its mobile search algorithm. This was aimed at significantly changing the mobile search results to give preference to mobile ready web sites over non mobile ready ones. Experts jokingly termed it 'Mobilegeddon', because all signs indicated that it is a major change in many years, and will significantly impact websites. But a week after the launch, has it really been such a significant update?


Thus far, the algorithm doesn't seem to have had as big of an impact as we expected.


Google confirmed in the Webmaster Central blog that the roll out began on Tuesday, April 21st. Some experts started seeing a difference as early as the 22nd. Some websites such as SEJ even published a list of top winners and losers from this mobile friendly update.


Mobilegeddon


However, in many cases, these changes were merely slight disturbances, and not very significant shifts. Several SEO metric companies such as Searchmetrics are tracking the update and for the most part, they are not seeing huge shifts in the Google mobile ranking algorithm just yet.


This is not to say that websites haven't been affected. Quite the contrary. Some websites certainly seem to be losing and some taking advantage. But compared to overall search volume for major keywords, the change isn't huge. However, Google has said that the roll out can last a week more yet. So maybe we just need to wait a little longer.


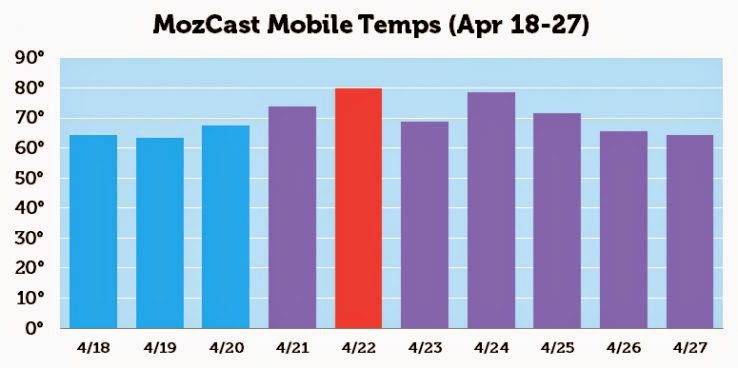
According to Moz, "so far, the big day was April 22nd, and it wasn't that big." Peter Meyers from Moz has been tracking mobile search results rankings for a set of top keywords, and according to him, the punch of the update hasn't fallen, not as yet anyway.


MozCast
Credits: Moz Blog


Some experts reckon that Mobilegeddon is here. According to Searchmetrics, 'visible trends can be seen in the new data'. But for the most part, the webmaster community hasn’t been too impressed with the level of significance in the mobile results. Ryan Heuser from seoClarity noted a variance of only 5.1% in Google mobile search results.


This means that most are not noticing significant changes to the mobile search rankings yet. Again, that might change over the course of the next week. With that said, there is still time to make your site mobile friend. Follow the article below to get started on that.


Good luck :)

"Featured Posts" Slider Widget For Blogger

"Featured Posts" Slider Gadget For Blogger

Featured posts slider is a gadget that slides featured(recommended) articles of a blog. Featured posts sliders are of several types, some are of images type which slides only images of posts while some only slides titles of posts but in this post I will share something awesome which nobody has shared before me. Its a Slider that slides the whole posts along with thumbnails, titles, and a short description. It has a unique style and a good look! You can see a demo of this gadget on my blog's HomePage. Before you add this gadget in your blog let me tell you one thing that is you have to write the description, title, link of the post and thumbnail link on your own, it will not automatically get posts for you. You can select which posts do you want to show up.

I hope you'll love this gadget. You can add as much posts as you want, there is no limit of posts. To add this gadget in your blog follow below steps:

See Live Demo

Title Of Post goes here

Description Of Post goes here Post goes here Post goes here Post goes here Post goes here Post goes here

Title Of Post goes here

Description Of Post goes here

Title Of Post goes here

Description Of Post goes here


Step 1: Go to blogger dashboard.

Step 2: Select template and click on edit html.

Step 3: Search for <head> and just below it paste the below code:
<script src='https://ajax.googleapis.com/ajax/libs/jquery/1.12.2/jquery.min.js'/>

Step 4: Click on save template.

Step 5: Go to Layout and click on add a gadget.

Step 6: Scroll down to Html/javascript.

Step 7: Copy below code and paste it in the Html/javascript window.

<div class="slider">
<div><a href="Your post link"><img src="Your post's thumbnail link" /><h3>Your post's title</h3></a><p>Your post description </p></div>
<div><a href="Your post link"><img src="Your post's thumbnail link" /><h3>Your post's title</h3></a><p>Your post description</p></div>
</div>
<style>
.fadein { position:relative; height:332px; width:500px; }
.slider img {width:235px;height:200px;position:absolute; left:5px; top:5px;padding:0;border:0;box-shadow:none;}
.fadelinks > *, .slider > * { position:absolute; left:0; top:0; display:block; }
.fadelinks, .slider {
    position: relative;
    height: 200px;
width: 615px;
    background: #eee;
overflow: hidden;
padding: 5px;
}
.slider h3 {
    position: relative;
    left: 250px;
top: 5px;
    font-size: 17px;
  white-space: nowrap;
  width: 350px;
  overflow: hidden;
  text-overflow: ellipsis;
}
.slider a { text-decoration:none; }
.slider p {
    position: relative;
    left: 245px;
    font-size: 13px;
    bottom: 5px;
    padding: 0 5px;
   width: 350px;
}
</style>
<script>
  $(function(){
  $('.slider > :gt(0)').hide();
  setInterval(function(){
    var rand = Math.floor(Math.random() * ($('.slider').children().length-1));
    $('.slider > :first-child').appendTo('.slider').fadeOut();
    $('.slider > *').eq(rand).prependTo('.slider').fadeIn();
  }, 7000);
});
</script>


Replace Your post link with your post's link Your post's title with your post's title Your post's thumbnail link with your post's image url and Your post description with your post's short description.


Step 8: Click on save and you are done.

Customization:

To change the time duration of sliding posts change the number 7000 highlighted by yellow color in the ending lines of code.

7000 means 7 seconds.
<script>
  $(function(){
  $('.slider > :gt(0)').hide();
  setInterval(function(){
    var rand = Math.floor(Math.random() * ($('.slider').children().length-1));
    $('.slider > :first-child').appendTo('.slider').fadeOut();
    $('.slider > *').eq(rand).prependTo('.slider').fadeIn();
  }, 7000);
});
</script>

Adding more slides:

I have set up 5 slides in this gadget but if you want to add a new slide just copy the below code and paste it above this piece of code:
<---Area below which new slide code is to be placed---->
<div class="slider">

Code for New slide:
<div><a href="Your post link"><img src="Your post's thumbnail link" /><h3>Your post's title</h3></a><p>Your post description</p></div>

I have added 10 slides so you can add 10 slides without any problem as shown in above example.

Changing Width Of The Slider:

To change width of the slider make changes in  width: 615px; 

Note: If you are changing width of your slider then you need to change the width of description too.

width: 350px; refers to width of description and width: 350px; refers to width of title.

Make sure to change with of title and description while making any change in width of slider because it may look irregular if you don't do so.

I hope you like this post and it worked in your blog. If you have any problem ask me in comments or contact me. Follow by E-mail to get instant news about blogger gadgets in your inbox. If this post or any other post help you out then share it with others through social networks. Keep visiting 101Helper :)

Search tags: Increase post page views gadget,"Featured Posts" Slider For Blogger, Post slider gadget for blogger, Featured post gadget, 101Helper gadgets for blogger.

Major WordPress Plugins Making Websites Vulnerable


Vulnerable WordPress Plugins


Are you using WordPress to run one of your websites? If yes, then you need to read through. According to a latest warning by a security company, a number of WordPress plugins are vulnerable to a security flaw, which could compromise your website and leave it open for malicious attacks. These are some of the major plugins that you are likely to have installed on your websites. If so, then immediate action is required!


The warning was issued by WordPress Security watchdogs Sucuri. According to them, this is a major security flaw that is shared by many WordPress plugins, some of which are quite popular. According to them;


“Cross-site Scripting (XSS) due to the misuse of the add_query_arg() and remove_query_arg() functions. These are popular functions used by developers to modify and add query strings to URLs within WordPress.”


Apparently, the problem was that the official WordPress Official Documentation for these functions was not very clear, which led to many plugin developers using them in an insecure way.


To date, this is the list of affected plugins:


  • Jetpack

  • WordPress SEO

  • Google Analytics by Yoast

  • All In one SEO

  • Gravity Forms

  • Multiple Plugins from Easy Digital Downloads

  • UpdraftPlus

  • WP-E-Commerce

  • WPTouch

  • Download Monitor

  • Related Posts for WordPress

  • My Calendar

  • P3 Profiler

  • Give

  • Multiple iThemes products including Builder and Exchange

  • Broken-Link-Checker

  • Ninja Forms


As you can see, some of these plugins are very popular and used by millions of websites. If you use any of the above plugins, it’s recommended that you update them immediately.


This vulnerability was initially discovered last week, which has allowed for time for the flaws to be patched. Sucuri reports that all plugins have been patched, and as of this morning updates should be available to all users.


As an additional caution, plugins beyond what’s listed above may be vulnerable to the same security flaw, and have just not been detected yet. With that in mind, it’s best to keep all of your plugins updated just in case.


Stay safe :)


How To Add Facebook Page Plugin/Like Box In Blogger

How To Add New Facebook Page Plugin In blogger | 101helper

Facebook is the number one social network and has a global rank 2. It is used by every individual now a days. Facebook is good for chatting and also for small businesses like blogs or websites. It is used by most of bloggers to get in touch with their fans, so Facebook is used to create fan pages too. In the beginning Facebook provided a plugin called like box for blogs and websites but it will stop working from June 23rd 2015 as Facebook has upgraded this plugin to a new plugin called "Page Plugin".


Facebook new like box | 101helper

"Page Plugin" is much better than Like box due to its stylish look, share option, cover photo and professional look. As Facebook has deprecated the old plugin so now we should upgrade to new plugin in order to get in touch with our fans so in this post I will show you how to add Facebook "Page Plugin"  in blogger.


Don't Miss:
Follow below steps to add Facebook "Page Plugin" in blogger:

Step 1: Go to Facebook Page Plugin page.


Step 2: Replace https://www.facebook.com/facebook with your page's link.


Stylish Facebook new like box blogger blog

Step 3: Adjust width and height of your plugin(Minimum height is 130px and minimum width is 280 px and maximum width is 500px).


Stylish Facebook new like box blogger blog | 101helper

Step 4: Check or un-check other options according to your needs(Hide cover photo, Show friend's faces, Show pages posts).


Facebook like box new

You can see a preview of your plugin below the widget customization box.

Step 5: Click on Get Code(A pop-up window will be opened).

Facebook says to copy the javascript code and paste it after <body> or </body> but it won't work on blogger. Blogger will not accept your template so you have to do it in other way. So move to step 6.


Facebook new like box blogger

Step 6: Copy the javascript code and go to Blogger Dashboard > Layout > Add A Gadget > Html/javascript and paste the javascript .

Step 7: Go back to Facebook plugin page and copy the second code.


Facebook new like box blogger blog

Step 8: Paste this code(second code) into the same Html/javascript window in which you pasted the first code.

The overall code should look like similar to below code:

<div id="fb-root"></div>
<script>(function(d, s, id) {
  var js, fjs = d.getElementsByTagName(s)[0];
  if (d.getElementById(id)) return;
  js = d.createElement(s); js.id = id;
  js.src = "//connect.facebook.net/en_US/sdk.js#xfbml=1&version=v2.3";
  fjs.parentNode.insertBefore(js, fjs);
}(document, 'script', 'facebook-jssdk'));</script>
<div class="fb-page" data-href="https://www.facebook.com/facebook" data-hide-cover="false" data-show-facepile="true" data-show-posts="false"><div class="fb-xfbml-parse-ignore"><blockquote cite="https://www.facebook.com/facebook"><a href="https://www.facebook.com/facebook">Facebook</a></blockquote></div></div>

Step 9: Click on save and you are done successfully!

I Hope you like this post and it was helpful to you. Follow by E-mail to stay updated. Keep visiting 101Helper and share this post with others. 

Give me your feedback in comments.

Search tags: Facebook like box, New Facebook like box, How To Add New Facebook Page Plugin In blogger, Facebook like box not working, Facebook like box for blogger. 

How To Check Your Blog's Seo Status

Seo analysis tools for blogger | 101helper

Search engine optimization is a way to get more blog traffic, organic traffic and unique traffic but it needs a blog to be optimized 100% for better traffic. There are many ways to optimize a blog for search engines like title optimization, description optimizations, robots text optimization etc but one more thing is important as well and that is to check your blog's seo, to know if you are doing it in write way or not. So in this post I am gonna tell you how to check your blog's seo using some online tools. I will discuss all tools one by one, hope you'll find this post helpful.


(1). Meta Checker:

Meta codes like meta title, meta description, meta keywords, meta language, meta author etc are added to blog to tell search engines bots about your blog's title, keywords, description, language, author info etc. It helps in better crawling as well as better search results. But while adding it there is no indicator or analyzer in blogger to tell you about the status of your meta codes, so you have to check it on you own by using online tools. So here I am using the best meta checker to check my blog's meta status. You can also use it to check your blog's meta codes status.


Step 1: Go to Meta checker


Step 2: Type your blog's Homepage url in the box.


Meta checker for blogger | 101helper

Step 3: Click on check and wait for your results.


This tool is 100% reliable. It gives you all info about your meta codes status, duplicate description, keywords strength as well as it has a meter at the top just like a car's speed meter and it indicates your blog's meta codes status. If the meter is showing reading from zero to 100 again and again then it means you are 100% optimized.


Seo Site Checkup:


Seo site checkup blogger | 101helper

Seo site checkup is an online tool which provides you with all seo information of your blog. It give all data such as title, description, keywords, favicon, url structure, social shares, speed, general analysis, Google search results preview, h1 and h2 tags etc. In other words this tool is all in one online seo checker and can be used for free as well as you can buy premium membership. Seo site checkup has seo articles too which are really helpful to make one's seo better. To check you blog's seo status follow below steps:


Step 1: Go to Seo Site Checkup.


Step 2: Enter your blog's Homepage url.


Seo site checkup blogger | 101helper seo

Step 3: Click on checkup and wait for tools to look up your blog.


Note: This tool is for free but can be used only once in an hour. You can also get more tools by signing up for 30 days trial.


Site Analyzer:


Site seo analyzer blogger seo tools

Site analyzer is another tool to analyze blog's seo status. It is similar to seo site checkup but is 100% free of cost. It gives all information about your blog, from accessibility to social networking with brief details. 


Use this tool


Bing Seo Analyzer:


Bing is one of the biggest search engines and like other developed search engines it also have webmaster tools. In Bing webmaster tools seo analyzer is also found which lets you to check out the seo of a specific page of your site/blog. It notifies about long or short description, images alt and h1 tags. So Bing seo analyzer can be used to make your blog's seo better. Follow below steps to know how to use Bing seo analyzer:


Step 1: Go to Bing webmaster tools and Sign-in to your Microsoft account(create a new one if you don't have a Microsoft account). 

Bing Seo Analyzer blogger | 101helper

Step 2: Click on Diagnosis & tools in the menu on left side and select Seo Analyzer.

How to use Bing Seo Analyzer | 101helper

Step 3: Enter the link of the page which you want to analyze.

Blog seo checkup | 101helper

Step 4: Click on Analyze and wait for Bing to analyze your page.

Final words(Conclusion):

Its important to analyze your blog using the above tools because it helps you to know if you are doing it in right way or your all efforts are going in vain. 

Hope you like this post and you found it helpful. If you have any problem or suggestion, share it with me in comments. Follow and subscribe to get latest blogger tutorials in your inbox. 

Search tags: How To Check Your Blog's Seo Status, Online seo tools, Seo tools for blogger, Seo guide 2015, How to check blogger seo.

How To Fully Optimize Blogger Blog Titles For Seo

How to optimize blogger blog titles for seo | 101helper

Title optimization is very important thing in seo, specially in 2015, blog title optimization is the first step to get high blog traffic. Although description and keywords are also very important but if you are very serious about your blog traffic then you must concentrate titles of your blog first, because the titles are on the top. You must have read about titles optimization in blogger by adding a separator between blog and post title, but that's not enough because that only works for post pages and what about other pages? so you have to optimize them too for more better results. Therefore in this post I will show you how to optimize your "blog posts", "pages" and also "page not found" pages for seo. If you have read this post http://101helper.blogspot.com/2014/12/blog-title-optimization-for-seo-in-blogger.html then your blog is 90% optimized but after applying this post your blog titles will be 100% optimized for search engines. So lets begin!


Step 1: Go to blogger dashboard > template > edit template.

Step 2: Search for the following codes:


<title><data:blog.pageTitle/></title>


If you didn't find it then find this one:


<b:if cond='data:blog.pageType == "item"'><title><data:blog.pageName/> |<data:blog.title/></title><b:else/><title><data:blog.pageTitle/></title> </b:if> 


Step 3: Replace it with the following code:


<title><b:if cond='data:blog.pageType == &quot;index&quot;'><data:blog.pageTitle/><b:else/><b:if cond='data:blog.pageType != &quot;error_page&quot;'><data:blog.pageName/> | 101Helper<b:else/>Page not found | 101Helper</b:if></b:if></title> 


Step 4: Replace 101Helper with your blog name.


Step 5: Save your template and you are done.


Congratulations! you are successfully optimized for search engines. 

How does it work?

It works in a very simple way. The old code which is recommended by every website/blog(used in step 2) adds a separator in only post titles and has no concern with other pages like contact, sitemap etc but these pages are also important as they are indexed so the new code which we used in step 3 adds separator in other pages too. To see a demo visit my blogs sitemap and see at the top of your browser.
   
Optimized robot text:

As above you have optimized your blog's titles for search engines therefore you have to use optimized robot text also to block those pages from being indexed that don't have any description or optimized titles(category/label pages). So I have created 100% optimized robots text which will surely help you in getting higher traffic. Follow below steps to add 100% optimized robots text in your blog:

Step 1: Navigate to Dashboard > Settings > Search Preferences >  Crawling and Indexing > Custom robots txt > Edit.

Step 2: Copy the below text and paste it into custom robots text window:

User-agent: Mediapartners-Google
Disallow: 

User-agent: *
Disallow: /search
Allow: /

Sitemap: http://Youblog.blogspot.com/sitemap.xml

Step 3: Replace http://Youblog.blogspot.com with your blog's Homepage url.

Step 4: Click on save changes.

I hope you like this post, if you have any question ask me in comments. Follow by E-mail to get latest blogger seo tutorials in your inbox. Share this post with others and help me spread my blog. 

Search tags: Robots text for blogger, How to optimize blogger blog titles for seo, 2015 seo guide, seo guide for blogger 101helper.

How To Optimize Content For Google's Mobile Algorithm Update?


Google's mobile algorithm update


What is the biggest algorithm update Google has made over the last decade? For most of us, Google Panda and Penguin immediately spring to mind. Right? Wrong! The biggest and most notable change Google has made over the last few years happened, or at least started today. Unofficially dubbed as "Mobilegeddon", this new April 21 update is focused towards promoting mobile-friendly sites in search results, effectively turning the tables for various businesses, large and small.


This new update promises to be a game changer. It will rank mobile-friendly sites higher than non-mobile-friendly ones. Many webmasters from around the world are anxious about its release since it could significantly impact traffic, and could mean an entire reworking of site architecture and the content contained therein.


Today, we'll look at what this update means for your content, and how can you adapt your content to meet the requirements of this new algorithm update. There is going to be a series of changes that you should aim to heed if you intend to keep producing high-quality, compelling content after the update has completely rolled out.


1. Headline length


User experience on a mobile device is different than a desktop browser. One of the most obvious differences is the change in screen size (and the amount of usable real estate). Currently, a headline can stretch across the full banner-length of a browser, but mobile screens change the game when it comes to headline width.


Create shorter headlines. For Twitter users, it just means that you can practice your 140-character limit more often. For those of us who don’t use this particular social media network, now is a good time to start. We need to learn how to condense page-width headlines into more bite-sized chunks, without sacrificing the impact potential of our headline.


2. Create short paragraphs


“Snackable content” is something that content producers are all too aware of, but is especially important for mobile optimization. Create content that the user can consume in one sitting. However, the format in which we present this content is likely to be as bite-sized as the content itself. Because of short attention spans and aversions to “walls of text” it’s likely that mobile users would feel put upon when it comes to dealing with paragraphs that fill their entire screen.


What this Means for Us: Learn to summarize your ideas. Keep to the point and make your copy more targeted in nature. In some cases, such as home pages, reduce the amount of copy there altogether. Increased copy gives the user a hard time and makes for difficult reading, especially on a tiny display. Get your message across in short bursts.


3. Keeping it relevant


This mobile update is likely to make content producers do the same, paring content down to be less wordy while at the same time interspersing calls to action. Condensing content will require us to consider what we write and distill the message in as few words as possible.


What this Means for Us: Rethink the methodology for creating content. In addition to making content compelling and benefit focused, we must also now take a look at the amount of words we use and how often we call to action. It could possibly mean a change in the basic tenets of web writing.


The exclusion is blog content– they will always rank and read better in long form – but for your home and main pages, less content means a better mobile experience, and happier readers.


You may need to review web writing and revamp some marketing approaches accordingly to align to with what is expected from mobile friendly sites.

Syntax Highlighter Shortcode For Blogger Blogs!

SyntaxHighlighter Shortcode for Blogger

SyntaxHighlighter as you know is a fully functional self-contained code syntax highlighter developed in JavaScript. Which helps you prettify your Code format and display it in an organized numbered list style. Most Blogspot users often share HTML, CSS or JavaScript codes with their audience using Blockquotes but with this new shortcode you can better display scripts on your sites in a presentable way. This plugin neatly displays web technologies such as HTML, CSS, JavaScript, Php, Python, Sql, xml etc. The codes are displayed line by line number wise. It also provides the user with options to Print the code, copy it to clip board or to see the code Source. With SyntaxHighlighter Shortcode you can add codes not only inside your posts or sidebar widgets but you can also insert it inside Blogger comments!


add SyntaxHighlighter in comments

This new shortcode will be a revolution in the way bloggers share codes on their sites. Lets first see it in action!


1. Install Blogger Shortcode Plugin

In order to use SyntaxHighlighter shortcode you must first install the shortcode plugin for your blogger blog by following 7 easy steps shared on the link below:

Skip installing it if you have already added it in your blogger template

2. Add SyntaxHighlighter  Brushes and Styles

Brushes defines the formatting for the programming language you would use. The plugin shows different styles and formats the code differently for the type of script you use. Each code type comes with a script called Brush. I have used the most popular brushes but if you wish to use a brush of your choice then you can select one from this Brush list.

1 Go To Blogger > Template > Backup your Template

2 Click Edit HTML

3 Paste the code below just above </head>

<!--SYNTAX HIGHLIGHTER BY MBT STARTS-->
<link href='http://alexgorbatchev.com/pub/sh/2.1.382/styles/shCore.css' rel='stylesheet' type='text/css'/>
<link href='http://alexgorbatchev.com/pub/sh/2.1.382/styles/shThemeDefault.css' rel='stylesheet' type='text/css'/>
<script src='http://alexgorbatchev.com/pub/sh/2.1.382/scripts/shCore.js' type='text/javascript'/>
<script src='http://alexgorbatchev.com/pub/sh/2.1.382/scripts/shBrushCpp.js' type='text/javascript'/>
<script src='http://alexgorbatchev.com/pub/sh/2.1.382/scripts/shBrushCSharp.js' type='text/javascript'/>
<script src='http://alexgorbatchev.com/pub/sh/2.1.382/scripts/shBrushCss.js' type='text/javascript'/>
<script src='http://alexgorbatchev.com/pub/sh/2.1.382/scripts/shBrushJScript.js' type='text/javascript'/>
<script src='http://alexgorbatchev.com/pub/sh/2.1.382/scripts/shBrushPhp.js' type='text/javascript'/>
<script src='http://alexgorbatchev.com/pub/sh/2.1.382/scripts/shBrushPython.js' type='text/javascript'/>
<script src='http://alexgorbatchev.com/pub/sh/2.1.382/scripts/shBrushRuby.js' type='text/javascript'/>
<script src='http://alexgorbatchev.com/pub/sh/2.1.382/scripts/shBrushSql.js' type='text/javascript'/>
<script src='http://alexgorbatchev.com/pub/sh/2.1.382/scripts/shBrushVb.js' type='text/javascript'/>
<script src='http://alexgorbatchev.com/pub/sh/2.1.382/scripts/shBrushXml.js' type='text/javascript'/>
<script src='http://alexgorbatchev.com/pub/sh/2.1.382/scripts/shBrushPerl.js' type='text/javascript'/>
<script language='javascript'>
SyntaxHighlighter.config.bloggerMode = true;
SyntaxHighlighter.config.clipboardSwf = &#39;http://alexgorbatchev.com/pub/sh/2.1.382/scripts/clipboard.swf&#39;;
SyntaxHighlighter.all();
</script>
<!--SYNTAX HIGHLIGHTER BY MBT ENDS-->

4 Save your template and you are all done with the coding part!

Customization:

The above code will create the default White theme as shown in demo but if you want to use a dark theme or anyone of the 6 themes available then you just need to replace the yellow highlighted code above with the style sheet link of your preferred theme. Lets suppose you liked the "Fade to Grey theme" , then you will simply replace the yellow highlighted code with this code instead:

<link href='http://alexgorbatchev.com/pub/sh/current/styles/shThemeFadeToGrey.css' rel='stylesheet' type='text/css'/>

Output:
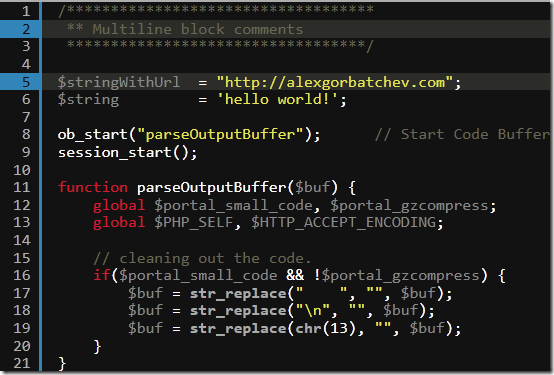
fadeTogrey Theme SyntaxHighlighter

For more such themes read this post

3. Finally Start Adding The SyntaxHighlighter Shortcode!

Now whenever you wish to add code inside your posts. comments or sidebar widgets, follow these steps

1. First Encode your Code using our HTML Encoder Tool

2. Next simply use the shortcode below to display the syntax highlighter on your blog

[code]Add Your Encoded Code Here[/code]

3. If you wish to highlight a certain row in your code then you can specify the row number with the "hl" attribute as shown below. Lets highlight row 1, 4 and 7.

Tip: Separate row numbers with comma. If you want to highlight a single row i.e. row 9 then simply type hl="9"

[code hl="1, 4, 7"]Add Your Encoded Code Here[/code]

Output:
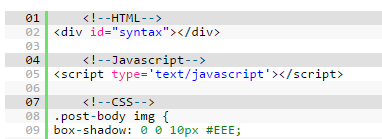
highlight rows in SyntaxHighlighter


Need Help?

Let me know if you need any help here. I hope the shortcode above simplifies code sharing on your blog and makes it easy for you to highlight Code Syntax in a much professional way using just a simple shortcode without adding any complex long HTML.

Peace and blessings buddies! =)
YouTube Shortcode For Blogger Blogs!

youtube shortcode plugin

After having developed shortcodes for SoundCloud and Dailymotion, it is now time to start embedding YouTube Video Player and YouTube Playlists anywhere you want. The shortcode for YouTube player lets you insert the player inside your Posts, Widgets and even the threaded comments with a single line of code. The method is extremely easy and lets you add the responsive version YouTube video Player which adjusts automatically to any screen size. You can now easily share MP4 or HD videos with your readers from YouTube with an extremely easy way. Lets see its demo in action!

Note: If YouTube is banned in your country try viewing the demo by installing this tool.

There are some old techniques which lets you embed YouTube videos in blogger comments but the method we are sharing today gives you an extra benefit. It lets you add a light-weight shortcode  which can be inserted almost anywhere not just the comment sections. You can treat it as a simple TEXT which can be pasted on any location of your template structure. It also gives you full control over your player or playlist thanks to the attributes which you can configure to turn ON or OFF the Player options. So it has a lot more to offer than any method shared earlier!


1. Install Blogger Shortcode Plugin

In order to use YouTube shortcode you must first install the shortcode plugin for your blogger blog by following 7 easy steps shared on the link below:

Skip installing it if you have already added it in your blogger template

2. How To create the YouTube Shortcode?

First select a video from Youtube and then copy its Video ID which is a 11 Characters pattern that is added at the end of every YouTube Page URL, as shown below

Video ID of youTube

In our example the Video ID is Qy4yULSqBA0.

Next use the shortcode below to insert your Player anywhere on your blog

[youtube src="Qy4yULSqBA0"/]

Replace the Video ID inside src with yours.

Output:

youtube shortcode output

That simple!

Create a YouTube Playlist Shortcode

This time find your favorite playlist on Youtube and copy the Video ID and Playlist ID from the URL in your address bar as shown below

finding youtube Playlist ID

Then use the shortcode below to embed your playlist on your web blog

[youtube src="-L-GOHa5-YQ" playlist="PL332F98D63FD60CB6"/]

The Video ID is inserted inside "src" and Playlist ID is inserted inside "playlist"

Output:

playlist shortcode

Customize your Player!

Find below the complete list attributes supported by the shortcode

Attribute Definition
src Insert Video ID here
playlist Insert Playlist ID here
width Adjusts width of video player. Can also be assigned in percentage for responsiveness.
height Adjusts height of video player
info Setting it to "0" will hide the video title and player actions. By default it is set to "1"
control Setting it to "0" will hide the player controls like the play/pause buttons, settings, streamer and Volume options. By default it is set to "1"
related Setting it to "1" will show suggested videos when the video finishes. By default it is set to false i.e. "0"

Use the format below to insert attributes inside shortcode. In the video below I am turning OFF the controls, Video title and turning ON showing related videos when video ends. I am also re-sizing the video using custom width and height.


[youtube src="z2_2cFityc4" control="0" info="0" related="1" width="450" height="350"/]

Output:

customize youtube player

Wasn't that easy!

Need Help?

I hope this new shortcode helps you embed videos on your blog with much more ease and comfort. Let us know if you need any help if needed. There is a lot more to come which will change your blogging experience forever. Stay tuned!

Peace and blessings buddies! =d

"About Me" Author Box Gadgets With Different Styles For Blogger

"About me" gadgets with different styles for blogger | 101helper

"About-me" gadget in blogger shows the profile pic, name and description about author of a blog. The simple about-me gadget shows only an image with a Google+ follow button and a link to Google+ profile. So I have created 4 stylish "about-me" gadgets which are easy to use, good looking and follow buttons of 4 different social networks are also added. I hope you like these gadgets. To add this gadget in your blog follow below steps.


Step 1: Go to blogger dashboard > Layout > add a gadget > Html/javascript.

Step 2: Copy the code of desired "about-me" gadget and paste it into Html/javascript window.


Style 1


<link href='http://fonts.googleapis.com/css?family=Open+Sans+Condensed:300' rel='stylesheet' type='text/css'/>

<div class="box">
   <div class="ribbon"><span>Admin</span></div>
<div id="about-me"> 
  <img src="http://lh5.googleusercontent.com/-p4_CJcGp4AM/AAAAAAAAAAI/AAAAAAAAABM/vdNgm0VFg70/s80-c/photo.jpg" /><p>Fahim Raza</p><p></p><h5>My name is Fahim Raza. I am a professional blogger. I have created many blogs. My recent one is 101Helper....</h5>
<p></p><p></p>
</div>
<div id="my-link">
<a href="https://www.facebook.com/pages/101Helper/623626157780837" target="_blank"><img src="http://i57.tinypic.com/aonk43.png" title="Facebook" width="22px" /></a>
<a href="https://twitter.com/101Helperblog" target="_blank"><img alt="Twitter" src="http://i58.tinypic.com/2ldzzog.png" title="Twitter" /></a>
<a href="https://plus.google.com/+101helperBlogspot" target="_blank"><img alt="Google+" src="http://i57.tinypic.com/3009oqw.png" title="Google" /></a>
<a href="https://www.pinterest.com/101helper" target="_blank"><img alt="Pinterest" height="22px" src="http://www.nptechforgood.com/wp-content/uploads/2012/02/pinterest-logo.jpg" title="Pinterest" width="22px" /></a></div></div>
<style>
#about-me{
  color:#444;
    width: 300px;
    padding: 20px 10px 110px;
    border: 2px solid #555;
  background-color:#eee;
 font-family: 'Open Sans Condensed',sans-serif;
}
#about-me img {
  border: 2px solid #666;
  width: 100px;
  height: 100px;
  position: absolute;
  bottom: 16px;
  border-radius: 2px;
  left: 8px;
}
#about-me p{
position:absolute;
bottom:84px;
  font-size:17px;
font-weight:bold;
  left:119px;
color: rgb(58, 148, 227);
}
#about-me h5{
  width:200px;
  position:absolute;
  left:119px;
  top:9px;
  color:#555;
font-size:14px;
}
#my-link {
position:absolute;
top: 94px;
  left: 119px;
}
.ribbon {
  position: absolute;
  left: -3px; top: -3px;
  z-index: 5;
  overflow: hidden;
  width: 75px; height: 75px;
  text-align: right;
}
.ribbon span {
  font-size: 10px;
  font-weight: bold;
  color: #FFF;
  text-transform: uppercase;
  text-align: center;
  line-height: 20px;
  transform: rotate(-45deg);
  width: 100px;
  display: block;
  background: #79A70A;
  background: linear-gradient(#359BED 0%, #5467A7 100%);
  box shadow: 0 3px 10px -5px rgba(0, 0, 0, 1);
  position: absolute;
  top: 19px; left: -21px;
}
.ribbon span::before {
  content: "";
  position: absolute; left: 0px; top: 100%;
  z-index: -1;
  border-left: 3px solid #5467A7;
  border-right: 3px solid transparent;
  border-bottom: 3px solid transparent;
  border-top: 3px solid #5467A7;
}
.ribbon span::after {
  content: "";
  position: absolute; right: 0px; top: 100%;
  z-index: -1;
  border-left: 3px solid transparent;
  border-right: 3px solid #5467A7;
  border-bottom: 3px solid transparent;
  border-top: 3px solid #5467A7;
}
</style>

Style 2

Stylish About me gadget for blogger style 2 | 101helper

<link href='http://fonts.googleapis.com/css?family=Open+Sans+Condensed:300' rel='stylesheet' type='text/css'/>

<div id="about-me"> 
  <img src="http://lh5.googleusercontent.com/-p4_CJcGp4AM/AAAAAAAAAAI/AAAAAAAAABM/vdNgm0VFg70/s80-c/photo.jpg" /><p>Fahim Raza</p><p></p><h5>My name is Fahim Raza. I am a professional blogger and owner of 101helper.blogspot.com. I like music, playing football,car race and blogging...</h5>
<p></p><p></p>
</div>
<div id="my-link">
<a href="https://www.facebook.com/pages/101Helper/623626157780837" target="_blank"><img src="http://i57.tinypic.com/aonk43.png" title="Facebook" width="22px" /></a>
<a href="https://twitter.com/101Helperblog" target="_blank"><img alt="Twitter" src="http://i58.tinypic.com/2ldzzog.png" title="Twitter" /></a>
<a href="https://plus.google.com/+101helperBlogspot" target="_blank"><img alt="Google+" src="http://i57.tinypic.com/3009oqw.png" title="Google" /></a>
<a href="https://www.pinterest.com/101helper" target="_blank"><img alt="Pinterest" height="22px" src="http://www.nptechforgood.com/wp-content/uploads/2012/02/pinterest-logo.jpg" title="Pinterest" width="22px" /></a></div>
<style>
#about-me {
  color: #444;
  width: 314px;
  padding: 40px 22px 114px;
  border: 2px solid #A0A0A0;
  background-color: #fafafa;
  font-family: 'Open Sans Condensed',sans-serif;
}
#about-me img {
  border: 6px double #A0A0A0;
  width: 100px;
  height: 100px;
  position: absolute;
  bottom: 23px;
  border-radius: 12px;
  left: 18px;
  -ms-transform: rotate(7deg);
  -webkit-transform: rotate(7deg);
  transform: rotate(-17deg);
  z-index: 5;
}
#about-me p {
  position: absolute;
  bottom: 102px;
  font-size: 18px;
  font-weight: bold;
  left: 146px;
  color: rgb(58, 148, 227);
}
#about-me h5 {
  width: 185px;
  position: absolute;
  left: 146px;
  top: 15px;
  color: #747272;
  font-size: 15px;
  letter-spacing: 0.2px;
  text-align: left;
}
#my-link {
  position: absolute;
  top: 20px;
  left: 332px;
}
#my-link img{
border-radius:70px;
padding:2px;
}
</style>


Style 3

Stylish About me gadget for blogger style 3 | 101helper
<link href='http://fonts.googleapis.com/css?family=Open+Sans+Condensed:300' rel='stylesheet' type='text/css'/>
<div id="about-me"> 
  <img src="http://lh5.googleusercontent.com/-p4_CJcGp4AM/AAAAAAAAAAI/AAAAAAAAABM/vdNgm0VFg70/s80-c/photo.jpg" /><p>Fahim Raza</p><h5>Hi there! my name is Fahim Raza. I am a professional blogger. I like music(Linkin Park), playing games(football) and blogging...</h5>
</div>
<div id="my-link">
<a href="https://www.facebook.com/pages/101Helper/623626157780837" target="_blank"><img src="http://i57.tinypic.com/aonk43.png" title="Facebook" width="22px" /></a>
<a href="https://twitter.com/101Helperblog" target="_blank"><img alt="Twitter" src="http://i58.tinypic.com/2ldzzog.png" title="Twitter" /></a>
<a href="https://plus.google.com/+101helperBlogspot" target="_blank"><img alt="Google+" src="http://i57.tinypic.com/3009oqw.png" title="Google" /></a>
<a href="https://www.pinterest.com/101helper" target="_blank"><img alt="Pinterest" height="22px" src="http://www.nptechforgood.com/wp-content/uploads/2012/02/pinterest-logo.jpg" title="Pinterest" width="22px" /></a></div>
<style>
#about-me {
  color: #444;
  width: 225px;
  padding: 20px 10px 110px;
  border: 2px solid #B0AEAE;
background: -webkit-linear-gradient(#eee, white);
  font-family: 'Open Sans Condensed',sans-serif;
  height: 175px;
}
#about-me img {
  border: 2px solid #666;
  width: 110px;
  height: 110px;
  position: absolute;
  bottom: 184px;
  border-radius: 60px;
  left: 65px;
}
#about-me p {
  position: absolute;
  bottom: 135px;
  font-size: 19px;
  font-weight: bold;
  left: 91px;
  color: rgb(58, 148, 227);
}
#about-me h5 { letter-spacing: 0.3px; width: 200px; position: absolute; left: 30px; top: 140px; color: #555; font-size: 14px; text-align: center; }
#my-link {
  position: absolute;
  top: 260px;
  left: 79px;
}

</style>


Style 4

Stylish About me gadget for blogger style 4 | 101helper

<link href='http://fonts.googleapis.com/css?family=Open+Sans+Condensed:300' rel='stylesheet' type='text/css'/>
<div id="about-me"> 
  <img src="http://lh5.googleusercontent.com/-p4_CJcGp4AM/AAAAAAAAAAI/AAAAAAAAABM/vdNgm0VFg70/s80-c/photo.jpg" /><h5>My name is Fahim Raza. I am a professional blogger and owner of 101helper.blogspot.com. I like music, playing football,car race and blogging...<br /><br />Email: Fahimraza101@gmail.com<br />Phone: xxx-xxx-xxx-001<br />Skype ID: Fahim Khan</h5>
<h4>Author Name:</h4><p>Fahim Raza</p>
</div>
<div id="my-link"><p>Follow On</p>
<a href="https://www.facebook.com/pages/101Helper/623626157780837" target="_blank"><img src="http://icons.iconarchive.com/icons/danleech/simple/512/facebook-icon.png" title="Facebook" width="35px" height="35px" /></a>
<a href="https://twitter.com/101Helperblog" target="_blank"><img alt="Twitter" src="http://icons.iconarchive.com/icons/danleech/simple/1024/twitter-icon.png" title="Twitter" width="35px" height="35px" /></a>
<a href="https://plus.google.com/+101helperBlogspot" target="_blank"><img alt="Google+" src="https://developers.google.com/+/images/branding/g+128.png" title="Google" width="35px" height="35px" /></a>
<a href="https://www.pinterest.com/101helper" target="_blank"><img alt="Pinterest"  src="http://www.iconarchive.com/download/i54058/danleech/simple/pinterest.ico" title="Pinterest"  width="35px" height="35px" /></a></div>
<style>
#about-me {
  color: #444;
  width: 275px;
  border: 2px solid #A0A0A0;
  background-color: #fafafa;
  font-family: 'Open Sans Condensed',sans-serif;
  height: 310px;
}
#about-me img {
  border: 2px solid #A0A0A0;
  width: 80px;
  height: 80px;
  position: absolute;
  top: 15px;
  border-radius: 4px;
  left: 186px;
}
#about-me p {
  position: absolute;
  top: -2px;
  font-size: 18px;
  font-weight: bold;
  left: 99px;
  color: rgb(58, 148, 227);
  letter-spacing: .4px;
}
#about-me h5 {
    border-top: 3px double #999;
    width: 165px;
    position: absolute;
    left: 13px;
    padding-top: 5px;
    top: 16px;
    color: #747272;
    font-size: 15px;
    letter-spacing: 0.2px;
    text-align: left;
}
#about-me h4 {
    font-size: 18px;
    position: absolute;
    top: 15px;
    left: 8px;
    border: 0;
    color: #555;
}
#my-link {
  position: absolute;
  top: 268px;
  left: 10px;
}
#my-link p {
position: absolute;
  bottom: 29px;
  color: #444;
  font-size: 16px;
  font-weight: bold;
  left: 3px;
}
#my-link img{
border-radius:5px;
padding:2px;
}

</style>

Customization:


To change pic:


Replace http://lh5.googleusercontent.com/-p4_CJcGp4AM/AAAAAAAAAAI/AAAAAAAAABM/vdNgm0VFg70/s80-c/photo.jpg with your profile pic url. 


To change name:


Replace Fahim Raza with your name. Maximum characters allowed are 12.


To change description:


Replace green colored text with your description. don't write too long description, otherwise it may look irregular.


To add your social profiles links:


Replace the yellow colored links with your social profiles links.  


Hope you this post and this gadget is working fine in your blog. If you have any question about any of the above gadgets, ask me in comments or contact me. Follow and subscribe to get instant updates about blogger gadgets. Share this post with others and help my blog grow.


Search Tags: "About me" gadgets with different styles for blogger, Stylish about me gadget for blogger, Author profile gadgets for blogger.