Use Dropbox To Host Your WordPress Website Images


Save images to Dropbox


Dropbox is a great way to share content with the world easily. It offers hot-linking to images which is useful. Recently we talked about how hosting your media content on a faster third-party server can help you out in many ways. If you're a Dropbox user, you can use your Dropbox storage to host images from your small to medium-sized website. Today, we'll talk about using Dropbox as an external media storage for your WordPress site.


Some third-party platforms have the advantage of speed. Typical web servers might not be well suited to serve media content quickly, especially large files. So these third party platforms can take care of that.


But the biggest advantage of your own personal cloud storage is the peace of mind. You can never trust free third-party image storage websites. But Dropbox and other such cloud storages are another story. Secondly, exporting/migrating your blog is a huge hassle if there's a lot of media content as well. Third-party servers give you peace of mind during migration, because you only have to move the text content. It is faster, and much more convenient.


Hosting images on Dropbox


If you're running a WordPress blog, you can easily host your images on Dropbox.


  • Log into your WordPress dashboard and go to Plugins >> Add New

  • Search for the plugin named "Pressbox"  and install it.
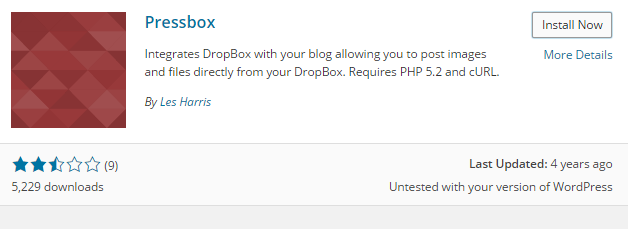


Pressbox


  • Go to Settings >> Pressbox

  • You will see a set of instructions to get a Dropbox API. Both the “Key” and “Secret” codes are needed to connect your blog to Dropbox. This step is needed to prevent unauthorized access to your Dropbox account. Follow the instructions to the letter and you’ll be just fine.


  • After acquiring the codes, press the “Connect your Blog to Dropbox” button and you can start using images in your Dropbox folder for your blog posts.


But why go through all that trouble if using images from the Dropbox public folder is as easy as copying and pasting the public URLs (as discussed in this article)? Well, first, Pressbox allows users to use images from any folder within your Dropbox account. Second, users don’t have to go back and forth between their blog and Dropbox account to fetch the image’s URL. Instead, you can easily add images using Pressbox’s code.


Pressbox also allows users to set their default path for a file list and favorite folders. You can use the “/Photos” folder as the default, but I’d suggest you go one folder deeper. Create another folder inside Photos and use it as the default.


If everything is set, you can easily put your blog images inside your chosen folder and add them using “[pressbox path=/Folder/imagename.extension]“. So if you want to add sunset.jpg inside the Pictures folder, you will write [pressbox path=/Pictures/sunset.jpg].


You can also browse and insert the pictures you want via the new “From Dropbox” menu in the “Add an Image” pop-up window.


The only thing you should consider if you choose to use Dropbox is the storage limit. With a 2GB storage limit for free accounts and an average 100KB image size, you can store up to 20,000 images. It’s a good idea to create a new Dropbox account specifically for this purpose.

Should You Host Blog Images On An External Server?


External servers


For most blogs and websites out there, the bulk of their size comes from images. For videos, most bloggers resort to any of the video sharing websites such as YouTube, Vimeo and so on. But what about images and other media content? It only makes sense to host large images on a faster third-party server as well. Fortunately for bloggers, this isn't an alien concept. There are much faster servers out there known as CDNs (Content Delivery Networks). We'll talk about using third-party services for hosting your images.


A lot of professional blog networks and websites use CDNs for delivering images faster. These CDNs often do not come cheap. But there are inexpensive options, as well as some free ones.


Why go third-party at all?


The advantages of third-party servers are numerous. The most obvious one is speed. Typical web servers might not be well suited to serve media content quickly, especially large files. CDNs take care of that problem since they're built for media capabilities.


Secondly, exporting/migrating your blog is a huge hassle if there's a lot of media content as well. Third-party servers give you peace of mind during migration, because you only have to move the text content. It is faster, and much more efficient.


Hosting images on external servers


Hosting images on external servers is easy. There are many well-known image services that you can use. Many are free as well. We're always skeptical of 'free' services out there, be they email, web hosting or any other software service. So we probably wouldn't recommend trusting these services completely.


This is not to say that third-party networks are bad. Some of these are really well-known services, and many people trust them. However, I'd take a little pinch of salt when trusting them entirely with my blog images.


Well known image services


With that said, let's look at some of the most well known image services out there you can use for free.


1. Photobucket


Photobucket is by far our top pick, It is so easy to use and its free. You can upload a variety of image sizes and image files, you can even upload videos. The image url is SO easy to find. You simply upload your image add it to an album and hover over the image to grab the code - simple.


The site is very user friendly and easy to navigate. Now if you have a site that stores and hot links MASS amounts of images (very rare) then Photobucket is not for you, but if you have an ordinary blog and just need somewhere to store post images etc..... Photobucket gives you a ton of space and it's free.


2. Flickr


Perhaps not the easiest to work with, but this one is full of features. Yahoo gives you an insane amount of storage - 1 TB - absolutely for free! And Flickr has come a long way from the frustrating UI to the feature-rich offering that it today.


Conclusion


So the question remains, should you use these services? Is it SEO friendly? In my opinion, these services are very trustworthy, and have an excellent trust rating. So you need not worry about them 'running away' with your pictures. However, do be mindful of their terms and conditions, especially if you're acting as a business.


Also, there's no SEO disadvantage in using a third-party image hosting service. It's how you present your content that matters, not where it is hosted physically.

How To Edit Template In Blogger

How to edit template code in blogger | 101helper

Template is the source code of a blog, it contains all CSS codes, gadget codes, settings, theme and everything so if you want to make any changes in your blog you need to edit template of your blog. Its very easy to edit template in blogger but those who are new to blogging are not familiar with it. Although gadgets can be added from layout by clicking on add a gadget but some gadgets are added by editing template so its very important for a blogger to know how to edit template.

A blogger should know how to edit blog template not because it is required for adding some gadgets but also if he wants to customize an existing gadget, increasing or decreasing width of sidebar, making cool effects in images, adding effects in header/logo of blog such as flipping effect and so on. This post is for those who don't know how to edit template in blogger. To edit template of your blog simply follow below steps:

Step 1: Go to blogger dashboard.


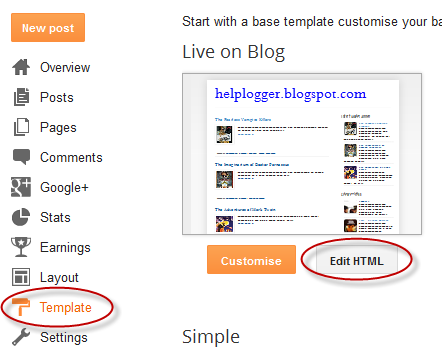
Step 2: Select template in menu and click on edit Html.

Step 3: Now you are on the Html page, if you want to search some thing click inside the code and use Ctrl+F on your keyboard, type inside the search box and hit enter.

Note: Click inside the code as shown in below image before searching something or else page search box will be opened which will not search for code you are looking for, it will search only things out of Html code.


How to edit template in blogger | 101helper

Step 4: Click on save after making changes and you are done.


If you are adding a CSS code in your blog search for ]]></b:skin> and paste CSS code just above it.


If you are adding a javascript code search for </head> and paste your code below it, make sure that the code you are adding it closed by </script> for example if the code is like below code:


My javascript code 


then it must be closed by </script> and opened by <script> similar to below code:


<script>
My javascript code</script>

If you want to add any ads or gadget at bottom of blog search for </body> and paste your code above it.


Create backup:


Always create a backup before editing code because sometimes unexpected things goes and codes are deleted by mistake which causes problem in template and blogger doesn't accept code when save template is clicked. So always create a backup before editing template, if you don't know how to create a backup in blogger then click here


Searching gadget codes in blogger template:


As I said blogger template is source code of a blog so it contains all gadget codes, sometimes gadget codes are searched in template for customizing them like hiding or displaying them in some pages, showing them on mobile phone devices or anything else but it becomes a problem to search gadget codes in template as it has so many codes. There are two ways to search a gadget code in blogger template one is to use Ctrl+F and the other is to jump to the widget. Using Ctrl+F is easy way but it is useful only if you have named the gadget while adding it otherwise you can't find it and jumping to the widget is also a good way to search a gadget but for that you must know ID of certain widget. How to find ID of a gadget in blogger? click here.

If you don't know how to jump to a widget in blogger template then follow the below steps:

Step 1: Go to blogger dashboard and select template in the menu.

Step 2: Click on Edit Html and on the Html page click on jump to widget beside save template.


find gadget code in blogger template | 101helper

Step 3: When you click on Jump to widget it will show list of gadgets you have added in your blog, use the ID of widget which you are looking for, for example Html 1, Html 2, Html 3, Html 4, Html 7, FollowbyEmail etc.

Step 4: Click the gadget ID and you are done.

If you haven't created a backup before editing template of your blog and you have made changes in template and now you want to undo the changes then simply click on revert changes above the template and all changes will be reverted. 

If you want to revert all changes which have made in widgets to default then click on revert widget templates to default beside Revert change.

Recently blogger has updated the template and some new features are added to like Preview template which lets you to preview changes you make in your template, so now you don't have to view blog after making every change just make changes and click on preview template. 

Thanks for visiting 101Helper, I hope you like this post. Share it with others and help 101Helper grow. Follow and subscribe to get instant news about blogging.

Search tags: How to edit template in blogger, blogging help, how to search a gadget in blogger, find gadget code in blogger template, how to search a code in blogger, how to create backup in blogger, 101Helper blogging tips and tutorials.

    How To Manually Add Disqus Comment Widget to Blogger?


    Disqus


    In a previous post, we talked about integrating Disqus comments in a Blogger blog. That is just one of the ways to add this commenting system to your blog. If you're the geeky type, you'd want to do it manually, just so you know you can control it and customize it to your liking. It can also come in useful when the Disqus gadget installer isn't working. So today, we'll look at a manual way of installing the Disqus commenting system on your blogger blog.


    Note that this method requires you to edit your blog's template HTML, so it is advisable to back up your template before continuing. Also, this method won't work on Blogger Dynamic Views templates.


    Adding Disqus comments manually


    • From your Blogger dashboard, go to Layout, and then click on Add a gadget in the sidebar

    • Select the HTML/JavaScript widget from the list


    Add a widget


    • Enter Disqus as the title and the following in the content;


    <!-- Disqus comments gadget -->


    We've added a new widget. It is time to tweak it a bit.


    • Now go to the Template section, and go into the Edit HTML mode

    • Find the widget you just created by searching for 'Disqus'. You should see something like this;


    <b:widget id='HTML1' locked='false' title='Disqus' type='HTML'>


    • Add a mobile='yes' key-value pair in that line. It will now look like this;


    <b:widget mobile='yes' id='HTML1' locked='false' title='Disqus' type='HTML'>


    • Now delete the following code before the closing widget tag...


    <b:includable id='main'>

      <!-- only display title if it's non-empty -->

      <b:if cond='data:title != &quot;&quot;'>

        <h2 class='title'><data:title/></h2>

      </b:if>

      <div class='widget-content'>

        <data:content/>

      </div>

      <b:include name='quickedit'/>

    </b:includable>


    • ...and replace it with the following code;


    <b:includable id='main'>

                <script type='text/javascript'>

                    var disqus_shortname = &#39;CHANGETHIS&#39;;

                    var disqus_blogger_current_url = &quot;<data:blog.canonicalUrl/>&quot;;

                    if (!disqus_blogger_current_url.length) {

                        disqus_blogger_current_url = &quot;<data:blog.url/>&quot;;

                    }

                    var disqus_blogger_homepage_url = &quot;<data:blog.homepageUrl/>&quot;;

                    var disqus_blogger_canonical_homepage_url = &quot;<data:blog.canonicalHomepageUrl/>&quot;;

                </script>

                <b:if cond='data:blog.pageType == &quot;item&quot;'>

                    <style type='text/css'>

                        #comments {display:none;}

                    </style>

                    <script type='text/javascript'>

                        (function() {

                            var bloggerjs = document.createElement(&#39;script&#39;);

                            bloggerjs.type = &#39;text/javascript&#39;;

                            bloggerjs.async = true;

                            bloggerjs.src = &#39;//&#39;+disqus_shortname+&#39;.disqus.com/blogger_item.js&#39;;

                            (document.getElementsByTagName(&#39;head&#39;)[0] || document.getElementsByTagName(&#39;body&#39;)[0]).appendChild(bloggerjs);

                        })();

                    </script>

                </b:if>

                    <style type='text/css'>

                        .post-comment-link { visibility: hidden; }

                    </style>

                    <script type='text/javascript'>

                    (function() {

                        var bloggerjs = document.createElement(&#39;script&#39;);

                        bloggerjs.type = &#39;text/javascript&#39;;

                        bloggerjs.async = true;

                        bloggerjs.src = &#39;http://&#39;+disqus_shortname+&#39;.disqus.com/blogger_index.js&#39;;

                        (document.getElementsByTagName(&#39;head&#39;)[0] || document.getElementsByTagName(&#39;body&#39;)[0]).appendChild(bloggerjs);

                    })();

                </script>

    </b:includable>


    • In the code above, change the text CHANGETHIS to your own forum shortname, e.g. MyBloggerTricks.


    You now have Disqus installed on your Blogger blog! You can now the widget to you liking!

    How To Automatically Add Disqus Comment Widget to Blogger?‏


    Disqus commenting system


    One of the most common problems bloggers face is comment moderation. If you want to get serious in the world of blogging, you'd do well to get set up with a good commenting platform, because you need one - managing the comments on your blog can be a real pain, and will consume a lot of your time. The Google Plus commenting system is good, but it has its downs. One of the most popular commenting systems today used by Bloggers around the world is Disqus.


    Why use Disqus?


    • Email notifications for each comment

    • Custom comment avatars

    • Moderation by email or mobile

    • You can easily post comment, vote, even share comments to social networks.

    • You can easily subscribe to comments.

    • More comments and increased engagement


    Adding Disqus to your Blogger blog


    • First up, log onto your Disqus account. If you don't have any, create a new one

    • Click no the Add Disqus to your site option at the top

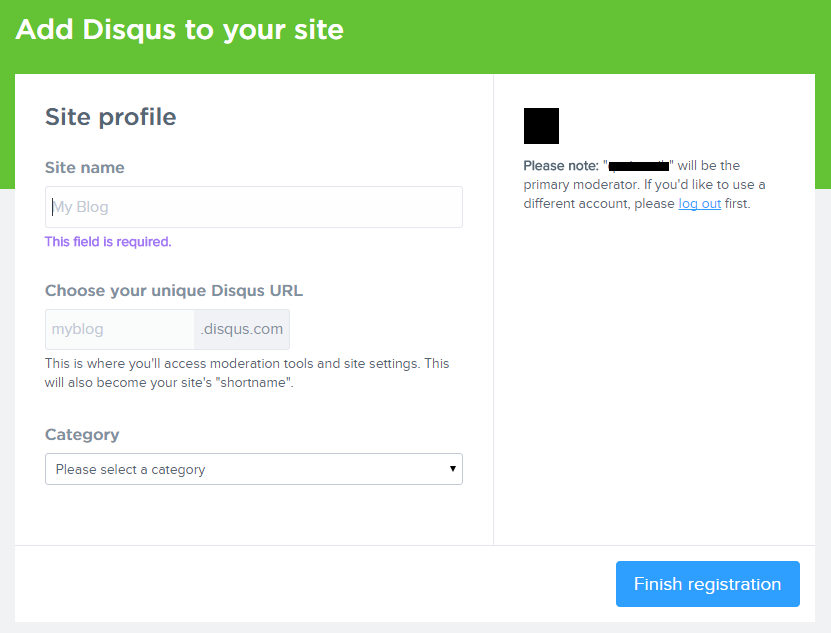
    • Time to fill out your site profile!


    Disqus registration


    • Click on Finish Registration, and choose Blogger as your platform on the next screen


    Now that we've set up a Disqus account, it's time to integrate it with a Blogger blog.


    • Click on Add [Your Blog Name] to my Blogger site

    • Now click on the Add Widget button on the next window. You have successfully added the Disqus commenting system to your blog. It will appear automatically under your blog posts


    Now you're free to start off a new disqus account, or import comments from an existing blog.


    There's another, geekier way of adding the Disqus commenting system that gives you more control. We'll share it in the upcoming post, so stay tuned! :)

    Now Search For Song Lyrics Within Google!


    Google Play Music


    After Bing started showing song lyrics within search results earlier this year, Google has finally decided to follow suit. The feature started on a silent roll-out last week, and was first observed by Search Engine Land. The new lyrics section has been added to search results in a knowledge-graph manner, with the lyrics on top and a Google Play link at the bottom.


    Here's what Google has to say about this new feature;


    There’s a feeling you get when you turn to a song and you know that the words have two meanings. Well it’s whispered that now if you go search the tune, maybe Google will lead you to reason. Ooh, it makes you wonder…


    Hmm, groovy!


    The feature is not available to all users right now. However it is still being rolled out, and is expected to complete over the next few days.


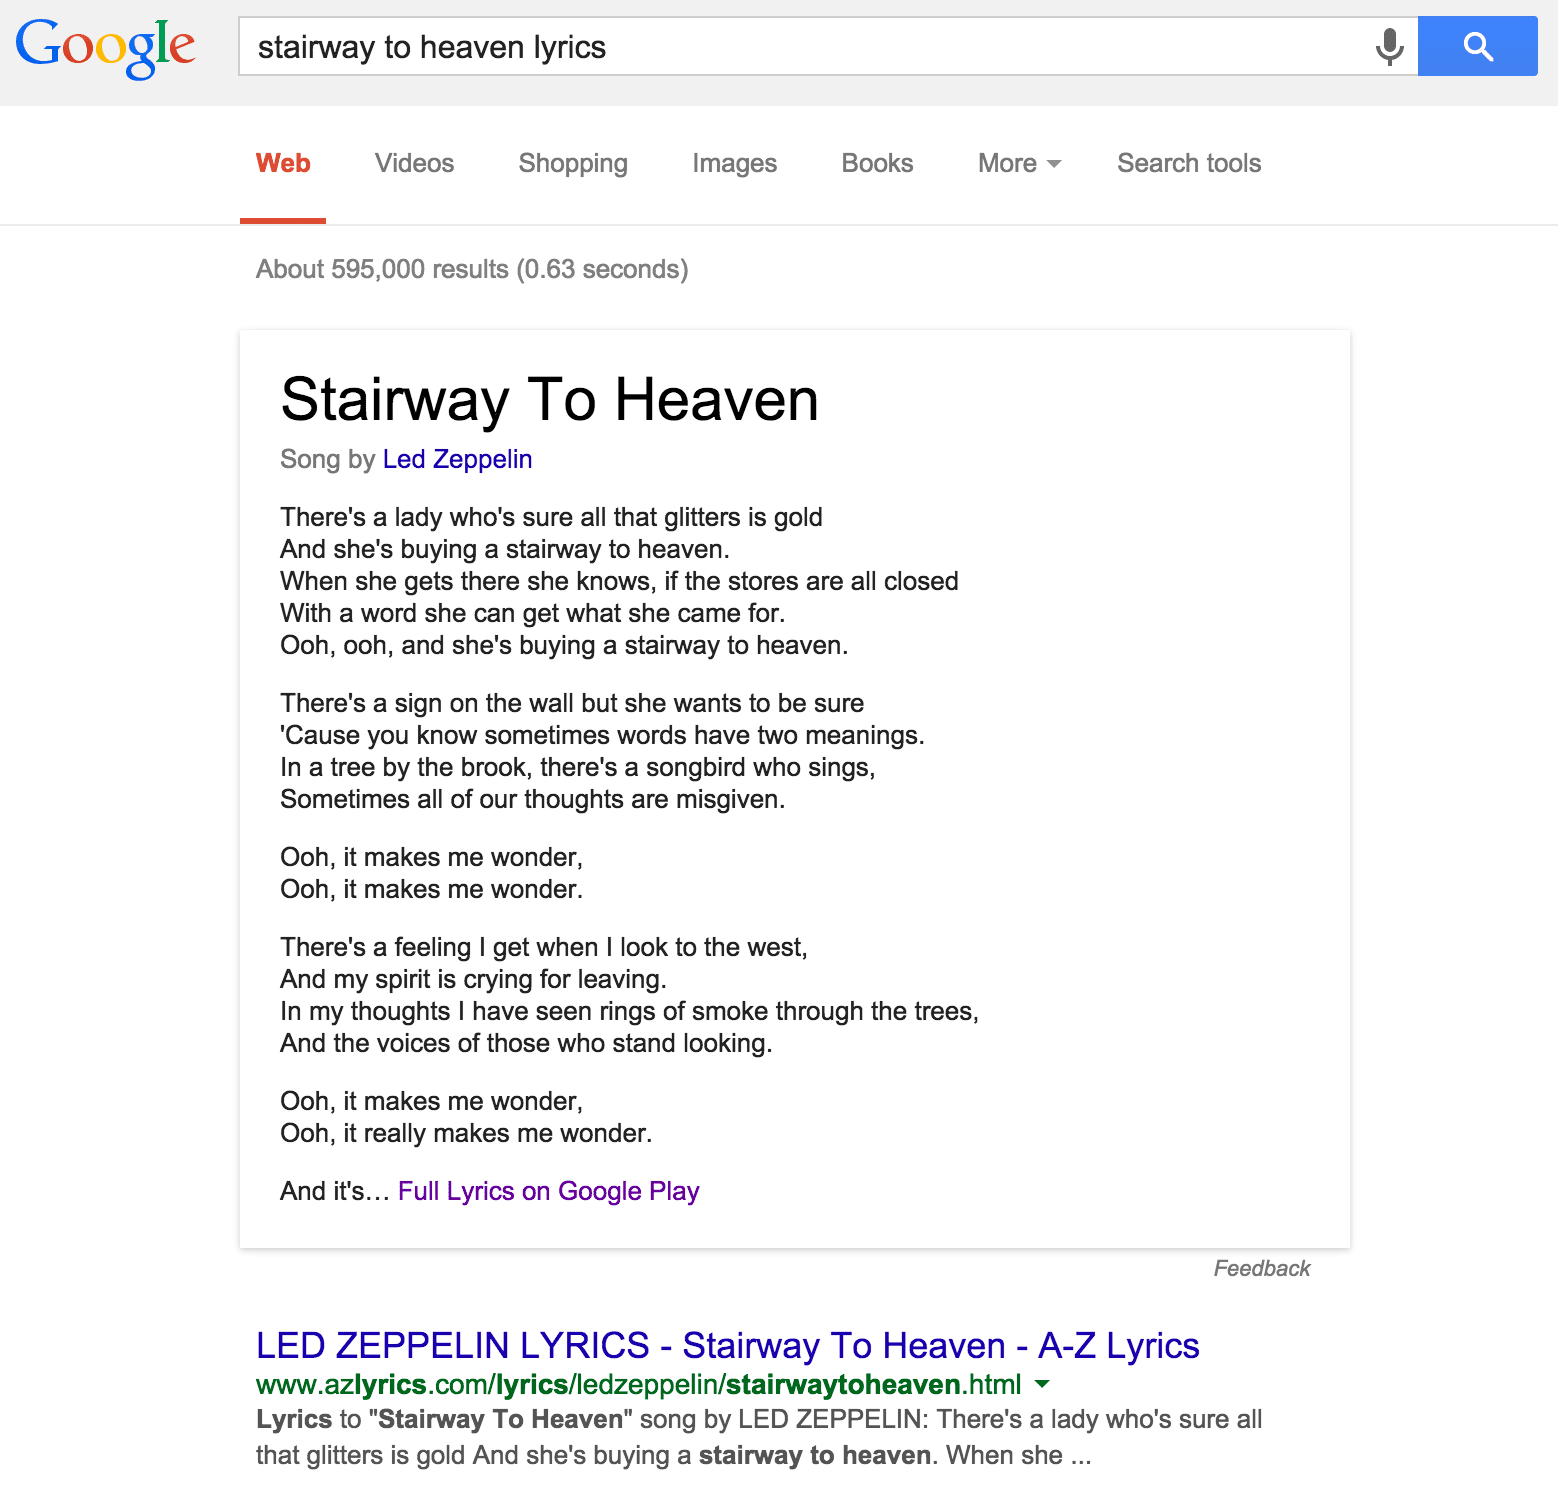
    To search for lyrics, all you have to do is type in a song name and add the 'lyrics' keyword at the end. Like so; [Stairway to heaven lyrics]. This will show lyrics for the popular song by Led Zeppelin.


    Stairway to heaven lyrics - Led Zeppelin


    While Bing uses lyrics data from popular websites such as LyricFind, Google has taken a different approach. According to Google, it has licensed the lyrics itself. Clicking on the “Full Lyrics” link brings people over to special pages at Google Play where users can look at the complete lyrics and/or buy a song.


    In my opinion, this is a much better approach. With third-party lyrics providers, you can never be sure of the quality or consistency. But Google licensing lyrics for itself means that quality can be ensured. Not only that, they can be easily used for other purposes, such as line-by-line playback on Google Play Music for Android mobile users who have purchased a song via the Play Store.


    What do you think of this feature? Is it a good initiative on Google's part, and should Bing follow the same model? Leave us your thought in the comments section below! Cheers :)

    Make Money With Steam This Holiday Season!


    Make money on Steam

    Winter is usually the most anticipated time for serious PC gamers, because the holidays mean one thing and one thing alone - gamer sales! Steam and EA's Origin, the two most popular digital game distribution platforms, have already kicked off their Christmas sales, and for gamers, this is nothing short of a spring vacation. However, for the business-minded, it is more than just a sale - it's an opportunity to make a few bucks easily.


    Steam trading cards


    To make any money from Steam, you need to familiarize yourself with the concept of Steam trading cards. These are cards you can trade, or sell on the Steam market. There are two basic types of cards, game cards and holiday/sale cards.


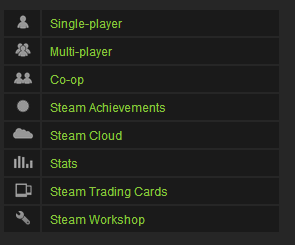
    Each game on Steam has its own set of trading cards, provided that it is fully integrated with Steam and supports trading cards. To check if a game supports trading cards, visit its store page, and look for its Steam compatibility in the right sidebar.


    Steam compatibility


    Additionally, you can see a list of all games owned by you that support trading cards by going to the badges page under your profile.


    Another type of trading card is the holiday/sale card. Steam runs a sale on holidays and special occasions all round the year, and the most common of these sales are the Summer and the Winter sales. Right now, the Winter/Christmas sale is underway.


    How to get trading cards?


    There are quite a few ways to get a card. Game cards are dropped randomly while you play a game. Each game has a collection of cards, but you don't get the whole collection this way. You only get roughly half of the collection for free. For a game with 10 cards, you might be allowed a maximum of 5 card drops. You can see how many card drops are left for each game under the Badges section in your profile.


    Here's a trick: If you don't have time to spend on playing a game, you can keep the game minimized while you do your work - the cards will still drop!


    This only applies to games that you purchased. For Free to Play games such as Team Fortress 2 or DOTA 2, you have to make purchases in-game to earn card drops.


    There are two types of game cards - normal and Foil. Foil cards are rare, and hence more valuable. So keep a special eye out for them.


    You can get holiday/sale cards while making game purchases during a major sale (Summer or Winter etc). Every $10 spent on a sale will get you a card. If that seems excessive, you can get a card by participating in the community voting. Every few votes in the 'Community Choice' deal get you a card. You can vote once in 8 hours during a sale, which usually lasts 10-15 days, giving you plenty of time to make a collection.


    You can also get cards by buying them from the Steam market, or trading them from your friends.


    Badges and Booster packs


    Getting all the cards drops available for a game makes you eligible for a booster pack. You don't need to complete a collection for it. Once you complete a collection, you can craft a badge. So what are these badges and booster packs?


    A booster pack contains 3 random cards, which might include a foil card (more valuable). Booster packs are awarded rarely, but randomly, provided that you are eligible (i.e. have gotten all card drops for a game). You don't have to play a game to win a booster pack - you just need to log into Steam at least once a week.


    If you have purchased a game, but have not gotten all the card drops, then I'd suggest you do it as soon as possible. The more booster packs you're eligible for, the higher your chances of being awarded one.


    When you complete a collection, you can use it to craft a badge. Badges give you experience for leveling up on Steam (which is also important), along with a chat emote, a background, and sometimes a voucher.


    Steam has introduced a new concept this time around. You can use your cards to make Gems. Gems can be used to buy booster packs.


    So, how to make money off all this?


    I know all this might be confusing for beginners, but you'll soon get the hang of it once you familiarize yourself with Steam. Making money from steam is simple. You can sell all cards, badges, and booster packs for money on the Steam market. Now here's where it gets a little.....mathy.


    Normal trading cards are very cheap, unless the game is new. They'll usually fetch you less than a dollar. Sometimes, only a few cents. A card's price rises and falls over time, like a stock market. It all depends on the supply and demand. You can search for a card in the market and look at its price history to get an estimate on what the card is worth.


    Here's a look at the price history for one of the Holiday cards this winter.


    Foil cards are rare, but they usually go for a lot more money - sometimes up to 10 times as much as normal cards. Just like normal and foil cards, there are normal and foil badges. But it's often not worth crating a foil badge. You'll make more money by simply selling the foil cards.


    Now Booster packs go for a lot of money as well. Once you're rewarded with a Booster Pack, you can either open it or sell it. If you sell it, you'll get some decent money. But if you open it, and find a foil card in there along with other cards, you'll get even more money! But be advised that foil cards in booster packs are rare, so choose what you want wisely.


    Sell games


    Selling cards probably won't make you rich, but can give you a small and steady income. You can use that money to buy games for friends, who can then pay you in person. You cannot cash out the money you have in your Steam wallet.


    Or here's another idea. During the sale, you can buy games at a much discounted rate. You can then sell those games for more money (but less than the official price) once the sale is over. A lot of people buy games outside of sales, so you can hit communities and connect with people to find interested buyers. You can even earn hundreds of dollars if you're willing to invest!


    Considering that the Winter sale is currently going on, I say why not take these theories and put them to the test? I've already got a game minimized as I write this, hoping to get some card drops. And I'll be buying some more games from the great Winter deals as well. It's a great time to be gaming this time of the year - you can get some money off it!


    Cheers :)

    How To Find ID Of A Widget In Blogger

    How to find ID of a widget in blogger | 101helper

    There are many things which are unknown by a beginner to blogging but they are required for some purposes like sitemap, blog ID, widget ID etc. Sitemap of a blog can be found by a specific link, its not like other websites, as if you are search for a website's sitemap you can find it simply by adding /sitemap.html  in homepage link for example https://www.abc.com/sitemap.html. Similar to sitemap widget/gadget ID is used in many things so it is also useful. 

    Why do I need a gadget/widget ID in blogger?

    If you are using blogger and you are trying to hide a gadget in some pages of your blog then for this purpose you need ID of the widget, you also need a widget ID to make it sticky/float or if you are trying to change background color of a gadget in your blog by CSS then you need ID of that gadget. There are so many other reasons for having ID of a gadget in blogger. But as a beginner it would not be in your knowledge so you have to learn how to find ID of a gadget/widget.


    How to find ID of a gadget/widget in blogger:


    Its very simple to find ID of a gadget in blogger, you don't need any script or code to find it. Just follow below steps and you are done!

    • First of all go to blogger dashboard.
    • Select layout and edit the gadget who's ID you want to know.
    • When the configure window opens click in the address of the configure window are copy it as shown in below image:
    How to find ID of a widget in blogger | 101helper
    • Paste it in notepad and search for widgetid= that's it you have got widget's id.
    If you want to know your blog ID you can find it in the same link just search for Blogid= and you are done. 

    I hope you like this post and it helped you. Thank you for visiting 101Helper. Follow and subscribe to get instant news about blogging. share this post with others if you like it.

    Search tags:  How to find ID of a widget in blogger, blog id in blogger, gadget id in blogger, how to get  id of a gadget in blogger,  how to search widget's id in blogger, 101Helper blogging tricks.

    WordPress 4.1 Now Available For Download


    WordPress has come a long way from the boring old 2.0+ version to the much more optimized and streamlined version you see today. With the 4.0 update, WordPress greatly improved the media experience for users, along with other performance improvements. WordPress continues its rapid stream of updates, and has announced that WordPress 4.1 is now available. It boasts of many new features.


    This latest version of WordPress is code-named 'Dinah' in honor of the singer Dinah Washington. Publicly available for download or update directly through the dashboard, this version focuses on enhancing the writing experience for users, along with performance improvements and other features.


    Editor improvements


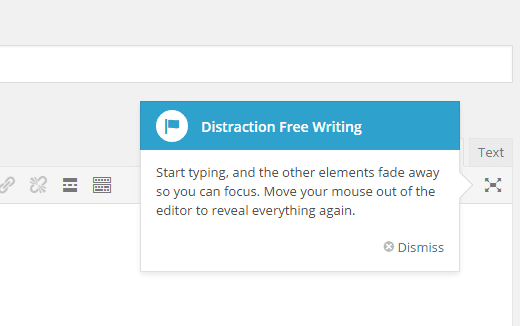
    Focus has made in this update to improve the writing experience. So now there's a new distraction-free mode to help you concentrate on writing content. This mode automatically triggers when you start typing, and anything that's not necessary simply fades away and then automatically returns when you stop writing.


    Distraction free writing


    This is a pretty neat feature. The whole update is about reducing clutter, so it makes sense. The WordPress text editor typically contains a lot of fields and whatnot, which can be overwhelming at times. So this feature is sure to make writing a lot easier.


    New theme


    It is customary for WordPress to release a new theme each year, named after the year itself. This theme acts as the default theme for all new WordPress installations, and you can revert back to it anytime.


    Twenty Fifteen is described as a 'blog-focused theme designed for clarity. It reduces clutter and puts your content front and center. It’s suitable to be viewed on any screen size, whether on a phone, tablet, laptop, or desktop computer.


    Additional features


    There's a new feature that lets you log out of any devices you might have logged in from in the past. This is useful because I log in from a lot of locations to constantly check up on my website, but don't always remember to log out. I am sure many of you will find this useful as well.


    One cool feature that we'd like WordPress to expand is the embed Vine video option. Instead of getting an embed code, you can simply paste in a Vine URL and it will automatically embed itself! We'd like to see this feature integrated with YouTube and other providers as well!


    Other improvements include extended language support, and plugin recommendations based on what you already have.


    All in all, it's a pretty nice update. If you want, you can view the full updated feature list here.

    How to Build High Quality Backlinks

    One of the secrets to creating more web traffic with your posts is to build in some backlinks. To build high quality backlinks is one of the most popular methods to boost your content over the competition. However, finding the right methods to build the backlinks is going to take a little effort.

    Everything starts with understanding what a backlink is and what it will do for your content. From there, you can then extend your efforts to build even more backlinks using creative and effective means that maximizes the potential of your content.

    backlinks

    What is a Backlink?

    A backlink is an incoming hyperlink that connects the web page or content to another website. Backlinks are very important when it comes to page ranking as Google rates them highly. However, the backlinks themselves must be of good quality in order to generate the rankings needed to boost your content ahead of the competition.

    Quality of the backlinks is important because having 10 good ones will beat 200 bad ones in terms of Google rankings. So, you must strive for quality each and every time. However, it will take time to build up backlinks to your articles because people will have to see it and then decide to link to it in order to add more value to their site.

    If you look at adding good backlinks as a long term strategy, you will eventually reap the rewards that they offer. What follows are some interesting ways to start building good quality backlinks so that you can start your success today a little bit at a time.

    Create Long, Interesting Posts

    One of the easiest ways to start creating good backlinks is by writing a good, long tutorial post that uses images, charts and other graphics to really make it interesting. It will need to be from 1000 to 1200 words long and not have any filler, so the information really needs to be good and tight to make it interesting.

    How-To guides often make the best long posts, especially if you can really hit the details so that people will fully understand how to do what you are explaining to them.

    Participate in Forums

    A person who is active in the forums when it comes to the subject that you are writing is building a network of potential fans who might offer high quality backlinks to their work. This is a delicate matter as you don't want to come across as someone only interested in what they can do for you. This will mean offering quality backlinks to those who participate in the forum as well if you find their articles useful and informative.

    Write e-Books

    An e-Book is one of the best ways to help spread the word about your talents and you can ask your friends to share it with the world through social media as well. You can also send your links to the best in social bookmarking sites as well to help augment your efforts.

    With e-Books, you don't have to write very many, but it does help if you create ones that are very useful, highly readable and can be shared so that you can build high quality backlinks.

    Create Special Days

    One of the more interesting ways to build high quality backlinks is creating special days like St. Patrick's Day, Halloween or Valentine's Day to offer discounts on your products or services. You can actually build up to the day as well with special writing and content features to help pull in more traffic.

    Remember, you'll need to do some research on your audience to see what type of holidays and content works best for their interest, but Valentine's Day is one that everyone shares, so that is an easy one to write good content, or run a contest that is bound to get good, high quality backlinks.

    Have Free Products

    Everyone likes free products and this can help you boost the number of visitors to your website. You can have a free e-Book or even a promotional gift if you want. While it may take some investment, the result will be getting more web traffic which in turn creates more demand for your products or services.

    Videos

    YouTube may very well be the biggest marketing tool of the moment with no signs of slowing down. If you can create a funny, interesting video then you will start getting some great backlinks. Today, the technology to create a solid, professional-looking video is dirt cheap compared to just a decade ago.

    You can create "how-to" videos or find something interesting to make a video about as long as it relates to the industry in which your business is in. The key is to do something fun and enjoyable for your audience so that they will start sharing it with their friends.

    Interact with Other Blogs

    When you read a blog or see a video you like that is within your industry, don't just say "good job" and leave it at that. Write a good, interesting comment or review so that you can really share your thoughts. Remember to be positive, articulate and get right to the point. If you can write your thoughts in an entertaining, audience-pleasing way, you can start building up an audience for your comments and reviews.

    Do Guest Blogging

    Want to make a great impression? Find a good place to guest blog and write until you get that post to go viral. This will not only attract you an audience, but by helping out someone else you will build high quality backlinks as well.

    It will take time, effort and the ability to write well. But if you can pull it off, your stint as a guest blogger will pay off big time for your efforts. The key is to write something that attracts people's attention and provides you with a place to write again for the blogger.

    Guest blogging can be very rewarding in more ways than one, so if you have the time to do it right, then you should market your services as a guest blogger.

    These are just some of the methods you can use to build high quality backlinks and start building up your web traffic.

    SEO Tips For Your Android App


    SEO for Android apps


    App deep linking is a relatively new concept in the world of search engine optimization. Google introduced deep linking back in June, and app developers have been using that to their advantage ever since. They're a way to increase user engagement by making the app content searchable and accessible through search engines. Today, we'll talk about SEO for your Android apps.


    According to Google, the last quarter has seen a 10x rise in the number of clicks on app deep links. And for signed-in users, 15% of Google searches on Android now return deep links to apps through App Indexing. This goes on to show that deep linking is the next big thing for developers to focus on.


    Here are some ways to monitor app performance and drive more user engagement.


    App indexing and search performance


    The first step is to obviously enable deep linking support. But after that, it is important to monitor your app's performance. Google Webmaster Tools lets you look at some basic information that you need. Here's what's available right now.


    • Errors in indexed pages within apps

    • Weekly clicks and impressions from app deep link via Google search

    • Stats on your sitemap


    Ensure crawlability


    Blocked resources are one of the top reasons for the “content mismatch” errors you see in Webmaster Tools’ Crawl Errors report. Google bots need access to all the resources necessary to render your app page. This allows them to assess whether your associated web page has the same content as your app page.


    Google now also shows you the specific resources it can't access. This can help you watch out for errors.


    You can see app error messages in your Webmaster Tools console. They will be under the Android Apps tab in the Crawl errors report. There are five main types of errors.


    • Content mismatch

    • Intent URI not supported

    • APK not found

    • No first-click free - This occurs when the link to your app does not lead directly to the content

    • Back button violation - Back button did not return to search results


    Usually, the majority of errors are usually caused by a blocked resource, or a region picker that pops up when the user tries to open the app from search. Taking care of that generally resolves it for all involved URIs.

    What to Do Before Applying for Google AdSense

    It seems that everyone wants to make money by joining up with Google AdSense and why not? Google AdSense is a relatively simple, straightforward way to actually start earning some extra money with your efforts. However, things have changed from the early days of AdSense when joining was not much of an issue. Today, applying for AdSense takes more effort and some preparation so that you can take full advantage of their services.

    First, you will need a good reason to apply for AdSense so you can reap the benefits that they offer. Here you will find out more about what Google AdSense is all about, what they offer and how you can properly prepare yourself before joining to really take advantage.

    applying to google adsense

    What is Google AdSense?

    One of the most established internet networks to offer advertisement publishing, AdSense uses the Pay Per Click (PPC) system to help businesses reach out to others on the web. At one time, Google used to provide AdSense to everyone who used their Blogspot program, but now that has changed.

    Today, AdSense is one of the most respected thanks to the many thousands of satisfied publishers and customers who use the service. It is straightforward, easy to use and always pays on time which makes it very attractive to anyone wanting to have this service. If you do your work the right way, it will pay better than any other similar service on the web.

    However, it is their very success that now makes them harder to join. When you apply, everything has to be just right otherwise you will not be approved.

    How to Avoid Getting Your Application Rejected

    There are a number of things to avoid when applying for AdSense so that your entry will not be discarded. Here are just a few.

    Read Google Policies: Just like studying for a test, Google posts their policies about what it takes for your site to get into AdSense. So, take the time to read them and be sure that your website follows the rules.

    Have Good Content: If your website doesn't have good or sufficient content, it will not be accepted. So, be sure that you provide them with enough to review. In addition, it has to be neat, professional and grammatically correct otherwise it will give them the excuse to toss out your application.

    Aesthetically Pleasing: Garish yellows and lots of distracting glitz will also stop you in your tracks when you apply for AdSense. Your website should have a good, solid design that is comfortable to look at and pleasing for the visitor.

    Post Your Contact Information: If Google cannot find a way to contact you through your website, you might as well not apply. Having an "About Us" page with a contact form is the minimum to getting accepted.

    Now that you've done the basics, it is time to hedge your bets when it comes to applying for AdSense by adding in items and procedures that will enhance your chances. While nothing is guaranteed, the following steps will help your website in getting approved.

    10 Ways to Increase Your Chances when Applying for AdSense

    1. Policy for Privacy

    It may seem odd to have a privacy policy for your blog, but it is vital if you want to get AdSense approval. Without it, you might as well not apply at all. The policy itself should describe to those who visit your blog what they will see and what they can and cannot do.

    2. Contact Information

    This is where you put in your contact information. At the very least, it should consist of an email so that readers can contact you directly about any issue they have on your blog.

    3. About Us

    This is where you tell people a little about who you are, what your business does and how you are going to accomplish it. This is sort of like an introductory page to your efforts and it critical when you apply for Adsense.

    4. Email & Name Verification

    Be sure that you put your email as well as your name in your About Me or Contact Us page so that it will help Google verify you quickly.

    5. Verify Age

    Always use your correct name and date of birth when applying for AdSense. This is mostly for those who are under 18, but it is important to be truthful otherwise you'll never get approved.

    6. Appropriate Design

    Your blog should look attractive, professional and easy to use. You don't have to be fancy or pour in thousands of dollars, just make it clean and neat will be sufficient.

    7. Have Plenty of Posts

    Do you know that there is no minimum number of posts stated by Google in terms of what is required for joining AdSense? Even so, if you only have a handful, do not count on getting approved. You should shoot for about 500 or so before applying to demonstrate your seriousness about your efforts and make sure that they are at least 500 words in length.

    8. Remember the Rules

    No pornography, illegal items, advocating drug use or other items that will not get you any AdSense at all. Plus, if your posts are all less than 200 words, that will not work either.

    9. Adds Value

    Your blog or website must provide real value for your audience. This will not only help keep people visiting your site, but it will also impress Google as well.

    10. Unique, Top Level Domain

    Basically, this means that your domain should be a ".com" in order to succeed. Plus, the name itself needs to be short as possible, related to your area of interest and easy to remember.

    When applying for AdSense, you will need to keep all of these things in mind so that you will be accepted. However, all of the attributes that Google AdSense requires are also ones that will boost your website as well. So, keep this in mind when you apply for AdSense because the result will be a blog that will start earning you another income stream that can build over time.

    How To Change Layout Design In Blogger

    How to change layout design in blogger

    In blogger, layout in an option which lets you to add any gadget in your blog or lets you to edit any existing gadget. When a new blog is created it has the default layout style in which blog post(content) exists in middle and is surrounded by gadgets but blogger lets you to change it. Why do you need to change your blog's layout design? there are many reasons for changing layout style like if you are adding a vertical menu in your blog and you wish to add it in left side then you need a space for it and you can get that space only if you change style of your layout other reasons are if you wish your content on right hand side and gadgets on left hand side then you need to change your blog layout and so on.
    But its not easy for a beginner to change layout design in blogger as he doesn't know much about blogging, so this post is for those who don't know how to change their blog's layout design/style/pattern. In this post I will show you some simple steps to change your blog layout design, lets get started:

    Step 1: First of all go to blogger and log-in to your blogger account.

    Step 2: Select template option and click on customize.

    Step 3: Click on layout in the customization page.

    Step 4: If you want to change body layout of your blog select it, there are eight different styles choose the one which you like, beside body layout there is footer layout if you want to change your blog's footer layout also choose one among three different styles and move to step 5.


    How to change layout design in blogger | 101helper

    Step 5: Click on apply to blog at top right of the customization page.

    You can change both body layout and footer layout of your blog, there are 8 styles for body layout and 3 styles for footer layout in blogger as shown in above image. Simply follow above steps and you are done!

    Thank you for visiting 101Helper. I hope you like this post, if you have any problem, suggestion or opinion leave a comment below. Follow and subscribe to get instant news about blogging, blogger tips, tricks, gadgets, menus, tutorials etc. Share this post with others if you like it.

    Search tags: How to change layout design in blogger, blogging, blogging tutorials for beginners, Learn blogging, how to customize blog settings, how to add gadgets in left side of blog, layout option in blogger, how to change layout style of blog, 101Helper blogging tutorials.

    Now You Can Search For Information Within Microsoft Office!


    Insights for Office


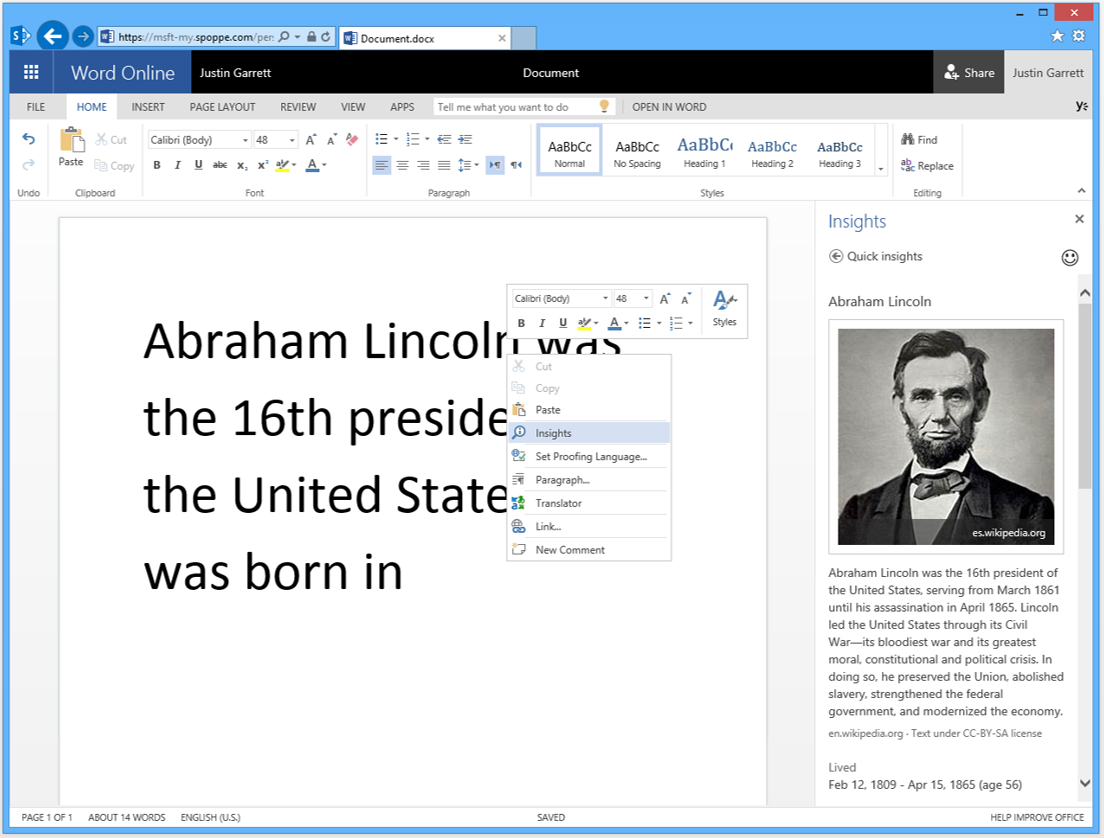
    When it come to word-processing capabilities, nothing beats Microsoft's Word, not even Google Docs. The web version - Office Word Online - has just become more powerful with a new feature developed by the Bing and Office teams. Insights for Office is a more powerful way to search for information you need while working inside Office online. It is the perfect companion for Bloggers, authors, and content creators who make frequent use of online information to craft their content.


    Microsoft has been upping its productivity game by developing solutions that provide usability to users. XBOX voice search, personal search with Cortana on Windows Phone, Bing Image Search in Sway Preview, and now Insights for Office are just a few examples.


    Insights for Office


    It is more than just a search bar for office. Imagine you're writing a piece on a famous personality, but don't actually know their bio details. Ordinarily, you'd have to open a browser, search for the person, and then load some particular website. Not a very streamlined work process.


    One of the biggest constraints in web search is, the query is limited to a few keywords. Users don't type more than a few keyword, which in many cases can lead to inaccurate guessing on the search engine's part, since it does't know much about the user's intent.


    The contents of a Word document, however, can provide a bigger picture for understanding the context behind a search.


    That’s where Insights for Office is different. It can use the words from your entire document (or also those you select) to pinpoint exactly what you are looking for. With the help of this context, Bing is able to rank the most relevant result at the top. The results are also prioritized by relevance, including Snapshot, Wikipedia, Bing Image Search, and related web content to help find what you need.


    Abraham Lincoln


    An example is the word “Amazon” where research intent may conflict with commercial intent – search engines are typically more likely to rank {Amazon the online shopping company}, which is more popular on the web, as opposed to results like {Amazon river} or {Amazon jungle}. But if the document contains related context about the Amazon River, then clearly Amazon the company is not the right result regardless of its overall web signal.


    Pretty neat, right? This feature will be available in Office Online in English to all markets in the next few days. You can try it for free here.

    Thousands Of WordPress Sites Blocked By Google


    If you're a fan of adding fancy plugins to your WordPress installation to spice up your website, you might want to hold back a bit. A new malware campaign from SoakSoak.ru has exploited certain vulnerabilities in a well known slider plugin to infect various domains. As a result, Google has blacklisted thousands of these malware-infected websites, many among them WordPress installations.


    According to a report, a total of over 100,000 sites have been effected by this new malware, 11,000 of which are WordPress sites.


    How it works?


    By using a vulnerability found in the WordPress plugin RevSlider, SoakSoak modifies a file in a site’s WordPress installation and loads Javascript malware.


    RevSlider is often used in WordPress themes, so many site owners may not even know they’re using the plugin, let alone that they need to update it to prevent a malware attack. Moreover, it’s not a plugin that’s easily updated, as Daniel Cid from Sucuri security points out:


    “The biggest issue is that the RevSlider plugin is a premium plugin, it’s not something everyone can easily upgrade and that in itself becomes a disaster for website owner. Some website owners don’t even know they have it as it’s been packaged and bundled into their themes”


    Visitors of infected sites may be redirected to a webpage that will attempt to download malware onto their computers. Google’s decision to block infected sites shortly after the vulnerability became known will hopefully prevent the malware from spreading any further.


    Getting back on track


    If you believe your WordPress site has been infected by the SoakSoak malware, there immediately disable/remove the plugin, and start working on the recovery process. The following links might help;


    If you’re in the clear, then let this be a reminder that it’s incredibly important to keep your WordPress plugins updated in order to be fully protected against security vulnerabilities. Updating your plugins is just as important as keeping your WordPress installation updated to the most current version.

    Now Make Hotel Reservations With Bing!


    Bing


    In a fresh bid to add more value to the search engine, Bing has added a new feature for making hotel reservation on Bing.com, along with some other nifty mobile features. So now when you're travelling, Bing can be your travel companion, and getting a place to stay should be one thing you can quickly check off your to-do list. Let's take a look at what Bing has been up to.


    Hotel reservations


    Bing, in partnership with TripAdvisor, has brought hotel booking to Bing.com for people in 22 countries.


    Start by searching for a hotel on Bing. In this case, let’s take a look at the Westin Melbourne. On the Snapshot region of the search page, you’ll see more information about the hotel, as well as the ability to select your dates and get rates on TripAdvisor.


    Hotel booking is available for people in the United States (in English and Spanish), Great Britain, Canada (in French and English), Australia, Japan, France, Germany, Mexico, Brazil, Spain, Italy, India, Russia, Austria, the Netherlands, Belgium, Turkey, Switzerland, Norway, Poland, Sweden, and Hong Kong.


    Mobile features


    Bing has also released a slew of improvements to the way that mobile search results show up. This is the first in a set of mobile optimizations you’ll be seeing over the next few weeks. Here’s some of what you can expect to see, along with the old experience for comparison:


    Extra facts


    Sitelinks


    File types


    What do you think of these new improvements to the Bing search engine? What would you say is the one biggest problem with Bing that if resolved, could move you to use the search engine more often? Leave your interesting responses in the comments section below!

    How Does Google Treat Hidden Content Within A Website?


    How Google treats hidden text


    Google has already announced in the past that it looks at webpage content just as users see it, which means that it renders webpages with CSS and JavaScript, just like a browser. We earlier discussed that blocking these files may lead to disruptions in the crawl process and ultimately impact the rankings. This applies to content and links that are hidden by JavaScript, only to be made visible by the click of a button or a link.


    You commonly see this type of behavior on 'click to expand' or 'read more' buttons that reveal hidden content or links when clicked. If Google was to render webpages just like browsers do, and factor in JavaScripts too, then technically, it shouldn't index this hidden content.


    That's not always the case.


    From the clarifications Google has provided, there's no reason to suggest that Google wouldn't index such content. This includes links, text, links, and so on. According to Google;


    ..in general this is something where if the content isn’t really visible, then it’s really hard for us to say whether or not it makes sense to put a lot of weight on the content. And it doesn’t really matter if it’s a video, if it’s a link or if it’s images, this is essentially something that has been the case for really long time now that if this is really important and relevant content, then make sure that it’s actually visible.


    The interesting thing here is, “it doesn’t really matter if it’s a video, if it’s a link or if it’s images.” This verifies that the scope of what Google considers to be content in these cases includes links.


    This is definitely an interesting consideration in terms of menu structures, especially for the mega menus that are becoming so popular and also in terms navigation handling for large eCommerce sites.


    This applies more to mobile web than anything else. In this mobile age, webmasters need to compress information, and only display it when needed, i.e. when a user wants. Hence, hidden menu options are a must for mobile.


    When it comes to ranking, Google may still be relying heavily on the desktop experience for these types of ranking signals.


    What do you think about hidden content?

    Show/Hide Blogger and Google+ Comments System With Toggle

    Many Blogger site owners received the new Google+ Comment System pretty negatively because it forced all commenting users to create their own Google+ account before they were able to write a comment. The Google+ Comment System on Blogger was convenient to writers, but discouraged many users from continuing to comment on blogs because they simply didn't want to use Google+. For those that did use Google+ to make a comment, Blogger would never email you and notify you that someone left a comment; you could go days or weeks without ever realizing that you never responded to a reader.

    In addition to frustrating your audience, the Google+ Comment System on Blogger depended upon the URL of your blog post. By changing your URLs or moving around your blog posts internally, you run the risk of losing every one of your comments that was placed using Google+.

    Previously, the only way to solve this problem was to disable the comment system through your account settings, thus giving up your ability to use their Google+ account. Now, there's an easy new way to have the best of both worlds. Allowing fans of Google+ as well as everyday blog readers to access all same features, you’ll be able to engage every visitor equally. You can respond to comments while still being able to communicate with other Google+ users outside of your site and take advantage of the Google+ Comment System on Blogger.

    google plus comments, blogger

    How to Integrate Blogger and Google Plus Comments

    To make the installation as simple as possible, I used inline jQuery and CSS, but who wants can change this code later. Also, the most accessible place I found to add it would be just after <b:include data='post' name='post'/>. So, let's start adding it:

    Step 1. Log into your Blogger account and select your blog > go to 'Template' and press the 'Edit HTML' button on the right side.


    Step 2. Click anywhere inside the code area and press CTRL + F keys to open the editor's search box and search for the following code:
    <b:include data='post' name='post'/>
    Step 3. Just after <b:include data='post' name='post'/> add the following code:
    <b:if cond='data:blog.pageType == &quot;item&quot;'>
    <style>#comments, #gplus-comments-visibility {display:none;} .comments-icons {background: url(https://blogger.googleusercontent.com/img/b/R29vZ2xl/AVvXsEj7Y7uIf0itELEBq04U1sJOy_2GKB6YADjHt9vIiQXz1sMleIaBwyiWbrFs36pM4OiyIXVcyT9a_T6XXkO-63zBrF41ncP4NN0yjpF3Ukr79bY4BwCTuPv4B5WOi8KUHeOVLd98_g4n2TOR/s1600/speech-bubble.png) no-repeat; font-size: 20px; font-family: &quot;Arial Narrow&quot;,Arial,sans-serif; color: #555; font-weight: bold; padding: 18px 15px 0; height: 70px; } .comments-icons a img {vertical-align: middle;}</style>
    <div class='comments-icons'>
    Show Comments: <a class='show-hide-comments' href='javascript:void();' onclick='$(&quot;#gplus-comments-visibility&quot;).slideToggle();$(&quot;#comments&quot;).hide();'><img class='gplus-icon' height='35' src='https://blogger.googleusercontent.com/img/b/R29vZ2xl/AVvXsEiakT6lM_JEswDcUaWkTQbWDGJpQCH1Q5Pm3bB3AIs9ly6W57dS-JvnsHItR_V0Luz3ZONVhBoVhPIqRqYqszgUbu8jqERl7XXSLj1jFMArpqEiV_e5pXLKPdOJqqeu-egff_r6ts9tX4zt/s1600/google-plus-logo.png' width='35'/></a> OR <a class='show-hide-comments' href='javascript:void();' onclick='$(&quot;#comments&quot;).slideToggle();$(&quot;#gplus-comments-visibility&quot;).hide();'><img class='blogger-icon' height='35' src='https://blogger.googleusercontent.com/img/b/R29vZ2xl/AVvXsEhNW02MRTumNB3nNz4UX5swQmGiVylRcQuJ_TiABn7qt6-tmCUOp_YTUoUJRwy4uS-iTuHob8fTor4XIV9I9v_B57Gpmz6Da6QKUX8kMRfT9uX69_79ihyphenhyphen11MBMc8ZmRlxPejfWeeWX4rv6/s1600/blogger-logo.png' width='35'/></a>
    </div>
    <div id='gplus-comments-visibility'>
    <div class='g-comments' data-first_party_property='BLOGGER' data-view_type='FILTERED_POSTMOD' data-width='550' expr:data-href='data:post.url'/>
    </div>      
    </b:if>

    Note: data-width is for setting the width of the comment box, so the number (550) indicated there can be changed according to the design of your blog.

    Step 4. Press the "Save Template" button located at the top of the editor and view your blog to see if you have successfully added Google+ commenting system to Blogger.

    Please note that in order to make this work, you need to make sure that you are using a version of jQuery in your site. Otherwise, add this line just above the </head> tag using the HTML template editor:
    <script src='https://ajax.googleapis.com/ajax/libs/jquery/1.6.4/jquery.min.js' type='text/javascript'/>
    That's it!
    From now on, any reader that views your post has the option of making a comment using their Google+ account, or the native Blogger comments. Your readers will enjoy the flexibility that your site provides and you will also benefit from the inclusive services offered by Google.