How To Choose Right Keywords To Boost Your Traffic - Blogger Seo

How To Choose Right Keywords To Boost Your Traffic - Blogger Seo

What are keywords and how do they help you to get visitors to your site? if this question is in your mind then you have reached to right place. Here you will learn everything about keywords and there importance. Keywords are the words used by visitors to search something in search engines and if you have that keyword in your blog then search engines will show your site and hence you will get maximum visitors to your blog. Keywords is an important part of on-page seo. Mainly keywords are of two types:

(1). Short Keywords:


Short keywords are those which contains only one or two words. For example for my blog Blogger Widgets, Blogger Seo, Blogger Menus are the short keywords. These keywords should be most relevant to your content otherwise they are useless. Also these keywords should be used in the main template in the <head> section. It has become so common that it is almost in every blog in the meta tag form. Like this:

<meta content="Most Relevant Keywords" name="keywords"/>

Short keywords should be searched very accurately because they play a vital role in seo so best tools should be used to find them or else you will loss all of your traffic. You can use Google Keywords Planner to search most relevant keywords for your blog. It is the best tool to find keywords.

You can also find best short keywords for your blog using Google search if you know the category of your blog for example if you have a blog about fashion then you can use to search the "latest fashion" to get more related words and you can use them as your short keywords. Now when someone will search fashion or any other related word your blog will appear in search results. You can see an example in below image:

keywords-for-blogger-seo

You can see related keywords in the above image. Now all you have to do is to add these keywords in your blog.

Moreover if you get other keywords from search engines using which people reach your blog collect them and use them as your keywords too. To find keywords used by visitors go to Stats > Traffic Sources and choose month or week or all time to see keywords used by visitors to reach your blog.

how-to-find-best-keywords-for-seo

(2). Long tail keywords:


These are the keywords which are most important for seo. A long tail keyword is actually a sentence used to search something and it is used more than short keywords. Short keywords are used to search the most popular sites like Facebook, Google, blogger, reddit etc so they are not important than long tail keywords for bloggers and other articles publishing sites like Moz or Wikihow. So a blogger should focus on long tail keywords more than short keywords.

If you are a seo researcher then you must know what are long tail keywords and how do they help visitors to reach to what they are looking for.


Long tail keyword is of 3-4 words or sometimes a full sentence. For example if you want to search for optimizing your blog for seo, then what would you Google? I guess "how to optimize blogger blog for seo Or How to get your site to the top of search results Or how to boost blog traffic" etc. These are the long tail keywords and similar to you everyone would search something similar to it or search for what Google show in the list. So you can use these long tail keywords to boost your traffic.

Where should be long tail keywords used? as short keywords have taken the space in the template
in the meta tag. Don't worry you can use long tail keywords in the search description of your post. Separate them by comma. And don't type the description just add long tail keywords as your description.

You can see a live demo to make sure if long tail keywords really work or no by googling "featured posts widget blogger" you will see 101Helper in the search results.

keywords-for-seo-boost-traffic

You can collect long tail keywords from Google Keyword Planner but I recommend you to collect them manually or use online long tail keywords generator to search keywords for every post you write. It will boost your traffic in a very short time.

I hope you found this post helpful if you have an problem ask me in comments below. Follow and subscribe to get latest updates about blogger seo.

Please share this post with others and keep visiting 101Helper.

Search Tags: High desity keywords,Keywords search, On-page seo blogger,Keywords planner,How to get deep keywords to boost blog traffic,Get organic traffic from search engines.

5 Best Popular Posts Widgets for Blogger

If you're using Blogger as the platform for your personal or business blog, you're probably looking for ways to customize it and make it your own. This way, you'll make your webpages unique and eye-catching and ensure they'll stand out from the many other pages on the internet. You'll also grab the attention of your target market, encourage them to browse through your blog and become your loyal readers and followers.

Fortunately, there are lots of ways to personalize your Blogger blog, and one of these is to customize your Popular Posts widget. Haven't installed this yet? Don't worry since putting it in your blog easy.
popular posts widget for blogger

Adding the Popular Posts Widget for Blogger

Just click on your blog title, access the "Layout" menu, click "Add a Gadget" and choose "Popular Posts". A window will appear asking you to configure the widget by choosing which posts you'll feature (e.g. those that were most viewed in the past 7 days or 30 days or from the beginning of your blog). You'll also be asked to choose how many posts you'll feature in your Popular Posts section and select if you'll show the post title only or along with the image thumbnail and/or the snippet. (Remember that each widget style has different requirements, so follow the styles and instructions carefully to find out if you need the snippet and image thumbnail or not).
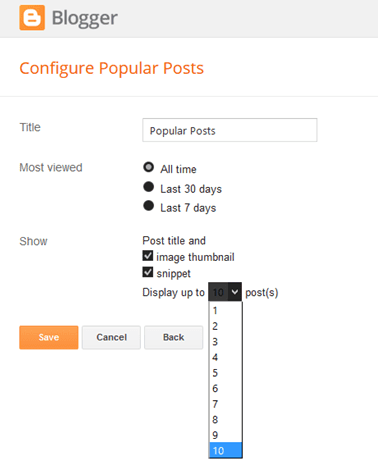
Configuring Popular Posts Widget for Blogger

Once you've followed these instructions, you'll get to see the basic version of the Popular Posts Widget for Blogger in your blog. You can stick with this if it matches your blog design but, if it sticks out like a sore thumb or doesn't suit your taste, there's no need to fret since you can personalize it. You can choose from the following styles - see the demo blog:

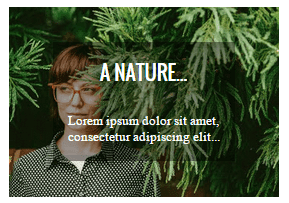
Popular Posts Style 1 - Box within a box

This is an interesting widget style since it uses your snippet and image thumbnail in a unique way. Your snippet is written in opaque text and placed in a small transparent box. This, in turn, is placed in a bigger rectangular box, wherein your image thumbnail is used as a background. Choosing this Popular Posts Widget for Blogger can be a great option if you want to brighten up your blog and grab the attention of readers with your colorful photos.

popular posts widget for blogger

CSS code:
<style type='text/css'>
.sidebar .PopularPosts ul{margin:0;padding:0;}.sidebar .PopularPosts ul li{list-style:none !important;padding:0 !important;margin-bottom:10px;}.sidebar .PopularPosts .item-thumbnail{height:190px;margin:0;overflow:hidden;width:100%;}.sidebar .PopularPosts .item-title{position: relative;}.sidebar .PopularPosts img{height:auto;width:100%;padding:0;}.sidebar .PopularPosts .item-title a{color: #FFFFFF;font:20px Oswald;text-transform:uppercase;padding:10px;position:absolute;right:0;left:0px;margin:0px auto;text-align:center;text-decoration:none;top:40px;width:60%;height:26px;overflow:hidden;z-index:2;}
.sidebar .PopularPosts .item-snippet{background:rgba(0, 0, 0, 0.35);border-top:6px solid rgba(0, 0, 0, 0.1);border-bottom:6px solid rgba(0, 0, 0, 0.1);color:#FFFFFF;left:0px;right:0px;margin:0px auto;padding:65px 10px 10px;position:absolute;font:13px 'Times New Roman',Times,FreeSerif,serif;text-align:center;top:35px;width:60%;z-index:1;}.sidebar .PopularPosts .item-content{position:relative;}
</style>

Popular Posts Style 2 - Large thumbnails with small post titles underneath

This uses the same code as the basic Blogger Popular Posts Widget with a few tweaks. Popularized by well-known blogs, this style is eye-catching because it focuses on pictures, which don't only summarize the posts' content but also add visual drama to the entire page. This is particularly useful for blogs that focus on clothes, makeup, art and other topics that highly depend on visual presentation to better express ideas.
popular posts widget for blogger
CSS code:
<style type='text/css'>
.sidebar .PopularPosts ul{counter-reset:popularcount;margin:0;padding:0;}.sidebar .PopularPosts ul li{width:100%;list-style:none !important;padding:0 !important;margin-bottom:20px;position:relative;border:0;text-align:center;}.sidebar .PopularPosts .item-thumbnail a{clip: auto;display:block;height:auto;height:120px;}.sidebar .PopularPosts .item-thumbnail{width:100%;height:120px;overflow:hidden;position:relative;margin-bottom:15px;}.sidebar .PopularPosts .item-thumbnail::before{background:rgba(0, 0, 0, 0);border-bottom:29px solid #fff;border-left:29px solid transparent;border-right:29px solid transparent;bottom:0px;content:&quot;&quot;;height:0;width:0px;left:0px;right:0px;margin-left:auto;margin-right:auto;position:absolute;z-index:3;}.sidebar .PopularPosts .item-thumbnail:after{color:#000;content:counter(popularcount, decimal);counter-increment:popularcount;font:13px &quot;Times New Roman&quot;,Times,FreeSerif,serif;list-style-type:none;position:absolute;bottom:0;margin:0px auto;left:0px;right:0px;z-index:4;}.sidebar .PopularPosts .item-thumbnail img{position:relative;width:100%;height:auto;padding:0;}.sidebar .PopularPosts .item-title{font:15px &#39;Oswald&#39;, sans-serif;text-transform:uppercase;margin:0px auto;padding-bottom:10px;border-bottom:1px solid #000;}.sidebar .PopularPosts .item-title a{color:#000;text-decoration:none;}.sidebar .PopularPosts .item-snippet{padding:10px 15px;font:13px &quot;Times New Roman&quot;,Times,FreeSerif,serif;}
</style>

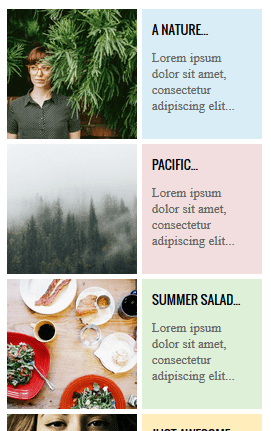
Popular Posts Style 3 - Colorful boxes

If your blog needs a pop of color, this is the right choice for you. This widget style presents your Popular Posts in several boxes that feature a thumbnail image and have bright, eye-catching shades like light green, ocher yellow and vivid orange. Each box has a different color, and you can add up to four boxes.

popular posts widget for blogger

CSS code:
<style type='text/css'>
.sidebar .PopularPosts ul{padding:0;margin:0;}.sidebar .PopularPosts .item-thumbnail a{clip:auto;display:block;height:auto;overflow:hidden;}.sidebar .PopularPosts .item-thumbnail{width:130px;height:130px;border-right:5px solid #fff;margin:0px 10px 0px 0px !important;position:relative;}.sidebar .PopularPosts .item-thumbnail img{position:relative;height:auto;width:100%;padding:0;}.sidebar .PopularPosts ul li{float:left;margin-bottom:5px;max-height:130px;min-width:250px;overflow:hidden;}.sidebar .PopularPosts ul li:first-child{background:#D9EDF7;}.sidebar .PopularPosts ul li:first-child + li{background:#F2DEDE;}.sidebar .PopularPosts ul li:first-child + li + li{background:#DFF0D8;}.sidebar .PopularPosts ul li:first-child + li + li + li{background:#FFEEBC;}.sidebar .PopularPosts ul li:first-child + li + li + li + li{background:#E0E0E0;}.sidebar .PopularPosts .item-title{font:13px &#39;Oswald&#39;, sans-serif;text-transform:uppercase;padding:10px 5px 10px;}.sidebar .PopularPosts .item-title a{color:#000;text-decoration:none;}.sidebar .PopularPosts .item-snippet{font:13px &quot;Times New Roman&quot;,Times,FreeSerif,serif;padding-right:5px;}.sidebar .PopularPosts .widget-content ul li{padding:0px 5px 0px 0px!important;}
</style>

Popular Posts Style 4 - Grid layout

Just like the large-picture widget style, the grid layout is an excellent option if you want to showcase your pictures or if your blog depends on visual information. However, the title of your posts won't be included in the layout, so readers will have to hover their mouses on the images to read the titles.

popular posts widget for blogger

CSS code:
<style type='text/css'>
.sidebar .PopularPosts ul{padding:0;}.sidebar .PopularPosts ul li:first-child{width:100%;max-height:100%;opacity:0.9;}.sidebar .PopularPosts ul li:nth-child(even){margin-right:2%;}.sidebar .PopularPosts ul li{-moz-box-sizing:border-box;-webkit-box-sizing:border-box;box-sizing:border-box;position:relative;padding:0px !important;width:49%;max-height:120px;opacity:0.4;overflow:hidden;float:left;margin-bottom:2%;-webkit-transition: all 0.5s ease 0s;-moz-transition:all 0.5s ease 0s;-ms-transition:all 0.5s ease 0s;-o-transition:all 0.5s ease 0s;transition:all 0.5s ease 0s;}.sidebar .PopularPosts ul li:hover{opacity:1;}.sidebar .PopularPosts .item-thumbnail{margin:0;width:100%;line-height:0;}.sidebar .PopularPosts ul li img {-moz-box-sizing:border-box;-webkit-box-sizing:border-box;box-sizing: border-box;width:100%;height:auto;padding:0;}.sidebar .PopularPosts .item-content:hover .item-title a,.sidebar .PopularPosts .item-thumbnail-only:hover .item-title a{visibility:visible;opacity:1;}.sidebar .PopularPosts .item-title a{color:#fff;background:rgba(0, 0, 0, 0) linear-gradient(to bottom, rgba(0, 0, 0, 0) 0%, rgba(0, 0, 0, 0.93) 100%, rgba(0, 0, 0, 0.85) 100%);text-decoration:none;position:absolute;text-align:center;font:13px &#39;Oswald&#39;, sans-serif;left:0;right:0;bottom:0%;padding:100px 10px 10px;opacity:0;visibility:hidden;}.sidebar .PopularPosts .item-snippet{display:none;}
</style>

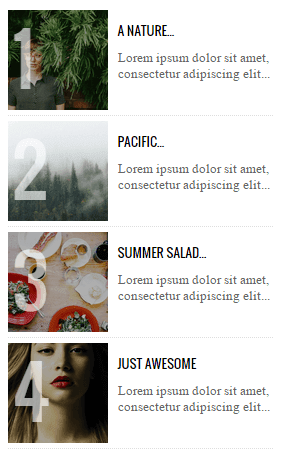
Popular Posts Style 5 - Numbered posts

If you love numbered lists, or if you'd like to make your blog more organized, this can be the perfect option. By using the code for this widget style, your Popular Posts will be automatically numbered and will feature clean, minimalistic boxes that include your snippet and image thumbnail.

popular posts widget for blogger

CSS code:
<style type='text/css'>
.sidebar .PopularPosts ul{counter-reset:popularcount;margin:0;padding:0;}.sidebar .PopularPosts ul li{float:left;max-height:130px;min-width:250px;position:relative;}.sidebar .PopularPosts .item-thumbnail::after{color:rgba(255,255,255, 0.63);content:counter(popularcount, decimal);counter-increment: popularcount;font:70px &#39;Oswald&#39;, sans-serif;list-style-type:none;position:absolute;left:5px;top:-5px;z-index:4;}.sidebar .PopularPosts .item-thumbnail::before{background:rgba(0, 0, 0, 0.3);bottom:0px;content:&quot;&quot;;height:100px;width:100px;left:0px;right:0px;margin:0px auto;position:absolute;z-index:3;}.sidebar .PopularPosts .item-thumbnail a{clip:auto;display:block;height:auto;overflow:hidden;}.sidebar .PopularPosts .item-thumbnail{width:100px;height:100px;margin:0px 10px 0px 0px !important;position:relative;}.sidebar .PopularPosts .item-thumbnail:hover:before{display:none;}.sidebar .PopularPosts .item-thumbnail img{position:relative;padding-right:0px !important;height:auto;width:100%;}.sidebar .PopularPosts .item-title{font:13px &#39;Oswald&#39;, sans-serif;text-transform:uppercase;padding:0px 5px 10px;}.sidebar .PopularPosts .item-title a{color:#000;text-decoration:none;}.sidebar .PopularPosts .item-snippet{font:13px &quot;Times New Roman&quot;,Times,FreeSerif,serif;}.sidebar .PopularPosts .widget-content ul li{padding:0px 5px 0px 0px !important;}.sidebar .PopularPosts .item-content{padding:5px 0px;border-bottom:1px dotted #dedede;overflow:hidden;height:100px;position:relative;}
</style>
These are just some of the widget styles you can choose from. When you've picked a style you want, make sure to copy its CSS code. Once you do so, go to your blog, click "Theme" on the left side and select "Edit HTML" under the template preview.

These next codes need to be pasted above the "</head>" or "</body>" tags, so check the instruction to know exactly where you need to put the code.

Adding the CSS

When the template editor has opened, click anywhere inside the code area and hit CTRL + F or Command F to search the following tag:
</head>
Just ABOVE the </head> tag, copy-paste the CSS code of one of the styles above.


Important: If the Popular Posts widget is located in the footer of your blog, remove the .sidebar class found in the CSS code in order to make it work.

Please note that most of the styles are using the 'Oswald' font which you need to add to your template's code as well.

So, search for this tag:
<head>
... and just BELOW it, add this line:
<link href='https://fonts.googleapis.com/css?family=Oswald:400,700' rel='stylesheet' type='text/css'/>

Adding the JavaScript

These styles also require using a script in order to resize the popular posts image / thumbnail and trim the post snippet and title. To add the JavaScript code, search the </body> tag and paste the following script just above it:
<script src='//ajax.googleapis.com/ajax/libs/jquery/1.11.1/jquery.min.js'/>
<script type='text/javascript'>
//<![CDATA[
$(".popular-posts img").attr("src",function(t,s){return s.replace("/w72-h72-p-k-no-nu/","/s350-c/")}),$(".popular-posts ul li .item-snippet").each(function(){var t=$(this).text().substr(0,60),s=t.lastIndexOf(" ");s>10&&$(this).text(t.substr(0,s).replace(/[?,!\.-:;]*$/,"..."))}),$(".popular-posts ul li .item-content a").each(function(){var t=$(this).text().substr(0,60),s=t.lastIndexOf(" ");s>=6&&$(this).text(t.substr(0,s).replace(/[?,!\.-:;]*$/,"..."))});
//]]>
</script>
Note: if you have already the jQuery library in your template, remove the line in red.

After you have added all the codes in the right place, press the "Save theme" button to save the changes.

That's it!

The five Popular Posts widgets for Blogger featured today are all great solutions for adding a popular post section to your blog. They all have different appearance for determining what makes a post popular, but the end result is the same: visitors are always one click away from your best content. Try some of these styles, find your favorite, and see how it impacts the performance of your blog.

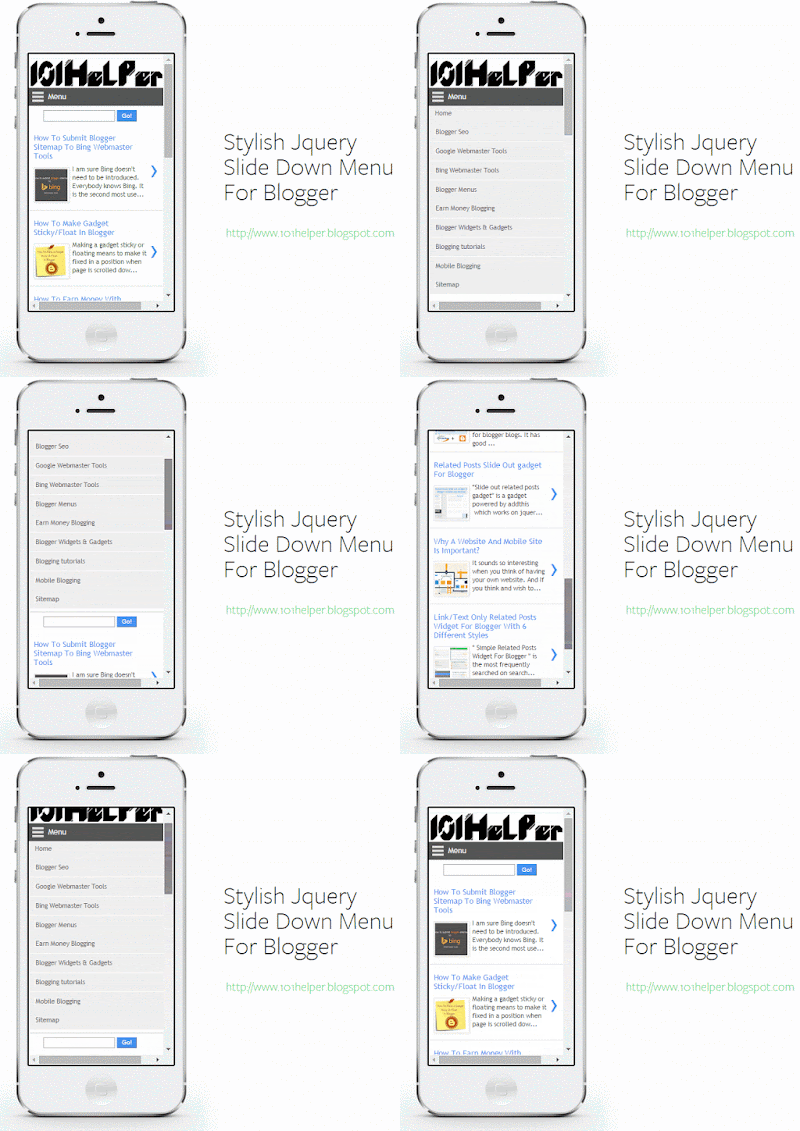
Jquery Slide Down Mobile Menu For Blogger

jquery-stylish-slide-down-menu-for-mobile-blogger.gif

A successful blogger is that who knows the importance of a mobile site. As blogger has no gadgets for mobile site therefore you have to add them manually. Basic things which are important for a mobile site are a search box, a related posts widget and a menu. If your mobile site has these gadget then your site is ready for mobiles.

In blogger page list is commonly used as a menu as it becomes a selector in mobile site. But it doesn't look professional and most of the visitors don't like it. So today I have a stylish jquery slide down menu for your blog's mobile site. It works on jquery so it works properly in all mobiles either it is iphone or Microsoft mobile or something else. But if you are using a phone which doesn't support javascript or jquery then this menu won't work on it.

In this post I will share my first mobile menu for blogger and show you how to add it in your blog's mobile site. So follow below mentioned steps to add this menu in your blog you can see a live demo of this menu above.

How To Add Stylish Jquery Menu In Blogger Mobile Site?

Step 1: Go to blogger dashboard > layout and click on "add a gadget" below header.


Step 2: Give a title to your gadget e.g mobile menu. Because it will help you in finding this gadget in your template in coming up steps.

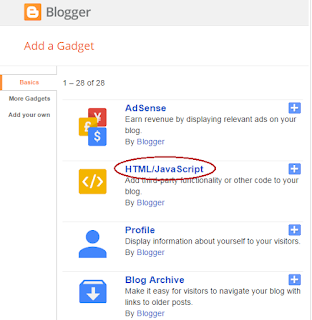
Step 3: Find Html/Javascript and click on it.

how-to-add-html-javascript-in-blogger

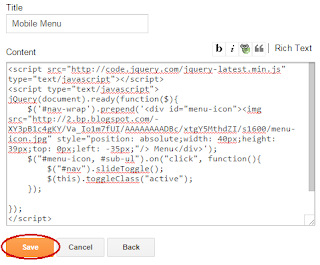
Step 4: Copy below code and paste it into Html/Javascript window.

Tip: Click inside the code container and use Ctrl+A to select code and Ctrl+C to copy it!


how-to-add-mobile-menu-in-blogger

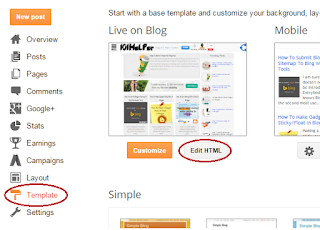
Step 5: Click on save, go to template and click on Edit Html.

how-to-edit-html-in-blogger

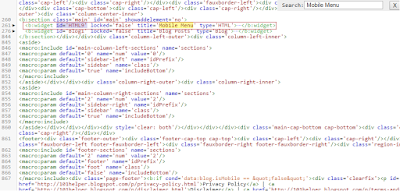
Step 6: Click inside the code and search for the name which you have given to your menu in step 2. I am searching for Mobile Menu as I've given it to my gadget.

You can also use jump this gadget to jump to your widget but its possible only if you have ID of your widget.

You Might Also Like Reading: How To Find ID Of A Gadget In Blogger

how-to-add-mobile-menu-in-blogger-101helper

Step 7: Type mobile='only' beside locked='false' and click on save template.

how-to-show-a-gadget-in-blogger-mobile-site-view

Thats it! you are done. Now open your blog in your phone and try your menu.


How To Edit This Menu?

You can't edit this gadget as you do others because after adding mobile='only' you have commanded blogger to show this gadget in your blog's mobile view only so if you check your layout now you will not see any gadget below header as it is shifted to mobile site. So to edit this menu and add your custom tabs in it follow below steps.

Step 1: Login to your blogger account first and then go to your blog's mobile site using below link:

https://yourblog.blogspot.com/?m=1

Step 2: Now find the edit image(wrench and screw driver) below your menu as shown in below image:


Step 3: Click on it and Html/Javascript window will be opened, now you can make changes in your gadget. Click on save after making changes and you are done.

Customization:

You can change its color font, font-size and every thing if you know CSS but I recommend you to use it as it is. Do only slight changes like font color or font family.

The important thing which needs customization is adding new tabs and links or removing existing tabs. So read below to add or remove any tab.

To Add A New Tab:

You can add a new tab using below piece of code:

<li><a href="Your tab's link">Your Tab's Text Or Name</a></li>

Replace Your tab's link with your link and Your Tab's Text Or Name with your tab name. For example:

<li><a href="https://101helper.blogspot.com/">Home</a></li>

To Remove A Tab:

Remove its code from <li> to </li> for example to remove Home button I will remove:

<li><a href="https://101helper.blogspot.com/">Home</a></li>

Important Note: Add or remove a tab between <ul> id="nav" style="display: none;"> and </ul> in the given code.

Menu Not Appearing?

You might face a common problem of gadget not appearing in mobile view so for that you have to use custom mobile template. If you haven't switched to custom mobile template yet then go to blogger dashboard template and below the mobile template click on the edit icon. Now switch to custom template as shown in below image;


I hope you like this post and this menu is working properly in your blog if not please ask me by leaving a comment below. Share this post with others. Follow and subscribe for more blogger gadgets, menus, tutorials etc. Thanks for visiting 101Helper.

Search Tags: Mobile Menu For Blogger,Jquery menu for mobile site,Blogger mobile view gadgets,Blogger slide down menu for mobile site,101helper menus for blogger blogs,iphone mobile menu.

How To Submit Blogger Sitemap To Bing Webmaster Tools

How-To-Submit-Blogger-Sitemap-To-Bing-Webmaster-Tools-101helper

I am sure Bing doesn't need to be introduced. Everybody knows Bing. It is the second most used search engine after Google which makes it important for bloggers and webmasters who are trying to promote their newly created site. One of the most important step to promote a blog or site is to submit its sitemap to every search engine so that it can be indexed and people can reach it though search engines. And that's why I created this post to help newbies how to submit blogger blog's sitemap to Bing Webmaster Tools. It will help Bing to crawl your blog and index every post you create. So follow below steps to submit your blog's sitemap to Bing. If you have any questions you can ask me in comments below.

You Might Also Like Reading:
  1. How To Add Your Blog To Google Webmaster Tools
  2. How To Submit Blogger Sitemap To Yandex
  3. Submitting Sitemap To Google Webmaster Tools
  4. How To Setup Google Custom Search Box In Two Pages In Blogger
  5. How To Fix Blogid,Postid,Image_url,Updated Errors In Blogger
Requirements:
How To Submit Sitemap To Bing In Blogger?

Step 1: Go to Bing Webmaster Tools and sign-in using your Microsoft account.

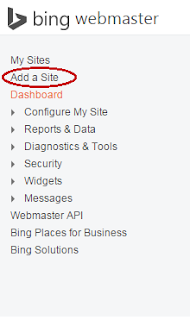
Step 2: Click on Add a Site in the menu above Dashboard.


how-to-submit-blogger-sitemap-to-Bing-webmaster-tools

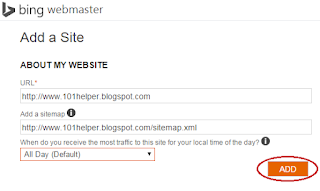
Step 3: Enter your blog's Homepage link and below it enter your blog's sitemap link. Leave the third option as it is.

I recommend you to use https://www.yourblog.blogspot.com/sitemap.xml as your sitemap url.

how-to-submit-blogger-sitemap-to-Bing

Congratulations! you are done successfully now its time to verify your ownership so follow below steps.


How To Verify Ownership In Bing Webmaster Tools?

Step 1: Click on Configure My Site below Dashboard in the menu and click on Verify Ownership.

how-to-verify-ownership-in-bing

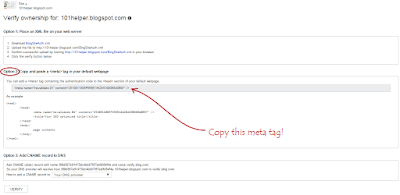
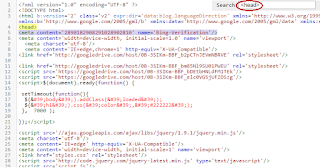
Step 2: On the verification page there are three ways to verify your bing webmaster tools but we will choose the second option which is meta tag verification. So copy the meta tag of your webmaster tools as shown in below image.

how-to-verify-ownership-in-bing-webmaster-tools

Step 3: Now go to Blogger Dashboard > Template and click on Edit Html.


Step 4: Click inside the code and search for <head> by using Ctrl+F on your keyboard.

verify-bing-ownership-blogger-tutorial

Step 5: Paste the Bing meta tag below <head> as shown in above image.

Step 6: Click on save template and go back to Bing verification page.

Step 7: Click on Verify button in the bottom and you are done.

Congartulations! Now your blog is verified in Bing Webmaster Tools. Bing will process your sitemap as soon as possible and index all your pages.

bing-webmaster-tools-tutorials-blogger

Important Note: Never remove Bing meta tag from your blog template even after verification because if you do so Bing will not index any of your page and start removing the already indexed pages.

After submitting your site to Bing Webmaster Tools wait for bing to index your pages meanwhile you may make some changes in your Robots text to indicate Bing which pages are to be indexed and which not.

Check Out: How To Use Robots Text For Better Seo

I hope you liked this post. If yes please share your views by leaving a comment below and share this post with others. Follow and subscribe to newsletter for latest updates about webmaster tools tutorials or blogging.

Search Tags: How to submit sitemap to webmaster tools, bing webmaster tools, blogger sitemap, blogger tutorials webmaster tools, 101Helper webmaster tools tutorials for blogger, How To Submit Blogger Sitemap To Bing Webmaster Tools,boost traffic,seo.

How To Make Gadget Sticky/Float In Blogger

Make-a-gadget-sticky-in-blogger-101helper

Making a gadget sticky or floating means to make it fixed in a position when page is scrolled down and it is possible with javascript. Gadgets are made sticky to provide visitors a good user experience such as a menu which floats with user so now he doesn't need to scroll up again and again to navigate through your blog. Similarly more gadgets are also made sticky such as ads or email subscription widget to get more clicks on ads and to get more subscribers respectively. You can see a live demo of making a gadget sticky on right side of this page(Recommended Articles). I have made it sticky to help visitors reach all of my content. Similarly you can also do it by following this post. So if you want to make any of your widget sticky then follow below steps.

 Don't Miss: 
How To Make A Gadget Sticky Or Float In Blogger:

Step 1: Go to blogger dashboard and navigate to layout.

Step 2: Add a gadget or edit an existing gadget which you want to make sticky.

Step 3: Copy its ID as shown in below image:

how-to-get-id-of-a-gadget-in-blogger


Step 4: Go to template and search for </body> by using Ctrl+F.

Step 5: Copy below code and paste it just above </body>.
<style>.sticker {background:#F5F5F5;position:fixed; top:0px; z-index:99;}</style>
<script>
//<![CDATA[
bs_makeSticky("HTML6"); 
function bs_makeSticky(elem) {
    var sticky = document.getElementById(elem);
    var scrollee = document.createElement("div");
    sticky.parentNode.insertBefore(scrollee, sticky);
    var width = sticky.offsetWidth;
    var iniClass = sticky.className + ' sticky';
    window.addEventListener('scroll', sticker, false);
    function sticker() {
        var rect = scrollee.getBoundingClientRect();
        if (rect.top < 0) {
            sticky.className = iniClass + ' sticker';
            sticky.style.width = width + "px";
        } else {
            sticky.className = iniClass;
        }
    }
}
//]]>
</script>

how-to-make-gadgets-sticky-float-in-blogger

Step 6: Replace HTML6 with your gadget's ID which you found in step 3.

Step 7: Click on save template and you are done. 

Customization:

(1). To change background color or your floating widget replace #F5F5F5 with desired color code.

You Might Also Like: How To Get Code Of A Color, Color Code Generator.

(2). To Change the height of your floating widget(height from top) make changes in top:0px;

I hope you like this post and it was helpful to you. Follow and subscribe to our newsletter or stay in touch with us via social networks to get latest updates about blogger tricks. Thanks for visiting 101helper.blogspot.com. Share this post with others and help me spread my blog.

Search Tags: Sticky gadget blogger, jquery tricks blogger, make a div float, javascript tricks blogger, 101helper blogging tricks, make a widget floating or sticky in blogger.

How To Earn Money With Chitika In Blogger

how-to-earn-money-blogging

Chitika is one of the highest paying ad network and very suitable for blogger blogs. It has good ppc rates and tracks traffic very accurately. It is very easy to use chitika for blogger because of its easier integrating service. It has all types of ad units e.g text ads, slide out ad, hover ads(appear when text is selected) and banners of every size. Chitika has started referral program also so now you can double your earnings by referring others to Chitika. Chitika payout method is paypal. In this tutorial I will show you how to earn money with chitika in blogger.

Requirements:
  1. A blog - Create a blog if you don't have one.
  2. Chitika account.
  3. Paypal account - To payout.

How To Sign-Up For Chitika?

Step 1: Go to Chitika.

Step 2: Enter your Email address and click on GO!

how-to-sign-up-chitika

Step 3: Open your Email and open the recent mail by Chitika.

Step 4: Click on Complete My Application.

how-to-apply-chitika-blogger

Step 5: Fill out the form. Enter your name, username, website url, password and select your country.

how-to-set-up-chitika-account-blogger

Step 6: Click on submit and wait for approval.


After approval you have to add ads in your blog to start earning money. So after approval follow below steps to add ads in your blog.

How To Add Chitika Ads In blogger?

Step 1: Go to Chitika and log in to your account using your email and password.

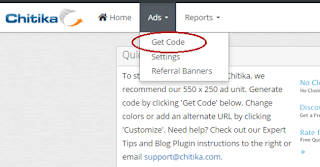
Step 2: Click on Ads and press Get code.

how-to-add-chitika-ads-in-blogger

Step 3: Scroll down to "Ad Code Generator" and select your ad using selector, you can see a preview of your ad below selector.

how-to-add-chitika-ads-in-blogger-101helper

You can customize your ad by clicking on Customize button

Step 4: Click on Get Code and copy the code.


Step 5: Go to blogger dashboard and click on layout.

Step 6: Click on Add a gadget and scroll down to Html/Javascript.

Step 7: Click on Html/Javascript and paste the code of ad.

Step 8: Click on Save and you are done.


How To Boost Your Chitika Earnings?

To boost your earnings you have to:
  1. Boost your traffic using seo .
  2. Attract visitors to your blog.
  3. Implement ads in right places to get maximum clicks on your ads.
  4. Refer other to chitika using refer banners provided by chitika.
I hope you like this post and it was helpful to you. Follow and subscribe for more blogger tutorials. Share this post with others and help me spread my blog. Thanks for visiting 101Helper.

Search Tags: Chitika Review, How to earn money with chitika, How to boost earnings, How to get more clicks on ads,Earn money blogging,Refer and earn,earn money online,101helper blogger tutorials.

How can a "Fish Aquarium" Keep you Punctual in Office?

Fish aquarium keeps one punctual in officeAround 22 beautiful and colorful Malawi, guppy and tropical fishes joined STCnetwork! These fishes were brought in for a purpose that is extremely related to work productivity and performance. The most difficult of all things for an entrepreneur is remaining punctual with office work. When you have no boss at top to monitor and supervise your activities, as a human we are all bound to become lazy and lethargic at some point and especially unpunctual when it comes to Office timings.  I love sleeping a lot and barely open my eyes unless I have slept enough for 12 hours! As a result my office opening timings are never fixed, sometimes I go at 11:00 AM while sometimes I go at 3:00PM. Indeed this habit will make me dump and lazy in future if I don't take precautionary steps to avoid sleeping a lot and making sure I setup a fix time to go office every morning. Neither did exercise help me with this lazy habit nor did sleeping early at night. The only best solution that I came around was placing a "Fish Aquarium" or "Fish Tank" at the Office!


Fish Feeding really makes one Punctual

Fishes are fed twice every 24 hours using a food supplement that looks like spherical balls which includes necessary nutrition for a healthy fish life. These fishes are so cute and adorable that you can barely miss feeding them on time else they would have a much shorter life and some would barely survive. Fishes even eat each other's wings or tails when they are not properly fed. Since they are living beings just like us, so I make sure that I treat them with care and feed them on time without delaying.

This habit has made be in fact quite punctual. Sometimes I jump off my bed just to reach office the sooner possible so that I may feed these little babies on time with proper diet. Just yesterday, I left my breakfast because I had a dull sinking sensation within my stomach that may be the little creatures are hungry, so I rushed straight to Office and started feeding the little ones. I had my breakfast after the fishes were properly served!

Aquarium keeps you and your customers socially active!

I never feel alone when I am in office thanks to these colorful little beings that smiles at you when you look at them. They even are quite hospitable to customers who visit the office. Customers find these colorful creatures quite fascinating and these clever beings never miss an opportunity of bringing a smile on a new visitor's face. =)

They keep the office lively, full of love, harmony and joy. Seeing so many lively colors in front of your eyes really makes one more productive and vigilant throughout the day.

Some Tropical Fishes are deadly carnivorous!

I am not sure if this term would be right for these beautiful little creatures but in fact the little ones are way quicker and sharper compared to the larger ones. Two days have passed now and around 4 of the fishes are hunted down by the Shifu Gang (it's the name I have given to the naughty ones), amongst the dead are the black balloon fish and few Malawi ones. The shifu group eats up the tails and wings of the bigger ones and I honestly feel too bad when I find a fish being badly tortured by this group. I am new to fish keeping and not well trained on what combination of fishes are kept together to make sure they breed and live for a longer period. The shop keepers being profit-motivated misguided me in this matter but with time I am learning how to keep better care of them and make sure no one is harassed! =d

Share your experience and feeding tips!

Let me know what tips could you give me to take better care of these little babies and make sure they are well looked after. How often do you feed them and what tips can you share regarding the combination and selection of same type of fishes that live in harmony without eating up each other! :p

Related Posts Slide Out Gadget For Blogger


"Slide out related posts gadget" is a gadget powered by addthis which works on jquery. It is one of the most important gadget that is very beneficial for those who have a very low traffic. This gadget slides up when a page is scrolled down and on every page it shows a different recommendation so every post is shown one by one which boosts your traffic stats. One more special thing about this gadget is that it doesn't affect your blogs speed. Moreover you can see analytics of  your slide out gadget which shows you "how many click you have got" on your recommendations. So you have a full information about your traffic stats. This gadget is available for both mobile sites and desktop sites. So now you can add this gadget in your mobile site as well as desktop site and start boosting your traffic.

In this post I will show you how to install slide out related posts widget  in blogger. Let us start adding it desktop first.

How To Add Related Posts Slide Out Gadget In Blogger Desktop Site?

This gadget is very easy to install. You can do it in just a few minutes. All you need is anAddthis account. So first signup for an Addthis account and after that follow below steps.

Step 1: Sign up for an Addthis account and sign in to your account.

Step 2: Click on TOOLS.

slide-out-related-posts-widget-blogger-101helper

Step 3: Scroll down to Recommended Content section and click on What's Next on the right side.

related-posts-slide-out-gadget-blogger-mobile

Step 4: Give a title to your slide out gadget that will appear above the post name and select theme of your slide out gadget.


<------------ Optional Part Of Post-------------->

Your gadget is almost ready but if you want you can make some customizations like:

(1). Hiding this gadget on specific pages of your blog.
(2). Position of gadget(left or right).
(3). Responsive width(width after which the gadget should slide up when page is scrolled).

So to make such customizations click on "Show more options"


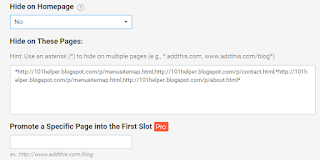
To hide the slide out on Homepage select No option below it. And if you want to hide this slide out in certain pages then move to Hide On These Pages and add the links of these pages between * if you want to hide it on multiple pages then separate the links by come(,).

Below it there is an option to promote a specific page into the first slot but you can use this feature only if you have Pro(Premium) account.


latest-blogger-gadgets-101helper.blogspot

The next option is Responsive Width which is the width in pixels after which the gadget would slide up when a user scrolls down your page. Set the desired width by typing it.

And the last option is Offset which decides whether the related post slide out will be shown on right side or left side. Choose the desired option, you can see a preview of your gadget above.

slide-out-related-posts-widget-blogger-free

<------------ Optional Part Of Post Ends-------------->


Step 5: Copy the code and click on Activate.

slide-out-related-posts-widget-blogger-free

Congratulations! your gadget is activated now you have to install it in your blog.

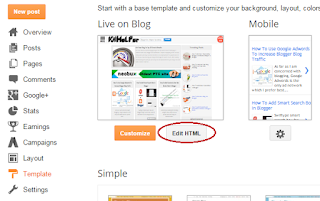
Step 6: Go to blogger dashboard, navigate to template and click on Edit Html.

Edit-html-blogger

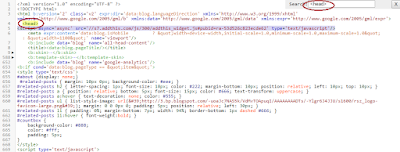
Step 7: Click inside your code and search for <head> by using Ctrl+F.

Step 8: Just below it paste the copied code.

how-to-use-blogger-template

Step 9: Click on save template and you are done.

How To Add Related Posts Slide Out Gadget In Blogger Mobile Site?


Step 1: Login to your Addthis account and navigate to tools as show above.

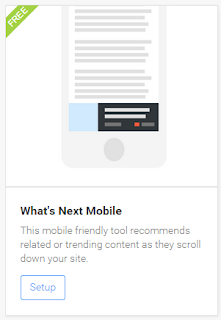
Step 2: Scroll to the end of the page and find What's Next Mobile.

slide-out-related-posts-widget-blogger-mobile

Step 3: Click on Setup and choose the desired options for your gadget e.g theme, title etc as shown above.

Must Read: Click on activate and you are done. If you have already added this gadget in your desktop them you don't have to follow next steps because you have already added the Addthis code to your blog. But if you haven't added Addthis code in your blog them follow next step!
Step 4: Copy the code and go to blogger > template and click on Edit Html.
How-to-edit-html-in-blogger

Step 5: Click inside the code and search for <head> by using Ctrl+F.

how-to-use-blogger-template

Step 6: Just below it paste the copied code and save your template as shown in above image.

If the gadget fails to appear in your blog's mobile site then go to template and switch your blog's mobile template from simple to custom.

how-to-create-mobile-site-blogger

If the widget still fails to appear in your mobile then optimize your blog's mobile site for phones or hire us to optimize it for you.

I hope this gadget was helpful to you and it didn't waste your time. Please share it with others and subscribe for latest blogger tutorial news. Share your views about this post in comments below. Thanks for visiting 101Helper.

Search Tags: Slide out related posts gadget for blogger, blogger mobile site gadgets, 101helper blogger tutorials, Related Posts Slide Out gadget For Blogger,New blogger widgets,Addthis tutorials for  blogger.