Infolinks, an innovative ads network is the best publishing network after Google Adsense. It has over 150,000 publishers worldwide and has wonderful opportunities for publishers and advertisers too! The best thing about Infolinks is it easily approves publishers, not like Adsense which takes you to your knees to get approval. Lets see what Infolinks gives us!
Note: In this post I will show you how to show Inframe ads in your blogger blog which usually don't show up.
Features Of Infolinks:
Infolinks brings you following features:1. High cpm and cpc rates, depending on region.
2. Referral program for publishers.
3. Smart ads.
4. Payment methods(Payoneer and Wiretransfer).
5. Fully customizable ads.
6. Easy integration in blogger, wordpress, joomla etc.
7. Real-time analytics(Android and IOS app).
8. Mobile, Tablets, PC and all devices compatible.
Payment Methods And Minimum Payout:
You can payout money from your Infolinks account by Payoneer or Wiretransfer. Previously Paypal was also available but now you can payout through Paypal. Instead you can hold your payments or payout through Payoneer or wiretransfer.
Minimum payout is Payoneer - $50 and Wiretransfer - $100
Infolinks Ad-types:
Read Why Infolinks is the best ad network for bloggers to learn about ad types
How To Integrate Infolinks Ads In Blogger?
Follow below mentioned steps:
2. Once your account is approved login to your account.
3. Click on integrate in the menu and copy the javascript code.

4. Now go to Blogger Dashboard > Template > Click on Edit Html
Note(Must Read): Infolinks says, paste the code above </body> but it has two problems, one is you won't see iframe ads and the second is it will hang up your blog for a few seconds everytime it is loaded so your blog will slow down.
5. Search for <head> and just below it paste the copied code.
6. Save your template and you are done, now its time to customize your ads.
How To Customize Infolinks Ads?
Follow below steps to customize your ads.
1. Go to Infolinks and login to your accoint.
2. Click on customize in the menu.

3. On the left side select your ads one by one to customize and enable or disable them. Let me tell you how to customize ads in infolinks.
How to customize intext ads?
First thing that you can customize in intext ads is number of ads on each page, use the slider to customize. Maximum number of ads are 12. furthermore you can change color of your ads. After customization check "Turn on intext ads on ...." and click on save.

On more thing about intext ads is you can control which area should have ads and which area shouldn't. For this you need to edit your blog's post > Switch to Html tab and paste <!--INFOLINKS_ON--> in the area where you want to show ads and <!--INFOLINKS_OFF--> above the area where you don't want to show ads. See example below:
User triggered, less intrusive that won't distract from your site's content
<!--INFOLINKS_OFF-->
[Script inactive - no words will be highlighted in this section]
Highly relevant InText ads for your site
visitors with
record high conversion rates<br/>
<!--INFOLINKS_ON-->
[Script active - words will be highlighted in this section]
Quick and easy with no changes to your website<br/>
How do I earn money with Infolinks?<br/>
<script type="text/javascript" src="http://resources.infolinks.com/js/infolinks_main.js"></script>
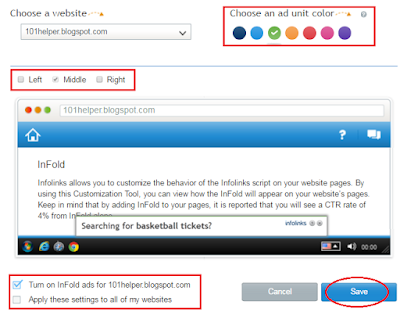
How to customize infold ads?
Infold ads aren't so customizable. You can just decide where should it slide up either from middle, right or left. Actually only right or left because middle is default. So check the box from which side you want infold ad to slide up and check "Turn on Infold ads on....." And click on save.
How to customize intag ads?
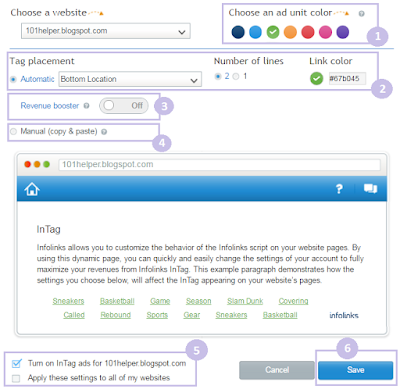
Intag ads are group of links displayed at the bottom or top of the post. You can show this links on both top and bottom of your posts. Use the selector to choose the ads position.
Infolinks has now introduced "Revenue Booster" which is actually powered by Taboola. It shows posts from web and other sites which are really interesting so when people from your blog reads them, you get paid!
To Enable "Revenue Booster" turn OFF to ON and you are done!
There is one thing more, that is "show ads manually". You are given a piece of code. now all you have to do is to copy it and paste it inside your posts where you want to intag ads to appear. Remember that if you are showing intag ads manually, you can't enable revenue booster.
How to customize inframe ads?
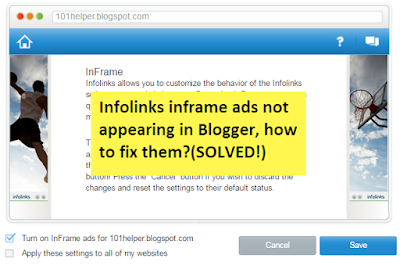
Infolinks inframe ads are actually not customizable, You can just enable them of disable them. Almost every blogger has complain about inframe ads that they don't appear because they aren't loaded properly because of render blocking scripts. I had the same problem but I have solved it now.
Infolinks inframe ads not appearing, how to fix them?
To solve inframe ads problem just paste the infolinks ad tag below <head> in your template not above </body>.
How to customize inscreen ads?
You can decide when the inscreen ads should appear. You have 3 options first is to show inscreen ads on entrance, second is to show show them on internal pages and last one is to show it on Exit.
How it works?

Entrance - It will show ads when someone enters your blog.
Internal page - It will add ads trigger to links of your pages. When a link is clicked inscreen ad will show up.
Exit - It will show when someone click a link on your blog that takes him to another blog or site.
The last ad type "Inarticle" ads can't be customized, you can just install them. You can given a code, copy it and paste it where you would like to show ad.
You might like: 10 Tips to Increase Your Infolinks Revenue
1. Go to Blogger Dashboard > Template > Mobile Template and click on settings icon.

2. Change your template to "Custom Template" and click on save.

3. Open your blog in Phone to see infolinks ads.
I hope you found this post helpful. If you have any problem comment below or contact me. Thanks for visiting 101Helper. Share this post with others. Like us on Facebook or follow on other social profiles to stay up to date!
How to customize intext ads?
First thing that you can customize in intext ads is number of ads on each page, use the slider to customize. Maximum number of ads are 12. furthermore you can change color of your ads. After customization check "Turn on intext ads on ...." and click on save.

On more thing about intext ads is you can control which area should have ads and which area shouldn't. For this you need to edit your blog's post > Switch to Html tab and paste <!--INFOLINKS_ON--> in the area where you want to show ads and <!--INFOLINKS_OFF--> above the area where you don't want to show ads. See example below:
User triggered, less intrusive that won't distract from your site's content
<!--INFOLINKS_OFF-->
[Script inactive - no words will be highlighted in this section]
Highly relevant InText ads for your site
visitors with
record high conversion rates<br/>
<!--INFOLINKS_ON-->
[Script active - words will be highlighted in this section]
Quick and easy with no changes to your website<br/>
How do I earn money with Infolinks?<br/>
<script type="text/javascript" src="http://resources.infolinks.com/js/infolinks_main.js"></script>
How to customize infold ads?
Infold ads aren't so customizable. You can just decide where should it slide up either from middle, right or left. Actually only right or left because middle is default. So check the box from which side you want infold ad to slide up and check "Turn on Infold ads on....." And click on save.

How to customize intag ads?

Intag ads are group of links displayed at the bottom or top of the post. You can show this links on both top and bottom of your posts. Use the selector to choose the ads position.
Infolinks has now introduced "Revenue Booster" which is actually powered by Taboola. It shows posts from web and other sites which are really interesting so when people from your blog reads them, you get paid!
To Enable "Revenue Booster" turn OFF to ON and you are done!
There is one thing more, that is "show ads manually". You are given a piece of code. now all you have to do is to copy it and paste it inside your posts where you want to intag ads to appear. Remember that if you are showing intag ads manually, you can't enable revenue booster.
How to customize inframe ads?

Infolinks inframe ads are actually not customizable, You can just enable them of disable them. Almost every blogger has complain about inframe ads that they don't appear because they aren't loaded properly because of render blocking scripts. I had the same problem but I have solved it now.
Infolinks inframe ads not appearing, how to fix them?
To solve inframe ads problem just paste the infolinks ad tag below <head> in your template not above </body>.
How to customize inscreen ads?
You can decide when the inscreen ads should appear. You have 3 options first is to show inscreen ads on entrance, second is to show show them on internal pages and last one is to show it on Exit.
How it works?

Entrance - It will show ads when someone enters your blog.
Internal page - It will add ads trigger to links of your pages. When a link is clicked inscreen ad will show up.
Exit - It will show when someone click a link on your blog that takes him to another blog or site.
The last ad type "Inarticle" ads can't be customized, you can just install them. You can given a code, copy it and paste it where you would like to show ad.
You might like: 10 Tips to Increase Your Infolinks Revenue
Infolinks Referral Program:
Infolinks has started referral program for publishers. So you can double, triple or boost your infolinks 10 times. Go to your account click on Referrals and start referring others using your unique link or banners.
How To Show Infolinks Ads In Mobile Site In Blogger?
Showing ads on mobile site will increase your earnings specially if you have more audience on mobile site because more ads are clicked on mobile sites as compared to desktop site. So follow below steps to allow your infolinks ads show on mobile site.1. Go to Blogger Dashboard > Template > Mobile Template and click on settings icon.

2. Change your template to "Custom Template" and click on save.

3. Open your blog in Phone to see infolinks ads.
❤ Happy Blogging!
I hope you found this post helpful. If you have any problem comment below or contact me. Thanks for visiting 101Helper. Share this post with others. Like us on Facebook or follow on other social profiles to stay up to date!