Multi Hover Effect On Blogger Images Using Pure CSS

Today I'm going to show you how to add an amazing mouseover effect for Blogger images using only CSS, in which moving your mouse over an image from different directions (from above, from below, etc) will cause an overlay transitioned in from the same vector. This trick will change not only the images appearance when moving mouse over them, but will also allow you to add inside a text with a description.

hover effect, mouseover, blogger hover effects

You can see the effect on this image below: try moving your mouse from the left, right, and above.

hover right hover top hover left hover bottom

Adding Hover Effect From Different Directions on Blogger Images

First thing to do is to add the CSS style to our Template:

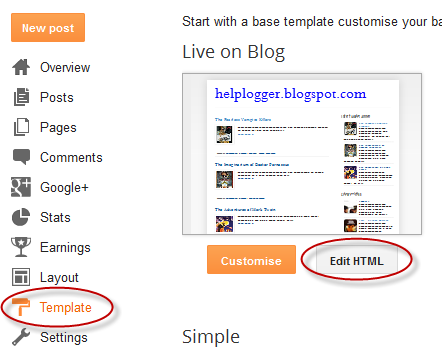
Step 1. From Blogger Dashboard, go to Template and press the Edit HTML button


Step 2. Search for the </head> tag - to find it, click anywhere inside the code area, press CTRL + F keys and type it in the search box.


Step 3. After you found it, add the following style just above it: 
<style>
  /* The container and the image */
  div.multi-hover {
    overflow: hidden;
    position: relative;
    vertical-align: middle;
    width: 100%;
    height: 358px;
    line-height: 358px;
  }
  div.multi-hover img {width: 100%;}

/* The texts that, by default, are hidden */
  div.multi-hover span {
    color: #FFF;
    font-size: 32px;
    font-weight: bold;
    height: 100%;
    opacity: 0;
    position: absolute;
    text-align: center;
    transition: all 0.3s linear 0s;
    width: 100%;
  }

/* And this is what will generate the effect */
  div.multi-hover span:nth-child(1) { /* right */
    background: none repeat scroll 0 0 rgba(255, 189, 36, 0.6);
    left: 90%;
    top: 0;
  }
  div.multi-hover span:nth-child(2) { /* top */
    background: none repeat scroll 0 0 rgba(106, 170, 255, 0.6);
    left: 0;
    top: -80%;
  }
  div.multi-hover span:nth-child(3) { /* left */
    background: none repeat scroll 0 0 rgba(204, 87, 166, 0.6);
    left: -90%;
    top: 0;
  }
  div.multi-hover span:nth-child(4) { /* bottom */
    background: none repeat scroll 0 0  rgba(97, 181, 115, 0.6);
    left: 0;
    top: 80%;
  }

  div.multi-hover span:hover {opacity: 1;}
  div.multi-hover span:nth-child(2n+1):hover {left: 0;}
  div.multi-hover span:nth-child(2n):hover {top: 0;}

</style>
Step 4. Save the Template

Now we are going to add the HTML that is nothing but a DIV where we included four SPAN tags with texts and an image:

Step 5. Choose Posts, create a New Post, click on the HTML tab (1) and paste this code inside the empty box:
<div class=multi-hover>
  <span>hover right</span>
  <span>hover top</span>
  <span>hover left</span>
  <span>hover bottom</span>
  <img src="https://blogger.googleusercontent.com/img/b/R29vZ2xl/AVvXsEicJOlj4gbWplxlluwTCeJizRQd_710lxJeABXQ4sKkI6NYvOH6SOBfRoIUY3ZXpKUUhfuinVSNE0IkQ5g-FDNKNkRAk31jUnNv_0It6cE-xiZ4sZgcjqk0JP8i8XGv_9yRbwu5u0QcscE/s1600/flowers">
</div>
Add your own text/description to "hover right", "hover top", "hover left" and "hover bottom" (2) and replace the url in blue with the image URL (3) where you want to apply the effect.
Important! Do not click on the Compose tab, otherwise the changes will be lost.


Step 6. After you finished editing your post, click Publish (4)

And that's it... enjoy! :)

Popular Posts With Automatic Numbering - Bubbles!

Popular Posts Widget

When blogger released Popular Posts widget back in 2011, we leaked out its stylesheet so that you can customize it to blend it perfectly to your BlogSpot templates. Today we will learn how to display the list of popular posts using CSS3 auto increment property. You can style the numbers in variety of shapes, we styled them in square/rectangular and circular shape. you guys were the first to display threaded comments with Comment Counts and today you will again learn something more interesting. You can see a practical demo of this implementation on our sidebar. Lets add this effect to blogger in fairly easy steps using pure styles with no use of JavaScript.

Popular posts widget is an effective tool to increase your blog pageviews and engage readers more on your blog. It fetches and ranks posts based on most visited pages using your Google analytics data.

Add Popular Posts Widget

  1. Go to Blogger > Layout
  2. Click "Add a Gadget"
  3. Choose "Popular Posts"  from the list
  4. You will need to configure its settings as shown in the image below: uncheck "image thumbnail" and also "snippet"   Its better that you display at most 7-9 posts. Less is good and clean.


popular posts widget settings

       5.  Save it


Customize Popular Posts Plugin

Now you need to change the default styles and change its look to our desired design using Custom styles.

  1. Go To Blogger > Template
  2. Backup your Template
  3. Click Edit HTML
  4. Search for </b:skin>.  Click the black arrow to expand the code.

compressed blogger stylesheet

   5.  Paste the following Styles just above </b:skin>

/*--- MBT Popular Posts --- */
.popular-posts ul {
padding-left: 0px;
counter-reset: popcount;
}

.popular-posts ul li:before {
list-style-type: none;
margin-right: 15px;
padding: 0.3em 0.6em;
counter-increment: popcount;
content: counter(popcount);
font-size: 16px;
background: #292D30;
color: #ffffff;
position: relative;
font-weight: bold;
font-family: georgia;
float: left;
border: 2px solid #dddddd;
box-shadow: 1px 2px 9px #666666; }

.popular-posts ul li {
border-bottom: 1px dashed #dddddd;
}

.popular-posts ul li:hover {
border-bottom: 1px dashed #696969;
}

.popular-posts ul li a {
text-decoration:none; color:#5A5F63;
}


.popular-posts ul li a:hover {
text-decoration:none;
}

Customization:

  • To change the background color of the Square bubble edit #292D30
  • To change the text color of the bubble edit #ffffff
  • By default the shape of the bubble is Square. To change it to Circle simply add the following code just after box-shadow: 1px 2px 9px #666666;

border-radius:15px;


    6. Save your template and you are all done!

Visit your blog to see it working just perfectly.

If you would wish to add it inside a Multi Tab Widget just like we have done on our blog, then you can find several tutorials on our blog that were released years ago on Multi Tabs. Please read one below:


Need Help?

I just hope you would find this tutorial easy and yet exciting. Please let me know if you need any help. I just hope you continue adding more colors and flavors to your beautiful blogs. Wish you success and peace buddies. :)

Drawbacks of JQuery Lazy Load Plugin For Posts and Images

Lazy Load For blogger blogsJquery and CSS3 has enabled front end developers and even designers to create amazing effects but unless you check the compatibility of the code, never play with such plugins and tools because there are still people who don't use JavaScript in their browsers and your blog will look no less than a mess to them. This effects both your readership and blog pageviews. We are observing a growing trend of Jquery implementation on both Blogger and Wordpress blogs. A Famous known plugin is Lazy Load for images (inspired from Yahoo plugin) and Lazy Load for blogger posts (Also called infinite scrolling). Lazy load for images delays loading of images in long web pages and makes the page load faster, on the other hand Infinite Scrolling plugin for Blogger keeps on loading posts as you scroll down the page just like you scroll down to load more tweets in twitter.

Note: Jquery is a library of JavaScript which is a simplified version JavaScript. It simplfies calling complex functions and saves time.

Most of MBT readers often complain why we don't publish such plugins and why we don't write tutorials on blogger Dynamic Views. The answer is simple, we are very careful when we suggest widgets and resources to our readers and we will never encourage them to apply a script on their blog that may cause harm to them in one way or the other. Even a Google employee himself commented on our post when we openly discouraged readers not to apply Dynamic views unless they are willing to accept its pitfalls behind the attractive AJAX look.

One of the bitter truth is that blogs using Dynamic views don't even load if JavaScript is disabled on a page! Imagine those thousands of views that you might be loosing because of using a Jquery script that does not take care of what-to-do if-JavaScript disabled scenarios. Today I will talk from development perspective and I really recommend that you read and understand this post clearly and clear your doubts.

How to view your blog by disabling JavaScript?

In order to check if your blog at least is loadable and provides fair interface to your visitors with JavaScript-disabled browsers, I will guide you by giving several examples. Lets take an example of the Gmail blog which uses the Jquery Easy Load effect and also runs on a Dynamic Theme.

What did you observe?

You observed a lazy loading effect as you kept on scrolling down. The posts kept on loading infinitely. Interesting isn't it? But now lets viist the same blog with JavaScript enabled.

Disable JavaScript:

For simplicity I am assuming you are using Google Chrome Browser. Following these steps to disable JavaScript in chrome.

  1. Go To Settings
  2. Click Advanced Settings
  3. Click Content settings under Privacy
  4. Then inside the popup window you will find an option to turn Off  JavaScript as shown in the image below:

Turn Off JavaScript in chrome

   5. Hit the Done button

Now visit the same Gmail blog again. Refresh the page and tell me what do you see?

You see a blank page! This explains everything to you. In Custom Blogger templates which are using Infinite Scrolling effect and if JavaScript is disabled by user then only the first post or second post will display and the remaining posts wont even show up on your homepage . Consequences are such that you lose precious Page Views.

What would you see on blogs where Image Lazy load effect is used?

You will see only first image or second image being displayed the other image wont event appear. If the plugin developer was clever enough to set conditional statements for JavaScript Disabled browsers, all your images will display just fine else your readers would be lost with no image being displayed.

When and How to use JQuery?

With all that being said, we leave the decision on you whether you wish to use this trending Loading effect for your blogger posts/image or not, but at least this explains now why we don't write tutorials on such tools.

You can surely add Jquery to add some cool effects to your blog design as long as the object using it loads fine even if JavaScript is disabled. Normally you can use JavaScript to create widgets like Recent comments, Popular Posts, Related Posts etc. because even if they don't load, they will at least not return a blank Page or effect your pageviews.

If you are developer then I recommend to add conditions to how your code may react in case of No JavaScript support. Instead of using just the display:none property in your stylesheet also add an extra div section for your object and control its behaviour using JQuery. Follow this Psedudo code:

If JavaScript Supported

Do this

Else

If JavaScript not supported

Do this

Now you would wonder how to check whether a browser supports JavaScript or not. If a browser supports it then it will surely execute the code else it wont. So if you don't want a div section to display when Jquery is supported simply add display:none property to it using Jquery AddClass() function. This Jquery function won't execute if JavaScript is disabled and thus the div section will show up correctly on screen  but this div section will not display if Javascript is enabled because the Addclass() function will execute and hide it on screen. That's how I personally handle this problem. You can surely apply different logics.

An Honest Advice:

The number of internet users are turning into publishers at a fastest rate, therefore you must be careful when applying a tutorial to your blog and extra careful when the tutorial talks of Jquery and SEO. I am observing baseless SEO tips coming from new bloggers that causes more harm to blogs at long term then a short term relief. Almost every new blogger has started sharing his own ideas of SEO and writing codes. This is surely encouraging but on the other side incorrect knowledge has caused several blogs to be hit by Google penalties such as Panda and Penguin. Be extra careful whom you read and follow. I am here for any help you may need and wish to hear your views on this topic. Wish you good health and peace buddies. :)

The same problem is seen with latest GooglePlus comments Plugin!

How To Add Social Media Icons to Blogger Header

social media icons, facebook icons, social media icons for bloggerThis tutorial will help you to add social media icons in the top right corner of the page which could increases the likelihood that readers can follow through the various social networks. There are several ways to do this, like adding a new widget section to the blog header but now, we'll do it using an unordered list that uses icons of Facebook, Twitter, Google+ and blog feed, and as a bonus, the icons will rotate when you hover over them.

You can see a demo in this test blog.


Adding Social Media Icons to Blogger Header

Step 1. From your Blogger dashboard, go to Template and click on the Edit HTML button:

blogger blogspot, blogger template, blogger gadgets

Step 2. To expand the style, click on the small arrow on the left of <b:skin>...</b:skin> (screenshot 1), then click anywhere inside the code area to search (using CTRL + F) for the ]]></b:skin> tag (screenshot 2) and add this code just above it:

 /* Social icons for Blogger
----------------------------------------------- */

#social-icons {
margin-bottom:-30px;
height:50px;
width:100%;
clear:both;
z-index: 2;
position: relative;
}
.social-media-icons {
display:table
}
.social-media-icons ul {
text-align:right;
padding:5px 5px 0 0
list-style-image:none;
list-style-position:outside;
list-style-type:none;
}
.social-media-icons ul {
margin-bottom:0;
padding:0;
float:right;
}
.social-media-icons li.media_icon {
margin-left:6px;
padding-left:0 !important;
background:none !important;
display:inline;
float:left;
}
.social-media-icons li:hover {
-moz-transform: rotate(360deg);
-webkit-transform: rotate(360deg);
-o-transform: rotate(360deg);
transform: rotate(-360deg);
-moz-transition: all 0.5s ease-in-out;
-webkit-transition: all 0.5s ease-in-out;
-o-transition: all 0.5s ease-in-out;
-ms-transition: all 0.5s ease-in-out;
transition: all 0.5s ease-in-out;
}

Screenshot 1:


Screenshot 2:


Step 3. Now search for this line

<b:section class='header' id='header' maxwidgets='1' showaddelement='no'>

Step 4. And just above it, add this code:

<div class='social-media-icons' id='social-icons'>
<ul>

<li class='media_icon'><a href='http://facebook.com/username'><img border='0' src='https://blogger.googleusercontent.com/img/b/R29vZ2xl/AVvXsEi4XS-EaSUcvLiTuwBYVW2ApB7d05mtXUwBs3MhkDdGz7YEUTtt1Y-qn5KC-Meua8lLYeIhAr0PN0_dgXXXgFzjhRRfEtSVQmBhTqOrZ-49SwA317v1gUi0aBUcX8jGKx4aAzLf7l-pWJ0/s1600/Facebook.png'/></a></li>

<li class='media_icon'><a href='http://twitter.com/#!/username'><img border='0' src='https://blogger.googleusercontent.com/img/b/R29vZ2xl/AVvXsEg5rSwUYBKqel31uAUqCBXJy_aaipSMD2rqTrbi8Iw5Mn-4fKs_1PenF9XtD4Nnos0yEaahdP29v0Lj7KNrhj1nhB6tnRRy0qlBwI04i3JAAYdBu3K4ixJmOObg_SGo67AZb-3prd7Bt6I/s1600/Twitter.png'/></a></li>

<li class='media_icon'><a href='https://plus.google.com/XXXXXXXXXXXXXXXXXX/about'><img border='0' src='https://blogger.googleusercontent.com/img/b/R29vZ2xl/AVvXsEhnHEEux0tx6DrTTfmuRmrCxMDy_rN2VMLUo6wZIziYFQDP0m-0AiHZ0XZSBLG8A6lCmxLrcnFMj_n_v0RMPq7GcKN7lH6sGYRuUue27RiRHH1K-7t04La1g7Wb369sFdHJw-iHkxMiaAk/s1600/googleplus.png'/></a></li>

<li class='media_icon'><a href='http://name-of-your-blog.com/feeds/posts/default'><img border='0' src='https://blogger.googleusercontent.com/img/b/R29vZ2xl/AVvXsEjL1r-iXf6mZ3pSWiydBRc4ilpHjVrMOGFscKS5JbUH1QQ9jfATs0wDYl0uYaoPBu7s6-RVAh9df4zs9hLcSeCzB3WhAtgkSvX9ZXYavyvDp5GQaEtxVDCuAKERkQKeuJ-gAOnidUWT794/s1600/RSS.png'/></a></li>

</ul></div>

Customization

- Change what's in red with your usernames and id: the first is your Facebook username, the second is that of Twitter, in the third you should change the X by the ID of your Google+ profile and in the fourth you will put the name of your blog.
- To change the icons, just replace the urls in blue with the ones of your images.
- You can add more icons if you want, you just have to add before </ul></div> a line like this for each extra icon you want:

<li class='media_icon'><a href='Link URL'><img border='0' src='Image URL'/></a></li>

Step 5. Finally, Save the Template to apply the changes.
The effect is done with CSS3, so this effect will not work in older browsers.

Create a Custom Contact Form For Blogger - Part 2

Custom Blogger Contact FormIn the first part of our series you learnt how to add a contact Form to your BlogSpot blog and control its display settings. Today you will learn how to change its stylesheet to reflect your custom styles with a more appealing design. You will learn today how to customize the Form input fields, add icons to it, add a "Clear Button"  and play several tricks with your custom form. The form is built using XHTML Get or Post Methods unlike PHP Forms which are used widely today. If you have not referenced the first part of our tutorial then kindly read it first:

3. Customizing The Contact Form - The Fun Part!

Now you will need to create a Static Page where we will add the HTML code for our new contact form.

  1. Go To blogger > Pages
  2. Choose a Blank Page
  3. Give it any title you like. I recommend "Contact Us"
  4. Switch to its HTML mode and paste the following HTML code inside it:

<div class='form'>
<!-- Custom Contact Form By MBT Starts -->

<form name='contact-form'>

<!-- Name Field -->

<input class='contact-form-name' id='ContactForm1_contact-form-name' name='name' value="Name" size='30' type='text' onblur='if (this.value == &quot;&quot;) {this.value = &quot;Name&quot;;}' onfocus='if (this.value == &quot;Name&quot;) {this.value = &quot;&quot;;}' />
<p></p>

<!-- Email ID Field -->

<input class='contact-form-email' id='ContactForm1_contact-form-email' name='email' value="Email ID"  size='30' type='text' onblur='if (this.value == &quot;&quot;) {this.value = &quot;Email ID&quot;;}' onfocus='if (this.value == &quot;Email ID&quot;) {this.value = &quot;&quot;;}'/>
<p></p>

<!-- Message Field -->

<textarea class='contact-form-email-message'  id='ContactForm1_contact-form-email-message' name='email-message'  value='Leave Your Message..'  onblur='if (this.value == &quot;&quot;) {this.value = &quot;Leave Your Message..&quot;;}' onfocus='if (this.value == &quot;Leave Your Message..&quot;) {this.value = &quot;&quot;;}'></textarea>
<p></p>

<!-- Clear Button -->
<input class='contact-form-button contact-form-button-submit MBT-button-color' type='reset' value='Clear'/> 

<!-- Send Button --> 
<input class='contact-form-button contact-form-button-submit MBT-button-color' id='ContactForm1_contact-form-submit' type='button' value='Send'/>
<p></p>

<!-- Validation -->
<div style='text-align: center; max-width: 222px; width: 100%'>
<p class='contact-form-error-message' id='ContactForm1_contact-form-error-message'></p>
<p class='contact-form-success-message' id='ContactForm1_contact-form-success-message'></p>
</div>
</form>

<!-- Custom Contact Form By MBT Ends -->
</div>


    5.  Don't switch to Compose Mode of your Blogger Editor else the code will get messed up due to your Editor settings. Save and Publish your Page.

   Now if you visit your contact page you will see the default contact form with blue button. Its time to customize its default styles.

Customizing The Form:
  1. Go To Blogger > Template
  2. Backup your Template
  3. Click "Edit HTML"
  4. Update: Search for </head>  and just above it paste the following CSS code:


<style>

/*---- Compatible contact Form by MBT -----*/

.contact-form-name, .contact-form-email, .contact-form-email-message {
max-width: 220px;
width: 100%;
font-weight:bold;
}

     
.contact-form-name {
background: #FFF url(https://blogger.googleusercontent.com/img/b/R29vZ2xl/AVvXsEj_Z3rAMIzvKg3rLF1-lwQvFoQ1_oU3Fgd4c0CqwMdQCV5NBAZAi9yOfoLgceKzjjCf_OISCf37kZaLHYjuaKY_of4TlCm2UCIAZvF5Pgeweti4bBV4YfypA_6G8oDWnN7_NrD1xk6_GwA/s320/name.png) no-repeat 7px 8px;
background-color: #FFF;
border: 1px solid #ddd;
box-sizing: border-box;
color: #A0A0A0;
display: inline-block;
font-family: Arial,sans-serif;
font-size: 12px;
font-weight:bold;
height: 24px;
margin: 0;
margin-top: 5px;
padding: 5px 15px 5px 28px;
vertical-align: top;

}
     

.contact-form-email {
background: #FFF url(https://blogger.googleusercontent.com/img/b/R29vZ2xl/AVvXsEjxu2GMHFJ6FxpRtrtnvANxq9Llix0RhtfCRhvX85HF-0x3xSbarRYZ_Fjk2FeBhbFoZEy6NW0EvFtILI3lPaW8V5u0D6cjGmRl_3e1ZtPaTfoAg_V9BrkMGPrtsZ5tElAsdvFaL7t2FHY/s320/email.png) no-repeat 7px 10px;
background-color: #FFF;
border: 1px solid #ddd;
box-sizing: border-box;
color: #A0A0A0;
display: inline-block;
font-family: Arial,sans-serif;
font-size: 12px;
font-weight:bold;
height: 24px;
margin: 0;
margin-top: 5px;
padding: 5px 15px 5px 28px;
vertical-align: top;

}


.contact-form-email:hover, .contact-form-name:hover{
border: 1px solid #bebebe;
box-shadow: 0 1px 2px rgba(5, 95, 255, .1);


padding: 5px 15px 5px 28px;

}

.contact-form-email-message:hover {
border: 1px solid #bebebe;
box-shadow: 0 1px 2px rgba(5, 95, 255, .1);
padding: 10px;
}

.contact-form-email-message {
background: #FFF;
background-color: #FFF;
border: 1px solid #ddd;
box-sizing: border-box;
color: #A0A0A0;
display: inline-block;
font-family: arial;
font-size: 12px;
margin: 0;
margin-top: 5px;
padding: 10px;
vertical-align: top;
max-width: 350px!important;
height: 150px;
border-radius:4px;
}


.contact-form-button {
cursor:pointer;
height: 32px;
line-height: 28px;
font-weight:bold;
border:none;
}


.contact-form-button {
display: inline-block;
zoom: 1; /* zoom and *display = ie7 hack for display:inline-block */
*display: inline;
vertical-align: baseline;
margin: 0 2px;
outline: none;
cursor: pointer;
text-align: center;
text-decoration: none;
font: 14px/100% Arial, Helvetica, sans-serif;
padding: .5em 2em .55em;
text-shadow: 0 1px 1px rgba(0,0,0,.3);
-webkit-border-radius: .5em;
-moz-border-radius: .5em;
border-radius: .5em;
-webkit-box-shadow: 0 1px 2px rgba(0,0,0,.2);
-moz-box-shadow: 0 1px 2px rgba(0,0,0,.2);
box-shadow: 0 1px 2px rgba(0,0,0,.2);
}
.contact-form-button:hover {
text-decoration: none;
}
.contact-form-button:active {
position: relative;
top: 1px;
}


.MBT-button-color {
color: #fef4e9;
border: solid 1px #da7c0c;
background: #f78d1d;
background: -webkit-gradient(linear, left top, left bottom, from(#faa51a), to(#f47a20));
background: -moz-linear-gradient(top, #faa51a, #f47a20);
filter: progid:DXImageTransform.Microsoft.gradient(startColorstr='#faa51a', endColorstr='#f47a20');
}
.MBT-button-color:hover {
background: #f47c20;
background: -webkit-gradient(linear, left top, left bottom, from(#f88e11), to(#f06015));
background: -moz-linear-gradient(top, #f88e11, #f06015);
filter: progid:DXImageTransform.Microsoft.gradient(startColorstr='#f88e11', endColorstr='#f06015');
border-color: #F47C20!important;
}
.MBT-button-color:active {
color: #fcd3a5;
background: -webkit-gradient(linear, left top, left bottom, from(#f47a20), to(#faa51a));
background: -moz-linear-gradient(top, #f47a20, #faa51a);
filter: progid:DXImageTransform.Microsoft.gradient(startColorstr='#f47a20', endColorstr='#faa51a');
}

</style>


      <!--[if IE 9]>
    <style>
   
.contact-form-name {
background: #FFF url(https://blogger.googleusercontent.com/img/b/R29vZ2xl/AVvXsEj_Z3rAMIzvKg3rLF1-lwQvFoQ1_oU3Fgd4c0CqwMdQCV5NBAZAi9yOfoLgceKzjjCf_OISCf37kZaLHYjuaKY_of4TlCm2UCIAZvF5Pgeweti4bBV4YfypA_6G8oDWnN7_NrD1xk6_GwA/s320/name.png) no-repeat 7px 0px;
}

.contact-form-email {
background: #FFF url(https://blogger.googleusercontent.com/img/b/R29vZ2xl/AVvXsEjxu2GMHFJ6FxpRtrtnvANxq9Llix0RhtfCRhvX85HF-0x3xSbarRYZ_Fjk2FeBhbFoZEy6NW0EvFtILI3lPaW8V5u0D6cjGmRl_3e1ZtPaTfoAg_V9BrkMGPrtsZ5tElAsdvFaL7t2FHY/s320/email.png) no-repeat 7px 6px;
}

    </style>
    <![endif]-->
   
    <style>
@media screen and (-webkit-min-device-pixel-ratio:0) {


.contact-form-name {
background: #FFF url(https://blogger.googleusercontent.com/img/b/R29vZ2xl/AVvXsEj_Z3rAMIzvKg3rLF1-lwQvFoQ1_oU3Fgd4c0CqwMdQCV5NBAZAi9yOfoLgceKzjjCf_OISCf37kZaLHYjuaKY_of4TlCm2UCIAZvF5Pgeweti4bBV4YfypA_6G8oDWnN7_NrD1xk6_GwA/s320/name.png) no-repeat 7px 6px;
padding: 15px 15px 15px 28px;


}

.contact-form-email {
background: #FFF url(https://blogger.googleusercontent.com/img/b/R29vZ2xl/AVvXsEjxu2GMHFJ6FxpRtrtnvANxq9Llix0RhtfCRhvX85HF-0x3xSbarRYZ_Fjk2FeBhbFoZEy6NW0EvFtILI3lPaW8V5u0D6cjGmRl_3e1ZtPaTfoAg_V9BrkMGPrtsZ5tElAsdvFaL7t2FHY/s320/email.png) no-repeat 7px 8px;
padding: 15px 15px 15px 28px;

}


.contact-form-email:hover, .contact-form-name:hover{
padding: 15px 15px 15px 28px;
}


.contact-form-button {
height: 28px;

}

}

</style>

The above Stylesheet will work just fine with all browsers including Internet Explorer. The code has been made compatible to work fine with all major browsers like IE, Mozilla and Webkit browsers.

  • To change button colors edit the class .MBT-button-color
  • To change the button color on mouse hover edit the class .MBT-button-color:hover  and for active mode edit .MBT-button-color:active


     5.  Save your template and you are all done!

4. Add the Form anywhere you like!

Now if you wish to add the form to your sidebar or post  then simply follow these steps:

  • To add the form to sidebar. Copy the HTML code in Step#4   and paste it inside HTML/JavaScript Widget
  • To add the form to Post editor, switch to HTML mode and paste the code in Step#4  inside it

Your Views:

I just hope this tutorial would be helpful for all of you. The steps are extremely simple and the codes are carefully written. You can now create a contact form to let your clients request you for a price quote or add it to let your readers contact you in person. Wish you all the best with your blogging endeavors. I will make sure you enjoy it to your fullest. Peace and blessings buddies :)

Fading Box With Newer/Older Posts Links and Titles for Blogger

The navigation links are those that appear at the bottom of the page that says "Older Posts", "Newer Posts" and "Home" and help us to move through the blog posts. This tutorial will show you how to change the word "Older Posts" and "Newer Posts" for post titles and make these to appear in a box "fading" when you scroll down the page.
blogger gadgets, navigation for blogger

You can see it in action on this demo blog - when you scroll down, the navigation links will appear showing the post titles for the older/newer entries.

This way to display the navigation links will be seen only in individual entries, while those on the homepage and other parts of the blog will still be displayed as usual.

How to Add Navigation Box with Newer & Older Posts on Blogger

Step 1. From your Blogger Dashboard, go to Template > Edit HTML, click anywhere inside the code area and search - using CTRL + F - for this line:

<b:include name='nextprev'/>

Screenshot:

Step 2. REPLACE the code above with this one:

<b:if cond='data:blog.pageType != &quot;item&quot;'>
<b:include name='nextprev'/>
</b:if>
<b:if cond='data:blog.pageType == &quot;item&quot;'>
<div id='blog-pager-box'>
<h4>Other posts published:</h4>
<b:include name='nextprev'/>
</div>
</b:if>

Note: you can change the "Other posts published" title with your own

Step 3. Now add just above </head> the following code:

<b:if cond='data:blog.pageType == &quot;item&quot;'>
<script src='http://ajax.googleapis.com/ajax/libs/jquery/1.8.2/jquery.min.js' type='text/javascript'/>
<script>
// <![CDATA[
$(function() {
$('#blog-pager-box').toggle()
.css({
width: '520px',
height: '150px',
position: 'fixed',
padding: '1em',
bottom: 0,
right: 0,
background: 'url(https://blogger.googleusercontent.com/img/b/R29vZ2xl/AVvXsEjVwKM_uWd_hVKPyw8TENkXvq5WVEM8kZhUmAWVajmfdqE1YWaTc7TnYlpo3xZHDEZVAvOeYFDoUsCd4R0M0awbiIw-2H_ska344pZn74zXijz1ocFFj-Rk5vk1Uhrzrt5eh1dG6POS9ViQ/s1600/paper.jpg)'
});

$(window).scroll(function() {
if($(this).scrollTop() > 100) {
$('#blog-pager-box').fadeIn();
} else {
$('#blog-pager-box').fadeOut();
}
});
});
$(document).ready(function(){
var newerLink = $("a.blog-pager-newer-link").attr("href");
$("a.blog-pager-newer-link").load(newerLink+" .post-title:first", function() {
var newerLinkTitle = $("a.blog-pager-newer-link:first").text();
$(".blog-pager-newer-link").html("<div>Newer Posts:</div>" + newerLinkTitle);
});
var olderLink = $("a.blog-pager-older-link").attr("href");
$("a.blog-pager-older-link").load(olderLink+" .post-title:first", function() {
var olderLinkTitle = $("a.blog-pager-older-link").text();
$(".blog-pager-older-link").html("<div>Older Posts:</div>" + olderLinkTitle);
});
});
// ]]>
</script>

<style type='text/css'>
<!--
#blog-pager-box {
box-shadow: 0 0 3px #AEAEAE;
z-index:9;
}

#blog-pager-box h4 {
margin:0;
padding:0;
color:#4898B9; /* Widget's title color */
font-size:16px; /* Title font size */
}

#blog-pager-newer-link {float:left;clear:both;line-height:30px;}
#blog-pager-older-link {float:left;clear:both;line-height:30px;}
.home-link {display:none;}
.blog-pager-older-link, .blog-pager-newer-link {
background-color: transparent !important;
background-image: none !important;
border:0 !important;
color: #4B4B4B !important; /* Color of the links */
float: left;
width: 500px;
clear:both;
}

a.blog-pager-older-link:hover, a.blog-pager-newer-link:hover {
text-decoration:none !important;
}
 
a.blog-pager-newer-link:before {
content: url(https://blogger.googleusercontent.com/img/b/R29vZ2xl/AVvXsEj-z5yqBPgfedMtz53SzE3oJ_FiJtOyil0121tivchUzd_tzNy_9ok1_9udpK9A-PBkahfha8YHYtX382TMqpSCbVzfZe2FohZUSC0p-hHhmoBqvSs1H-CMptDS5WMFX1CcxhdKQUnFFiQ/s1600/back.png);
float:left;
}
a.blog-pager-older-link:before {
content: url(https://blogger.googleusercontent.com/img/b/R29vZ2xl/AVvXsEg1723_xuZQAjkPxAAVbHNxhQI5MbxO_uhGdKBgj4elWisVrv3LivceuMI27PXVyrojskSAc33iGcjIXjAdPasDfBuF2XoaMw2Z7K7oC79_y6PPRXCrkNzNrFWOgyXWfp2gf8y63K910T8/s1600/forward.png);
float:left;
}
#blog-pager {
width:500px;
background-color: transparent !important;
background-image: none !important;
border:0 !important;
text-align:left;
}
 
#blog-pager div {
color:#0577AB; /* Color for the "Newer Posts" and "Older Posts" text */
font-weight:bold;
margin-bottom: -5px;
}
a#blog-pager div:hover {
text-decoration:none !important;
color:#4898B9; /* Color for the "Newer Posts" and "Older Posts" text */
}
-->
</style>
</b:if>

Note that this gadget uses jQuery, so try to have only one version.


Customization:


- There are three URLs in blue, the first is the paper background image for the box, the other two are the icons that correspond to the arrows. You can replace these with your own.
- In green you can see where to change the text colors.
- The red number is the distance in pixels that activates the gadget, this means that the box will appear when you scroll down the 100px. You can use a higher value if your posts are usually long and therefore the "height" of the scroll is greater.
Step 4. Now, Save the Template and that's it!

You can also change the "Older Posts" and "Newer Posts" links with posts titles or images.

New Blogger Widget: Contact form - Change Style & Install in a Static Page

Just a few days ago, Blogger introduced a new contact form widget that you can add to your blog easily. At the moment, it is very basic because, at least for now, does not allow sending files or anything other than plain text.

The contact form for Blogger has the following features:
  • Field for the user name
  • Field for email
  • Field for the message (textarea)
  • Submit Button
contact form, blogger gadgets, static page
The design is simple and the text colors inherit the section where you add it. At the moment, this widget has no configuration options and is not available for dynamic views.

How to Add Contact Form to Blogger

To add it to your blog, just select the Layout tab, then click on "Add a gadget" in the section you want to show - for example, in the sidebar. Then, select the More gadgets tab and add the Contact Form gadget.


blogger gadgets, blogger widgets, contact form

Styling Contact Form

Since the background is transparent, the form will blend well aesthetically speaking, but nevertheless it is easy to modify using Style Sheets (CSS) to the appropriate selectors. Here's an example:

/* Contact Form Container */
.contact-form-widget {
width: 500px;
max-width: 100%;
margin: 0 auto;
padding: 10px;
background: #F8F8F8;
color: #000;
border: 1px solid #C1C1C1;
box-shadow: 0 1px 4px rgba(0, 0, 0, 0.25);
border-radius: 10px;
}

/* Fields and submit button */
.contact-form-name, .contact-form-email, .contact-form-email-message {
width: 100%;
max-width: 100%;
margin-bottom: 10px;
}

/* Submit button style */
.contact-form-button-submit {
border-color: #C1C1C1;
background: #E3E3E3;
color: #585858;
width: 20%;
max-width: 20%;
margin-bottom: 10px;
}

/* Submit button on mouseover */
.contact-form-button-submit:hover{
background: #4C8EF9;
color: #ffffff;
border: 1px solid #FAFAFA;
}

This is how it will look like after applying the style:
contact form, blogger gadgets, contact form for blogger

To add this style, go to Template > Edit HTML, click on the sideways arrow next to <b:skin>...</b:skin> and paste the code just above ]]></b:skin> (press CTRL + F to find it):


How To Add Contact Form In A Static Page


First step is to add the Contact Form gadget (Layout) and second, to edit the template (Template > Edit HTML) to remove most of the gadget. You have to search for the id "ContactForm", expand the widget by clicking on the black arrow on the left (same with the includable) and then delete the part that I have colored in red (see below):

Part to be removed:

  <b:widget id='ContactForm1' locked='false' title='Contact Form' type='ContactForm'>
    <b:includable id='main'>
  <b:if cond='data:title != &quot;&quot;'>
    <h2 class='title'><data:title/></h2>
  </b:if>
  <div class='contact-form-widget'>
    <div class='form'>
      <form name='contact-form'>
        <p/>
        <data:contactFormNameMsg/>
        <br/>
        <input class='contact-form-name' expr:id='data:widget.instanceId + &quot;_contact-form-name&quot;' name='name' size='30' type='text' value=''/>
        <p/>
        <data:contactFormEmailMsg/> <span style='font-weight: bolder;'>*</span>
        <br/>
        <input class='contact-form-email' expr:id='data:widget.instanceId + &quot;_contact-form-email&quot;' name='email' size='30' type='text' value=''/>
        <p/>
        <data:contactFormMessageMsg/> <span style='font-weight: bolder;'>*</span>
        <br/>
        <textarea class='contact-form-email-message' cols='25' expr:id='data:widget.instanceId + &quot;_contact-form-email-message&quot;' name='email-message' rows='5'/>
        <p/>
        <input class='contact-form-button contact-form-button-submit' expr:id='data:widget.instanceId + &quot;_contact-form-submit&quot;' expr:value='data:contactFormSendMsg' type='button'/>
        <p/>
        <div style='text-align: center; max-width: 222px; width: 100%'>
          <p class='contact-form-error-message' expr:id='data:widget.instanceId + &quot;_contact-form-error-message&quot;'/>
          <p class='contact-form-success-message' expr:id='data:widget.instanceId + &quot;_contact-form-success-message&quot;'/>
        </div>
      </form>
    </div>
  </div>
  <b:include name='quickedit'/>

</b:includable>
  </b:widget>

After you have saved the template, go to Pages and paste the following code into a new blank page with the title you want:

 <div class='widget ContactForm' id='ContactForm1'>
  <div class='contact-form-widget'>
    <div class='form'>
      <form name='contact-form'>
        <p>Name</p>
        <input class='contact-form-name' id='ContactForm1_contact-form-name' name='name' size='30' type='text' value=''/>
        <p>E-mail *</p>
        <input class='contact-form-email' id='ContactForm1_contact-form-email' name='email' size='30' type='text' value=''/>
        <p>Message *</p>
        <textarea class='contact-form-email-message' cols='25' id='ContactForm1_contact-form-email-message' name='email-message' rows='5'></textarea>
        <input class='contact-form-button contact-form-button-submit' id='ContactForm1_contact-form-submit' type='button' value='Submit'/>
        <p class='contact-form-error-message' id='ContactForm1_contact-form-error-message'></p>
        <p class='contact-form-success-message' id='ContactForm1_contact-form-success-message'></p>
      </form>
    </div>
  </div>
</div>

Messages will be sent to the same email that you have registered in Blogger.

Here is the demo page where you can test it (this is an account for demo purposes only, so don't expect any reply).

That's it! If you have any questions or comments, leave them below.

Customize Blogger Contact Form! Part 1

Blogger Contact Forms

So most of you are aware of the recent gadget added to blogger widget directory and that is a small contact form with two input fields for name and Email and a text area for writing the message. We use a complex PHP Form for our contact page but blogger has made it extremely easy for you guys. Ever wondered how to customize this simple form into a professional looking contact form that may give a complete new boost to your overall blog look? Fortunately all MBT readers will be the first to learn this trick today. Plus you will also learn how to add this form anywhere on your blog! I had sometime today so I designed a custom version of this contact form by adding several new CSS3 effects and also added an additional button called "Clear" that will reset and erase the message for your visitors if incase they wish to rewrite a new message. Kindly view the Demo below:


DEMO

Note: We have added the contact Form to a static page and also the sidebar. Just to show that you can add this Custom Form anywhere you want. On static page the Form on sidebar wont display but it will display on all other pages.

Tutorial Guide:

We have divided this tutorial in 4 parts:

  1. Adding the Normal Contact form widget to sidebar
  2. Controlling Widget Display
  3. Customize the Contact Form
  4. Finally Add the Customized contact Form to Sidebar, Post or Static Page


1. Adding contact Form to Sidebar:

By default blogger will allow you to add this widget to your sidebar only but you can easily embed its code on any post or static page easily by copying the HTML code by viewing the browser source file (Ctrl + U). I have taken all the headache so you will only need to follow these easy steps below:

  1. Go to blogger > Layout
  2. Click Add a gadget
  3. Next click on "More Gadgets"  and then choose the first widget as shown below:

adding contact form

     4.  Now you have successfully added or in other words registered your contact form widget with blogger.

     5.  Don't Remove this gadget and leave it intact. If you tried to ever remove it then the Customized contact form that we will code wont work. We will surely Hide this widget from sidebar.


2. Controlling Widget Display

The contact form that you created has an ID #ContactForm1   , using this ID you can easily locate the HTML code of the normal form in your blog source file. Well we have already done all the work so you simply need to follow these easy steps:

Hide The Normal Form on sidebar
  1. Go To Blogger > Template
  2. Backup your template
  3. Click Edit HTML
  4. Search for </head>
  5. Just above it paste the following conditional statement that will hide the widget on sidebar:

<b:if cond='data:blog.pageType == "static_page"'>
  <style>
#ContactForm1{ display:none!important;}
  </style>
</b:if>

The above code will hide the Normal Contact Form on a Static Page only. If incase you wish to add the Custom contact Form to a Post then you may use the following code instead:

<b:if cond='data:blog.url == "URL OF Selected Post"'>
  <style>
#ContactForm1{ display:none!important;}
  </style>
</b:if>

Replace URL OF Selected Post  with the URL of the Post where you will add the contact form.

In our DEMO we have added the contact form to a static page therefore we have used the first code in step#5.

3. Customizing The Contact Form - The Fun Part!

To Keep the tutorial easy, this part will be discussed in Part2 of the tutorial.

Share your views below and stay tuned for the amazing tricks coming tomorrow! Peace and blessings buddies :)

Automatic Numbering for Blogger Threaded Comments

Numbering blogger threaded commentsToday's tutorial will take blogger comment system one step more closer to wordpress commenting engine. I was amazed today when I discovered that W3 has already introduced an excellent way of automatically numbering lists in a HTML structure using pure CSS3 properties like counter-reset and counter-increment. Both these functionality provide a non-JavaScript approach to show comment counts for threaded and nested comments in blogger. MBT has contributed a lot in changing Blogger's Comment-body Styles for the past three years and this time we are introducing an interesting trick to add more spice to your blog comments. We are using a non-JavaScript approach unlike Wordpress's popular plugin called Greg's threaded Numbering


DEMO


How it works?

Like any ordered list, BlogSpot blogs uses the <ol> tag  for displaying comments in hierarchal order. Each comment holds a separate <li> tag. The counter-reset Property sets the value to zero as soon as the loop ends and counter-increment property increases the value by one unit depending on the number of li tags used inside the parent loop. Well enough of theory, now its time to implement this effect on your blogs!

Note: This tutorial can also be applied to Wordpress blogs. you just need to change the name of CSS classes to that used by twenty12 theme used by WP engine.

Lets Count Comments in Blogger!

For this tutorial to work you must be using threaded comments in your blogger templates. If you have not yet switched to that then please do so by reading the following tutorial:

  1. Go to blogger > template
  2. Backup your template
  3. Click Edit HTML
  4. Search for </b:skin>.  Click the black arrow to expand the code.

compressed blogger stylesheet

    5.  Paste the following Styles just above </b:skin>

/*----- Comment Counter by MBT -----*/

.comment-thread ol {
counter-reset: mbt-comments;
}
.comment-thread li:before {
content:counter(mbt-comments);
counter-increment: mbt-comments;
font-size: 30px;
float:left;
position:relative;
top:0px;
left:-10px;
margin-right:0px;
height:100px;
margin-right:0px;
font-weight:bold;
font-family:arial, georgia;
color: #666;
}
.comment-thread ol ol {
counter-reset: mbt-comments-sub;
}

.comment-thread li li:before {
content: counter(mbt-comments) "." counter(mbt-comments-sub,lower-latin);
counter-increment:mbt-comments-sub;
font-size: 12px;
color: #666;
position:relative;
top:10px;
}


.comments .comments-content .comment-header, .comments .comments-content .comment-content {  margin:0px 0px 8px 28px!important;}

Customization:

  • You can adjust the font size and color of comment counts for Main section using the yellow highlighted regions
  • To edit the font size and color of sub sections (nested replies) change orange highlighted regions
  • lower-latin: Nested replies for first comment are counted in this order 1.a,  1.b,  1.c ... If you wish to display them in roman like 1.I, 1.II, 1.III, 1.IV... then replace lower-latin with Upper-roman,  if you wish to display them as integers then change it to decimal. Following are some other styles you can use for nested replies: lower-greek, circle, square, disc, lower-roman

       6.   Save your template and you are all done!

Visit your blog to see it working just fine! :)

Must Read:

Following are some posts that you would surely like to read:

Need Help?

I just hope this new addition to blogger tricks brings a delightful change to all of you who have been looking for a way to count comments in threaded list. I would really appreciate hearing form you all. Take good care of yourselves buddies. Peace and blessings be upon you all! :)

Download counter : A Plugin for blogs!

Download counter for blogsThis is the first plugin of its kind created for websites which share downloadable resources. The plugin amazingly works with all major blogging platforms like wordpress and blogger blogs. It can even be used in static Sites or any CMS you may be using. This tool will count and display download stats whenever a visitor downloads a resource form your site. The data is stored at your firebase free account. Luckily we are amongst very few who have started developing tools using the newly introduced Firebase system that allows developers to create dynamic and data-driven tools without worrying about backend development. You do not need to worry about server code or managing databases, firebase does it all for free. All you need is to code some delicious scripts that does half the work.  This plugin is a custom alternative to Dstats download tracking service. Lets add this amazing tool to your blogger blogs!

Demo

The following link will take you to our first plugin created with Firebase.

Note: If you have already followed our first tutorial on firebase then ignore steps marked as (*)

1. Create your Firebase Account *

To store your data for downloads, you will first sign up for a free account at Firebase.

Fill up the easy steps sensibly and then once your account has been activated, you must create your first Firebase database as guided below in step#2.

2. Create a Firebase Database

Previously you could only create 2 firebases but now you can create a total 5! So create one for your download stats data

  1. Towards the bottom right side of your account, you will find the following submit box.

create firebase

  2.  Give your firebase a short name. In my case I named it mbtblogstats. This name will be used as your unique Identification.

  3.   Hit create and note down your firebase URL because we would need it later in this tutorial.

Installing Download Counter Plugin:

The steps below are for blogspot blogs. Wordpress users may simply note down the method and apply accordingly on their WP powered blogs.

  1. Go To Blogger > Template
  2. Backup your template
  3. Click Edit HTML
  4. *Search for </b:skin>.  Click the black arrow to expand the code.

compressed blogger stylesheet

   5.  Paste the following Styles just above </b:skin>

/*----- download counter by MBT-----*/

.mbtloading {
background: url('https://blogger.googleusercontent.com/img/b/R29vZ2xl/AVvXsEiwY7MDl-HIBOjsq4aTkmJxYMiSlpfayYo078yDtHKEIg-TAg1R9NXh7ggSH8Bs070c2exGNbDmOa5TTsXZTmjS1t_LNzF-JoM43GRal4ahVVmyU1Ci6bUoLuWaUiiKe5PpzJQicOIa9AJy/s320/mbtloading.gif') no-repeat left center;
width: 16px;
height: 16px;
}

.blog-stats {
color: #289728;
font: bold italic 18px georgia, arial;
float: right;
}


You can easily change the color and size of the Numeric Text count by editing   #289728

Tip: Use our color generator Tool to pick a color of your choice

6. Now search </body> and just above it paste the following script:

<!-- Download Counter by MBT starts-->


<script type='text/javascript'>
    window.setTimeout(function() {
        document.body.className = document.body.className.replace(&#39;loading&#39;, &#39;&#39;);
      }, 10);
  </script>
<script src='https://cdn.firebase.com/v0/firebase.js' type='text/javascript'/>
<script>
$.each($(&#39;[data-download-count=true]&#39;), function (i, e) {
    var elem = $(e).parent().find(&#39;#download-count&#39;).addClass(&#39;mbtloading&#39;);
    var id = $(e).closest(&#39;.post-body&#39;).siblings(&#39;a[name]&#39;).attr(&#39;name&#39;) + &quot;-&quot; + $(e).attr(&#39;id&#39;);
                          var downloadStats = new Firebase(&quot;https://mbtblogstats.firebaseio.com/downloads/id/&quot; + id);
    var data = {}, isnew = false;
    downloadStats.once(&#39;value&#39;, function (snapshot) {
        data = snapshot.val();
        if (data == null) {
            data = {};
            data.value = 0;
            data.url = window.location.href;
            data.id = id;
            isnew = true;
        }
        elem.removeClass(&#39;mbtloading&#39;).text(data.value);
    });
    $(e).click(function (e) {
        data.value++;
        if (isnew) downloadStats.set(data);
        else downloadStats.child(&#39;value&#39;).set(data.value);
    });
});
</script>

<!-- Download Counter by MBT Ends-->


Replace mbtblogstats with your Firebase name that you created in step#2.

     7.  * Now search for <head>   and paste the following JQuery library just below <head>

<script src='http://ajax.googleapis.com/ajax/libs/jquery/1/jquery.min.js' type='text/javascript'></script>


You may not add the jquery code if you have already linked to Jquery library in your blog.

      8.   Save your blog and you are all done with coding!

Displaying Download stats in Posts

Now whenever you wish to display download stats for a particular file. Simple link to your file using the code below:

<div style="width:120px;">
<a data-download-count="true" href="#">Download Now!</a>
<div class="blog-stats" id="download-count">
</div>
</div>

  • Replace the # sign with your File link.
  • You can write anything instead of Download Now! If your link is bigger in length then increase the width of the counter so that it shows the count in alignment.

Need Help?

I just hope this new plugin proves helpful for blogger users who are missing a database access. I am sure this plugin is the second best use of FireBase which is indeed a magic hub for developers. I would really appreciate you to use it for your projects. Please ask me any query you may have and feel free to share your precious views. Have fun buddies. Peace and blessings be upon you all always. :)


Note: All questions with links will be deleted no matter how important the question be. Avoid Spamming please.

Exams Over! Celebrating Over 58,000 Readers

hurray Exams are over!Its tough being a final year B.E student and yet running blogs. Exams for some may sound horrible but it means a complete two months deadlock to my online activities. I just can't express how great I am feeling at this moment, talking to you after several weeks. It felt more like missing my great family and friends. Internet and technology waits for no one, during my absence I observed tremendous developments across major platforms from Blogger till social Media. I was shocked today when I saw the new layout of Google+ Profiles. Changes are going fast at Google side. Amazingly they have even integrated their comment Plugin with BlogSpot blogs. But what amazed me more was looking at STC Network's two months traffic Analytics and Ranking Details. Unfortunately Alexa for MBT has dropped from 4K to 6K but the good news is that readership has taken a whole new turn out. We are now a big community Alhamdulillah with a loyal readership of over 58,800 Readers  which is indeed a great news for all MBT readers and the team.

We have started getting great public  exposure and have been invited by several renown local universities this year for conducting sessions on "Internet Marketing, SEO and Blogging". Buddies all this was only a dream without your kind support and continuous feedback. I am whole heartedly thankful for your consistent motivation through emails, comments, Home visits and telephone calls. Love you always! :)

Increase in Readership

Readership has always remain one of the fundamental ingredient of a successful blogging career. It's the following that helps you to reach your goals and work hard even better. People track blogs using different sources thanks to growing development in Web technology. They are no more limited to RSS subscription or atom feeds.

Following are some ways you can keep track of our delicious tutorials, plugins, updates and creative piece of resources coming this month.

18,900 Subscribers: Subscribe Now! Email | RSS
25,164 Facebook Fans: Like Us to join the club »
4,320  Twitter Followers: Follow our tweets »
2,348   Google+ Followers: Follow us on Google+ »
5,707    Google+ Profile: Follow my personal Profile!
1,400  Friend connect followers

What are the things I will do first?

The blogs were under mild management for over two months and they have gathered enough dust that needs some serious cleanup. Following are things I often do whenever I get back to work after a long time:

  • Blog backup: I periodically make a backup of Wordpress and Blogger blogs on daily and weekly basis respectively. Read:Backup Wordpress Database and Files 
  • Checking Email Accounts: I am really lazy at checking emails during exams so this is one of the first things I do. Since I maintain three email accounts so it becomes necessary to keep a close look at all of them.
  • HD backup: I backup all files on my Hard Drive into a safe portable Storage Device to ensure I have a safe backup of client resources, blog resources and personal data incase of Hard disk failure. For this I use a 500GB PassPort USB Disk
  • Traffic Strategy:  I discuss monthly list of trending topics with my co-authors and guide them on how to make proper use of Keywords and optimize their posts well. Great focus is given on basic SEO and SMO 
  • Fight spam: Both at blogs and Inbox. Spamming blogs have increased so much that we were force to start coding a plugin for this and I will release it this week inshAllah.
  • Read my Favorite list! To recharge myself with all the latest developments happening at social media and blogosphere, I visit and read my favorite blogs. 
  • Schedule Orders: To server readers and clients parallelly I have to maintain a close relationship with both. for the past three months, I unfortunately failed to serve my lovely readers due to Engagement and Exams. Forgive me buddies :)
  • Prepare Resources: I love to code, Design and craft for my readers. This month my head is popping with a lot of ideas! :p
  • Buy domains: During every vocations I start experimenting with different domains in order to understand the fluctuating behavior of I-Market and search engines. I rarely sell them but keep them secret before they are grownup enough to be shared with you all. So it's a hint buddies that few surprises are on its way again :)
  • Pay bills: Normally I pay on annual basis for Web hosting, Themes and some software tools but Ad campaigns require a monthly checkup to ensure I have paid for solo Ads, contextual Ads and Search ads on time. I often do it for clients who are using our lifetime PPC/CPM service Package.

What were the exams all about?

Time wasn't easy for me this time. Engineering is tough and demands both time and effort. The papers I attempted this semester (7th semester) for my Computer and Information System Engineering Program were:

  1. Artificial Intelligence
  2. Parallel Processing
  3. Computer System Modeling
  4. Operating systems
  5. VLSI

I am a back bencher and spend most of the time online and attend classes rarely, so for a lazy student like me, preparing for papers during the 11th Hour is surely no less than a nightmare :p

What were you guys up to?

I haven't talked or seen you guys for months so I would really appreciate getting to know your whereabouts. Share all your online experiences, achievements, and even exciting nightmares! I am free for a month now and would reactivate the kitchen Recipes soon. I have some tasty and delicious recipes along with resources this time so make sure you don't miss any! Peace and blessings buddies always :)

Success Secrets of Pete Cashmore who started blogging at age 19


mashable and pete cashmoreFor any field that you might pick for yourself, has its own benchmarks of perfection and if you talk about blogging, Mashable is a winner here. No matter which niche you choose for your blog, there is no doubt that the best place to grab your hands on the latest news related to the online world and social media network is mashable. We have been advising our newbie readers to keep their eyes on sites like mashable as following sites which breaks headlines is something that always brings you not only a boost in readership, but also a quick revenue.


What I now believe after reading many success stories is that entrepreneurs are born that way actually, and a good example here is of Pete Cashmore, the mashable-man!


Mashable-The Inside!


Covering every minute aspect related to social media, technology, news and what not, Mashable is the largest independent online news site. The site that was launched back in 2005 is now enjoying a respectable alexa rank of 361, with more than 20 million unique visitors a month and 6 million social media followers. What makes this site unique is its reliability and quickness when it comes to cracking the latest news. Mashable is now headquartered in New York City and also has an office in San Francisco.


Secret#1 : Pete Cashmore and his childhood!


Pete-Cashmore


There is one thing very special about the fortunate people; they experience something misfortunate and that very incident becomes a turning point of life. What made Pete Cashmore what he is now, was his surgery of vermiform appendix at the age of 13. Although the surgery was a complete success, the recovery was even harder and due to his illness, Pete had to skip his school for complete rest. While being at home, he started peeping in to many blogs and started learning from what was shared on those sites.


Secret#2: Pete never told parents until his first success!


Been locked in a room, all busy with your machine and doing something attentively makes parents suspicious, and that’s true, isn't it? However, Pete was a lucky one here; probably some credit goes to his illness too that his parents never questioned him about what he was up to all day long. All that they predicted was that Pete was busy in something and wanted to make some money online.


Secret#3: Mashable born at the age of 19!


In 2005, after learning all that was needed, Pete founded mashable that primarily focused on social media and technology initially. He was only 19 at that time and was living in Scotland with his parents.


Secret#4: Pete hasn't slept at nights since a long time!


After getting a considerable response from his home country, Pete realized that targeting Britain only would not work and for that he planned a different strategy. As much of the work was done in America, he decided to reschedule his life to be available on those hours that could bring better results by targeting audience from America as well. If you are a pro-blogger, you must have understood his logic behind doing so, time really matters!


pete cashmore


He started writing and posting at night and used to sleep few hours in the morning. Most of us, whether it be students or bloggers know how bad it really is to be up all night and compensate the loss in daytime.


Pete, in an interview shared:


'Cause I quickly realized, Well, Britain's not gonna be a big enough market, and most of the stuff is happening in America anyway. So, I need to be on those hours. So, maybe I'd go to bed at 6:00 AM, 7:00 AM, maybe I'd be up by mid-day and writing again, and every time that just burned me down. What I would do at weekends, I would... Friday night I would say, okay, there is no news that's gonna happen, I would just sleep all of Saturday, I'd wake up on Sunday morning. And hopefully, I had recovered enough that I could start blogging again, 'cause the news cycle doesn't stop, and I went on for a long time. That was probably 18 months or so, when it was just me up at bizarre hours. Sleeping in the morning, not getting any sunlight, and it really drains you.’


Secret#5: Success in 18 months!


It was amusing for him also to figure out mashable’s popularity and the fact that there were about two million people reading mashable content a month by the end of 18 months.


Secret#6: “Have I beaten Yesterday?”


pete-cashmore-founder-mashable


Every successful man has got his own rules to follow and Pete has this question to answer daily. He revealed once that what matters to him is the fact that whether his today is better than his yesterday or not! If yes, it’s a satisfaction!


Secret#7: Mashable-a team of more than 50 people!


mashable


When your work gets recognition, you need to produce even better. Being all alone in a business might help you in keeping all the revenue with yourself, the revenue been generated, however, is pretty less. Pete has now more than 50 people working for him and enjoying a reasonable share in the returns.


So, that’s all for now, but there is one thing for sure, Pete is one of those lucky people on earth who find their talent at initial stages of life and learn how to cash it.


More power to him,


Wishes