Have you swiped next or back while surfing your blog's mobile site on your phone? If yes then you might have wished to remove this thing from your blog because sometime it is swiped next or back without intention and it is a negative thing for your user experience. Mostly it happens if your mobile site page e.g a post has a html table or it has a big image because of with content is bulging out of your main post body which causes the user to swipe next or back without intention and if it happens 2-3 times the visitor just leave and stop visiting your blog. May be they don't leave but it is not a good visitor experience. I personally don't like swiping pages without next.
 Anyway, suppose your visitor is reading a long story on your blog page on his mobile and he is in the middle of the page and just swipe to next page although he doesn't want to do so but by mistake he did it so now he has to go back and scroll to the middle and find where he was? so he will definitely not like it. Because most of the mobile sites do not have this feature so everybody don't know about it so this mistake occurs often on blogger sites. So to avoid this bad user experience you can remove it.

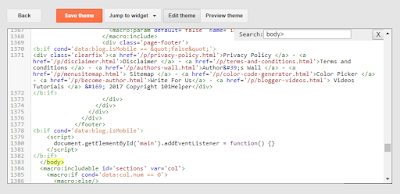
Step 5: Save your theme and visit your site on your phone, swipe next or back and see its removed!
 Anyway, suppose your visitor is reading a long story on your blog page on his mobile and he is in the middle of the page and just swipe to next page although he doesn't want to do so but by mistake he did it so now he has to go back and scroll to the middle and find where he was? so he will definitely not like it. Because most of the mobile sites do not have this feature so everybody don't know about it so this mistake occurs often on blogger sites. So to avoid this bad user experience you can remove it.
Unfortunately it is not known that how blogger add this swipe next and back because you don't find any script for it in blogger templates so we have to add a script to remove this swiping rather than to remove a script.
So in this post I am going to show you step by step how to remove swipe next and back from blogger mobile site. In my next post I will show you how to add sticky next and back buttons in your blogger mobile site so that if a user wants he can go to next or previous post by intention without any mistake.
How To Remove Swipe "next" And "previous" From Blogger Mobile Site?
Step 1: Go to blogger > Theme > Click on Edit HTML.

Step 2: Click in your theme code and use CTRL+F to open theme search box.
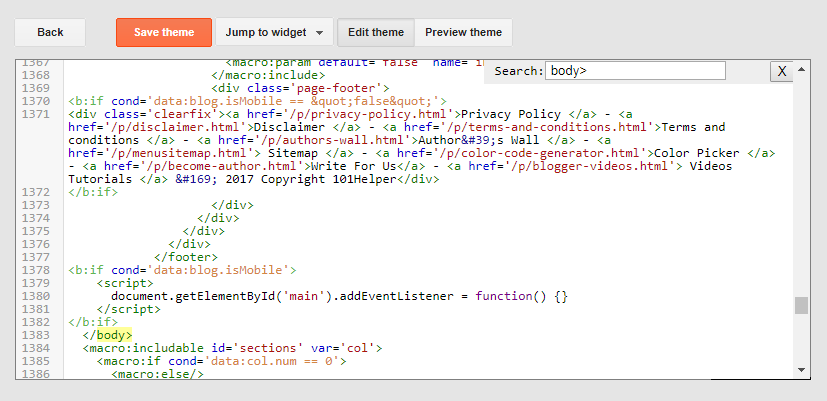
Step 3: Search for </body>.
Step 4: Copy below code and paste it above </body>.
<b:if cond='data:blog.isMobile'>
<script>
document.getElementById('main').addEventListener = function() {}
</script>
</b:if>
I know it is not a long post and just simple 5 steps post but many people ask how to do it so I decided to do a post on it. If you like it share it with others and if you don't leave a comment below.
Search keywords: How To Remove Swipe "next" And "previous" From Blogger Mobile Site, add next and prev button in blogger, remove swipe from blogspot mobile,how to modify blogger mobile template,blogger mobile template help,101helper mobile blogging