Socializing a blog is the most efficient way to get a reach of people instantly so making a blog social media friendly is very important which lets people engaged with your blog to share your articles with others. Making a site social media friendly needs addition of social media buttons so its really important to install social media buttons in sites especially sites which have content that is readable.
Although social media buttons are installed in every site/blog below articles or above articles but advanced sharing tools aren't common. Advanced sharing tools means sharing buttons in each and every thing such as images.
Images not only put interest in boring articles but also play a major role in bringing traffic from search engines and social networks. So installing social media share buttons in images to make them shareable is very effective to get more traffic from search engines and social networks as most of people follow images to reach its source.
So i brought you "on-hover share buttons" which appear when mouse is hovered on an image. It is very similar to Pinterest on hover "pin it" button. But that is just a single button so i brought you more buttons which show on hovering an image. It will make your images shareable as well as make your blog design impressive and will increase your traffic too as people will reach your articles by following images, these buttons will not share only images but also source link of images so you will get more reach to your articles.
These sharing buttons are powered by addthis. So credits goes to addthis.
How To Add On-Hover Share Buttons To Images In Blogger?
Follow below steps to add share buttons to your blog images:
Step 1: Go to Addthis and login to your account, if you don't have account register an account.
Step 2: Click on Tools and navigate to Share buttons.
Step 3: Activate Image sharing buttons.
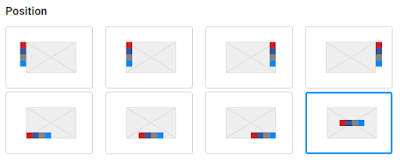
Step 4: Make changes according to your needs, you can make following changes(customizations):
Position: You can choose position of your share buttons on your images.
Shape: You can change shape of your buttons, 3 shapes are available.
Services and number of buttons: You can choose which buttons should appear on hovering an image and also how many buttons should appear. Max allowed buttons are 4.
Step 5: After customizing your buttons, click on activate button and you are done!
Follow Below Steps Only If You Haven't Inserted Addthis Code In Your Blog !
For New Addthis Users Only!
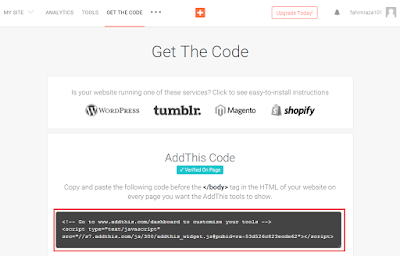
Step 6: Click on GET THE CODE in the menu on the top.
Step 7: Copy the Addthis code as shown in below image.
Step 8: Go to blogger dashboard, navigate to template and click on Edit Html.
Step 9: Search for <head> and just below it paste the copied code.
Step 10: Click on save template.
Wait for 3-5 min and hover an image. You will be able to see share buttons, you can change position of your buttons and their shape by logging in to your Addthis account and by clicking on setup image share buttons as shown in step 4 earlier.
I hope you like this post. Check out more Addthis tools and read tutorials about them by searching 101Helper.
Thanks for reading this post, if you have any difficulty please let me know!
Search Tags: how to add share buttons to images in blogger,wordpress,website,blogs, on-hover share buttons in images in blogger,share buttons on hover in images,social media buttons blogger,how to use addthis in blogger.
Every new blogger want to increase blog traffic fast, for this you need to index your blog fast.Indexing a new blog can take two weeks or more normally but we can fasten this process by simple tricks.Actually this process include two steps.In first step google bot collect information of your posts and add it in search index box.Once your posts will index google bot start crawling your blog. Google bot is very busy because billions of people update their blog daily and even hourly and it can not index all of them simultaneously but today i will show you how to speed up this process. How Google And Other search engines finds your blog? You have to submit your blog or site's sitemap to webmaster tools to tell search engines that you have a site or blog and you want it to index your blog and its content. So after submitting sitemap to search engines, they crawl your blog or site and index its pages which are allowed to be indexed Submit sitemap: Sitemap is very important thing, it provide more information to Google and other search engine site crawlers that are bots to crawl and index your blog. It is a kind of notification to search engines about already publish post on your blog. When a sitemap is submitted to search engine it starts showing only submitted posts. Posts You Might Need To Read:
Ping your blog: Actually many newbies do not know about blogger seo and how search engine works and hence fails to get traffic. Pinging your blog tell search engine that your blog is updated and it helps to index your blog fast. You can ping your blog daily there is no limit but it is recommended to ping when you update your blog with fresh content. You can ping your blog at https://pingomatic.com/ Fetch as google: Use "Fetch As Google" in Google webmaster tools and Bing webmaster tools to submit your new posts and exclude those which you don't want to be indexed. You can find this tool in Google webmasters tools and Bing webmaster tools, I am not sure about Yandex. It will help to index your posts quickly. Share your content: Also share your new posts on social media. It also helps you to get targeted traffic, pining posts tp pinterest or making a video related to post and give related link in the description will bring you targeted traffic as well as boost indexing process. A blog which have all posts shared more on social media is considered as an active blog and crawling of new posts is faster than other blogs. Submit blog to directories: Submitting your blog to directories is very beneficial in indexing a new blog. There are paid as well as free directories available online. Dmoz is one of the very popular, human edited directory and its free, you can submit your blog to it and find other directories on Google! Try out these tips, once your blog is indexed you will see the difference in your traffic. Do not rush and keep patience.
Search tags: how to index blog posts fast,how to submit blog to google, bing, yandex, how to boost traffic website,how to submit posts to search engines fast,101 helper blogger tutorials,seo tips 101helper
Google often updates blogger and always adds something new, which is sometimes good and sometimes bad, for example recently Google added "Featured posts widget" in blogger that many people liked and also added HTTPS feature that lets you enable HTTPS so browsers can consider your custom domain safe and secure. But some updates in blogger aren't good and one of them is country-specific redirection of blogspot e.g if you open 101Helper in India you will be redirected to 101helper.blogspot.in similarly in UK it will be redirected to 101helper.blogspot.co.uk which affects your blog in following ways:
5 Reasons To Stop Country Specific Redirection In Blogger:
1 - Affects On Performance: The first affect of country-specific redirection is on site performance, it slows down your blog because it takes time to redirect to country specific domain e.g in, fr, jp, uk, id etc
2 - Ads And Gadgets: Some ads are also affected by specific country redirection for example Revenuehits ads disappear when blogspot blog is redirect to a country's specific domain it may also happen in case of Adsense and your earnings can decrease. Another problem is some gadgets like web page translator stops working when a blog is redirected, it may happen with other gadgets too.
3 - Seo: Your backlinks gets divided because of different domains so you need to do more efforts to create backlinks for each country e.g blogspot.in backlinks, blogspot.co.uk backlinks etc. So its better to redirect your blog to top level domain that is dot com so you don't need extra work and efforts, you just have to concentrate on dot com.
4 - Socail Media Shares: Just like backlinks are divided because of country-specific redirection, social media shares are also affected because when a post of your blog is shared on......for example 10 times on Facebook from uk domain(yourblog.blogspot.co.uk) now when you visit yourblog.blogspot.com you will see zero Facebook shares so post shares are also divided.
5 - Crawling And Indexing: Some webmaster tools like Yandex show an error while indexing your blog, after submitting sitemap yandex show mirror site detected error it could be blogspot.in or blogspot.co.uk or other so your site isn't indexed.
So these errors emphasize to redirect all domains to the top level domain(.com). It will solve ads and gadgets loading problem, seo problem, crawling and indexing problems and improve your blog performance.
How To Set Auto Redirection From Country-Specific Redircetion To .COM In Blogger?
Follow below steps to set auto redirection from country specific domains to top level(.com) domain.
Step 1: Go to blogger dashboard.
Step 2: Navigate to template and click on Edit Html.
Step 3: Search for </head>.
<script type='text/javascript'> var blog = document.location.href.toLowerCase(); if (!blog.match(/\.blogspot\.com/)) { blog = blog.replace(/\.blogspot\..*?\//, ".blogspot.com/ncr/"); window.location.replace(blog); } </script>
Step 4: Just above it paste the below code.
Step 5: Click on save and you are done successfully.
I hope this post was helpful to you, if not please let us know by leaving a comment below. Follow ans subscribe for more blogging tutorials. Don't forget to share this post with others. Keep visiting 101Helper :)
Search Tags:How To Stop Country-Specific Redircetion In Blogger,5 reasons to stop country specific redirection in blogger,how to boost traffic,increase backlinks,get social media shares,improve site ranking.
Font is one of the things that makes a site look great. A font gives your writing skills a style which impress your readers therefore choosing best fonts for site is really important. Especially in-case of fashion blogs font style is very important. Blogger has many built-in fonts but these are too common because everyone is using one or more of them, for example for titles they use a different font and for post body they use a different font so to a unique font for your blog you have to call it from some external source and then apply it in your blog. So this post is to teach you how to use custom fonts in blogger blogs. I will use Google fonts but you can use fonts from other websites also by following steps below. I am using Google fonts below they don't have any negative impact on page loading speed.
Follow below mentioned steps to use Google fonts in your blog.
Step 2: Search for a font in Google fonts and click on the quick use icon as shown in below image(I am choosing Kimberly Geswein).
Step 3: Scroll down to step 3 where you will see a code as shown in below image.
Step 4: Copy the code given in the box.
Step 5: Go to blogger dashboard > template and click on Edit Html.
Step 6: Below <head> paste the code you just copied.
Note:Make sure to close the tag of code you just pasted like this(highlighted with yellow color!): <link href='https://fonts.googleapis.com/css?family=Shadows+Into+Light' rel='stylesheet' type='text/css' />
Step 7: Search for below piece of code in your template by using Ctrl+F.
<Group description="Page Text" selector="body">
You will find some codes similar to this below the above piece of code:
Now all you have to do is to find value="........" in the codes you found and replace the font name with the name of the font which you want to apply to your page text. Make sure to use accurate name otherwise it will not work. You can find the accurate name of your font on the Google font page from where you copied the font code as shown in below image:
Step 8: Click on save template and you are done.
CSS Code For Different Titles:
After following above part of this post you might have default font for your blog title, post titles and gadgets which could only be modified with Css so following are the css codes for different titles(blog title,post titles,gadgets) which are to be included above ]]></b:skin> in your template.
For Post Titles:
.post-title.entry-title {font-family:Your font name;}
For Blog Title: .Header h1 {font-family:Your font name;}
For Gadgets Title:
div.widget > h2, div.widget h2.title {font-family:Your font name;}
Replace Your font name with your font name which you have imported from Google
I hope you found this post helpful, if not ask me in comments. Follow and subscribe for latest post news. Thanks for visiting 101Helper. Keep visiting us. Search Tags: Google fonts in blogger,stylish fonts blogger, how to add web fonts to blogger, use custom fonts blogspot, upload stylish fonts to blogger blogs,how to change font in blogger,101 helper blogging tutorials,101helper
A customer review on how Ezoic increases website ad revenue and helps you to display up to 5 AdSense Ads per page with no blank spaces.
Mohammad Mustafa Ahmedzai
If your AdSense Ad revenue is continuously dropping over the past year and you are tired of trying every possible method to increase your website's Ad revenue - changing Ad Placements, trying different Ad formats, seeing blank ad spots on your blog - and still not seeing results then this means you are amongst millions of AdSense publishers who are facing this problem on daily basis. Just like you optimize your blogs, you also need to optimize your website's ad slots in order to maximize your AdSense earnings.
This is one disappointing comment by one of our readers:
Mohammad I am in deep trouble now. I used to get few dollars a day which suddenly changed into few cents for past two months. I am very sad and helpless. I thought it would change back. Very low earnings for twice the visits as earlier. Please help me bro. I am willing to give u my password if necessary.
We can't blame Google for this because they already informed us to optimize our unsold Ad inventories with DFP or DoubleClick Ad Exchange. Google even recommends doing A/B testing or split testing. All such recommendations are no less than a headache because each requires a lot of time and technical skills. As a result we need a more user friendly and handy auto-pilot Ad monetization system that could systematically test many different ad sizes and locations to determine the best combination of ads on any given webpage of our sites and thus displaying high bidding Ads on our blogs by maximizing the value of every impression.
After we started seeing too many AdSense Blank Spaces on our network blogs and received complaints from clients who were experiencing a consistent drop in their AdSense income due to lower RPM, I started doing a detailed research on several ad monetization tools as a computer engineer to find out how come some websites are displaying over 3 AdSense content units on their sites and almost all ad slots are displaying ads on every single page with no blank spaces. I wondered how could some bloggers violate AdSense's restriction by displaying 5 AdSense Ads on each page?
This thorough investigation led me to an advanced Monetizationtool called Ezoic which is a renown Google Certified Publishing Partner that helps publishers to optimize their website ad revenue. The best thing that I liked about Ezoic is that using it is completely free.
In today's case study I will give you a detailed demonstration of how to setup Ezoic for your blog or website. In my coming tutorials I will guide you on how to add Ezoic ad slots in different sections of your blogger blog.
Ezoic Helped Us Display Over 5 AdSense Content Units!
After just 15 minutes of setting up Ezoic on one of our network blogs "Rich Income Ways" which is hosted on Wordpress, I was able to show over 5 AdSense Content Units on every single page of it with not a single empty space! The ads come from Google’s Doubleclick ad exchange as well as a number of other ad networks and exchanges who all bid for the inventory.
See the screenshots below:
All we had to do was to install Ezoic code on different locations of our site and then allow it to display best performing Ads for different screen sizes i.e. Mobile, Tablet and Desktop.
Ezoic automatically displays different ad sizes for different devices on your site. You can choose easily which devices should see your ad and what sizes of ads should be shown in your selected ad units. All this is done with a simple click of a mouse using Ezoic's Ad Tester App.
Our Ad Revenue Increased by almost 200%
UPDATE: Our revenue now increased by 1200% ! =)
We installed Ezoic as a test on RichIncomeWays just 3 days ago that is 27th Jan, 2016. We were almost receiving no lucrative earning from this blog so to be safe, I used it to experiment if Ezoic's claims of doubling your Ad revenue were true or not.
Our monthly AdSense revenue from this blog was almost negligile i.e. $8/month. Which means on average we were making $0.27/day. See the screenshot below:
But see it for yourself a blog which was literally making nothing is now generating upto $1.40 per day thanks to ezoic. Which means approximaltely $6/week and $24/mon. If your maths is good you can analyze that this means a straight 200% Increase! [(24-8)/8 x 100 = 200%]
See the screenshot below:
UPDATE: This is the updated snapshot after a 1200% increase in revenue. RIW is now making $10 a day while it was making just $0.27 previously! =)
What's bad in receiving a free cash of $24/mon from an already dead blog? What’s even better is the system will continue to find the best ad placements based on user interaction, so I expect our Earnings Per Thousand Visitors (EPMV) to gradually increase over time.
This significant increase in our daily AdSense earnings is what that forced me to write this long customer review of Ezoic out of goodwill for their excellent technology which surely deserves to be publicized as much as possible to help disappointed publishers to improve their dropping ad revenue.
I will keep experimenting with this amazing tool to test Ads on two of my others sites also and will keep updating you with a detailed case study of their progress.
Why Use Ezoic When AdSense's Dashboard already exists?
Ad revenue optimization is what Google recommends too and this is one reason why Google gives permission to private agencies through its Certified Publishing Program to help Google in promoting their Ad network.
Managing ads directly from AdSense dashboard is recommended only for small publishers who earn less than $50-$100 but if your blog or website is capable of making more than that then you must use free Ad Monetization tools like Ezoic which uses artificial intelligence to optimize your CPMs and automatically displays the highest paying AdSense Ads on your websites without loosing a single impression caused due to empty boxes or blank spaces.
A Blank space appears on your site when AdSense is not able to find enough advertisers that are interested in your content, here is where advanced tools like Ezoic comes to your rescue which is programmed to make sure every slot is filled with highest bidding ads thus helping you to double your website Ad revenue.
How do your receive payments from Ezoic?
Unlike AdSense which pays mostly through Wire transfer, EFT or Western Union, Ezoic pays you straight through paypal, Dwolla, check or Payoneer. The minimum payment threshold is $20.
There are a number of payment methods you can choose from including:
1)Check - requires name and address
2) Paypal - requires only paypal address
3) Dwolla Email - requires only Dwolla email address
4) Dwolla ID - requires only Dwolla ID
5) US Bank Transfer Via Payoneer - will deposit money directly into your domestic account
6) International Bank Transfer Via Payoneer - will deposit your money directly into your international account in the currency of your country
Important Tips To use Ezoic's Apps and Tools
Using Ezoic is extremely simple thanks to its 24/7 Live help and support system. I will only give you a quick helicopter view of the technology used by this revenue boosting tool. Testing with Ezoic gives you the following three benefits:
Increased Ad Revenue
Access to Google's ad Exchange where thousands of advertisers bid for your unsold inventory.
Most importantly the ability to show 5 ads per page!
First watch this simple video which I found really useful while setting up ezoic.
I am sure this video is self explanatory but I will share some detailed tips that will help you make the most out of ezoic.
1. Change Name Servers Option While Integrating
The most common way to integrate your site with Ezoic is to update your site’s name servers. This allows Ezoic to optimize the ad sizes and locations automatically. Changing nameservers wont affect your site's health nor will you experience any down time. Do backup your old domain name serves if in case you wished to switch back.
Another option is to install Ezoic's code on your blogger blog or wordpress blog. It is a simple script that you need to add just below starting head tag.
Since I am using Hostgator I could easily change default hostgator nameservers to that of ezoic using the Launchpad Domain hosting management tool.
2. Apply for Google's Ad Exchange
On your Ezoic dashboard you should see a new check box that says "Apply for Google's Ad Exchange". I would suggest you go ahead and fill this out, since you will gain access to thousands of ad networks and advertisers who want to bid for your site’s inventory using Google’s ad exchange.
This program provides Ezoic system a read only access to your AdSense account to use it as a control for testing.This also allows the Ezoic system to pull your AdSense stats into the Ezoic dashboard for reporting. This allows you to do a direct comparison of how the Ezoic ads are performing in comparison to your original ad units.
This option will provide you with different in-depth insights on how your ads are performing for different mobile/desktop/tablet devices:
You will also be able to check your earnings through filters. You can choose how your ads are performing in different countries, devices and find what are the traffic sources and landing pages.
Ezoic easily integrates with your AdSense account to manage your account in auto-pilot mode. I recently allowed Ezoic to manage my AdSense account by filling out a simple invite from Google. I have shared the invite link above.
4. Must Install Mediation App
The mediation app will allow you to link your AdSense account to the Ezoic system. This will allow your AdSense to compete in the Ad Exchange for the ad inventory, ensuring that the highest bidder is always serving the ads for your site thus making you more money.
You can easily install it from Ezoic's appstore:
5. Do Install Ezoic Chrome Extension
In order to get maximum results from Ezoic it needs to test as many ad locations as possible. However, depending on a website structure and CMS, it sometimes can be difficult to add tens or hundreds of ad placeholders manually, so a better solution is using the new Ezoic Chrome Extension. It took me half an hour to install ad units manually on different sections of my blog but with this extension, it took just seconds.
Using this extension on your chrome browser, you can simply highlight-and-click to add new ad placeholders to your site and the Ezoic Platform will test them for you. Check the screenshot below which gives a quick demonstration of how can different ad sizes look on your site. You can then choose the best ad sizes based on ad location.
Identify Error Pages That Wastes Revenue
Inside the monitoring page of ezoic you will find three options.
1. Platform updates are related to platform development news from ezoic
2. Error pages tells you which of your blog pages are causing revenue leakage or needs your attention to fix them.
3. Google Updates keeps you updated with all Google algorithm updates made over the recent years. They also educate you on what exactly are these updates and how it could have affected your revenue. I am sure many of you know that Google Penguin and Panda updates were amongst the famous penalties that affected up to 70% of ad revenue for millions of publishers. Therefore staying updated with it is really important for all webmasters.
Ezoic has its own App Store for Websites!
This app store is something which requires years of hard work to develop. Ezoic's app store has plenty of free and useful apps for websites. Using these apps you can choose to block ad placements, disable ads by page, block an advertiser, choose to show more than just 5 ads and so on.
Amongst these I would categoricaly mention Ezoic's iOS App creator that helps you to convert your website's content to a native iOS app without the need for a developer. Apps are listed in the iTunes store and are compatible with iPhones, iPads, and iPods. Your iOS app will update as you update your website and will benefit from ongoing Ezoic improvements including additional ad services and evolving features.
We recently created an android app for our blog but we lacked support for an iOS app. I guess this option could really save us both time and heavy development costs.
How is your AdSense Earning Going on?
I just hope the above post may help you understand how important is it to optimize your website Ads using free tools like Ezoic. Forums and blogs are now filled with debates on dropping AdSense Income and lower RPMs. Most publishers are really disappointed at increased traffic but lower earnings. The actual reason is that webmasters today spend so much time optimizing their sites for search engines but they rarely try optimizing their ad locations and doing A/B testing. Testing Ads is surely a hectic work but without making up your mind to use a tool like ezoic you are only selling cents for dollars.
Do share your precious feedback and let us know if you are also experiencing a drop in Ad revenue. Feel free to ask me any queries related to ezoic. I would love to help as much as I can.
Wishing you a lucrative and ever increasing Ad Revenue! Peace and blessings buddies. =)