Add Google Plus Followers Gadget To Blogger!


Google Plus Followers' Widget


One of the best perks of using Google is, it has products that seamlessly integrate with each other to provide an easy and comprehensive interface to users. For example, Google Drive can be used to attach files with emails quickly. You can +1 posts outside Google+, and share search results on Google Plus. You can even auto-publish your Blogger blog feed to your G+ profile. And that is by no means the end of it. In fact, Google just announced a brand new feature, the Google Plus Followers gadget for blogger blogs! This new Google Plus followers' gadget for blogspot blogs will provide another layer of integration between your Google Plus profile and your Blogger/Blogspot blog.


The Google Plus followers' gadget


Connecting your Google Plus profile with your blog is a great way to enhance your readership by increasing your followers and engaging better with your audience. You can auto-publish your blog posts on your Google Plus stream so as to deliver your content right where your readers want it delivered. Those readers can then recommend your content directly, which can lead to more exposure. This new Google Plus followers widget is another step towards enhancing your readership and boosting your authority.


This widget will tell the world how many people are following you, and will also show them some friendly faces (different for each person). It also has a follow button by default, which lets users follow your Google Plus profile page with a single click. This will help in getting your content across multiple streams, and to reach more readers on a more personal level through your blog.


Adding this widget to your Blogger blog is really simple. But for it to work, you first have to connect your blogger profile with your Google Plus account. We have detailed the process in a previous post, so make sure you read it first.


Once done, visit the Layout tab on your blogger dashboard, and select "Add a Gadget". You will then be able to see and add this widget easily to your blog.


A note from Google: For those who are using Google Friend Connect followers' widget, they can keep using it, even though Google retired most of Friend Connect services earlier this year. For the time being, it will keep running on Blogger.


Have questions in mind? Feel free to ask us. You can also refer to Google's Help Center for more information on this update. Happy blogging :)

Why do paid links violate Google's guidelines while other ads don't?


Google is known for its non-tolerance for paid links to a site. Previously, sites tended to gain ranking on account of the paid links they had pointing to themselves. Bu Google has been working on its algorithm, and the Panda and Penguin updates have been all about cutting down on such spam activities. Now Google delivers a penalty to such a website that has paid back-links. But if you come to think about it, don't ads seem to do the same thing? For example, if you buy an ad slot on a website that points to your own site, then how is that different from links on other websites that you buy?


Google is not against advertising. It is great for educating people, and alerting them. It can drive traffic to a site, and raise awareness. And there can be a lot many reasons for advertising, but Google has nothing against them.


But the simple answer to the question is, one type on link manipulates search engines, whereas the other type does not (you can guess which does which). When you're paying for links that pass PageRank, fundamentally, you are paying for something that manipulates search engines, something that creates the worst search experience for users, and hence violate Google's Terms of Service.


So you can use AdSense, DoubleClick, Chitika, or whatever you're interested in. What Google looks for is, whether search engines get worse, or whether PageRank is being passed, and whether search engines get manipulated by a particular set of links.


So you can make sure you don't pass PageRank with no-follow, and you can have links go through a JavaScript redirectot where that's blocked by JavaScript. The vast majority of banner ads, advertising and ad networks know how that works, and know how to do it such that GoogleBot doesn't crawl all the way through those ads, and those ads don't pass PageRank.


So if you have a link to your site that passed PageRank, then that will definitely harm your website more than it will do good. If you're doing advertisements  just make sure those links don't pass PageRank and manipulate search engines in any way. Avoid spamming :)

Why might GoogleBot get errors when trying to access my robots.txt file?.


GoogleBot


A great thing about Google is, it gives webmasters all the help they need to get their websites into Google's index. There's a nice tool available in Google Webmaster Tools called 'Fetch as GoogleBot'. This tool, as we discussed in our SEO Tips for start-ups, can be a great help diagnosing errors and getting a website in Google's index faster. A robots.txt file is used for crawling efficiency, and preventing certain pages from being crawled etc. Sometimes though, GoogleBot might have difficulty fetching your robots.txt file. Here's a solution from Google to this problem.


The original question asked o the GWT forum had to with crawling inefficiency. The GoogleBot was unable to crawl a robots.txt file 50% of the time, even though the file could be fetched from other hosts with a 100% success rate. It is worth noting that this was on a plain nginx server and a mit.edu host, so that should have a pretty good up-time. So the problem seems to be with Google, right?


Sometimes, people try cloaking on their websites. Cloaking means hiding content from crawlers, so that different content is served to crawlers and users. So what a user might see on their websites might be a lot different than what crawlers such as GoogleBot see. Not only is this a bad SEO practice, it can also have consequences.


During cloaking, people sometimes make a mistake, and end-up reverse-cloaking. So while browsers and user agents see the website fine, crawlers don't see any content. Making such a mistake is like axing your own foot. So this could be one of the reasons to the problem.


As we discussed about at the start, the Fetch as GoogleBot feature in Google Webmaster Tools is a pretty awesome tool. You can use it to fetch your robots.txt file. t will tell you when there's a problem. Many people might not know this, but sometimes, their web hosts might alternate between different systems and hosts. So a 50% success rate might be accounted for one of the hosts being improperly configured. You might want to contact your hosting company about this.


These two could be the most probable causes for robot.txt crawling errors. Did this help? Please do let us know. And stay tuned for more SEO questions and their answers :)

Reposition Navigation Buttons in Blogger!

reposition navigation links in bloggerThe navigation buttons or links that are displayed at the bottom of each comment section in BlogSpot blogs enable visitors to switch between new and old posts or move from one post page to another ordered by date and time. These buttons become less of use when number of comments increase too much. Normally readers do not even observe the navigation deep down and this results in loss of precious pageviews. I have always emphasized that value pageviews more than unique visitors because it is indeed pageviews that turns into revenue generating page impressions both for AdSense or any other Ad Network.  You might have seen the More, Next and Previous button showing inside the top black sticky bar on MBT homepage and post pages. It is really not possible to shift a Post data item to any other widget section in blogger. Doing such results in "Data variable not found in dictionary" error or similar.

We played a work around and used Cascading stylesheet Position properties to allocate fixed positions to these buttons anywhere on the page. This is again a unique addition to Blogger Customization and being implemented for the first time. The tutorial today will not only help you change the position of navigation links but will also teach you to install a custom sticky bar just like the one we are using on our blog. We are pretty sure you will find today's tutorial really easy yet delicious!

PS: Tested with Chrome, Firefox, IE9 & Safari.

STEP1: Adding the sticky bar

First comes first. I have already shared a detailed tutorial on adding a stickybar to blogger. Please first install a stickybar on your blogs and then try step#2 of today's tutorial.

Note: The style that I am using on MBT is different from that of the tutorial so if you want a similar color theme then simply copy the stylesheet from MBT source file or let me know to help you.

STEP2:

Now comes the interesting part. What we will do here is simply shifting your current Newer, Older & Home buttons to the top left of the stickybar and replace them with more fancy buttons like the one we are using.  Follow these steps:

  1. Go To Blogger > Template
  2. Backup your template
  3. Click Edit HTML and then check "Expand Widget Templates"
  4. Search for the following CSS classes and delete them all: You will find three such classes or more starting with either #blog-pager or .blog-pager

#blog-pager {
------
}


#blog-pager-newer-link {
----

---

--
}

#blog-pager-older-link {
-----

---


--
}


   5.   Now after you have deleted them, add the following code in their place:

#blog-pager {
text-align:center;
}
#blog-pager-newer-link {
position:fixed;
z-index:9999;
margin-left:-320px;
top:0px;
margin-top:5px;
}

#blog-pager-older-link {
position:fixed;
z-index:9999;
margin-left:-290px;
top:0px;
margin-top:5px;
}

#blog-pager-more-link {
position:fixed;
z-index:9999;
margin-left:-20px;
top:0px;
margin-top:5px;
}

@media screen and (-webkit-min-device-pixel-ratio:0) {
#blog-pager-newer-link {
position:fixed;
z-index:9999;
margin-left:-627px;
top:0px;
}

#blog-pager-older-link {
position:fixed;
z-index:9999;
margin-left:-597px;
top:0px;
}
}


What we did in step4 and step5 was simply replacing your old code with the new one.

    6.   Next search for the following chunk of code:

Note: You are only concerned with finding the two highlighted codes. The code inside them may look different for your template so just finding these two highlighted tags and then follow step7.

<b:includable id='nextprev'>
  <div class='blog-pager' id='blog-pager'>
    <b:if cond='data:newerPageUrl'>
      <span id='blog-pager-newer-link'>
      <a class='blog-pager-newer-link' expr:href='data:newerPageUrl' expr:id='data:widget.instanceId + &quot;_blog-pager-newer-link&quot;' title='Previous'>&#171; Prev</a>
      </span>
    </b:if>

    <b:if cond='data:olderPageUrl'>
      <span id='blog-pager-older-link'>
      <a class='blog-pager-older-link' expr:href='data:olderPageUrl' expr:id='data:widget.instanceId + &quot;_blog-pager-older-link&quot;' title='Next'>Next &#187;</a>
      </span>
    </b:if>
<span id='home-link'>
    <a class='home-link' expr:href='data:blog.homepageUrl'><data:homeMsg/></a>
</span>
    <b:if cond='data:mobileLinkUrl'>
      <div class='blog-mobile-link'>
        <a expr:href='data:mobileLinkUrl'><data:mobileLinkMsg/></a>
      </div>
    </b:if>
  </div>
  <div class='clear'/>
</b:includable>

     7.  Replace the code inside them with the following code as shown below:

<b:includable id='nextprev'>

<b:if cond='data:blog.url == data:blog.homepageUrl'>
   <b:if cond='data:olderPageUrl'>
      <span id='blog-pager-more-link'>
      <a class='blog-pager-more-link' expr:href='data:olderPageUrl' expr:id='data:widget.instanceId + &quot;_blog-pager-older-link&quot;'><img src='https://blogger.googleusercontent.com/img/b/R29vZ2xl/AVvXsEhi3m-8vZEXeMa-kcCyO6Nub8NBvtNhvU7OLcmh7je06X6BWzHps1TsRNdz5bTLgCpDJMSCOw36l93_Z11yHwHn1ZKDTA8HHhYibEjW-vLkUslIPWaMI8lZD8kyLJiOJixa8nyr5lqVqOeL/s400/more.png'/></a>
      </span>
      </b:if>
</b:if>


<b:if cond='data:blog.url != data:blog.homepageUrl'>
  <div class='blog-pager' id='blog-pager'>
    <b:if cond='data:newerPageUrl'>
      <span id='blog-pager-newer-link'>
      <a class='blog-pager-newer-link' expr:href='data:newerPageUrl' expr:id='data:widget.instanceId + &quot;_blog-pager-newer-link&quot;'><img src='https://blogger.googleusercontent.com/img/b/R29vZ2xl/AVvXsEjKxOy-0ivAbGCqGZOmr49nlqJG-pwGghjnetL6ub3XV86UUlDeJbYFbMi5tv6TMevlHJehwMRaTS5nS1xdH1xVF3sC9eUG6gZ4tag7rrHQQr2SZgDGaRVae3LDnPpk029Chu4yRv2LIOoP/s400/Previous.png'/></a>
      </span>
    </b:if>

    <b:if cond='data:olderPageUrl'>
      <span id='blog-pager-older-link'>
      <a class='blog-pager-older-link' expr:href='data:olderPageUrl' expr:id='data:widget.instanceId + &quot;_blog-pager-older-link&quot;'><img src='https://blogger.googleusercontent.com/img/b/R29vZ2xl/AVvXsEhAjYypyGwzx8T5tb0Q1i8YUJkEex5sjg5hN5GBKsm_QLdKHey1MD2GPE2bWHnwalWUUrQ73cLs8CSjmKe2x7K3VPH1cT_VU4yRfGG9aF07KXR9h-_UrOVLt4__rlx3aT2YriiRH2WfFqCW/s400/Next.png'/></a>
      </span>
      <b:else/>
 
    </b:if>

  </div>
  <div class='clear'/> </b:if>

</b:includable>

It was that easy!

   8. All done! Visit your Blog to see it functioning just fine. :)

How it works?

Previous Previous will display newer posts

Next Next will display Older posts

more More will display on homepage alone.

  • Button More is responsible for displaying the next set of previously published posts. It will show a bunch of posts depending on the number of posts you allowed to be displayed on homepage.
  • The other two buttons will help the visitor to navigate between next and previous page. If the visitor is on your newly published post then the Previous button will not show up and Next will show alone.

Everything is operated using conditional statements provided by XHTML 1.0.

If you are looking for read more buttons then do check our Icons and buttons category that has been downloaded over thousands of times and found on almost every Blogger blog today: Download from here
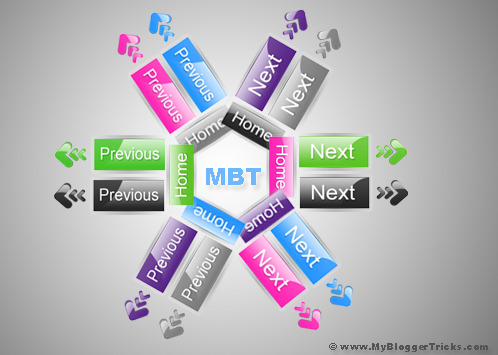
navigation buttons

Questions?

I have one last paper on 29th Nov  after which I will be free for one month to help you all with every query you may have. The blog is being maintained by co-authors because I am not currently available. I am writing posts as soon as I get some spare time. You are most welcomed to ask any question you may have related to this post. Off-topic questions should kindly be avoided. I just hope you find this new addition useful to your overall Pageviews. Wish you more power buddies. Peace and blessings. :)

What has having your own blog taught you about SEO?


If you have any interest in the web-development industry, you will find that there are countless entries on the internet about Search Engine Optimization (SEO) - from so-and-so hot SEO tactics to the best SEO practices, and so on. There are also tonnes of blogs and websites like Search Engine Land, SEOmoz etc that provide SEO tools, guides, tips, and more. But can you learn all about SEO from these sources? For a person working in the SEO industry, or working as a SEO, is it necessary for him to have a blog or a website? Have you learned something about SEO that you wouldn't know if you haven't had your own blog?


Most people create a blog to create an outlet to their thoughts, or to share content with friends, family or the world. But there's a lot more to blogging than meets the eye. When you create a blog or a website, you step into a whole new mind-set of a webmasters, and basically get a new perspective on the whole 'SEO' for websites. If you're only working on reducing spam, then you will always look at the bad things out there, and how to reduce them. To be fair, you have to look at the other perspective as well, i.e. look at the good content out there as well, and work for its enhancement.


It is the natural instinct of people to want to get a higher ranking in search engines, and to make their content available to the whole world. It doesn't mean that they are spammers, and should be cast aside. Instead, they should get an opportunity. It's a natural instinct to want to do better.


If you have a blog or an online presence, you'll definitely learn a few things you can't learn otherwise. For example, if you make a list of 'top 10 such and such things', you'll get more clicks etc. You also learn about keyword selection, how to write a proper title, what things are more popular (such as iPods, Chrome extensions etc). It's always helpful to actually see all stuff in action, and not just learn about it in an academic way.


Such things can only be learned from experience, and not from theory. So everyone interested in the field should have a blog or a web presence, because that's the only way to learn the ins and outs of it. Cheers :)

Show each Author Picture In Post Titles Dynamically

Post Contributed by Hassam Ahmad Awan, a Gold Star MBT contributor and senior co-author. You can catch him always on his blog Bloggingehow

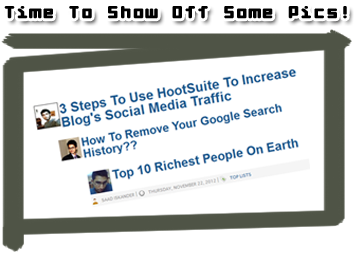
add author pictures beside blog titlesIts a pleasure for me to share one of a Blogger tweak that we managed to implement on BloggingeHow.com recently that makes sure that every author's image is shown up beside their post titles, both on home and post pages. The dynamic tweak enables every individual authors in Blogger based blogs to get them selves showcased. Also as for readers, its a much satisfying thing to know the actual person behind the article. Its much easier to get your self related with the post. It will display author pics dynamically unlike the static way that Mohammad shared months ago which can be find here: Show Profile Avatars next to post titles.
 

Live Demo
 
PS: At MBT a different approach is utilized and that alternative tweak will be shared by Mohammad himself so stay tuned to that.

What the trick?

The most tricky part in implementing the dynamic feature was to align the image and the post titles in a single line and not laying down the actual code for displaying individual authors images. As every other Blogger template is different as of its coding structure, so the below tutorial might not exactly match with your template, though you would be given the idea of what sort of code to search for in order to get to that point in the code where you have to implement the Dynamic author's profile images in Blogger.

Step #1 Open Edit HTML section

  1. Navigate towards your Blogger Dashboard >> Template >> Edit HTML
  2. backup your template. 
  3. Hit 'Expand Widget Templates' and find the following code
<h2 class='post-title entry-title'>
 
Though, note that you might not find the exact code in your template, though you can search for something similar that says 'Post Titles'. Once you find the above code, you're now on the right place to implement the dynamic author's profile tweak.

The approach?

Now, there are multiple ways through which we can show up the author's image beside post titles. For this tutorial and what we have implemented on the demo blog, we'll be using HTML Tables to wrap up the post titles in a single <td> tag and the author's image in another <td> section.
author photo in titles
The green box indicates first <td> tag while the red box indicates another one. Now that we know what code is responsible for displaying the Post Titles, we can easily place Dynamic author's profile beside it with the help of HTML table.

Step #2 What to do?

Once you have found the above code in Step #1 you now have to mark out the entire code that shows up the post titles as mentioned below.
 

<table>

<tr> <td>

<b:if cond='data:post.author == &quot;Author #1 Exact Name&quot;'> <span style='margin-right:5px;'>

<img src='Author #1 image link' style='border:1px'/>

</span>

</b:if>

<b:if cond='data:post.author == &quot;Author #2 Exact Name&quot;'> <span style='margin-right:5px;'>

<img src='Author #2 image link' style='border:1px'/>

</span>

</b:if>

 </td>

<td style='vertical-align:middle'>    

<b:if cond='data:post.title'>     

 <h2 class='post-title entry-title'>      

<b:if cond='data:post.link'>        

<a expr:href='data:post.link'><data:post.title/></a>      

<b:else/>         <b:if cond='data:post.url'>          

<b:if cond='data:blog.url != data:post.url'>            

<a expr:href='data:post.url'><data:post.title/></a>

<b:else/>             <data:post.title/>           </b:if>         <b:else/>           <data:post.title/>         </b:if>       </b:if>       </h2>     </b:if>

</td> </tr>

</table>

 
The above code can be divided into 2 parts. The first section is packed into first <td> tag as mentioned before. The other one is shown in <td> color. Wrap your Post Titles code that are in your template with in the <table> <tr> <td> tags as shown above with the author's profile image/conditional tags in the first <td>. You can relate in a much better way by having a look at the image below.
blogger author picture in post titles

How does it work?

All that table thing was to make sure that the Author's image and the Post Titles are aligned with each other. Though the actual Dynamic Pictures comes in from the below code:
 <b:if cond='data:post.author == &quot;Author #2 Exact Name&quot;'> <span style='margin-right:5px;'> <img src='Author #2 image link' style='border:1px'/> </span> </b:if>
As you would have noticed, Author #2 Exact Name that is with in the conditional tags is responsible for showing the content with in it only when the post is written by 'Author #2 Exact Name' string. So to make that work, you got to make sure that what ever name you enter, that must be the same as the actual author's Blogger's author's account name. Other wise that wont work.

Was that difficult to implement?

I know it can be tricky to find the exact code responsible for showing the Post titles, though the above explanation would have hopefully helped you out in understanding that what needs to be done. In case of any problem, simply leave out your quires below and I would love to get back to you guys as soon as I can. Salam!

For optimizing post titles don't forget to read:

Search For Adsense Ads by Image using Ad Review Center Tool


AdSense Review Center

Have you ever considered grabbing more control over your AdSense ads through, say the AdSense Ad review center? The Ad review Center is a really powerful tool that lets you tweak the settings, and control ads that appear in your site's ad units. Following a set of changes and improvements from Google earlier this year, that gave this useful tool even more power and reliability, Google has now introduced another remarkable feature - image filtering. This new feature will let you find ads, and review them very easily and effectively, hence saving your time.


Recommended for you: How to Block annoying AdSense Ads using Publisher Toolbar?


What's the use?


This new feature makes use of the same technology as Google Image Search. You can upload an image from your computer. And this tool will then use the technology to search for similar images, and will return ad banners that have a similar image in them. You can then review such banners, and take an appropriate action.


This comes real handy when you want to not display an ad banner that has, let's say, the logo of a competitor of your site. Seems logical? You can simply take a screenshot or image of your competitor's logo, and then upload it to this tool. You will then see all ad banners that have that logo in them. You can then block those banners. Simple!


To use this feature, simply log into your AdSense account. Then go into the 'Allow and Block Ads' tab. There, you will see this feature, with an option to upload an image etc.


Allow and Block ads


Limitations


Currently, you can only upload an image of maximum size 2 MB, and a max dimension of 1024 pixels. Also, this feature for now only returns image ads. More functionality will be added later on, and we'll keep you posted about it :)


We'd recommend you use this tool rarely, and with care. Only block content that you absolutely don't want to appear, because blocking ads is generally not a very good idea. It isn't a good revenue generating practice, and can reduce your revenue. So be careful! Good luck :)

Why People Quit Blogging?


Blogging has become very popular, and has become a 'hot' way of earning money online. But while so many people make a fortune at blogging, a lot of others get discouraged, and quit blogging. The major reason for this is, some people just don't know how to avoid some pitfalls that accompany the field. There's a lot more to blogging than just writing and earning money in return. Take a look at the top 10 reasons people quit blogging, and learn to avoid those pitfalls.


1. Earning Lust


This is a trap everyone, even the pros should avoid. A lot of people get tangled in the web of their dreams about making large sums of money from their blogs. Now this either steals focus from the blog itself, or it induces bloggers to use every trick they can find on the internet to boost their revenue, and this includes stuff like black-hatting, spam back linking etc. Now you might get away with it for some time, but Google eventually will deliver the penalty, from which it is hard to recover. Hence, a lot of people quit in such circumstances.


A lot of people also quit because of all the hard work required. Well, instead of thinking about earning money, they should think of their hard work as an investment. The more they put in, the more they'll get in return. But they also have to be patient. Blogging pays, but in due time.


2. No proper Optimization


A lot of bloggers don't know about how to properly optimize their blogs for users as well as search engines. As a result, they get little to no traffic from search engines, at which point their website stalls. Hence, most get discouraged. Such people should learn about how to optimize their website. For better ranking.


3. No social activity


A lot of bloggers also underestimate the power of social media in building blog traffic. They don't use social channels properly. Some don't even share their content at all, whereas others excessively promote to the effect of spamming. Both groups should learn to properly make use of social media, or their progress might stall, which ultimately leads to rejection and quitting.


4. Lack of research and quality


This is a major problem these days. There is an acute lack of quality on a blot of blogs these days. The two most important ingredients in a blog are originality, and then quality. Lacking both means a visitor has little interest in that blog. This is mainly why a lot of blogs don't get traffic and readership, and hence it flops.


5. Ignoring hot topics


One of the basic rules in blogging is to talk about hot stuff. It is one of the best ways to get traffic and engage readers. A lot of blogs fail because they don't discuss hot topics and latest news, and readers on that blog find the content outdated or monotonous. We have talked to our readers about this through various comments as well. We got complains from a few readers about covering latest news on Google. This is the answer to them right here. Latest news are a must for any blog.


6. Delivering news


This is the same point as the above one, but from a competitors' stand-point. If you deliver news before your competitors, you will get the maximum effect of your hard work. But a lot of bloggers don't realize this, which is why most of the time, their posts go unnoticed.


7. Underestimating the worth of readership


Readership is the most powerful thing a blog can have. If a blogger chooses to ignore his readership by not replying comments, or answering his readers' questions, they will ultimately leave his website. Hence, the traffic and engagement will drop, and the blog will go back to the stone age.


8. Valuing PR over Alexa


In our post about the latest November 2012 PR update, we talked about how we give more value to Alexa that to PR, because Alexa is a more accurate indicator of readership and traffic. A lot of people keep their focus on PR, and backlinking and all that kind of stuff, but ignore the important part that is readership and traffic.


9. No monthly goals


As a blogger, you should set up monthly goals for your blog. For example, concentrate on one topic for a week or a month, and write about it on all aspects. This will develop your blog little by little on all fronts relevant to your niche.


10. No Six-Month target


Another mistake people make is, they don't have a six-month, or a long-term strategy in mind. It is important to decide where you're going, and where you want to go. Creating a strategy is important, otherwise a blog will fail, and this is one of the many reasons people quit blogging after their blogs fail.


So, are you making any of the above mistakes? And what have we missed? Feel free to tell us in the comments below :)


Do you think 'Search Engine Optimization' should be renamed?


We often hear and use the term Search Engine Optimization (SEO) with regards to blogging / website designing, and getting content on Google. But what is the first thing that comes to mind when you hear this word? A lot of people picture link building and other such practices, which kind of limits their imagination and their field. But comparing its actual meaning to the way it is used today, do you think there's any difference between the two? And do you think the name is descriptive of the way it is used these days? Or should it be renamed appropriately? Here's Google's viewpoint on the matter.


You can think of it as Search Experience optimization rather than Search Engine Optimization, with focus on the user experience, i.e. whether a user likes a content on your page, does he convert well once landing on your page, does he bookmark your page and tell his friends about it, all those kinds of things. So unlike the viewpoint some people have, SEO is much more than link-building now, and has more focus on quality.


Unfortunately, Search Engine Optimizers these days have a pretty bad name. This is mostly because of some of the SEOs who practice black-hat techniques to give themselves an unfair advantage. And even though a lot of people do create good content, and create a good user-experience, they still get a bad name because of some rotten apples.


So even if the field is given a new name, it doesn't really matter. Those who practice shady techniques will still be in the same field as those who don't. So isn't it unfair to paint both of them with the same brush? The only solution is to broaden one's perspective of how this field works. Again, there's a lot more to it than just building links.


So tell us, do you think the term Search Engine Optimization should be changed to something else? What do you think it should be called? Leave your interesting responses in the comments below :)

How long does a Reconsideration request take to process?.


Google rolls out its algorithmic updates on a regular basis now. And it impacts a lot of websites positively, as well as negatively. Although the negative effect might be because of shady practices or spam action, it could also be a mistake, for which Google offers webmasters an option to file a reconsideration report. So if you think your website has been unduly penalized, or maybe if there's a misconception from Google's side, you can use this option. But some people have been submitting and submitting reconsideration requests, but don't hear anything about it for weeks, or even months. So how long does Google take to actually process a reconsideration request?


First of all, if your requests has not been considered for a long time, say like a month or so, then it's not normal. You should submit a reconsideration request again if you don't hear in two weeks or so. Sometimes, usually when Google is sending out a new kind of message, a lot of requests might get piled up, so you might want to wait a bit more. But if a month or two pass by without a reply, then its time to file another request.


You can tell something is wrong when you don't get a confirmation email right after you file your request. This means that maybe the request didn't go through properly, or there was an error on server-side.


Typically, there are three types of responses you can get from Google out of a reconsideration request. First, you might get a positive response about your domain, saying that your domain seems fine, and hence the penalty has been lifted, and you are now good to go. You can also get a negative answer, which means that your request has been disregarded, because there are still issues with your site.


And if Google is still working on your site, you will get a message simply saying your request has been considered. It won't say yes or no. This means, that Google has looked at your website, but hasn't found any reason to disregard your request. But while some part of your website was fine, the other part might have some other issue, such as a technical issue. So Google will take a closer look, and then let you know.


But if it is past two months or so, then that's bad, and you should do something about it, and notify Google. Usually, you can wait for up to two weeks before filing a reconsideration request again. Good luck with your reconsideration :)

Move your blog from LiveJournal To Blogger


LiveJournal is a great free resource for people who want to keep a log or a diary of sorts of theirs online, or share their life experiences with their friends and family. It allows people to make posts, and then cross-post and share on their social media profiles. Hence, these journals have all the markings of a blog. But for people who started off with LiveJournal, but aren't satisfied with the limited options it has, Blogger is a great option for them. Blogger is so much more than what LiveJournal is. So if you're not satisfied with LiveJournal, you can just move your blog from LiveJournal over to Blogger and get much more functionality.


We recently published a post about transferring your blog from WordPress to Blogger. And we shall continue this series with this LiveJournal to Blogger conversion. Our dear readers have been demanding a post on conversion from Blogger to WordPress, so we will be doing that soon. Stay tuned :)


And now, back to the topic at hand.In this post, we will walk you through the conversion. We are assuming that you already have a LiveJournal account, with some content published on it, which you want to transfer.


Transferring from LiveJournal to Blogger


First of all, visit this link (liveJournal2Blogger), and log into your LiveJournal account using the form given on the page. Unlike WordPress, LiveJournal doesn't provide you with an option to export your content. So you need a third-party app to do it for you. And this app does just that for you.


You will be prompted to save a file on your computer. This is your LiveJournal in a Blogger-friendly exported format. We will use this to import data into Blogger, so keep it ready at hand. 


Importing data into Blogger


Now you have the exported file, all you need to do is import this file into Blogger. Log into, or sign up for a Blogger account, From there, either Create a new blog, or click on an existing blog where you want to publish your LiveJournal content.


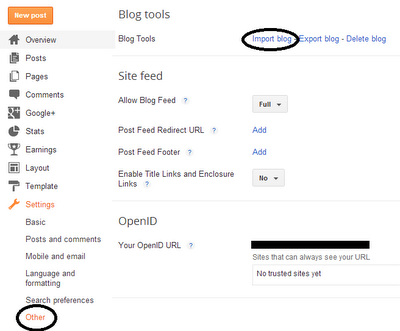
Once you're logged into a blog's dashboard, Click on the Settings at the bottom of the left side-bar. From the options that pop out, click on Others. Then, on the right, you'll see an option to Import Blog.


Now, all you need to do is browse to the file you downloaded, and upload it here. Follow the simple instructions, and you have a set of posts from your LiveJournal account ready to be published!


As with the WordPress to Blogger, this conversion has a limitation of file sizes for up to 1 MB. But LiveJournal blogs are pretty small, so you shouldn't have much of a problem exporting your posts and comments. That's all there is to the conversion. You might also like to know about Blogger2WordPress.

How will Google interpret links to URLs ending with a campaign tag?


Campaign tags, also known as URL parameters, are a way of telling apart different variables, such as a visitor's source, or affiliate id, or something similar. Hence, they are used for tracking purposes. These tags or parameters change the URL, even if they might point to the same content. For example www.example.com and www.example.com?ref=1234, both might point to the same webpage. So the important question is, how does Google treat such URLs? It is logical to think about them as two different URLs, since there's an added key-value pair. And some parameters even change the content on a webpage. So how does Google interpret such links that have a campaign tag? Does it consider them as the same page or not? And what are the SEO effects of inbound links?


First of all, it is important to know about different types of URL parameters. There are basically two types of URL parameters; the ones that change content, and the ones that don't. Content changing URL Parameters are typically used for searching, sorting, narrowing down results etc. And since they change content, they should be treated as different URLs.


URL parameters that do not change content, such as campaign tags, affiliate ids, referral sources etc are just used for tracking purposes. And since such parameters point to the same content, it is these that we need to be worried about.


Firstly, Google's crawl team does a good job of detecting such issues. If there are multiple URLs that point to the same content, they can canonicalize them, meaning they can group such URLs together, and pick one best URL from among them. So if you have standard URL parameters, most of the time Google will be able to tell which parameters point to the same content, and it will then canonicalize them.


However, if you have non-standard URL endings, or maybe are in a doubt that search engines won't be able to recognize similar URLs, then there are a few things you can do to help the process.


Keep it simple


Always try to follow the KISS rule, i.e. Keep It Simple, Stupid! Make it as easy for your users as possible, and also for search engines. But if you don't trust a search engine to get it right, you can set a rel="canonical" tag for your page. A canonical page is a preferred version (or original version) of a set of pages with the same content. So Google will know straight away that this URL has multiple versions.


You can also use a 301 redirect. If you want the URL tag(s) version(s) of a page to not be in Google's index, you can use a 301 redirect to direct traffic to the original page, while still registering a hit at that page on your server.


Configure URL parameters


You can also use Google Webmaster Tools to configure URL Parameters, and tell Google which parameters change content, and which don't. You can tell Google what URL to consider, and which to regard as repeated versions. Please read the following two posts to understand about URL parameter configuration.


That's all there is to URL parameters. If you have questions, ask them here. We'd be glad to help :)


Convert a Wordpress blog To Blogger in easy steps


Blogger is a very widely used publishing platform, mostly because its strength lies in its simplicity and ease of use. It is quite easy to use, and is recommended for beginner bloggers who are looking for a quick and easy way to create a presence for themselves online. For bloggers who have created a WordPress blog, but are at a loss to maintain or modify it, they have a great option in Blogger. They can easily migrate their WordPress blog to Blogger without any hitch. In this post, we will talk about how you can shift from WordPress to free Blogger.


Normally, such a transfer isn't easy. Data needs to be imported from WordPress first, and then imported to Blogger. Since Blogger doesn't allow any data format except its own, there needs to be a conversion process that will convert WordPress exported files. Luckily, there's just such a utility available! Here, we will guide you through the simple steps. Following them, you can convert self-hosted WordPress blogs to Blogger, as well as migrate from free WordPress to Blogspot.


Step 1: Importing from WordPress


  • Log into your WordPress account (for free WordPress users), and then choose the blog you want to convert into Blogger. Alternatively, you can log into your blog's dashboard directly by adding the /wp-login.php suffix to your blog's home URL (eg yourblog.com/wp-login.php or yourblog.wordpress.com/wp-login.php)

  • Navigate through your WordPress menu, and find the Tools option. When you click on it, you'll see further options, among which you will see the Export option. Click on it.


Export


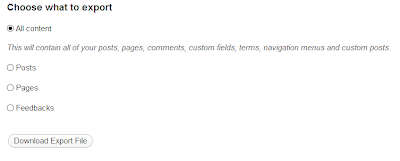
  • Click on the Radio Button next to 'All Content' under the heading 'Choose what to Export'. You can select only posts, or pages, or feedbacks, but it is recommended that you select All content to ensure maximum content is transferred. Then click on Download Export File, which will let you save the exported file to your hard drive. You have completed step 1 at this point.


Download exported file


Step 2: Convert into Blogger format


There is a useful little app that will do this job for you. To convert, visit this app's page, and navigate to the button in the middle of the content that says 'Choose file'. Browse to the file you downloaded from WordPress, and upload it here. Then click Convert. After the conversion, you will need to save the output file. This file is in Blogger-friendly format, and will be used inside Blogger.


Step 3: Import to Blogger


  • The import process into Blogger is pretty straightforward. Simply log into, or sign up for your Blogger account, and click on Create a Blog link. I'm assuming you want to create a new blog for your new content. But if you want to, you can import into an existing blog as well.

  • From the Dashboard, click on Settings >> Other >> Import Blog.


  • Now, all you need to do is follow the simple instructions, and upload the converted file. You will be guided through a wizard that will import data from this file into Blogger. Once done, you will see all your posts from WordPress ready to be published!


Limitations


Although this is a really cool app, it has a serious limitation. You can only upload and convert a WordPress-exported file that is less than 1 MB, which is too inconvenient, especially if you have a large blog, or even a small blog with a size-able number of posts.


If you're disappointed about this, then don't worry! Because Muhammad is working on just such a tool that will allow users to upload a much larger WordPress file to convert into Blogger format. And this tool will be made available soon, so stay tuned!


Also, about the SEO requirements, well they are a bit more technical, so we'll be covering them in more detail in a future post. So try out this cool feature, and if you like it, then stay tuned for more posts and updates on our own tool for converting WordPress blogs into Blogger.


How does Google consider site-wide backlinks?


Site-wide backlinks


Are site-wide backlinks good or bad for your website? People are often confused by the question, and most are under the impression that the more the backlinks to a website, the better, no matter whether they are from the same, or a different domain. And judging from a crawler's point of view, it seems logical, since crawlers crawl each link on a page, and then follow the link to the linked page, and a backlink is registered for that page if it's external. But is it worth back-linking to a site more than once? More importantly, does it have any pitfalls?


In a perfect world, there shouldn't be any problem with multiple backlinks. But as you know, spammers take advantage of every small opportunity they can get to get the most out of their own website through shady practices. And in this case, back-linking is the opportunity. People have started spamming, or excessive, low quality guest posting on high ranking websites. As a result, it seems unfair to those who don't spam, but don't have access to high quality websites either. So this makes the question much more important. How does Google consider site-wide backlinks?


Algorithmic detecting


There are two ways Google looks at this problem. Algorithmically, and manually. The algorithm works in much the same way for site-wide backlinks as it does for keywords. For keywords, the relation between the number of keywords and the importance of each new keyword is asymptotic. This means that the first keyword will count a lot, the second not as much, the third, much lesser, and so on. So for those who are using keyword stuffing and inserting a ton of keywords in their posts, all those keywords lose their importance, and hence are rendered useless.


Site-wide backlinks are treated in a similar fashion. When Google finds a backlink on a website, that backlink counts the most. Each subsequent backlink to the same domain loses its value, so much so that even if there are a hundred backlinks to the same domain, only one or so will be actually considered as an 'important' backlink.


Manual scenario


In the case of manual detection, Google has a different behavior. And since it now focuses on the user-experience part, it will look at all those backlinks like any normal user would. For example, if you have a blog A, and a blog B, and blog A has site-wide links to blog B, then visitors on blog A will find it irritating to continually come across multiple links to the same domain. So chances are, this might very well go against you.


If your links are natural, such as a gallery, or an archive of some sort, or maybe a blog roll or RSS where you have site-wide backlinks to another site, then you can be sure of safely passing Google's manual scrutiny. But if you are doing this for spamming purposes, then Google will discard most of your backlinks as spam. And this might even hurt your ranking.


So yes, site-wide back-linking is allowed, but only when you are linking naturally. Spam linkers will get their links discarded, and their rank degraded, which they deserve. Hope this makes the problem clear. Feel free to ask any questions you might have. And always, stay away from spam :)


300 x 600 Largest Ad Size Now available in AdSense! - Boost CTR


AdSense biggest 300x600 Ad size


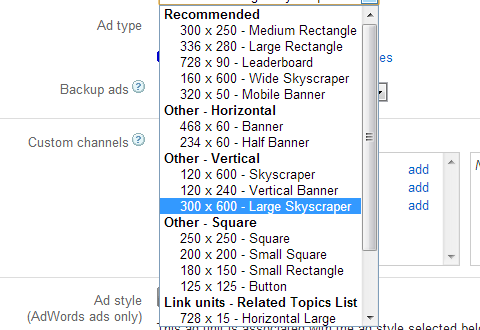
We have previously discussed about the different screen size available out there, and how to optimize your website for better experience on smartphones and Tablets. Since the evolution of the internet and the advancement in display technology, the number of pixels has been increasing, from the small VGA display to the current ultra-HD 2048 x 1600 display. So webmasters have been trying forever to make use of the high resolutions and to return better value to the users. This calls for a redesigning of most major aspects of a site. Fortunately, Google AdSense team is here to help in the process. On popular demand, it has just announced a new ad size of 300 x 600 for webmasters who use AdSense. And that is the largest skyscraper ever that will surely boost your overall AdSense earning by increasing the click through rate (CTR) of all your pages.


From Mohammad:


 At present the skyscraper
appears half filled and half vacant because advertisers just got
familiar with the new size and it will take 2-3 days for the Adsense
Adword market to update their campaign Ad display size and design new
banners that could fit the size of 300 x 600. The new big fancy banners
are on their way and will be ready to add a new boom to your overall
adSense earning. 


We highly recommend that  you add the skyscraper to middle half of your blogs in the sidebar area to make sure to increase page CPC to its maximum. You can keep the sidebar layout to 300px in width.


Responsive web design


One frequently used term with regards to varying screen sizes is Responsive Web design. Responsive content adjusts itself based on the screen size of the user's platform. For example, it could replace the ordinary 300 x 300 ad unit with a smaller, 150 x 150 one if the user's screen size is less than (or equal to) 600 pixels wide, or something similar - since a 300 x 300 ad would take up half of the screen that is just 600 pixels wide, which is not recommended.


In this way, elements on your webpage 'respond' to the user's platform, and adjust themselves accordingly. These new ad sizes of 300 x 600 could come in handy for webmasters who want to return a more appropriate ad size to the user agent.


About the new ad size


The 300 x 600 ad unit, also knows as a half-page unit, goes into the 'large' category, and offers a larger space to advertisers to advertise their content, and offer users rich engagement. And so far, it seems to be pretty popular, and is one of the fastest growing ad unit sizes by way of impressions. So for publishers, it could be a better trade-off between ad space and ad revenue. It also shows advertisers prefer the larger ad size, since it better promotes their product(s).


Since this ad unit is so recent, it currently only shows text ads. It'll take some time before a range of display inventory are added. So instead of worrying about the content that is being displayed, focus instead on where to place the ad, because it could play a part in your impressions. Read the following post to get a better idea.


Got any questions? Feel free to ask, and we'll try helping you all out. You can also give feedback about this ad unit size on the AdSense Plus Page. Happy monetizing :)


Does Google take Action on Spammy Guest Blogging Activities?


By far, the most popular method of acquiring links among webmasters is guest blogging. People write for other websites in exchange for links to their own websites. This not only gives people a backlink, it also gives them a small increase in traffic, hence making it a favorite among bloggers. But sometimes, it seems a bit too easy, as anyone can pick up content from the internet and submit a guest post about it. And since the practice is widely used, a lot of spammy activity is bound to surface at one time or another. So what does Google do about it? Will it penalize websites for links acquired through guest blogging?


In a previous post, we talked about when Google is okay with guest blogging. If you are a good writer and blogger, and create quality content, then there should be no problem. You can post as many blog posts as you like to other blogs. Indeed, from Google's point of view, it's all about quality. So a good blogger should have nothing to worry about.


That is as far as it goes for quality content. On the flip side, Google does take strict action against spammy activities. A lot of people, in order to acquire a lot of backlinks, submit one guest post to multiple blogs. This post could either be copied exactly, or spun from another source. In any case, it counts as copied content, and Google does get an indication of low quality from such content.


People who are submitting guest posts should know better than to try this approach, because duplicate content will get them an instant penalty. And if there's a link to their website from a low quality, or spammy page that Google knows has suspicious content, then it will do more harm than good, and the website owner will ultimately have to disavow such links.


But what about webmasters who accept guest posts? If  you accept such blog posts on your website that are low quality, then you will be penalized all the same for duplicate / similar content as well as low quality content that user's aren't happy with. In addition, if those guest posts link to another website, then chances are, it's a low quality website. And Google definitely will penalize your site for linking to a low quality website.


So don't just take guest blogging for granted. Whether you are a website owner accepting guest posts, or a blogger willing to write on other websites for backlinks, always consider the quality of content you're dealing with, and also the quality of the links that will be acquired, because often times, you might end up doing more harm than good to your website. Hope I was clear. If you have any questions, shoot them our way. And for the net time, always check the quality of guest posts before accepting or submitting them. Good luck :)

Google tips to Optimize a Website for Tablet and Smartphone users


Mobile devices such as Smartphones, and especially Tablets, are now fast becoming more and more popular, and although nowhere near replacing desktops, they do seem to be gaining up on browser statistics. Now, they have more than 10% of the share, with Tablets almost as much being used as smartphones. This makes optimizing websites for mobile devices all the more important. But tablet users now don't want you to return a mobile version of your website to them. They want the desktop experience. But although there are no official guidelines from Google on creating search engine and user friendly tablet-optimized site, there are a few tips you can apply to make your website work across multiple platforms.


Smartphones often have small screens (despite high resolutions). So it is okay to return a mobile version of your site to them. But what about tablets? Tablets have much larger screens, and their hardware has gotten quite advanced, so as to be at par with a computer. So for them, rich-desktop versions of websites is just as easily manageable as on the desktops themselves.


Creating websites for Tablets


One good way to optimize your website for different devices is to use responsive web design. Since there are so many tablets out there, and so many screen sizes, you can't just target your website at just one screen size. This is where responsive web design helps. We have discussed about it in more detail in another post. Responsive designs re-adjust themselves according to the user's screen size. So they will look great across multiple platforms. 


Another suggestion is to create multiple versions of your website, and then detect the user's platform beforehand. You can then redirect him to the appropriate version of your website. Smartphone users go to the mobile version, whereas tablet users go to the desktop one.


Detecting platform


In order to detect whether a user has a tablet or a smartphone, you need to look at the user-agent string returned by browsers. Mobile users have the keyword "Mobile" in them. Tablets don't. Here's an example of a string returned by Chrome on a smartphone.


Mozilla/5.0 (Linux; Android 4.1.1; Galaxy Nexus Build/JRO03O) AppleWebKit/535.19 (KHTML, like Gecko) Chrome/18.0.1025.166 Mobile Safari/535.19


Similarly, here's a string returned by Firefox on a smartphone.


Mozilla/5.0 (Android; Mobile; rv:16.0) Gecko/16.0 Firefox/16.0


As you can see, both have the keyword "Mobile" in them. In contrast, take a look at strings returned by an Android tablet (from Chrome)


Mozilla/5.0 (Linux; Android 4.1.1; Nexus 7 Build/JRO03S) AppleWebKit/535.19 (KHTML, like Gecko) Chrome/18.0.1025.166 Safari/535.19


And from Firefox;


Mozilla/5.0 (Android; Tablet; rv:16.0) Gecko/16.0 Firefox/16.0


As you can see, no "Mobile" keyword for Tablets. You can then use some programming to check for this keyword in the string, and then return the respective website accordingly.


This should hopefully give you an idea on how to deal with tablet users. Take advantage of this technique and harness the large potential your tablet audience contains. If in doubt, feel free to ask any questions. Good luck :)

Designing a Successful Facebook Offer for your Brand


Previously, we have talked about a new feature released by Facebook recently called Facebook Offers. This feature lets you promote your brand by offering people rewards for visiting your website or your brand's physical location. Simple creating an offer, however, is just a start. To make it work, you have to utilize the maximum potential of your audience by designing a successful offer, and keeping the basic Facebook marketing tips in mind. And since you're spending money on creating offers, you have to be extra careful, as a slight mistake might result in a loss for your business. Here, we'll discuss some tips for designing a successful Facebook Offer.


Offers can be a game-changer, but only if placed correctly. Every business has different type of customers. So it's always a good idea to experiment with what offers work best for your customers. If they do not understand your offer, or if they think it's a scam, they might unlike your page. So to keep things smooth, here are a few tips you should keep in mind.


Make it easy to understand


The most important part about an offer is its simplicity. If it's easy to understand, then a lot of people will do it, just for the sake of participating. But if the process is complicated, and makes users go through an unusual activity (such as signing up for something), then that will substantially reduce the number of people who participate. So make the process simple, and explain your Terms of Service in simple words as best as you can.


Discount offers


Make your discounts substantial. No one is gonna bother if you're giving 5 or 10% off on a t-shirt. Generally, discounts become notable and intriguing at 20%. You can also offer free items, as in 'Buy one, get one free'. But at the same time, make your discount believable. If I see an offer on my Facebook home saying 'Click here and get a free iPhone 5', I'll probably flag that story as scam. Make no mistake, business do hand out such lavish gifts. But you've gotta have some reputation before you make such a bold step. For example, everyone seemed to believe in it when Redmondpie decided to give away two free copies of the latest Windows 8.


Discount offers


Use a good image


Most of the time, products sell better if other people see a customer using it. So it'd be a good idea to use an image that shows your product in action, rather than just a logo image or an image with just your product on it.


Pay attention to your headline


Your headline is one of the most important things. Make it engaging, and yet keep it natural. Caption it as if you're talking in the real world, and as naturally as possible. Don't excessively capitalize, and don't use extravagant words. Keep it simple, and easily understandable, while at the same time making the purpose crystal clear.


Expiration date


Set up a reasonable expiration date. Don't make it end so soon that most people would miss it. And don't set it too far away, or it'll lose a sense of urgency. It depends from offer to offer, but around a week or two sounds realistic.


Promote!


Spread the word! Share your offer with the world. Re-share your offer as much as possible, and encourage others to do so too. Share on other social networks such as Pinterest as well, so maximum number of people might access it. Usually, word-of-mouth-marketing works like a charm in such situations.


Promote


Those were of the basic tips you should keep in mind while creating a Facebook offer. Such offers can mean a lot to your business, but only if done correctly. Hope you understand these points. See you soon in the next post. Peace :)