How To Add Social Media Icons to Blogger Header

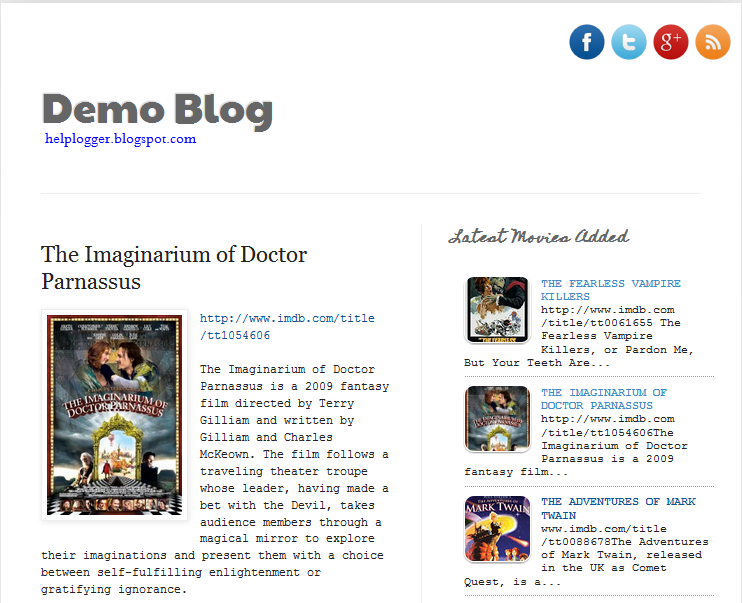
social media icons, facebook icons, social media icons for bloggerThis tutorial will help you to add social media icons in the top right corner of the page which could increases the likelihood that readers can follow through the various social networks. There are several ways to do this, like adding a new widget section to the blog header but now, we'll do it using an unordered list that uses icons of Facebook, Twitter, Google+ and blog feed, and as a bonus, the icons will rotate when you hover over them.

You can see a demo in this test blog.


Adding Social Media Icons to Blogger Header

Step 1. From your Blogger dashboard, go to Template and click on the Edit HTML button:
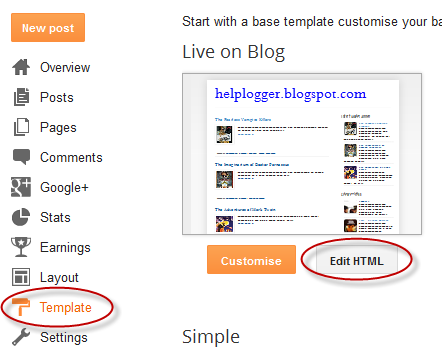
blogger blogspot, blogger template, blogger gadgets

Step 2. To expand the style, click on the small arrow on the left of <b:skin>...</b:skin> (screenshot 1), then click anywhere inside the code area to search (using CTRL + F) for the ]]></b:skin> tag (screenshot 2) and add this code just above it:

 /* Social icons for Blogger
----------------------------------------------- */

#social-icons {
margin-bottom:-30px;
height:50px;
width:100%;
clear:both;
z-index: 2;
position: relative;
}
.social-media-icons {
display:table
}
.social-media-icons ul {
text-align:right;
padding:5px 5px 0 0
list-style-image:none;
list-style-position:outside;
list-style-type:none;
}
.social-media-icons ul {
margin-bottom:0;
padding:0;
float:right;
}
.social-media-icons li.media_icon {
margin-left:6px;
padding-left:0 !important;
background:none !important;
display:inline;
float:left;
}
.social-media-icons li:hover {
-moz-transform: rotate(360deg);
-webkit-transform: rotate(360deg);
-o-transform: rotate(360deg);
transform: rotate(-360deg);
-moz-transition: all 0.5s ease-in-out;
-webkit-transition: all 0.5s ease-in-out;
-o-transition: all 0.5s ease-in-out;
-ms-transition: all 0.5s ease-in-out;
transition: all 0.5s ease-in-out;
}

Screenshot 1:


Screenshot 2:


Step 3. Now search for this line

<b:section class='header' id='header' maxwidgets='1' showaddelement='no'>

Step 4. And just above it, add this code:

<div class='social-media-icons' id='social-icons'>
<ul>

<li class='media_icon'><a href='http://facebook.com/username'><img border='0' src='https://blogger.googleusercontent.com/img/b/R29vZ2xl/AVvXsEi4XS-EaSUcvLiTuwBYVW2ApB7d05mtXUwBs3MhkDdGz7YEUTtt1Y-qn5KC-Meua8lLYeIhAr0PN0_dgXXXgFzjhRRfEtSVQmBhTqOrZ-49SwA317v1gUi0aBUcX8jGKx4aAzLf7l-pWJ0/s1600/Facebook.png'/></a></li>

<li class='media_icon'><a href='http://twitter.com/#!/username'><img border='0' src='https://blogger.googleusercontent.com/img/b/R29vZ2xl/AVvXsEg5rSwUYBKqel31uAUqCBXJy_aaipSMD2rqTrbi8Iw5Mn-4fKs_1PenF9XtD4Nnos0yEaahdP29v0Lj7KNrhj1nhB6tnRRy0qlBwI04i3JAAYdBu3K4ixJmOObg_SGo67AZb-3prd7Bt6I/s1600/Twitter.png'/></a></li>

<li class='media_icon'><a href='https://plus.google.com/XXXXXXXXXXXXXXXXXX/about'><img border='0' src='https://blogger.googleusercontent.com/img/b/R29vZ2xl/AVvXsEhnHEEux0tx6DrTTfmuRmrCxMDy_rN2VMLUo6wZIziYFQDP0m-0AiHZ0XZSBLG8A6lCmxLrcnFMj_n_v0RMPq7GcKN7lH6sGYRuUue27RiRHH1K-7t04La1g7Wb369sFdHJw-iHkxMiaAk/s1600/googleplus.png'/></a></li>

<li class='media_icon'><a href='http://name-of-your-blog.com/feeds/posts/default'><img border='0' src='https://blogger.googleusercontent.com/img/b/R29vZ2xl/AVvXsEjL1r-iXf6mZ3pSWiydBRc4ilpHjVrMOGFscKS5JbUH1QQ9jfATs0wDYl0uYaoPBu7s6-RVAh9df4zs9hLcSeCzB3WhAtgkSvX9ZXYavyvDp5GQaEtxVDCuAKERkQKeuJ-gAOnidUWT794/s1600/RSS.png'/></a></li>

</ul></div>

Customization

- Change what's in red with your usernames and id: the first is your Facebook username, the second is that of Twitter, in the third you should change the X by the ID of your Google+ profile and in the fourth you will put the name of your blog.
- To change the icons, just replace the urls in blue with the ones of your images.
- You can add more icons if you want, you just have to add before </ul></div> a line like this for each extra icon you want:

<li class='media_icon'><a href='Link URL'><img border='0' src='Image URL'/></a></li>

Step 5. Finally, Save the Template to apply the changes.
The effect is done with CSS3, so this effect will not work in older browsers.

Create a Custom Contact Form For Blogger - Part 2

Custom Blogger Contact FormIn the first part of our series you learnt how to add a contact Form to your BlogSpot blog and control its display settings. Today you will learn how to change its stylesheet to reflect your custom styles with a more appealing design. You will learn today how to customize the Form input fields, add icons to it, add a "Clear Button"  and play several tricks with your custom form. The form is built using XHTML Get or Post Methods unlike PHP Forms which are used widely today. If you have not referenced the first part of our tutorial then kindly read it first:

3. Customizing The Contact Form - The Fun Part!

Now you will need to create a Static Page where we will add the HTML code for our new contact form.

  1. Go To blogger > Pages
  2. Choose a Blank Page
  3. Give it any title you like. I recommend "Contact Us"
  4. Switch to its HTML mode and paste the following HTML code inside it:

<div class='form'>
<!-- Custom Contact Form By MBT Starts -->

<form name='contact-form'>

<!-- Name Field -->

<input class='contact-form-name' id='ContactForm1_contact-form-name' name='name' value="Name" size='30' type='text' onblur='if (this.value == &quot;&quot;) {this.value = &quot;Name&quot;;}' onfocus='if (this.value == &quot;Name&quot;) {this.value = &quot;&quot;;}' />
<p></p>

<!-- Email ID Field -->

<input class='contact-form-email' id='ContactForm1_contact-form-email' name='email' value="Email ID"  size='30' type='text' onblur='if (this.value == &quot;&quot;) {this.value = &quot;Email ID&quot;;}' onfocus='if (this.value == &quot;Email ID&quot;) {this.value = &quot;&quot;;}'/>
<p></p>

<!-- Message Field -->

<textarea class='contact-form-email-message'  id='ContactForm1_contact-form-email-message' name='email-message'  value='Leave Your Message..'  onblur='if (this.value == &quot;&quot;) {this.value = &quot;Leave Your Message..&quot;;}' onfocus='if (this.value == &quot;Leave Your Message..&quot;) {this.value = &quot;&quot;;}'></textarea>
<p></p>

<!-- Clear Button -->
<input class='contact-form-button contact-form-button-submit MBT-button-color' type='reset' value='Clear'/> 

<!-- Send Button --> 
<input class='contact-form-button contact-form-button-submit MBT-button-color' id='ContactForm1_contact-form-submit' type='button' value='Send'/>
<p></p>

<!-- Validation -->
<div style='text-align: center; max-width: 222px; width: 100%'>
<p class='contact-form-error-message' id='ContactForm1_contact-form-error-message'></p>
<p class='contact-form-success-message' id='ContactForm1_contact-form-success-message'></p>
</div>
</form>

<!-- Custom Contact Form By MBT Ends -->
</div>


    5.  Don't switch to Compose Mode of your Blogger Editor else the code will get messed up due to your Editor settings. Save and Publish your Page.

   Now if you visit your contact page you will see the default contact form with blue button. Its time to customize its default styles.

Customizing The Form:
  1. Go To Blogger > Template
  2. Backup your Template
  3. Click "Edit HTML"
  4. Update: Search for </head>  and just above it paste the following CSS code:


<style>

/*---- Compatible contact Form by MBT -----*/

.contact-form-name, .contact-form-email, .contact-form-email-message {
max-width: 220px;
width: 100%;
font-weight:bold;
}

     
.contact-form-name {
background: #FFF url(https://blogger.googleusercontent.com/img/b/R29vZ2xl/AVvXsEj_Z3rAMIzvKg3rLF1-lwQvFoQ1_oU3Fgd4c0CqwMdQCV5NBAZAi9yOfoLgceKzjjCf_OISCf37kZaLHYjuaKY_of4TlCm2UCIAZvF5Pgeweti4bBV4YfypA_6G8oDWnN7_NrD1xk6_GwA/s320/name.png) no-repeat 7px 8px;
background-color: #FFF;
border: 1px solid #ddd;
box-sizing: border-box;
color: #A0A0A0;
display: inline-block;
font-family: Arial,sans-serif;
font-size: 12px;
font-weight:bold;
height: 24px;
margin: 0;
margin-top: 5px;
padding: 5px 15px 5px 28px;
vertical-align: top;

}
     

.contact-form-email {
background: #FFF url(https://blogger.googleusercontent.com/img/b/R29vZ2xl/AVvXsEjxu2GMHFJ6FxpRtrtnvANxq9Llix0RhtfCRhvX85HF-0x3xSbarRYZ_Fjk2FeBhbFoZEy6NW0EvFtILI3lPaW8V5u0D6cjGmRl_3e1ZtPaTfoAg_V9BrkMGPrtsZ5tElAsdvFaL7t2FHY/s320/email.png) no-repeat 7px 10px;
background-color: #FFF;
border: 1px solid #ddd;
box-sizing: border-box;
color: #A0A0A0;
display: inline-block;
font-family: Arial,sans-serif;
font-size: 12px;
font-weight:bold;
height: 24px;
margin: 0;
margin-top: 5px;
padding: 5px 15px 5px 28px;
vertical-align: top;

}


.contact-form-email:hover, .contact-form-name:hover{
border: 1px solid #bebebe;
box-shadow: 0 1px 2px rgba(5, 95, 255, .1);


padding: 5px 15px 5px 28px;

}

.contact-form-email-message:hover {
border: 1px solid #bebebe;
box-shadow: 0 1px 2px rgba(5, 95, 255, .1);
padding: 10px;
}

.contact-form-email-message {
background: #FFF;
background-color: #FFF;
border: 1px solid #ddd;
box-sizing: border-box;
color: #A0A0A0;
display: inline-block;
font-family: arial;
font-size: 12px;
margin: 0;
margin-top: 5px;
padding: 10px;
vertical-align: top;
max-width: 350px!important;
height: 150px;
border-radius:4px;
}


.contact-form-button {
cursor:pointer;
height: 32px;
line-height: 28px;
font-weight:bold;
border:none;
}


.contact-form-button {
display: inline-block;
zoom: 1; /* zoom and *display = ie7 hack for display:inline-block */
*display: inline;
vertical-align: baseline;
margin: 0 2px;
outline: none;
cursor: pointer;
text-align: center;
text-decoration: none;
font: 14px/100% Arial, Helvetica, sans-serif;
padding: .5em 2em .55em;
text-shadow: 0 1px 1px rgba(0,0,0,.3);
-webkit-border-radius: .5em;
-moz-border-radius: .5em;
border-radius: .5em;
-webkit-box-shadow: 0 1px 2px rgba(0,0,0,.2);
-moz-box-shadow: 0 1px 2px rgba(0,0,0,.2);
box-shadow: 0 1px 2px rgba(0,0,0,.2);
}
.contact-form-button:hover {
text-decoration: none;
}
.contact-form-button:active {
position: relative;
top: 1px;
}


.MBT-button-color {
color: #fef4e9;
border: solid 1px #da7c0c;
background: #f78d1d;
background: -webkit-gradient(linear, left top, left bottom, from(#faa51a), to(#f47a20));
background: -moz-linear-gradient(top, #faa51a, #f47a20);
filter: progid:DXImageTransform.Microsoft.gradient(startColorstr='#faa51a', endColorstr='#f47a20');
}
.MBT-button-color:hover {
background: #f47c20;
background: -webkit-gradient(linear, left top, left bottom, from(#f88e11), to(#f06015));
background: -moz-linear-gradient(top, #f88e11, #f06015);
filter: progid:DXImageTransform.Microsoft.gradient(startColorstr='#f88e11', endColorstr='#f06015');
border-color: #F47C20!important;
}
.MBT-button-color:active {
color: #fcd3a5;
background: -webkit-gradient(linear, left top, left bottom, from(#f47a20), to(#faa51a));
background: -moz-linear-gradient(top, #f47a20, #faa51a);
filter: progid:DXImageTransform.Microsoft.gradient(startColorstr='#f47a20', endColorstr='#faa51a');
}

</style>


      <!--[if IE 9]>
    <style>
   
.contact-form-name {
background: #FFF url(https://blogger.googleusercontent.com/img/b/R29vZ2xl/AVvXsEj_Z3rAMIzvKg3rLF1-lwQvFoQ1_oU3Fgd4c0CqwMdQCV5NBAZAi9yOfoLgceKzjjCf_OISCf37kZaLHYjuaKY_of4TlCm2UCIAZvF5Pgeweti4bBV4YfypA_6G8oDWnN7_NrD1xk6_GwA/s320/name.png) no-repeat 7px 0px;
}

.contact-form-email {
background: #FFF url(https://blogger.googleusercontent.com/img/b/R29vZ2xl/AVvXsEjxu2GMHFJ6FxpRtrtnvANxq9Llix0RhtfCRhvX85HF-0x3xSbarRYZ_Fjk2FeBhbFoZEy6NW0EvFtILI3lPaW8V5u0D6cjGmRl_3e1ZtPaTfoAg_V9BrkMGPrtsZ5tElAsdvFaL7t2FHY/s320/email.png) no-repeat 7px 6px;
}

    </style>
    <![endif]-->
   
    <style>
@media screen and (-webkit-min-device-pixel-ratio:0) {


.contact-form-name {
background: #FFF url(https://blogger.googleusercontent.com/img/b/R29vZ2xl/AVvXsEj_Z3rAMIzvKg3rLF1-lwQvFoQ1_oU3Fgd4c0CqwMdQCV5NBAZAi9yOfoLgceKzjjCf_OISCf37kZaLHYjuaKY_of4TlCm2UCIAZvF5Pgeweti4bBV4YfypA_6G8oDWnN7_NrD1xk6_GwA/s320/name.png) no-repeat 7px 6px;
padding: 15px 15px 15px 28px;


}

.contact-form-email {
background: #FFF url(https://blogger.googleusercontent.com/img/b/R29vZ2xl/AVvXsEjxu2GMHFJ6FxpRtrtnvANxq9Llix0RhtfCRhvX85HF-0x3xSbarRYZ_Fjk2FeBhbFoZEy6NW0EvFtILI3lPaW8V5u0D6cjGmRl_3e1ZtPaTfoAg_V9BrkMGPrtsZ5tElAsdvFaL7t2FHY/s320/email.png) no-repeat 7px 8px;
padding: 15px 15px 15px 28px;

}


.contact-form-email:hover, .contact-form-name:hover{
padding: 15px 15px 15px 28px;
}


.contact-form-button {
height: 28px;

}

}

</style>

The above Stylesheet will work just fine with all browsers including Internet Explorer. The code has been made compatible to work fine with all major browsers like IE, Mozilla and Webkit browsers.

  • To change button colors edit the class .MBT-button-color
  • To change the button color on mouse hover edit the class .MBT-button-color:hover  and for active mode edit .MBT-button-color:active


     5.  Save your template and you are all done!

4. Add the Form anywhere you like!

Now if you wish to add the form to your sidebar or post  then simply follow these steps:

  • To add the form to sidebar. Copy the HTML code in Step#4   and paste it inside HTML/JavaScript Widget
  • To add the form to Post editor, switch to HTML mode and paste the code in Step#4  inside it

Your Views:

I just hope this tutorial would be helpful for all of you. The steps are extremely simple and the codes are carefully written. You can now create a contact form to let your clients request you for a price quote or add it to let your readers contact you in person. Wish you all the best with your blogging endeavors. I will make sure you enjoy it to your fullest. Peace and blessings buddies :)

Fading Box With Newer/Older Posts Links and Titles for Blogger

The navigation links are those that appear at the bottom of the page that says "Older Posts", "Newer Posts" and "Home" and help us to move through the blog posts. This tutorial will show you how to change the word "Older Posts" and "Newer Posts" for post titles and make these to appear in a box "fading" when you scroll down the page.
blogger gadgets, navigation for blogger

You can see it in action on this demo blog - when you scroll down, the navigation links will appear showing the post titles for the older/newer entries.

This way to display the navigation links will be seen only in individual entries, while those on the homepage and other parts of the blog will still be displayed as usual.

How to Add Navigation Box with Newer & Older Posts on Blogger

Step 1. From your Blogger Dashboard, go to Template > Edit HTML, click anywhere inside the code area and search - using CTRL + F - for this line:

<b:include name='nextprev'/>

Screenshot:

Step 2. REPLACE the code above with this one:

<b:if cond='data:blog.pageType != &quot;item&quot;'>
<b:include name='nextprev'/>
</b:if>
<b:if cond='data:blog.pageType == &quot;item&quot;'>
<div id='blog-pager-box'>
<h4>Other posts published:</h4>
<b:include name='nextprev'/>
</div>
</b:if>

Note: you can change the "Other posts published" title with your own

Step 3. Now add just above </head> the following code:

<b:if cond='data:blog.pageType == &quot;item&quot;'>
<script src='http://ajax.googleapis.com/ajax/libs/jquery/1.8.2/jquery.min.js' type='text/javascript'/>
<script>
// <![CDATA[
$(function() {
$('#blog-pager-box').toggle()
.css({
width: '520px',
height: '150px',
position: 'fixed',
padding: '1em',
bottom: 0,
right: 0,
background: 'url(https://blogger.googleusercontent.com/img/b/R29vZ2xl/AVvXsEjVwKM_uWd_hVKPyw8TENkXvq5WVEM8kZhUmAWVajmfdqE1YWaTc7TnYlpo3xZHDEZVAvOeYFDoUsCd4R0M0awbiIw-2H_ska344pZn74zXijz1ocFFj-Rk5vk1Uhrzrt5eh1dG6POS9ViQ/s1600/paper.jpg)'
});

$(window).scroll(function() {
if($(this).scrollTop() > 100) {
$('#blog-pager-box').fadeIn();
} else {
$('#blog-pager-box').fadeOut();
}
});
});
$(document).ready(function(){
var newerLink = $("a.blog-pager-newer-link").attr("href");
$("a.blog-pager-newer-link").load(newerLink+" .post-title:first", function() {
var newerLinkTitle = $("a.blog-pager-newer-link:first").text();
$(".blog-pager-newer-link").html("<div>Newer Posts:</div>" + newerLinkTitle);
});
var olderLink = $("a.blog-pager-older-link").attr("href");
$("a.blog-pager-older-link").load(olderLink+" .post-title:first", function() {
var olderLinkTitle = $("a.blog-pager-older-link").text();
$(".blog-pager-older-link").html("<div>Older Posts:</div>" + olderLinkTitle);
});
});
// ]]>
</script>

<style type='text/css'>
<!--
#blog-pager-box {
box-shadow: 0 0 3px #AEAEAE;
z-index:9;
}

#blog-pager-box h4 {
margin:0;
padding:0;
color:#4898B9; /* Widget's title color */
font-size:16px; /* Title font size */
}

#blog-pager-newer-link {float:left;clear:both;line-height:30px;}
#blog-pager-older-link {float:left;clear:both;line-height:30px;}
.home-link {display:none;}
.blog-pager-older-link, .blog-pager-newer-link {
background-color: transparent !important;
background-image: none !important;
border:0 !important;
color: #4B4B4B !important; /* Color of the links */
float: left;
width: 500px;
clear:both;
}

a.blog-pager-older-link:hover, a.blog-pager-newer-link:hover {
text-decoration:none !important;
}
 
a.blog-pager-newer-link:before {
content: url(https://blogger.googleusercontent.com/img/b/R29vZ2xl/AVvXsEj-z5yqBPgfedMtz53SzE3oJ_FiJtOyil0121tivchUzd_tzNy_9ok1_9udpK9A-PBkahfha8YHYtX382TMqpSCbVzfZe2FohZUSC0p-hHhmoBqvSs1H-CMptDS5WMFX1CcxhdKQUnFFiQ/s1600/back.png);
float:left;
}
a.blog-pager-older-link:before {
content: url(https://blogger.googleusercontent.com/img/b/R29vZ2xl/AVvXsEg1723_xuZQAjkPxAAVbHNxhQI5MbxO_uhGdKBgj4elWisVrv3LivceuMI27PXVyrojskSAc33iGcjIXjAdPasDfBuF2XoaMw2Z7K7oC79_y6PPRXCrkNzNrFWOgyXWfp2gf8y63K910T8/s1600/forward.png);
float:left;
}
#blog-pager {
width:500px;
background-color: transparent !important;
background-image: none !important;
border:0 !important;
text-align:left;
}
 
#blog-pager div {
color:#0577AB; /* Color for the "Newer Posts" and "Older Posts" text */
font-weight:bold;
margin-bottom: -5px;
}
a#blog-pager div:hover {
text-decoration:none !important;
color:#4898B9; /* Color for the "Newer Posts" and "Older Posts" text */
}
-->
</style>
</b:if>

Note that this gadget uses jQuery, so try to have only one version.


Customization:


- There are three URLs in blue, the first is the paper background image for the box, the other two are the icons that correspond to the arrows. You can replace these with your own.
- In green you can see where to change the text colors.
- The red number is the distance in pixels that activates the gadget, this means that the box will appear when you scroll down the 100px. You can use a higher value if your posts are usually long and therefore the "height" of the scroll is greater.
Step 4. Now, Save the Template and that's it!

You can also change the "Older Posts" and "Newer Posts" links with posts titles or images.

New Blogger Widget: Contact form - Change Style & Install in a Static Page

Just a few days ago, Blogger introduced a new contact form widget that you can add to your blog easily. At the moment, it is very basic because, at least for now, does not allow sending files or anything other than plain text.

The contact form for Blogger has the following features:
  • Field for the user name
  • Field for email
  • Field for the message (textarea)
  • Submit Button
contact form, blogger gadgets, static page
The design is simple and the text colors inherit the section where you add it. At the moment, this widget has no configuration options and is not available for dynamic views.

How to Add Contact Form to Blogger

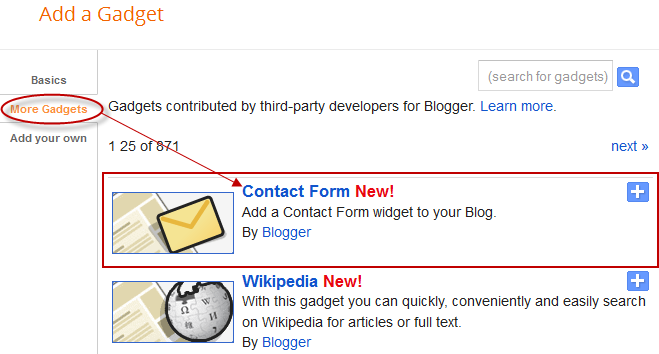
To add it to your blog, just select the Layout tab, then click on "Add a gadget" in the section you want to show - for example, in the sidebar. Then, select the More gadgets tab and add the Contact Form gadget.


blogger gadgets, blogger widgets, contact form

Styling Contact Form

Since the background is transparent, the form will blend well aesthetically speaking, but nevertheless it is easy to modify using Style Sheets (CSS) to the appropriate selectors. Here's an example:

/* Contact Form Container */
.contact-form-widget {
width: 500px;
max-width: 100%;
margin: 0 auto;
padding: 10px;
background: #F8F8F8;
color: #000;
border: 1px solid #C1C1C1;
box-shadow: 0 1px 4px rgba(0, 0, 0, 0.25);
border-radius: 10px;
}

/* Fields and submit button */
.contact-form-name, .contact-form-email, .contact-form-email-message {
width: 100%;
max-width: 100%;
margin-bottom: 10px;
}

/* Submit button style */
.contact-form-button-submit {
border-color: #C1C1C1;
background: #E3E3E3;
color: #585858;
width: 20%;
max-width: 20%;
margin-bottom: 10px;
}

/* Submit button on mouseover */
.contact-form-button-submit:hover{
background: #4C8EF9;
color: #ffffff;
border: 1px solid #FAFAFA;
}

This is how it will look like after applying the style:
contact form, blogger gadgets, contact form for blogger

To add this style, go to Template > Edit HTML, click on the sideways arrow next to <b:skin>...</b:skin> and paste the code just above ]]></b:skin> (press CTRL + F to find it):


How To Add Contact Form In A Static Page


First step is to add the Contact Form gadget (Layout) and second, to edit the template (Template > Edit HTML) to remove most of the gadget. You have to search for the id "ContactForm", expand the widget by clicking on the black arrow on the left (same with the includable) and then delete the part that I have colored in red (see below):

Part to be removed:

  <b:widget id='ContactForm1' locked='false' title='Contact Form' type='ContactForm'>
    <b:includable id='main'>
  <b:if cond='data:title != &quot;&quot;'>
    <h2 class='title'><data:title/></h2>
  </b:if>
  <div class='contact-form-widget'>
    <div class='form'>
      <form name='contact-form'>
        <p/>
        <data:contactFormNameMsg/>
        <br/>
        <input class='contact-form-name' expr:id='data:widget.instanceId + &quot;_contact-form-name&quot;' name='name' size='30' type='text' value=''/>
        <p/>
        <data:contactFormEmailMsg/> <span style='font-weight: bolder;'>*</span>
        <br/>
        <input class='contact-form-email' expr:id='data:widget.instanceId + &quot;_contact-form-email&quot;' name='email' size='30' type='text' value=''/>
        <p/>
        <data:contactFormMessageMsg/> <span style='font-weight: bolder;'>*</span>
        <br/>
        <textarea class='contact-form-email-message' cols='25' expr:id='data:widget.instanceId + &quot;_contact-form-email-message&quot;' name='email-message' rows='5'/>
        <p/>
        <input class='contact-form-button contact-form-button-submit' expr:id='data:widget.instanceId + &quot;_contact-form-submit&quot;' expr:value='data:contactFormSendMsg' type='button'/>
        <p/>
        <div style='text-align: center; max-width: 222px; width: 100%'>
          <p class='contact-form-error-message' expr:id='data:widget.instanceId + &quot;_contact-form-error-message&quot;'/>
          <p class='contact-form-success-message' expr:id='data:widget.instanceId + &quot;_contact-form-success-message&quot;'/>
        </div>
      </form>
    </div>
  </div>
  <b:include name='quickedit'/>

</b:includable>
  </b:widget>

After you have saved the template, go to Pages and paste the following code into a new blank page with the title you want:

 <div class='widget ContactForm' id='ContactForm1'>
  <div class='contact-form-widget'>
    <div class='form'>
      <form name='contact-form'>
        <p>Name</p>
        <input class='contact-form-name' id='ContactForm1_contact-form-name' name='name' size='30' type='text' value=''/>
        <p>E-mail *</p>
        <input class='contact-form-email' id='ContactForm1_contact-form-email' name='email' size='30' type='text' value=''/>
        <p>Message *</p>
        <textarea class='contact-form-email-message' cols='25' id='ContactForm1_contact-form-email-message' name='email-message' rows='5'></textarea>
        <input class='contact-form-button contact-form-button-submit' id='ContactForm1_contact-form-submit' type='button' value='Submit'/>
        <p class='contact-form-error-message' id='ContactForm1_contact-form-error-message'></p>
        <p class='contact-form-success-message' id='ContactForm1_contact-form-success-message'></p>
      </form>
    </div>
  </div>
</div>

Messages will be sent to the same email that you have registered in Blogger.

Here is the demo page where you can test it (this is an account for demo purposes only, so don't expect any reply).

That's it! If you have any questions or comments, leave them below.

Customize Blogger Contact Form! Part 1

Blogger Contact Forms

So most of you are aware of the recent gadget added to blogger widget directory and that is a small contact form with two input fields for name and Email and a text area for writing the message. We use a complex PHP Form for our contact page but blogger has made it extremely easy for you guys. Ever wondered how to customize this simple form into a professional looking contact form that may give a complete new boost to your overall blog look? Fortunately all MBT readers will be the first to learn this trick today. Plus you will also learn how to add this form anywhere on your blog! I had sometime today so I designed a custom version of this contact form by adding several new CSS3 effects and also added an additional button called "Clear" that will reset and erase the message for your visitors if incase they wish to rewrite a new message. Kindly view the Demo below:


DEMO

Note: We have added the contact Form to a static page and also the sidebar. Just to show that you can add this Custom Form anywhere you want. On static page the Form on sidebar wont display but it will display on all other pages.

Tutorial Guide:

We have divided this tutorial in 4 parts:

  1. Adding the Normal Contact form widget to sidebar
  2. Controlling Widget Display
  3. Customize the Contact Form
  4. Finally Add the Customized contact Form to Sidebar, Post or Static Page


1. Adding contact Form to Sidebar:

By default blogger will allow you to add this widget to your sidebar only but you can easily embed its code on any post or static page easily by copying the HTML code by viewing the browser source file (Ctrl + U). I have taken all the headache so you will only need to follow these easy steps below:

  1. Go to blogger > Layout
  2. Click Add a gadget
  3. Next click on "More Gadgets"  and then choose the first widget as shown below:

adding contact form

     4.  Now you have successfully added or in other words registered your contact form widget with blogger.

     5.  Don't Remove this gadget and leave it intact. If you tried to ever remove it then the Customized contact form that we will code wont work. We will surely Hide this widget from sidebar.


2. Controlling Widget Display

The contact form that you created has an ID #ContactForm1   , using this ID you can easily locate the HTML code of the normal form in your blog source file. Well we have already done all the work so you simply need to follow these easy steps:

Hide The Normal Form on sidebar
  1. Go To Blogger > Template
  2. Backup your template
  3. Click Edit HTML
  4. Search for </head>
  5. Just above it paste the following conditional statement that will hide the widget on sidebar:

<b:if cond='data:blog.pageType == "static_page"'>
  <style>
#ContactForm1{ display:none!important;}
  </style>
</b:if>

The above code will hide the Normal Contact Form on a Static Page only. If incase you wish to add the Custom contact Form to a Post then you may use the following code instead:

<b:if cond='data:blog.url == "URL OF Selected Post"'>
  <style>
#ContactForm1{ display:none!important;}
  </style>
</b:if>

Replace URL OF Selected Post  with the URL of the Post where you will add the contact form.

In our DEMO we have added the contact form to a static page therefore we have used the first code in step#5.

3. Customizing The Contact Form - The Fun Part!

To Keep the tutorial easy, this part will be discussed in Part2 of the tutorial.

Share your views below and stay tuned for the amazing tricks coming tomorrow! Peace and blessings buddies :)

Automatic Numbering for Blogger Threaded Comments

Numbering blogger threaded commentsToday's tutorial will take blogger comment system one step more closer to wordpress commenting engine. I was amazed today when I discovered that W3 has already introduced an excellent way of automatically numbering lists in a HTML structure using pure CSS3 properties like counter-reset and counter-increment. Both these functionality provide a non-JavaScript approach to show comment counts for threaded and nested comments in blogger. MBT has contributed a lot in changing Blogger's Comment-body Styles for the past three years and this time we are introducing an interesting trick to add more spice to your blog comments. We are using a non-JavaScript approach unlike Wordpress's popular plugin called Greg's threaded Numbering


DEMO


How it works?

Like any ordered list, BlogSpot blogs uses the <ol> tag  for displaying comments in hierarchal order. Each comment holds a separate <li> tag. The counter-reset Property sets the value to zero as soon as the loop ends and counter-increment property increases the value by one unit depending on the number of li tags used inside the parent loop. Well enough of theory, now its time to implement this effect on your blogs!

Note: This tutorial can also be applied to Wordpress blogs. you just need to change the name of CSS classes to that used by twenty12 theme used by WP engine.

Lets Count Comments in Blogger!

For this tutorial to work you must be using threaded comments in your blogger templates. If you have not yet switched to that then please do so by reading the following tutorial:

  1. Go to blogger > template
  2. Backup your template
  3. Click Edit HTML
  4. Search for </b:skin>.  Click the black arrow to expand the code.

compressed blogger stylesheet

    5.  Paste the following Styles just above </b:skin>

/*----- Comment Counter by MBT -----*/

.comment-thread ol {
counter-reset: mbt-comments;
}
.comment-thread li:before {
content:counter(mbt-comments);
counter-increment: mbt-comments;
font-size: 30px;
float:left;
position:relative;
top:0px;
left:-10px;
margin-right:0px;
height:100px;
margin-right:0px;
font-weight:bold;
font-family:arial, georgia;
color: #666;
}
.comment-thread ol ol {
counter-reset: mbt-comments-sub;
}

.comment-thread li li:before {
content: counter(mbt-comments) "." counter(mbt-comments-sub,lower-latin);
counter-increment:mbt-comments-sub;
font-size: 12px;
color: #666;
position:relative;
top:10px;
}


.comments .comments-content .comment-header, .comments .comments-content .comment-content {  margin:0px 0px 8px 28px!important;}

Customization:

  • You can adjust the font size and color of comment counts for Main section using the yellow highlighted regions
  • To edit the font size and color of sub sections (nested replies) change orange highlighted regions
  • lower-latin: Nested replies for first comment are counted in this order 1.a,  1.b,  1.c ... If you wish to display them in roman like 1.I, 1.II, 1.III, 1.IV... then replace lower-latin with Upper-roman,  if you wish to display them as integers then change it to decimal. Following are some other styles you can use for nested replies: lower-greek, circle, square, disc, lower-roman

       6.   Save your template and you are all done!

Visit your blog to see it working just fine! :)

Must Read:

Following are some posts that you would surely like to read:

Need Help?

I just hope this new addition to blogger tricks brings a delightful change to all of you who have been looking for a way to count comments in threaded list. I would really appreciate hearing form you all. Take good care of yourselves buddies. Peace and blessings be upon you all! :)

Download counter : A Plugin for blogs!

Download counter for blogsThis is the first plugin of its kind created for websites which share downloadable resources. The plugin amazingly works with all major blogging platforms like wordpress and blogger blogs. It can even be used in static Sites or any CMS you may be using. This tool will count and display download stats whenever a visitor downloads a resource form your site. The data is stored at your firebase free account. Luckily we are amongst very few who have started developing tools using the newly introduced Firebase system that allows developers to create dynamic and data-driven tools without worrying about backend development. You do not need to worry about server code or managing databases, firebase does it all for free. All you need is to code some delicious scripts that does half the work.  This plugin is a custom alternative to Dstats download tracking service. Lets add this amazing tool to your blogger blogs!

Demo

The following link will take you to our first plugin created with Firebase.

Note: If you have already followed our first tutorial on firebase then ignore steps marked as (*)

1. Create your Firebase Account *

To store your data for downloads, you will first sign up for a free account at Firebase.

Fill up the easy steps sensibly and then once your account has been activated, you must create your first Firebase database as guided below in step#2.

2. Create a Firebase Database

Previously you could only create 2 firebases but now you can create a total 5! So create one for your download stats data

  1. Towards the bottom right side of your account, you will find the following submit box.

create firebase

  2.  Give your firebase a short name. In my case I named it mbtblogstats. This name will be used as your unique Identification.

  3.   Hit create and note down your firebase URL because we would need it later in this tutorial.

Installing Download Counter Plugin:

The steps below are for blogspot blogs. Wordpress users may simply note down the method and apply accordingly on their WP powered blogs.

  1. Go To Blogger > Template
  2. Backup your template
  3. Click Edit HTML
  4. *Search for </b:skin>.  Click the black arrow to expand the code.

compressed blogger stylesheet

   5.  Paste the following Styles just above </b:skin>

/*----- download counter by MBT-----*/

.mbtloading {
background: url('https://blogger.googleusercontent.com/img/b/R29vZ2xl/AVvXsEiwY7MDl-HIBOjsq4aTkmJxYMiSlpfayYo078yDtHKEIg-TAg1R9NXh7ggSH8Bs070c2exGNbDmOa5TTsXZTmjS1t_LNzF-JoM43GRal4ahVVmyU1Ci6bUoLuWaUiiKe5PpzJQicOIa9AJy/s320/mbtloading.gif') no-repeat left center;
width: 16px;
height: 16px;
}

.blog-stats {
color: #289728;
font: bold italic 18px georgia, arial;
float: right;
}


You can easily change the color and size of the Numeric Text count by editing   #289728

Tip: Use our color generator Tool to pick a color of your choice

6. Now search </body> and just above it paste the following script:

<!-- Download Counter by MBT starts-->


<script type='text/javascript'>
    window.setTimeout(function() {
        document.body.className = document.body.className.replace(&#39;loading&#39;, &#39;&#39;);
      }, 10);
  </script>
<script src='https://cdn.firebase.com/v0/firebase.js' type='text/javascript'/>
<script>
$.each($(&#39;[data-download-count=true]&#39;), function (i, e) {
    var elem = $(e).parent().find(&#39;#download-count&#39;).addClass(&#39;mbtloading&#39;);
    var id = $(e).closest(&#39;.post-body&#39;).siblings(&#39;a[name]&#39;).attr(&#39;name&#39;) + &quot;-&quot; + $(e).attr(&#39;id&#39;);
                          var downloadStats = new Firebase(&quot;https://mbtblogstats.firebaseio.com/downloads/id/&quot; + id);
    var data = {}, isnew = false;
    downloadStats.once(&#39;value&#39;, function (snapshot) {
        data = snapshot.val();
        if (data == null) {
            data = {};
            data.value = 0;
            data.url = window.location.href;
            data.id = id;
            isnew = true;
        }
        elem.removeClass(&#39;mbtloading&#39;).text(data.value);
    });
    $(e).click(function (e) {
        data.value++;
        if (isnew) downloadStats.set(data);
        else downloadStats.child(&#39;value&#39;).set(data.value);
    });
});
</script>

<!-- Download Counter by MBT Ends-->


Replace mbtblogstats with your Firebase name that you created in step#2.

     7.  * Now search for <head>   and paste the following JQuery library just below <head>

<script src='http://ajax.googleapis.com/ajax/libs/jquery/1/jquery.min.js' type='text/javascript'></script>


You may not add the jquery code if you have already linked to Jquery library in your blog.

      8.   Save your blog and you are all done with coding!

Displaying Download stats in Posts

Now whenever you wish to display download stats for a particular file. Simple link to your file using the code below:

<div style="width:120px;">
<a data-download-count="true" href="#">Download Now!</a>
<div class="blog-stats" id="download-count">
</div>
</div>

  • Replace the # sign with your File link.
  • You can write anything instead of Download Now! If your link is bigger in length then increase the width of the counter so that it shows the count in alignment.

Need Help?

I just hope this new plugin proves helpful for blogger users who are missing a database access. I am sure this plugin is the second best use of FireBase which is indeed a magic hub for developers. I would really appreciate you to use it for your projects. Please ask me any query you may have and feel free to share your precious views. Have fun buddies. Peace and blessings be upon you all always. :)


Note: All questions with links will be deleted no matter how important the question be. Avoid Spamming please.