Add Google+ Button & Social Networking Buttons Below Post Title

After having explained the importance of social network buttons for your blog traffic in order of priority, its now time to add them below your blogger posts titles so that readers may find it easy to like, stumble, +1 recommend and tweet your posts instantly.  This is the same widget that I am using on this blog. Check the social network buttons appearing below this post title and see how they are arranged. social-share-buttonsI have arranged them in order of load time so that they may appear as quickly as possible when the page is viewed. I have added twitter, Facebook like, stumbleupon and Google+ button i.e +1 button. Other sharing options are included in the AddThis Share button. This widget is different from my previous version in terms of load time and importance. You can find the previous version by visiting this page.

Adding Social Networking Buttons To Blogger

  1. Go To Blogger > Design > Edit HTML
  2. Backup your template
  3. Search for <data:post.body/>
  4. and just above it paste the code given below,

<b:if cond='data:blog.pageType == &quot;item&quot;'>

<table border='0'>

<tr> <td> <a class='twitter-share-button' data-count='horizontal' data-lang='en'  data-via='mybloggertricks' expr:data-text='data:post.title' expr:data-url='data:post.url' href='http://twitter.com/share' rel='nofollow'/> <b:if cond='data:post.isFirstPost'> <script src='http://platform.twitter.com/widgets.js' type='text/javascript'> </script> </b:if> </td>

<td> <iframe allowTransparency='true' expr:src='&quot;http://www.facebook.com/plugins/like.php?href=&quot; + data:post.url + &quot;&amp;layout=button_count&amp;show_faces=false&amp;width=100&amp; action=like&amp;font=arial&amp;colorscheme=light&quot;' frameborder='0' scrolling='no' style='border:none; overflow:hidden; margin-left:20px; width:100px; height:20px;'/> </td>

<td><div style='margin-right:25px;'> <script expr:src='&quot;http://www.stumbleupon.com/hostedbadge.php?s=1&amp;r=&quot; + data:post.url'/></div> </td>

<td><div style='margin-right:5px;'> <g:plusone expr:href='data:post.url' size='medium'/> </div> </td>

<td> <!-- AddThis Button BEGIN --> <div class='addthis_toolbox addthis_default_style '> <a class='addthis_counter addthis_pill_style'/> </div> <script src='http://s7.addthis.com/js/250/addthis_widget.js' type='text/javascript'/>

<script type='text/javascript'> var addthis_config = { ui_cobrand: &quot;MY BLOGGER TRICKS&quot;, ui_header_color: &quot;#ffffff&quot;, ui_header_background: &quot;#0080FF&quot; } </script> <!-- AddThis Button END --></td>

</tr> </table>

</b:if><br/>


Replace mybloggertricks your twitter username.

5.  Note: If you have previously added the +1 button then you may skip this step. Now search for </head> and just above it paste the following code,

<script src='http://apis.google.com/js/plusone.js' type='text/javascript'> {lang: &#39;en-US&#39;} </script>

6.   Save your template and visit your blog to see it appearing on post pages. The widget will not be visible on homepage but on post pages only. If you want to show it on homepage too then delete the highlighted yellow lines.


Have fun! :>

Feel free to ask any questions you may have.

Google+ Privacy: 10 Settings That You Must Know

Google+ Privacy-settingsGoogle Plus has succeeded greatly in attracting massive amount of registered users. Users from yahoo, Hotmail, Facebook and other services are busy exploring this new social networking site. Since more and more of your friends will be joining you on Google+ therefore it is very important to set your privacy settings and better manage and control your account. Your photos, personal info and circle sharing are things that matter a lot therefore care must be taken to avoid misuse of them by trouble makers. Now before you scream out "My Google+ account is hacked!" it is very important that you make some significant profile privacy settings to ensure safe use of your social life.

How To Manage & Control Google+ Privacy Settings?

To set your privacy settings do this:

  1. Sign in Google Plus
  2. At the top right corner select Google+ settings
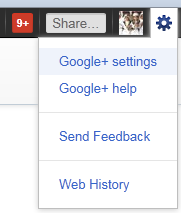
google+ settings

     3.    Then select Profile and Privacy

google+ settings

Once you land on this page then you may follow these steps one by one:

1. Choose Who can see your Personal Info

Lets first make smart settings to how your profile info may appear to people who search for you. Click Edit Visibility on Profile

google+ settings

This will let you choose what information in your profile you want to make visible to specific individuals, to circles, or to everyone. Now on your profile click on any personal info and then in the edit page click the "Anyone on the web"  button to choose which circle can see it and who can not.

choose who can see you

Amazingly Google+ lets you choose the privacy settings for every single profile info line. You can choose which part to be visible to whom.

Note: Do not Click Done Editing because we need to do more of editing

2. Choose Who can Email You On Google+

Now click on the Email area,

block emails

And select whether you want people to send emails to your Gmail Account or not. I would recommend that you disable direct emails from Google+ profile in order to avoid spam.
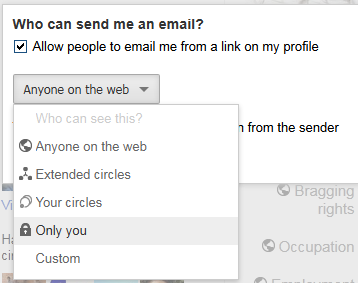
Google+ email settings 

3. How To Show & Hide Circles On Profile page

You can easily set which circles, friend list or network friends you wish to show on your profile. You show or hide people in your circles. You can also choose whether to show or not to show people who have added you in their circles. To do this click the Profile pics area where your friends appear,

Circles and network settings

Once clicked you can then choose to make some settings:

network settings

As you can see there are two options. The first option lets you show people in your selected circles and you can set whether your circles should be visible to all or friends only. The second option lets you show or hide circles you are in.

4. Manage Photo Tagging and Visibility in Google+

You can choose to show or hide your photos from people in your circles. You can also selected who can tag you in photos. To manage and control your photo tagging and visibility options click the "Photo" tab/button

photo settings

If you check the box that says "Show this tab on your profile" then your photos will be visible to people you have chosen. If you uncheck it then your photos will be visible to you alone and no one in your circles can see it. If you select the "show photo geo location information.." then your real time location from where you uploaded the photos will be visible to your friends. If you are in US or UK or Canada wherever you are. The location will be tagged on your photos.

I will recommend that you check both the boxes and select circles carefully for the first option.

5. Hide the Video Tab On Your Profile

sometimes the videos where you are tagged can be controversial to your friends and may effect your personality therefore it is often wise to disable the video tab option from your profile so that no one could see what videos you are tagged in. To do this simply uncheck the box on the video Tab as shown below,

disable video tab


6. How To Hide your relationship status in Google+

This feature of course plays an important privacy role in your life. Better be careful with this regard. I have written a detailed post on this. You can read it here:

7. Disable Post Resharing on Google+

When you share a link, text or video then your friends have the option of resharing it with others. To disable this option and not to let resharing of your personally shared stuff then do this:

Share your post as you normally do and once it is posted, click the drop down menu to the right side of your post. You will then find the option that says "Disable Reshare" Choose this option to prevent your friends from resharing your post with others.
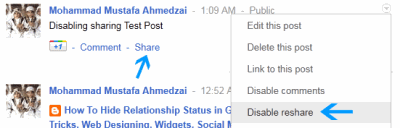
disable-reshare

Once you click it the Share link will be removed. You can also Enable reshare by repeating the same process and selecting the "Enable share" option.

8. Disable Comments on a Post

You can also prevent your friends from commenting on your selective post by disabling the comment option in exactly the same way as you did for preventing post resharing. Simply click the Disable Comments option and you are all done.

disable-comments

Choosing this option will remove the Comment link. You can enable comments by repeating the same process i.e. Choosing the "Enable Comments" option.


9. How to Disable Google+ Email Notifications

Go To Google+ settings page and select Google+

disable email notifications

Now you will see a list of Email options. Please carefully uncheck all boxes that you think are unnecessary and you don't want Email notifications for those activities.

disable email notifications

If you are a regular Google+ user then I will recommend that you turn of almost all options because obviously you wont need to spam your inbox with so many emails each day. You can directly read notifications on your Google+ account and find out for yourself who has mentioned you in a post, commented on your post, tagged you in a picture etc. etc.

10. How To Block or Remove a Person?

Now here comes the trouble makers. People who share sarcastic comments, posts or hateful links or videos with you. Of course the first thing that would come to your mind would be "How to block him or her?" In order to permanently block or remove a person from your circle or friend list then kindly read this post:

How To Hide Relationship Status in Google+ Plus?

relationship-settingsThe only single reason why many relationships break online is lack of privacy settings. Facebook become popular because of that relationship status feature and it is hated till now for lack of privacy on this status. Fortunately Google+ lets you choose to show or hide your relationship status from friends in circles. You can now happily share your happiness by openly letting your closest friends whether you are single, engaged or married or even if you are in a relationship. Lets now learn how to make this important setting.


Relationship Status Privacy Settings On Google+

To set your privacy settings do this:

  1. Sign in to Google Plus
  2. At the top right corner select Google+ settings

Google+ privacy settings

     3.    Then select Profile and Privacy

profile and privacy

     4.   Click Edit Visibility on Profile

edit visibility button


    5.  On the new page you will find your relationship status. Click it and then you can easily set which circles may see or not see your status as shown below:

Click it

image

Then make changes accordingly. Choose the custom option

image

Remove the Extended circles option by clicking the cross next to it

relationship settings on Google+

and then click the "+Add more people" to choose your closest friends you trust and wish to share this info with them. You can select a single person, circle or even a email address. All control lies in your hands.

relationship status settings

I would recommend that you add just the names of people or email IDs. Like this:

relationship status settings on Google+

You can add as many people as you want. This will allow you the freedom to choose different people within a circle or even those not using Google+ by typing their Email IDs. I just hope you find this tutorial helpful and useful. If you needed any help with regard to your Google+ privacy settings then feel free to let me know. Would be a pleasure to help you out. Stay safe. :»

MBT is Now Amongst Top 5 Blogger Tutorials Blogs


I was browsing through DMOZ directory today and surprisingly found this little young blog added to the Major Blogger Publishers Category. Only five blogs could manage to hold this position. Two are official blogger blogs and the other three include Blogger Buster, Blogger Plugins and luckily your stupid brother's Blog i.e. My Blogger Tricks :»


All praise be due to Allah the Great and to all of you without whom reaching this stage would have been not possible.


Update: Since Blogger.com and BloggerBuzz are official sites of Google and not blogs driven by a non-Google employee therefore MBT now comes under Top3 Blogger Publishers that produces quality tutorials to blogspot community. 


Which Category Did MBT Fit into?


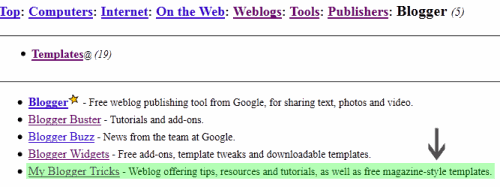
In 2010 our blog was added to the Blogger Templates category where around 19 blogs are listed but since free blogger tutorials and resources was our main focus so our blog was relisted in the main Blogger Publisher category as shown below,


blogger-publishers-DMOZ


Clicking this category will open this page:


Source: Publishers


Dmoz-listing


DMOZ is the largest human-edited directory of the web. With over 85,559 editors. DMOZ’s Open Directory Project (ODP) has listed more than 4.5 Million quality websites in 590,000 categories. To some extent a major portion of Google data base is based on DMOZ listings and information is often fetched from there. To find out What is DMOZ directory and how can you submit your blogs to it then kindly read this post:


Which Social Networking Buttons Should You Use On Blogs?

social-networking-buttonsWeb Traffic a word heard everywhere and to achieve it, web owners will try every possible method to push themselves to a better level. In order to achieve web traffic the simplest and most effective solution is the use of Major Social networking websites. With the rapid advancement and development of Internet, more and more bloggers and webmasters are getting addicted to social tools and services for the purpose of inorganic traffic flow. Social networks are expanding widely and every year we hear of another name. By far there are over 350 big and small social connecting sites. Just a month ago we heard of Google+ and God knows how many more will evolve in future.

The question here is that which social buttons should you use in order to increase the number of your unique visitors and thereby daily page views. It really destroys readers interest when he sees too many buttons on your site, eating their internet speed with their heavy load time. Providing efficient and easy navigation to user should be our goal. If you add each and every social media buttons like Digg, reddit, delicious, Twitter, technorati, Facebook like button, Facebook send button, Google +1  button, linkedin, stumbleupon and so on then obviously you are increasing your web blog load time discouraging both visitors and search engines. Readers enjoy fast load time and search engine robots enjoy crawling data at a faster rate. According to Google new webmaster guidelines, all websites with slow load time are penalized by Google and will be ranked low in SERP (Search Engine Result Page). So lets select the best traffic value buttons for your blogs.

Give Priority To Big Social Networks

By big I mean social networking websites with extremely high traffic and audience value. Use social buttons which have the greatest number of online registered users for example Facebook. It has around 750 Million active registered users. The probability that your visitor is a Facebook user is near to 90% so make sure you Keep Facebook at the top of your priority list. Second comes Twitter with 175 Million users.  Third comes the new social Giant though new but soon it will expand like fire and this new giant is of course Google+. Fourth comes LinkedIn with over 100 Million active users.


Social Networks That Counts Second

Now lets look at the traffic value of some other social networking sites that comes in our second priority list.

These names include Stumbleupon with 7 Million users, Digg with approximately 1 Million registers users and reddit.

Now here goes the order of priority from best to least best:

  1. Facebook
  2. Twitter
  3. Google+
  4. Linkedin
  5. StumbleUpon
  6. Reddit
  7. Digg

You must Keep the first 4 buttons as the main social sharing buttons on your blogs and keep others on Addthis Share button which contains over 350 social networking sites. This way you keep the load time performance of your blog high and will receive a handsome traffic in return.

What buttons do we use?

You can see Twitter, Facebook Like, Stumbleupon and Google+ buttons as our main focused buttons on MBT Blog and that is contradictory to the priority list I shared above. I have skipped Linkedin because it is mostly used by business professionals and my site does not address them therefore I have used stumbleupon instead. So you should decide yourself which buttons are more important for your blog's growth and success.

You can use the following social networking widgets for customizing your blogs:

I have published many widgets on social networking buttons. You can use the search box above to choose the best widget design for your blog.

How To Remove or Block Someone in Google+ ?

block-or-remove-Google+Google Plus unlike any other social networking site provides you with multiple privacy options.  You have complete control over your account and privacy. You can choose what to share with whom. Sometimes you don't want a person to follow you in any circle so you can easily delete that person from all your circles. You can not just remove someone from a circle but you can even block that person permanently. This world is full of envoy, jealousy and hatred so you must know how to tackle them if you encounter them in your circle list. These people can be even those who spam your profile or leave comments that you don't like. So lets kick all those who don't deserve to be in your circle.


How To Remove or Block Someone From All Circles?

Follow these easy steps:

  1. Go To your Google Plus Account
  2. Click the Circles Tab at the top
  3. You will see the following page,

remove from circle

     4.  This page enable you to invite a friend, create a circle, remove a friend from a circle and most importantly block a person.

     5.   Select anyone who you want to remove or block. Simply click a badge/person

     6.   Now towards the right you will find some links as shown below,

Google+ invitation page

     7.   To remove someone simply click the Remove link. If you wish to block some one then click the More Actions link and choose Block  as shown below,

Block a person in Google+

      8.   You can also select multiple people and remove or block them all with a click of a mouse.

      9. That's it!

If you needed any help just feel free to post your question in the comments box below.

Download Facebook Template Design For Custom Tabs


Facebook IFRAME TabsUPDATE: Facebook Template Custom Tab2 now available. 


Releasing yet another design template for Facebook Static IFRAME Custom Tabs. This new design includes one additional feature i.e. the Navigation menu. You can now add your most important links to the menu and if you wish you can even convert it into a drop down menu by reading our previous tutorials on drop down menus. The coding is kept simple so that you may easily customize the colors and fonts styles and sizes. You will need to edit the template in the Editor mode and paste this new design template code inside the source page of your woobox's HTML Editor. I will be here to help you out with any help if needed. The template is compatible with all major browsers.


Live Demo


To use this template first you need to create a custom Facebook IFRAME tab by reading the tutorial below:


Download Facebook Template


Kindly submit your Email ID below to receive tons of such design goodies for free straight in your inbox:


Check you inbox and activate your feeds. Once you have activated the feeds then kindly post the same ID in the comments box below with which you subscribed. We share resources with subscribers only to keep things clean.


Installation


Find all installation guide and help in this post:


Customization


To edit the navigation menu Find this code,


<li><a href="#" ><span>Link 1</span></a></li>
  <li><a href="#" ><span>Link 2</span></a></li>
  <li><a href="#" ><span>Link 3</span></a></li>
  <li><a href="#" ><span>Link 4</span></a></li> 


Replace the hash(#) sign with your Page Links /URL and replace Link1, Link2, Link3 etc. with your Page Titles. If you wish to add or delete a tab then simply add or delete this line,


<li><a href="#" ><span>Link</span></a></li>


Terms of Use


All MBT resources are copyrighted content and can not be redistributed without our permission.