How To Use Google Fonts In Blogger Blogs
By JOKO at 9:06 AM
Blogger Tips And Tricks
Font is one of the things that makes a site look great. A font gives your writing skills a style which impress your readers therefore choosing best fonts for site is really important. Especially in-case of fashion blogs font style is very important. Blogger has many built-in fonts but these are too common because everyone is using one or more of them, for example for titles they use a different font and for post body they use a different font so to a unique font for your blog you have to call it from some external source and then apply it in your blog. So this post is to teach you how to use custom fonts in blogger blogs. I will use Google fonts but you can use fonts from other websites also by following steps below. I am using Google fonts below they don't have any negative impact on page loading speed.
Follow below mentioned steps to use Google fonts in your blog.
Step 1: Go to Google Fonts
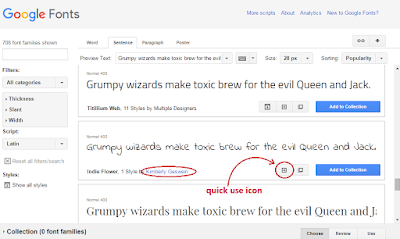
Step 2: Search for a font in Google fonts and click on the quick use icon as shown in below image(I am choosing Kimberly Geswein).
Step 3: Scroll down to step 3 where you will see a code as shown in below image.
Step 4: Copy the code given in the box.
Step 5: Go to blogger dashboard > template and click on Edit Html.
Step 6: Below <head> paste the code you just copied.
Note: Make sure to close the tag of code you just pasted like this(highlighted with yellow color!):
<link href='https://fonts.googleapis.com/css?family=Shadows+Into+Light' rel='stylesheet' type='text/css' / >
Step 7: Search for below piece of code in your template by using Ctrl+F.
<Group description="Page Text" selector="body">
You will find some codes similar to this below the above piece of code:
<Variable name="body.font" description="Font" type="font"
default="normal normal 12px Arial, Tahoma, Helvetica, FreeSans, sans-serif" value="normal normal 12px Yanone Kaffeesatz"/>
<Variable name="body.text.color" description="Text Color" type="color" default="#222222" value="#666666"/>
Now all you have to do is to find value="........" in the codes you found and replace the font name with the name of the font which you want to apply to your page text. Make sure to use accurate name otherwise it will not work. You can find the accurate name of your font on the Google font page from where you copied the font code as shown in below image:
Step 8: Click on save template and you are done.
CSS Code For Different Titles:
After following above part of this post you might have default font for your blog title, post titles and gadgets which could only be modified with Css so following are the css codes for different titles(blog title,post titles,gadgets) which are to be included above ]]></b:skin> in your template.
For Post Titles:
.post-title.entry-title {font-family:Your font name;}
For Blog Title:
.Header h1 {font-family:Your font name;}
For Gadgets Title:
div.widget > h2, div.widget h2.title {font-family:Your font name;}
Replace Your font name with your font name which you have imported from Google
I hope you found this post helpful, if not ask me in comments. Follow and subscribe for latest post news. Thanks for visiting 101Helper. Keep visiting us.
Search Tags: Google fonts in blogger,stylish fonts blogger, how to add web fonts to blogger, use custom fonts blogspot, upload stylish fonts to blogger blogs,how to change font in blogger,101 helper blogging tutorials,101helper


