 When it is Google things are always extra ordinary. Google recently added Picnik to Google+ which is a image editing tool to add amazing effects to your G+ profile photos. You can crop, resize, rotate, fix red eye and do a lot more with this cool tool. One of the unique feature of Picnik is that it allows you to add text to your profile photos and not just that, you can also stick your country flag or any sports logo to your photo. You can even paint your profile pic! We edited the photo on the left side using Google+. Lets learn how.
How To Stick Country Flag To Google Plus Profile Photo?
I assume that you have read our previous post on Picnik, if not kindly read it first so that you may know how to launch this tool,
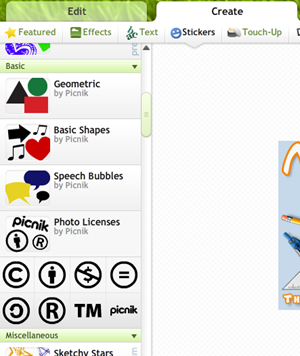
Click the Create button on picnik and then click on Stickers. You will then see many options appearing on the left. Choose your country from the drop down menu under Select Team. Then click con USA Stickers (In your Case it will be your country name instead of USA) A small adjustable image resizer will appear on your image. Simply drag it or expand it to enlarge the flag size. That's it you are done!
Note:- To go back click Undo from top right to undo any editing changes you have made. If you wish to delete the flag then click on the flag and click on the Delete button that appears next to it.

How To Add Text To Profile Photos?
For Adding text select TEXT from the menu at the top of your picnik tool and then write any text you want in the box and hit apply. You can then drag the text anywhere you want and can also change its size and colors. You can also change the font family.

How To Add Frames Across Profile Photo?
Similarly Click Frames from the Top and then select any outline you want for you photo. At present only limited frames are available for free and other frames can be purchased by upgrading your picnik account for premium options.
How to Add Creative Common Attribution License?
You can add copyright symbols, no redistribution or no copy symbols using the photo license option.
Go To Stickers again and choose Photo Licenses from the options on the left and then you can play with dragging and resizing again as we did for previous effects.
You can do almost anything with your image to crop or resize the image you can click the Edit button next to create button. Then you will have multiple editing options like eyedropper, auto resize, exposure, contrast, color etc. It is simply a tool you can play with. I hope you found this tutorial helpful and if you have any questions just post us a question and it would a pleasure to help you out with your Plus experience. More Google+ tricks will be published soon so make sure you subscribe to receive all updates straight in your inbox.
 In this blessed month of ramadan, a YouTube channel named MakkahLive has been launched that shows live prayers from Al Masjid al-Haram in Saudi Arabia. This is indeed a Ramadan gift from Google To Muslims worldwide. The prayers from the holy city are recorded live and broadcasted live through YouTube. Both audio and translation makes your heart feel as if you are in Makkah. The video stream was made live on July 31 2011. For the time being HD quality is not available but sound quality and buffering seems good.
 I wondered why don't we use back to bottom buttons just like back to top and this idea led me to jump at Photoshop again. The collection today consists of 20 high quality PNG static images that will allow your visitors to scroll up or scroll down thus making site navigation more easy and enjoying. Visitors are often too lazy to click Home or End button in the keyboard to scroll up or down the page and therefore these buttons will offer a much better flexibility to users to jump up or down as they wish and enjoy browsing through your blogs.



 I did a detailed analysis of what image dimensions are supported by Google+ for Profile Pic and scrapbook thumbnail images. Unfortunately the maximum image size supported by Google Plus is comparatively much smaller to Facebook which is 540px by 180px. The maximum profile image resolution in Google+ is 202px by 192px. This is my mere approximation and I can be wrong by 1 pixel more or less but as far as I could calculate the image dimensions using Photoshop, this was what I observed. So If you wish to use a clear cut image of yourself or your brand or product then make sure that you keep these image details in mind.
 Google+ Project has become viral by supporting latest mobile technologies. You can easily use Google plus with all its features like uploading photos, videos, sharing streams, creating circles and hangouts with latest mobile phones such as
  I am sharing another of my favorite Firefox add-on that will help you find out the colors used on different sections by a website or blog. This add-on is know as colorzilla and it offers many options. You can pick up a color used on a webpage, you can also zoom a page and enlarge its size but the best thing I like about it is its selection option which gives you important information regarding the webpage div sections and CSS classes. This tool comes with Advanced Eyedropper, ColorPicker, Page Zoomer and other useful options for web designers. Kindly first download it by