Ezoic: Best Tool To Increase Website Ad Revenue

A customer review on how Ezoic increases website ad revenue and helps you to display up to 5 AdSense Ads per page with no blank spaces.

If your AdSense Ad revenue is continuously dropping over the past year and you are tired of trying every possible method to increase your website's Ad revenue - changing Ad Placements, trying different Ad formats, seeing blank ad spots on your blog - and still not seeing results then this means you are amongst millions of AdSense publishers who are facing this problem on daily basis. Just like you optimize your blogs, you also need to optimize your website's ad slots in order to maximize your AdSense earnings.
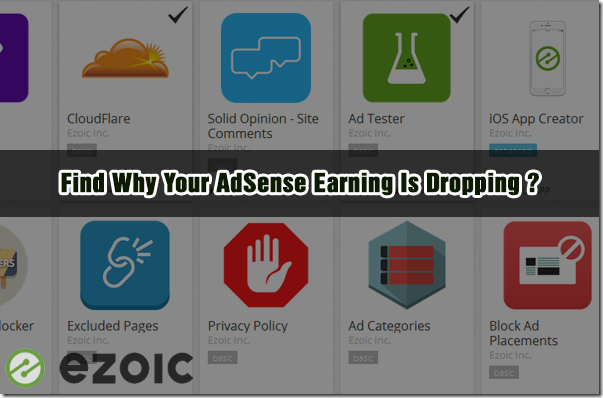
Ezoic: Best Tool To Increase Website Ad Revenue

This is one disappointing comment by one of our readers:

Mohammad I am in deep trouble now. I used to get few dollars a day which suddenly changed into few cents for past two months. I am very sad and helpless. I thought it would change back. Very low earnings for twice the visits as earlier. Please help me bro. I am willing to give u my password if necessary.

We can't blame Google for this because they already informed us to optimize our unsold Ad inventories with DFP or DoubleClick Ad Exchange. Google even recommends doing A/B testing or split testing. All such recommendations are no less than a headache because each requires a lot of time and technical skills. As a result we need a more user friendly and handy auto-pilot Ad monetization system that could systematically test many different ad sizes and locations to determine the best combination of ads on any given webpage of our sites and thus displaying high bidding Ads on our blogs by maximizing the value of every impression.

After we started seeing too many AdSense Blank Spaces on our network blogs and received complaints from clients who were experiencing a consistent drop in their AdSense income due to lower RPM, I started doing a detailed research on several ad monetization tools as a computer engineer to find out how come some websites are displaying over 3 AdSense content units on their sites and almost all ad slots are displaying ads on every single page with no blank spaces. I wondered how could some bloggers violate AdSense's restriction by displaying 5 AdSense Ads on each page?

This thorough investigation led me to an advanced Monetization tool called Ezoic which is a renown Google Certified Publishing Partner that helps publishers to optimize their website ad revenue. The best thing that I liked about Ezoic is that using it is completely free.

In today's case study I will give you a detailed demonstration of how to setup Ezoic for your blog or website. In my coming tutorials I will guide you on how to add Ezoic ad slots in different sections of your blogger blog.

Ezoic Helped Us Display Over 5 AdSense Content Units!

After just 15 minutes of setting up Ezoic on one of our network blogs "Rich Income Ways" which is hosted on Wordpress, I was able to show over 5 AdSense Content Units on every single page of it with not a single empty space! The ads come from Google’s Doubleclick ad exchange as well as a number of other ad networks and exchanges who all bid for the inventory.

See the screenshots below:

Showing 5 AdSense Ads Per Page

     Showing 5 AdSense Ads Per Page

All we had to do was to install Ezoic code on different locations of our site and then allow it to display best performing Ads for different screen sizes i.e. Mobile, Tablet and Desktop.

Ezoic automatically displays different ad sizes for different devices on your site. You can choose easily which devices should see your ad and what sizes of ads should be shown in your selected ad units. All this is done with a simple click of a mouse using Ezoic's Ad Tester App.

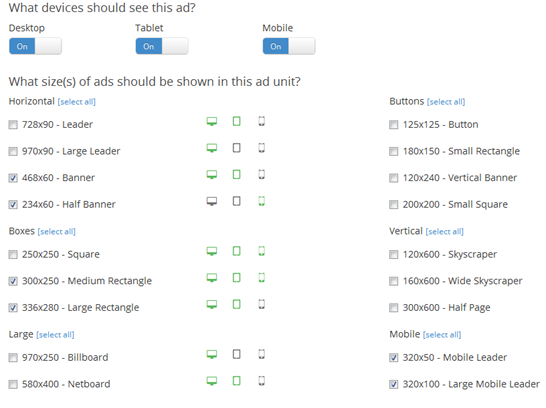
Ezoic Ad Tester App

Choose to test ads on different devices

Our Ad Revenue Increased by almost 200%

UPDATE: Our revenue now increased by 1200% ! =)

We installed Ezoic as a test on RichIncomeWays just 3 days ago that is 27th Jan, 2016. We were almost receiving no lucrative earning from this blog so to be safe, I used it to experiment if Ezoic's claims of doubling your Ad revenue were true or not. 

Our monthly AdSense revenue from this blog was almost negligile i.e. $8/month. Which means on average we were making $0.27/day.  See the screenshot below:
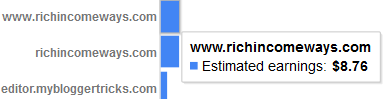
adsense monthly earnings


200% increase in AdSense revenu


But see it for yourself a blog which was literally making nothing is now generating upto $1.40 per day thanks to ezoic. Which means approximaltely $6/week and $24/mon.  If your maths is good you can analyze that this means a straight 200% Increase! [(24-8)/8 x 100 = 200%]

See the screenshot below:

ezoic optimized earnings

UPDATE: This is the updated snapshot after a 1200% increase in revenue. RIW is now making $10 a day while it was making just $0.27 previously! =)

Ezoic Increased Adsene Revenue by 1200%


What's bad in receiving a free cash of $24/mon from an already dead blog? What’s even better is the system will continue to find the best ad placements based on user interaction, so I expect our Earnings Per Thousand Visitors (EPMV) to gradually increase over time.

This significant increase in our daily AdSense earnings is what that forced me to write this long customer review of Ezoic out of goodwill for their excellent technology which surely deserves to be publicized as much as possible to help disappointed publishers to improve their dropping ad revenue.

I will keep experimenting with this amazing tool to test Ads on two of my others sites also and will keep updating you with a detailed case study of their progress.

Why Use Ezoic When AdSense's Dashboard already exists?

Ad revenue optimization is what Google recommends too and this is one reason why Google gives permission to private agencies through its Certified Publishing Program to help Google in promoting their Ad network.

Managing ads directly from AdSense dashboard is recommended only for small publishers who earn less than $50-$100 but if your blog or website is capable of making more than that then you must use free Ad Monetization tools like Ezoic which uses artificial intelligence to optimize your CPMs and automatically displays the highest paying AdSense Ads on your websites without loosing a single impression caused due to empty boxes or blank spaces.

A Blank space appears on your site when AdSense is not able to find enough advertisers that are interested in your content, here is where advanced tools like Ezoic comes to your rescue which is programmed to make sure every slot is filled with highest bidding ads thus helping you to double your website Ad revenue. 

How do your receive payments from Ezoic?

Unlike AdSense which pays mostly through Wire transfer, EFT or Western Union, Ezoic pays you straight through paypal, Dwolla, check or Payoneer. The minimum payment threshold is $20.

ezoic payment threshold

There are a number of payment methods you can choose from including:

1) Check - requires name and address

2) Paypal - requires only paypal address

3) Dwolla Email - requires only Dwolla email address

4) Dwolla ID - requires only Dwolla ID

5) US Bank Transfer Via Payoneer - will deposit money directly into your domestic account

6) International Bank Transfer Via Payoneer - will deposit your money directly into your international account in the currency of your country

Important Tips To use Ezoic's Apps and Tools

Using Ezoic is extremely simple thanks to its 24/7 Live help and support system. I will only give you a quick helicopter view of the technology used by this revenue boosting tool.  Testing with Ezoic gives you the following three benefits:

  1. Increased Ad Revenue
  2. Access to Google's ad Exchange where thousands of advertisers bid for your unsold inventory.
  3. Most importantly the ability to show 5 ads per page!

First watch this simple video which I found really useful while setting up ezoic.

I am sure this video is self explanatory but I will share some detailed tips that will help you make the most out of ezoic.

1. Change Name Servers Option While Integrating

The most common way to integrate your site with Ezoic is to update your site’s name servers. This allows Ezoic to optimize the ad sizes and locations automatically. Changing nameservers wont affect your site's health nor will you experience any down time. Do backup your old domain name serves if in case you wished to switch back.

Another option is to install Ezoic's code on your blogger blog or wordpress blog. It is a simple script that you need to add just below starting head tag.

Since I am using Hostgator I could easily change default hostgator nameservers to that of ezoic using the Launchpad Domain hosting management tool.

Changing name servers to ezoic

2. Apply for Google's Ad Exchange

On your Ezoic dashboard you should see a new check box that says "Apply for Google's Ad Exchange". I would suggest you go ahead and fill this out, since you will gain access to thousands of ad networks and advertisers who want to bid for your site’s inventory using Google’s ad exchange.

3. Let Ezoic manage your AdSense account

This program provides Ezoic system a read only access to your AdSense account to use it as a control for testing.This also allows the Ezoic system to pull your AdSense stats into the Ezoic dashboard for reporting. This allows you to do a direct comparison of how the Ezoic ads are performing in comparison to your original ad units.

optimized AdSense earnings

This option will provide you with different in-depth insights on how your ads are performing for different mobile/desktop/tablet devices:
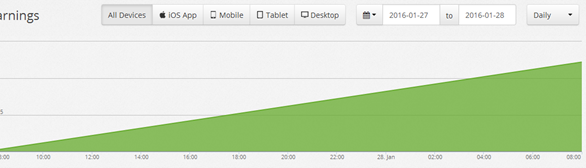
Optimized AdSense earnings Chart

You will also be able to check your earnings through filters. You can choose how your ads are performing in different countries, devices and find what are the traffic sources and landing pages.
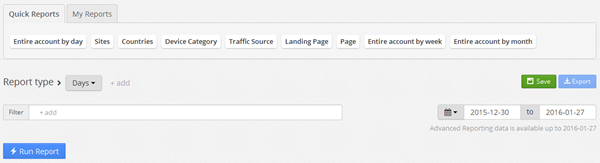
Ezoic reports and filters

Ezoic easily integrates with your AdSense account to manage your account in auto-pilot mode. I recently allowed Ezoic to manage my AdSense account by filling out a simple invite from Google. I have shared the invite link above.

Ezoic Managed AdSense Account


4. Must Install Mediation App

The mediation app will allow you to link your AdSense account to the Ezoic system. This will allow your AdSense to compete in the Ad Exchange for the ad inventory, ensuring that the highest bidder is always serving the ads for your site thus making you more money.

You can easily install it from Ezoic's appstore:

Ezoic Mediation App 

5. Do Install Ezoic Chrome Extension

In order to get maximum results from Ezoic it needs to test as many ad locations as possible. However, depending on a website structure and CMS, it sometimes can be difficult to add tens or hundreds of ad placeholders manually, so a better solution is using the new Ezoic Chrome Extension. It took me half an hour to install ad units manually on different sections of my blog but with this extension, it took just seconds.

Using this extension on your chrome browser, you can simply highlight-and-click to add new ad placeholders to your site and the Ezoic Platform will test them for you. Check the screenshot below which gives a quick demonstration of how can different ad sizes look on your site. You can then choose the best ad sizes based on ad location.

choosing different ad sizes and locations

Identify Error Pages That Wastes Revenue

Inside the monitoring page of ezoic you will find three options.

1. Platform updates are related to platform development news from ezoic

Ezoic Monitoring options

2. Error pages tells you which of your blog pages are causing revenue leakage or needs your attention to fix them.

Ezoic Error Pages

3. Google Updates keeps you updated with all Google algorithm updates made over the recent years. They also educate you on what exactly are these updates and how it could have affected your revenue. I am sure many of you know that Google Penguin and Panda updates were amongst the famous penalties that affected up to 70% of ad revenue for millions of publishers. Therefore staying updated with it is really important for all webmasters.

List of Google Algorithm Updates


Ezoic has its own App Store for Websites!

This app store is something which requires years of hard work to develop. Ezoic's app store has plenty of free and useful apps for websites. Using these apps you can choose to block ad placements, disable ads by page, block an advertiser, choose to show more than just 5 ads and so on.

Ezoic App Store


Amongst these I would categoricaly mention Ezoic's iOS App creator that helps you to convert your website's content to a native iOS app without the need for a developer. Apps are listed in the iTunes store and are compatible with iPhones, iPads, and iPods. Your iOS app will update as you update your website and will benefit from ongoing Ezoic improvements including additional ad services and evolving features.
iOS app creator

We recently created an android app for our blog but we lacked support for an iOS app. I guess this option could really save us both time and heavy development costs.

How is your AdSense Earning Going on?

I just hope the above post may help you understand how important is it to optimize your website Ads using free tools like Ezoic. Forums and blogs are now filled with debates on dropping AdSense Income and lower RPMs. Most publishers are really disappointed at increased traffic but lower earnings. The actual reason is that webmasters today spend so much time optimizing their sites for search engines but they rarely try optimizing their ad locations and doing A/B testing. Testing Ads is surely a hectic work but without making up your mind to use a tool like ezoic you are only selling cents for dollars.

Do share your precious feedback and let us know if you are also experiencing a drop in Ad revenue. Feel free to ask me any queries related to ezoic. I would love to help as much as I can.

Wishing you a lucrative and ever increasing Ad Revenue! Peace and blessings buddies. =)

Is Google adding "Next/Previous" Text To Your Page Titles?

If Google is rewriting your titles in search results by adding "Next" , "Prev" or "Previous" text before your webpage titles then know that you have mistakenly added rel="Next" , rel="Prev" or rel="Previous" attributes to links in an un-paginated page on your blog or website.

Is Google rewriting your page titles

Since blogosphere today is saturated with several new content creators and designers who are developing widgets and plugins without having proper know-how of SEO, its causing a problem for non-techy publishers who are using these free blogspot widgets without even investigating if its creator understands search engine optimization technical basics or not.

Today's tutorial will thus amend one such SEO mistakes made by developers of Blogger widgets and plugins. These errors could also be found in some Wordpress plugins and therefore the solution below can be applied across all CMS platforms.

Can you add Next/Prev Link Elements in Blogger Blogs?

rel="next" and rel="prev" are called HTML links elements that acts as a string hint for duplicate contents just like rel="canonical". They indicate the relationship between component URLS in a paginated series. To divide a large articles into small component pages, many CMS systems makes use of paginated content.

next/previous posts in blogger

More details on paginated content can be found in this Google's official post.

paginated content structure

Since there is currently no support to create paginated pages within a post in blogger blogs so it really makes no sense to add these link elements in widgets such as to display Next and Previous topics or Numbered page navigation.

Number page navigation in blogger blogs

Why Would Google Add New Keywords In your Page Titles?

Since each paginated content is interlinked and each page tells search robots which is the actual first page, Google is able to pick the correct title of the first post and display it in search results. But when you add next/prev link elements inside a blog post or webpage which has no component pages at all, then you are confusing the search robot as a result of which you see your page titles rewritten in SERPs as shown below:

rewritten title with rel="next"

rewritten title with rel="previous"

How To Check If Your Blog Titles are Rewritten?

To check if your blog titles are rewritten in Google search results, run this simple query in Google search box.

google site query

site:yourblog.blogspot.com

or for custom domains do this
site: www.yourblog.com


Remove HTML Link Elements From Your Blogger Template


If your blog titles are actually rewritten, then follow these steps to fix your blog's SEO


1. Go to Blogger > Template > Backup your template


2. Click "Edit HTML"


3. Search for this code and delete them where ever you find them


rel="next"  
rel="previous"
rel="prev"


Note that the above link elements could be located using single quotes or double quotes depending on your template's code. They could even be written in escaped characters as shown below:


rel="next"
rel="previous"
rel="prev"


So just find any code that resembles the ones I shared above. Once done resubmit your sitemaps to let Google refresh its cache and display the neat and clean page titles for you. =)


Do let me know if you needed any help and further clarification. Peace and blessings buddies!

AdSense: Difference Between Page RPM and Impression RPM

Page RPM VS. Impression RPM in AdSense


If you have spent any amount of time working with advertisements - especially Google AdSense - you will be familiar with the two terms: Page RPM and Impression RPM. Google AdSense is a very popular advertisement program that works on either a per-click or per-impression based model, and you often come across terms such as CTR, CPC, CPM, RPM, and so on. Today, we'll talk about the basics of these terms and then see how Page RPM and Impression RPM are different from each other, because they're often confused as one.


The basics of advertisement


Let us take a step back first and see whether we understand the very basic terms used in advertising.


  • Clicks - The total number of times an ad was clicked


  • Page view - A page view is registered every time a user opens a page on your website. It does not matter how many ads are there, it will only count as one page view.


  • Impression - This is a somewhat confusing term. Impression is defined as the user-view of a particular item on your website. It could refer to a user viewing a particular webpage, a particular ad unit, or an individual ad. Hence, an 'impression' can be sub-categorized into a page view, a page impression or an ad impression.


  • Page Impression - A page impression is the same as a page view - at least when talking about Google AdSense.


  • Ad Impression - An Ad impression is registered when an ad is viewed by a visitor. If a page contains multiple ads, then one page view may result in multiple ad impressions. For example, if a page with 2 ads is viewed 3 times, you get a total of 3 page views and 6 ad impressions.


  • Query - An ad query is a request made to Google AdSense's system to display an ad unit whenever that ad is displayed.


AdSense Page RPM vs. Impression RPM


Both of these metrics are important when it comes to calculating your AdSense revenue. Both are very similar to each other, so it is only natural to confuse between the two. Let us explain what RPM means first.


difference between page rpm and impression rpm


RPM (Revenue Per thousand iMpressions) is quite simply the amount of estimated revenue you will earn for every thousand impressions. It is calculated by dividing the total estimated earnings by the number of impressions, and then multiplying the result by 1000 (since the count is per thousand impressions).


Remember: Impression here can refer to a page view, an ad request, an ad query, or an individual ad impression. Impression is a broad term encompassing all these metrics.


Suppose, for example, that you have earned an estimated $10 from 5000 page views (page impressions). Your RPM would be (10/5000)*1000 = $2 for every 1000 page impressions.


Page RPM refers to your RPM based on the number of your page views or page impressions.


Impression RPM refers to your RPM based on the number of individual ad impressions you get.


Although Page RPM is the more commonly used metric, some advertisers do bid on AdWords for Impression RPM as well. Typically, Impression RPM is lower than page RPM owing to the fact that one page may contain many ad units. That is, however, not necessary and you could be counting the total number of ad units or just one particular ad unit.


The bottom line is, both these metrics are used widely and it can pay off to know the differences between them and how they are individually calculated.


Do ask any question which may still be not cleared. I would love to help =)
WebTextTool : How I Get Best Keyword Suggestions?


Customer WebTextTool review on how it gives us best keyword suggestions & optimize our blog posts in real-time to rank higher in Google search.


Out of every 10 clients who approach us for SEO auditing services, 8 find it difficult to understand how to do keyword research, how to get quality keyword suggestions, check keyword competition and search volume. In short every publisher today is most concerned about his competitor's keyword strategy and what is it that ranks his competitor higher on search results but not him or her.

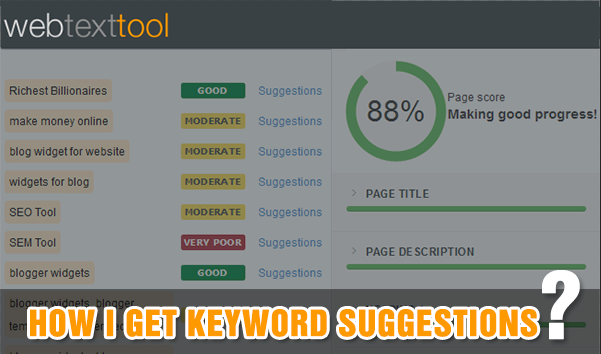
WebTextTool keyword suggestion tool

Web Platforms and frameworks are mostly auto optimized today, what is required on publishers side is on-page optimization. Keyword research is all that matters most for content writers. Search robots judge content based on its quality content which is E-A-T (Expert-Authoritative-Trustworthy) and quality is judged by your presentation and selection of keywords. Serious bloggers and SEO agencies today rely heavily on building a solid keyword strategy using the best tools found online. I will be sharing and reviewing one such SEO tool with all of you today that fulfills all your blogging needs and which is a must for people with multiple blogs and no SEO skills.   It will seriously help you dominate your niche in search rankings and crush your competition.

Do you really need a SEO tool to optimize content?

From 2015 onwards I personally felt the need for a user friendly SEO tool that could help my network authors to better optimize their blog posts in real time by choosing the best keywords for our content. For this I needed an advanced keyword suggestion tool which could fit my budget on monthly basis and as well as help us rank higher in SERPs. Google keyword planner is one such free option but it lacks several advanced functionalities and features and we needed something ahead of it.

I came across WebTextTool (WTT), which is the simplest on-page SEO assistant tool that helps you optimize your content in real time while you are writing your blog post. It gives you realtime suggestions to improve your content and make it more SEO friendly.

I was honestly fed up of correcting the SEO blunders done by my authors since a year but today thanks to webtexttool, I really don't need to waste precious time auditing a co-author's blog post. I can now concentrate on the creative part while WTT handles the optimization stuff.

I will therefore love to review WEbtexttool as a customer and share its unique features with all of you so that it may benefit you as much as it has helped us improve our organic traffic.

How can WebTextTool help you rank higher in SERPs?

Thanks to its 6 Unique Features!

Features Description
Keyword Suggestion Helps you find best keywords and matched phrases for your content
Advanced Editor Far advanced than even Open Live Writer or WordPress editor
Accessibility Checker Helps you optimize media content one by one
Sentiment Analysis Makes sure your content gives a positive touch and is irony-free
Readability Scores Calculates how easy and difficult is your text to understand.
Page trackers Tracks Google rank of your published content for a given keyword

Sometimes common sense and strong SEO skills are not enough, you really need tools to give you insights and stats to build a powerful keyword strategy in order to get an edge over your competitors.

I am currently using WTT's Silver Plan which suits our requirement, so I will be giving you a brief introduction of all its important features that we are using currently. It has both free and premium plans so it is really a handy tool for all bloggers unlike some expensive SEO and SEM tools found online that gives me nightmares when I see their monthly billing structure.

Before we could proceed, I recommend that you sign up for the 14 days free Webtexttool trial account. You can also sign up for the Starter Plan which is free forever. Follow the link below to register your free account.

WTT's unique features like sentiment analysis, readability scores and page trackers are a life savor. The webtexttool Page Tracker utility allows us to track the Google rank of our blog posts for a given keyword and its optimization score after it is published. Surely my favorite feature!

1. Keyword Suggestion

The biggest reason behind any websites high position in Google rankings is its combination of rich keywords. The better you understand this terminology the better you rank in Google search results page.

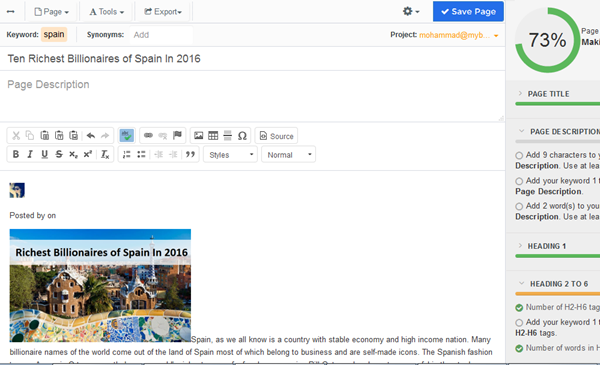
Our co-author Nida Zaidi wrote an article recently on "Ten Richest Billionaires of Spain In 2016" on our sister blog "Smart Earning Methods". Let's analyze how SEO friendly her article is and find SEO mistakes if any made by her =)

On WTT homepage click "New Page" to see the "Keyword suggestion tool". Follow the steps below to learn how to do a keyword research before writing a new blog post.

How to use the Keyword Suggestions Tool?

  1. Select the right language and country, so you will get the results for the relevant country and Google domain.
  2. Enter your keyword or keyword phrase in the second step.
  3. Click "Give me suggestions" to get a list of suggestions based on your keyword

keyword analysis and selection

It gives you a clear idea of how widely is this keyword searched (Volume) in Google USA each month and how strong is the competition for this phrase. If you scroll down you will get several related keyword suggestions that are no less than a treasure for your content.

keyword suggestions by webtexttool

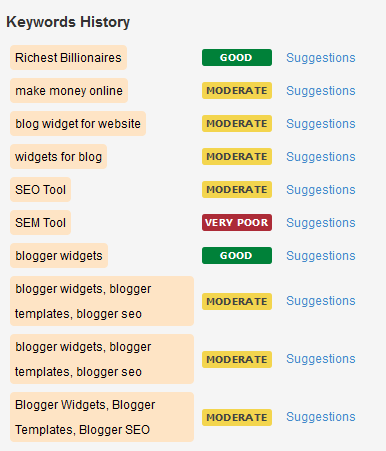
All your searched keywords are stored in history so that you could research them further in future.

keyword suggestions history

Click "Use my Keyword" button to start writing your blog post inside the WTT editor.

use your keyword

2. Advanced Editor

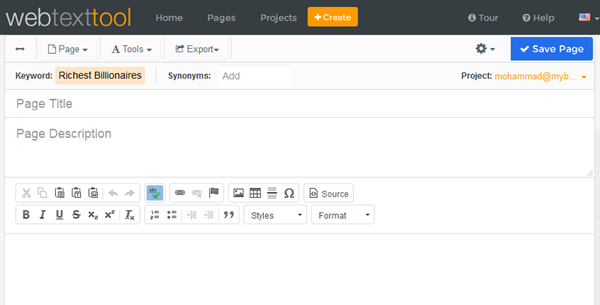
In simple words I am in love with this editor! I am using Wordpress and Blogger Editors since 7 years but I have never came across any WYSIWYG editor with so much functionalities and support for content writing. You really don't need Windows Live Writer or your blog editor to write content anymore. WTT editor has all web editing tools to help you produce high quality content, which may not only be optimized but also well formatted and presented.

webtexttool editor

The hyperlink tool does more than just linking. You can specify different protocols such as http and https.

hyperlink protocol

You are no more limited to just "target_blank" attribute to open links in new window. You can set your link target to an iframe or even a popup. Sky is the limit here.

types of link target values

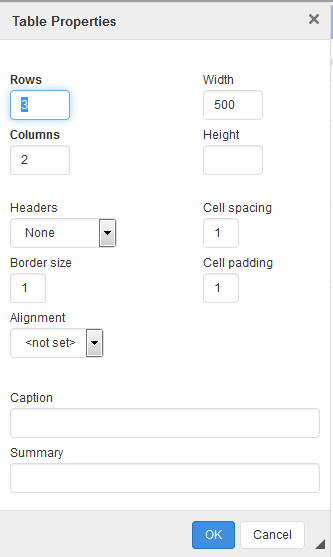
You can add optimized tables by giving it a caption name and summary:

webtexttool table properties

or add special characters inside your content.

select special character

The right panel gives your real-time SEO suggestions to improve your content. The page score meter monitors your overall optimization score in percentage.

page score  and realtime seo suggestion

Lets get to the real work!

In order to audit Nida's post for SEO errors, I don't need to copy and paste her article, I will simply import her published article using its URL. This option is surely a time savor and this is another reason why we find WTT so user friendly.

1. Go To Page > Import article

import article in webtexttool

Insert your URL and click load to see the magic occur!

import article from URL

optimize imported article

If you observe clearly WTT has detected that Nida's focus distracted from keyword "Richest billionaires" to "Spain", in short her post will not perform good in SERP's for our intended keyword unless these mistakes are corrected. That page score of 73% is for the word "Spain" and not for our intended keyword. Thus to better optimize this post, I will copy this post's source and paste it inside a new page in WTT for our intended keyword i.e. "Richest billionaires"

After creating this new page, the page score drops to 10% which is the actual and correct page score for her Post based on our intended keyword.

optimize  article using focus keyword

The Bad Things

  • She forgot to add meta description again! This is a serious mistake.

missing page description


  • She forgot to emphasize on her suggested keyword using bold and italic text. She could have used related keywords suggested by WTT here.

missing bold and italic text

  • The keyword density in her post is almost negligible. WTT suggests that adding the keyword 6 times can improve search appearance significantly. Without a proper keyword density, it is really difficult to rank high in SERPs. Though the length of her article is acceptable. Fixing this part can improve page score by 80%!

low keyword density in webtexttool

The Good Things

  • Her title is well optimized and follows best SEO practices as highlighted by WTT

optimized page title

  • She has used highest priority H1 tag in her title.

optimized H1 headline

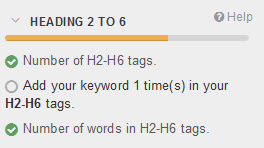
  • She has also made fair use of H3 tags for Sub headlines but adding her focus keyword at least once in these headlines can do wonders.

optimized  Subheadlines


Now lets dig further to see if more errors exists in her post.

3. Accessibility Checker

This tool will help us optimize media content by finding missing alt tags in your blog images.

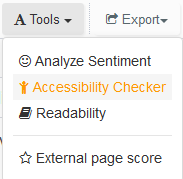
Go to Tools > Accessibility Checker.

accessibility checker in webtexttool

A window will guide you step by step to locate the errors in blog images and will give you option to fix it with a click of a button by optimizing blog images with keyword rich alternative text. Amazingly Nida forgot to add alt tags in a total 11 images. =/

accessibility checker in webtexttool


4. Sentiment Analysis

Here we can find out about the language tone used by the author and whether it follows ethical blogging standards or not.

Go To Tools > Analyze Sentiment

page sentiment summary

Luckily everything look normal here which shows that her verbal expressions are well expressed.

5. Readability Scores

Readability Tests are designed to indicate how difficult a reading text is to understand, usually by counting syllables, words and sentences inside your blog posts or general articles.

Go to Tools > Readability

page readability score

She scored on average 80% or 8, which means the post can be easily understood by a wide range of audience from age 14 onwards. Since most of our articles target teenagers, so this score means a well written post.

6. Page Trackers

The webtexttool Page Tracker allows you to track the Google rank of your published content for a given keyword. webtexttool page tracker

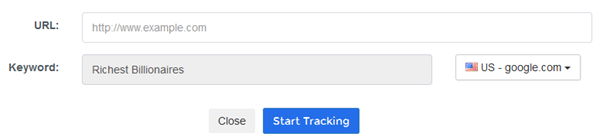
To start tracking a page, we simply need to fill in the URL and Google domain. WTT take the keyword from the current page you are optimizing in WTT editor. It then starts tracking the rank and the optimization score and will report it to you. I love this feature and it really helps us know where we stand in SERPs.

webtexttool page tracker  


Your Views

I could not be more honest with you than sharing with you the SEO mistakes of my co-author as a CASE STUDY with all of you. God knows how will sister Nida react to this! =d

Managing multiple blogs at a time is difficult unless you have tools and resources to lighten up your burden. Webtexttool has really helped me save precious time by making it easy for me to audit blog posts and fix the SEO mistakes instantly. WTT really helps you optimize all of your web content to make sure that you rank high in search engines like Google and Bing. I have been using several SEO tools for the past 7 years but so far none could provide us the above mentioned features.

I strongly recommend that you sign up the sooner possible with WTT. Use their 14 days free trial period and if you can offered, then go for Silver plan which is the partner plan I am using for managing all web content including those of my clients.

I hope this post may help you better understand how to optimize your blog posts using keyword suggestions and realtime optimization. Do share your feedback about this latest development and let me know if you have any queries to ask related to this Webtexttool review. Which of the features above impressed you the most and why? Do share your precious views. Peace and blessings buddies! =)

How To Show Ads Above Comments In Blogger Mobile Site

how to show ads in blogger mobile above comments 101helper

Placing ads in blogger mobile site is always difficult for every newbie because handling blogger template is not easy especially in case of mobile blogging it becomes more difficult so bloggers either avoid placing ads in blogger mobile site or add ads as a gadget or try to show infolinks ads in mobile site. Adding ads in gadget is not a problem but it may slow down your mobile site. But its important also to show ads on mobile site specially those bloggers which have majority of visitors on mobile site really need to show ads in mobile to get a maximum benefit from blog. So this tutorial is to show you how to place ads in blogger mobile site just above the comment box below every post. It will boost your blog revenue to a great extend. So lets start!

Steps To Follow To Show Ads In Blogger Mobile Site Above Comments:

Step 1: Go to blogger dashboard and navigate to template.

Step 2: Click on edit html and click inside the template code.


how to edit mobile tempate in blogger

Step 3: Search for below piece of code by pressing CTRL+F on your keyboard.

<b:if cond='data:post.allowComments'><h4><data:post.commentLabelFull/>:</h4>

Step 4: Copy below code and paste it just above the above code.

<b:if cond='data:blog.isMobile == &quot;true&quot;'>
<b:if cond='data:blog.pageType == "item"'>
---YOUR AD CODE HERE---
</b:if>
</b:if>

how to show ads in blogger mobile above comments

Step 5: Replace "---YOUR AD CODE HERE---" with your ad code.

Step 6: Save your template and you are done.

Ad Not Displaying In Mobile?

Follow below steps if your ad is not showing in mobile:

Step 1: Go to template and click on setting icon below the mobile site preview.

how to edit mobile tempate in blogger

Step 2: Enable custom template for your mobile site as shown in below image.

how to apply custom template in blogger mobile site

Step 3: Click on save and you are done.

Search Tags: how to show ads in blogger,show ads in blogger mobile,display adsense ads in blogger mobile,how to show adsense on blogspot mobile site,101helper make money blogging,ads below footer,above comments blogger mobile site.