How To Make Mobile Section For Gadgets In Layout In Blogger

How-To-Make-Mobile-section-For-Gadgets-in-Layout-In-Blogger
As predicted by Google that from now people will read blogs and sites more from phones rather than from desktop that's why everyone should make their mobile site and maintain it to get maximum traffic not from only desktop but also from mobile. It is also good to get mobile traffic because it can increase your earnings from both Adsense and Appnext. Specially mobile traffic is best for Appnext.

Making mobile site is not easy in a platform like blogger because everyone is not able to do it as its not easy to code and also most methods don't work in blogger. So I frequently write about making mobile site for blogger blogs to make it easier for other bloggers to make their own mobile site.


So in this post I am going to teach you how to make sections for mobile gadgets in blogger layout. So follow below steps to make sections for your mobile gadgets.

Step 1: Go to blogger > login to your account and navigate to Theme.

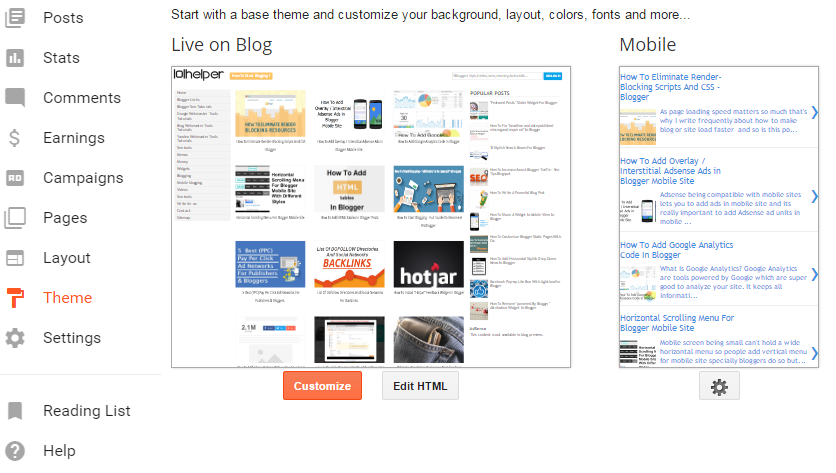
Step 2: Click on Edit Html to begin editing your blog theme to make sections for mobile gadgets.

how-to-edit-blogger-theme

Step 3: Search for below code by using CTRL+F:
<b:section class='header' id='header'

You will find this code:
<b:section class='header' id='header' maxwidgets='1' name='Header' showaddelement='no'>
<b:widget id='Header1' locked='true' title='Horizontal scroll menu (Header)' type='Header'>....</b:widget>
</b:section>

how-to-make-mobile-section-in-blogger

Step 4: Now just after above code paste below code and save your template.
<b:section id='mobile-section-1'>
</b:section>

Step 5: Go to layout to see your mobile gadget section.

You will find your gadget section below header section in layout but if you want you can make another one in the footer by the above method, all you need to do is to paste below code above </html> in your template.


<b:section id='mobile-footer-section'>
</b:section>

how-to-make-footer-section-for-mobile-gadgets-in-blogger

Important Note: Although you can make unlimited sections for your blog's mobile site but you will need to enable each gadget you add in these sections for mobile only. So after adding a gadget in mobile section of your blog go to your template and add mobile='yes' after locked='false' in your gadget code as shown in below image. For details about how to enable a gadget for mobile device only read How To Show A Widget In Mobile View In Blogger

how-to-show-a-gadget-only-in-mobile-blogger

Don't for get to give us feedback about this post, if you have any questions ask me in comments. Share this post with other bloggers. Thanks for visiting 101Helper.

Search Keywords: how to show gadget in blogger mobile site, how to make separate section for mobile gadgets in blogger, how to edit layout in blogger, make header and footer section for mobile site in blogger

How To Hide Ads And Gadgets On Error Pages In Blogger

404-error-message-adsense-blogger

Before explaining about hiding things on error pages, i am going to tell you why do you need to do so? Its because Ad networks like Good Adsense and Adhitz both prohibit showing ads on pages which are empty or on error pages and reason for not showing gadgets in error pages is that nobody needs them and these gadgets makeerror pages look ugly and error pages also load slowly so visitors are unable to leave page until the page is loaded completely so it's necessary to hide gadgets and ads on error pages.

In this post i will show you how to hide any ad or gadget on error page.


Step 1: Go to Blogger Dashboard and open template / theme.

how-to-hide-ads-and-gadgets-in-blogger-error-pages

Step 2: Edit Html.
hide-ads-on-error-pages-in-blogger

Step 3: Now find the gadget in which you have added your ad code or if you have added your code directly to your template e.g below </head> or above </body>.


Step 4: After finding your ad code gadget or ad code, copy below code.

<b:if cond='data:blog.pageType != &quot;error_page&quot;'>

Step 5: Paste this code above your ad code if you have added code directly to your template and in case of gadget paste the copied code below this line:

<b:includable id='main'>

As shown in below image:

how-to-gide-google-ads-in-error-pages-in-blogger

Step 6: Add below piece of code at the end of your code and above </b:includable> in case of gadget as shown in above image.

</b:if>

Step 7: Save your theme / template and you are done.

To check if your code is working fine, open any url of your post and add any wrong characters to it and view it, your gadgets or ads which you have hidden will not show on error pages.

What else can you do with above code?

A special thing about this code is that you can hide unwanted gadgets on error pages and also you can use it reversely by making a small change in it. Then it will start showing content on error pages only like if you want to show an error message or a search box to your visitors who accidentally reach an error page to let them search your site and find what they are looking for. So here is the reverse effect code:

<b:if cond='data:blog.pageType = = &quot;error_page&quot;'>

Also don't forget to close it with the same ending code: </b:if>

Your final code should be like this in both cases:

<b:if cond='data:blog.pageType = = &quot;error_page&quot;'>
My Content / Ad Code
</b:if>

If you have any confusion or problem ask me in comments or contact.

Thanks for visiting 101Helper.

Search Keywords: how to hide gadgets and ads on error pages in blogger,how to hide gadgets in 404 error pages blogger, how to hide google adsense ads in blogger error pages,how to show error message on 404 error pages in blogger,101helper blogger tricks

How To Eliminate Render-Blocking Scripts And CSS - Blogger

eliminate-render-blocking-javascript-css


As page loading speed matters so much that's why I write frequently about how to make blog or site load faster and so is this post about and I am writing this post on request of a visitor to help him and also those who also have this problem in their blogs. So let me start with intro of what is render blocking scripts and CSS.

What Is Render-Blocking Scripts And CSS ?

Render blocking script is usually a script from any external source which is called by using a <srcipt src="...../files/style.css"/> tag and the problem lies in the URL or storage of the javascript file. Some common problems with external scripts are:

1. The URL which contains the Javascript file is redirecting to multiple URLs and then reach the Javascript file.

2. The URL which contains the Javascript file responds slowly due to server error.

3. The URL which contains the Javascript file sometimes does not respond due to down server status.

Similar to Javascript files, there are some CSS files which are stored externally have the same problems as mentioned above.

How To Identify Render-Blocking Scripts 

To identify render blocking script or css you need to use PageSpeed Insights. It will show you which scripts and css files are blocking and making your page load slow.

how-to-eliminate-render-blocking-scripts-css-in-blogger

How To Remove Render-Blocking Scripts And CSS From Blogger

Step 1: Find render-blocking scripts by using Google PageSpeed Insights as shown in the above image.

Step 2: Go to blogger dashboard > Template > Edit Html.

how-to-edit-template-in-blogger

Step 3: Search for that script or CSS using CTRL+F in the code which you found to be blocking in the PageSpeed Insights tool.

Step 4: Do following things:

For Javascript:

1. Add "Defer" Tag:

A defer tag is a tag which stops the script from loading and loads it when the whole page contents are loaded completely so it improves page loading speed. To add defer tag to your javascript simply add defer='defer' as showing in below example:

<script defer="defer" src="...file/code.js"/>

2. Add External Javascript Internally:

If you see that javascript loading on your blog is redirecting or taking time to load than add the code above </head> in your template or shift it to another host like GitHub.

 Recommended:  How To Store Blogger Codes On Github To Speed Up Blog ?

3. Remove Blocking Code:

If you do above things and still see that the script is blocking then remove that script or copy it and add it in the Layout as a gadget.

 Recommended:  How To Add Or Remove Gadgets In Blogger ?

4. Use "async" Tag:

This tag tells the page that the code which is asynchronised will be executed when it is available and will not be executed when not available so it minimizes page loading speed. To add async tag to your code simply add async='async' because blogger doesn't accept async alone. Here is a sample:

<script async="async" src="...file/code.js"/>


For CSS:

1. Add CSS in <head>:

If you have CSS code stored externally but you are loading it in body by using below code:

<link href="...file/code.css" rel="stylesheet" type="text/css"/>

Simply move it below <head> in your template

2. Use Github:

If your hosting is not responding in time or have many redirects(as in GOOGLE DRIVE) then use Githun to store your codes.

 Recommended:  How To Store Blogger Codes On Github To Speed Up Blog ?

Step 5: Save your template and you are done successfully.

What To Do For Internal Blocking Javacript Or CSS ?

If you have any internal codes which are blocking your pages then remove them because you can't modify them to get work and also avoid such scripts because they are coded by inexperienced bloggers.

Final Words:

By following above steps you can remove blocking javascript and css but if you need the codes and you want to keep them but minimize the loading speed then don't remove the codes but store them on github or in the layout. You may not see any improvement in the Google PageSpeed Insights tool but there will be surely some improvement which you will observe while loading your page.

I hope this post was helpful to you, if not ask me about it. Thanks for visiting 101Helper. Like us on Facebook and never miss a post.

Search keywords: How To Eliminate Render-Blocking Scripts And CSS - Blogger, Blogger blog page loading speed, how to remove blocking scripts and css from blogger blog,how to speed up blog,how to minimize page loading speed in blogger

How To Add Overlay / Interstitial Adsense Ads in Blogger Mobile Site

how-to-add-overlay-interstitial-ads-in-blogger-mobile-site

Adsense being compatible with mobile sites lets you to add ads in mobile site and its really important to add Adsense ad units in mobile because it increases your earnings effectively and massively. So to increase your Adsense earnings you need to install special ad units which will fit mobile screens and help you to get more clicks and increase CPC earnings. You can see a demo of floating Adsense ad unit in below image.

how-to-add-floating-adsense-ad-in-blogger-mobile-site

This Adsense ad unit can be hidden by tapping and pushing it below and its best for those Adsense user who have more mobile traffic.

So in this post I am going to show you how to install Floating Adsense Ad unit in blogger mobile site.

Ad Types And Description.

1. Anchor/overlay ads:

overlay-ad-adsense

Description By Adsense:

  • Shown by AdSense at optimal times to help increase revenue and provide a good user experience

  • Don't count as advertisements as part of our valuable inventory policy

  • Only show on high-end mobile devices

2. Vignette/Interstitial ads:

pop-up-adsense-ad

Description By Adsense:

  • Shown by AdSense at optimal times to help increase revenue and provide a good user experience

  • Don't count as advertisements as part of our valuable inventory policy

  • Only show on high-end mobile devices

  • Limited in number to maintain a good user experience


How To Add Floating / Hover Adsense Ad in Blogger Mobile Site?

Step 1: Go to Adsense and Login.

Step 2: Click on My Ads and choose Page-Level ads.


Step 3: Enable both Anchor/overlay ads and Vignette ads.


how-to-add-adsense-ads-in-blogger-mobile-site

Step 4: Get your ad code.

how-to-add-ads-in-blogger-mobile-site

Step 5: Go to layout and click on add a gadget.

Step 6: Choose Html/Javascript and paste your ad code.

Step 7: Save the gadget and read How To Show Ads In Mobile View In Blogger for further steps.

I hope this post helped you, if you have any problem regarding this post, leave a comment or contact me.

Thanks for visiting 101Helper.

Search Keywords: How To Add Floating / Interstitial Adsense Ad in Blogger Mobile Site, how to enable anchor ads in blogger mobile, Google adsense interstitial ad,anchor ad,floating adsense ad mobile site,push ads in blogger mobile.

How To Add Google Analytics Code In Blogger

GoogleAnalytics-blogger
What Is Google Analytics?

Google Analytics are tools powered by Google which are super good to analyze your site. It keeps all information about your site e.g where your visitors are coming from, what is the country of your visitor, How much time is your visitor spending on your site, What is the behavior of your visitor etc. So with the help of Google Analytics you can keep every info about your site or blog and use it to improve your earnings and to make your site or blog better.

Why Should I Use Google Analytics?

The answer is simple and obvious, you can use Google Analytics to improve your site and earnings.

How can I increase my earnings using Google Analytics? Well, for example you have an interstitial ad which shows up after 10 seconds and overlays your content and you can see that your visitors are aware about your ad and they are smart :p  and when the ad shows up they simply close it and use your site for free without paying you a cent then you can know with the help of Google Analytics that exactly how much time your visitors are spending on your site so for instance your visitor is spending 2 mins on your site or blog then you can show your ad after 20 sec or after 40 sec so your visitor won't understand when the ad is going to show up so you will get more clicks and hence your earnings will increase.

How to improve your blog or site using Google Analytics? Let me share another example to explain how can your improve your site and user experience with the help of Google Analytics. So for example you have a blog and you have installed a "Pop Up Page Take Over Follow Buttons" in your blog using Hellobar then you can set the perfect time for the pop up to show up in the due time and make a good user experience. Moreover you can also plan timings of slideout and Newsletter to show up when your visitor is on your site so with the help of Google Analytics you can manage your dynamic widgets and get benefit of them.

How To Use Google Analytics For Blogger?

Step 1: Add your blog to Google Analytics.

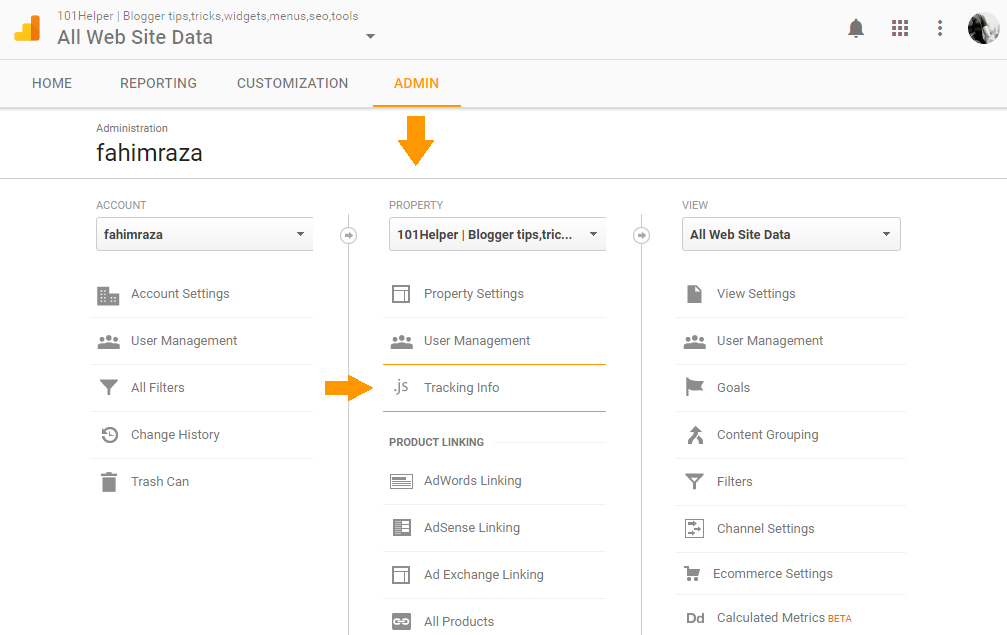
Step 2: Go to ADMIN in Google Analytics and select a property to get its analytics.

Step 3: Select Tracking Info > Tracking Code.


how-to-use-google-analytics-for-blogger

Step 4: Copy the Tracking ID or Website tracking code, its your choice you can copy the tracking ID or Website tracking code.

how-to-add-google-analytics-code-in-blogger

Step 5:  Follow below steps if you have copied website tracking code or scroll below to add tracking ID in your blog.

How to add Google Analytics website tracking code in blogger?

  • Go to Blogger > Template > Edit HTML and search for </head>
  • Paste your copied code above it.
  • Save your template and you are done.

  • How to add Google Analytics website tracking ID in blogger?

  • Go to Blogger > Settings > Other > Google Analytics.
  • Paste your tracking ID.
    how-to-add-tracking-id-in-blogger-google-analytics
  • Click on Save settings button on top right of the page and you are done.


  • That's it, you are done successfully. If you have any question ask me in comments or contact me.

    Follow us on social networks, thanks for visiting 101Helper.

    Search keywords: How To Add Google Analytics Code In Blogger, Google Analytics website tracking ID,Google Analytics website tracking code in blogger,what is Google anlytics,how to use google analytics,how to improve user experience and earnings with google analytics.

    Horizontal Scrolling Menu For Blogger Mobile Site


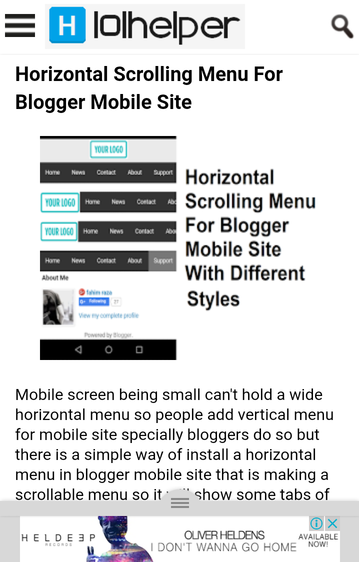
    Mobile screen being small can't hold a wide horizontal menu so people add vertical menu for mobile site specially bloggers do so but there is a simple way of install a horizontal menu in blogger mobile site that is making a scrollable menu so it will show some tabs of the menu and others can be seen by touching and scrolling. As you know that almost everyone is now using a touch screen mobile so it is a good menu for your mobile site. So in this post I am going to share 4 different types of horizontal scrolling menus. Follow below steps to add any of the menu in your blog's mobile site.


    Live Demo (Open In Mobile For Best Experience)

    How To Add Horizontal Scrolling Menu For Blogger Mobile Site?

    Step 1: Go to blogger and open Layout.

    Step 2: Add a gadget just above your "Blog Posts Gadget" as shown in below image and click on Html/Javascript.

    how-to-add-code-in-blogger

    how to add a gadget in blogger

    Note: If you are not able to add gadget above Blog Posts then simply add it in sidebar and drag it above Blog Posts because its important to keep it there

    Step 3: Copy code of desired menu from below and paste it into Html/Javascript window you just opened in step 2.

    Simple Scrollable Nav Without Logo.


    <style>
    .nav-scroll {
        background-color: #333;
        overflow: auto;
        white-space: nowrap;
        position: relative;
    }
    .nav-scroll a {
        display: inline-block;
        color: white;
        text-align: center;
        padding: 14px;
        text-decoration: none;
    }
    .nav-scroll a:hover {
        background-color: #777;
    }
    </style>
    <div class="nav-scroll">
      <a href="https://www.blogger.com">Home</a>
      <a href="#news">News</a>
      <a href="#contact">Contact</a>
      <a href="#about">About</a>
      <a href="#support">Support</a>
      <a href="#blog">Blog</a>
      <a href="#tools">Tools</a>
      <a href="#base">Base</a>
      <a href="#custom">Custom</a>
      <a href="#more">More</a>
      <a href="#logo">Logo</a>
      <a href="#friends">Friends</a>
      <a href="#partners">Partners</a>
      <a href="#people">People</a>
      <a href="#work">Work</a>
    </div>

    Horizontal Scroll Nav With Scrollable Logo.

    horizontal-nav-with-scrolling-logo-mobile-blogger

    <style>
    .nav-scroll {
        background-color: #333;
        overflow: auto;
        white-space: nowrap;
        position: relative;
    }
    .nav-scroll a {
        display: inline-block;
        color: white;
        text-align: center;
        padding: 14px;
        text-decoration: none;
    }
    .nav-scroll a:hover {
        background-color: #777;
    }
    .nav-scroll img {
        width: 100px;
        float: left;
        height: 48px;
        background: #fff;
    }
    </style>
    <div class="nav-scroll">
    <img alt="logo" src="https://www.servicetrade.com/wp-content/uploads/2016/04/your-logo-here.png"/>
      <a href="https://www.blogger.com">Home</a>
      <a href="#news">News</a>
      <a href="#contact">Contact</a>
      <a href="#about">About</a>
      <a href="#support">Support</a>
      <a href="#blog">Blog</a>
      <a href="#tools">Tools</a>
      <a href="#base">Base</a>
      <a href="#custom">Custom</a>
      <a href="#more">More</a>
      <a href="#logo">Logo</a>
      <a href="#friends">Friends</a>
      <a href="#partners">Partners</a>
      <a href="#people">People</a>
      <a href="#work">Work</a>
    </div>


    Horizontal Scroll Nav With Fixed Logo On Left.

    horizontal-nav-with-logo-mobile-blogger

    <div class="nav-mob">
    <img alt="brand" id="brand" src="https://www.servicetrade.com/wp-content/uploads/2016/04/your-logo-here.png"/>
    <div class="nav-scroll">
      <a href="https://www.blogger.com">Home</a>
      <a href="#news">News</a>
      <a href="#contact">Contact</a>
      <a href="#about">About</a>
      <a href="#support">Support</a>
      <a href="#blog">Blog</a>
      <a href="#tools">Tools</a>
      <a href="#base">Base</a>
      <a href="#custom">Custom</a>
      <a href="#more">More</a>
      <a href="#logo">Logo</a>
      <a href="#friends">Friends</a>
      <a href="#partners">Partners</a>
      <a href="#people">People</a>
      <a href="#work">Work</a>
    </div></div>
    <style>
    #brand {
        position: static;
        float: left;
        width: 105px;
        height: 50px
    }
    .nav-scroll {
        background-color: #333;
        overflow: auto;
        white-space: nowrap;
        position: relative
    }
    .nav-scroll a {
        display: inline-block;
        color: white;
        text-align: center;
        padding: 14px;
        text-decoration: none
    }
    .nav-scroll a:hover {
        background-color: #777;
    }
    .nav-scroll img {
        width: 100px;
        float: left;
        height: 48px;
        background: #fff
    }
    .nav-mob {
        position: relative;
    }
    </style>


    Horizontal Scroll Nav With Fixed Logo On Top.

    horizontal-nav-with-fixed-logo-on-top-mobile-blogger

    <div class="nav-mob">
    <div id="slogo">
    <img alt="logo" src="https://www.servicetrade.com/wp-content/uploads/2016/04/your-logo-here.png" /></div>
    <div class="nav-scroll">
      <a href="https://www.blogger.com">Home</a>
      <a href="#news">News</a>
      <a href="#contact">Contact</a>
      <a href="#about">About</a>
      <a href="#support">Support</a>
      <a href="#blog">Blog</a>
      <a href="#tools">Tools</a>
      <a href="#base">Base</a>
      <a href="#custom">Custom</a>
      <a href="#more">More</a>
      <a href="#logo">Logo</a>
      <a href="#friends">Friends</a>
      <a href="#partners">Partners</a>
      <a href="#people">People</a>
      <a href="#work">Work</a>
    </div></div>
    <style>
    .nav-mob {
        position: relative;
    }
    #slogo img {
        float: none;
    width:100px
    }
    #slogo {
        position: static;
        width: 100%;
        text-align: center;
        padding: 2px 0px;
        background: #eaeaea
    }
    .nav-scroll {
        background-color: #333;
        overflow: auto;
        white-space: nowrap;
        position: relative
    }
    .nav-scroll a {
        display: inline-block;
        color: white;
        text-align: center;
        padding: 14px;
        text-decoration: none
    }
    .nav-scroll a:hover {
        background-color: #777
    }
    .nav-scroll img {
        width: 100px;
        float: left;
        height: 48px;
        background: #fff
    }
    </style>

    Step 4: Save the gadget and note its ID or name it so that you can find it in your template for next steps.

    Read: How To Find ID Of A Widget In Blogger

    Step 5: Go to template and click on Edit Html.

    how-to-add-edit-html-in-blogger

    Step 6: Find your "Mobile Nav Gadget" in your template you just added in above steps with the help of its ID or name using Ctrl + F on your keyboard. You can directly jump to your gadget also.

    how-to-search-blogger-template

    Step 7: After finding the gadget copy below piece of code and paste it after locked='false' as shown in below image:

    mobile="only"

    how-to-show-a-gadget-in-blogger-mobile-view


    Step 8: Save your template and again go to Blogger > Template > Mobile.

    How-to-optimize-blogger-blogs

    Step 9: Change Default template to Custom and click on Save.
    mobile-templates-blogger-101helper

    That's it. Now open your mobile site in your mobile to see your menu working.

    I hope you liked this tutorial, for more menu tutorials go to Blogger menus

    Thanks for visiting 101Helper, Share this tutorial with others.

    Search Keywords: Horizontal Scrolling Menu For Blogger Mobile Site, menu for blogger mobile site,pure css menu for blogspot blog,how to add css,javascript menu in blogger mobile view,101helper menus for blogger,blogging tutorials.

    How to Create a Blogger Account?

    Are you wondering how to create a Blogger account? Many of us do, because Blogger is one of the most popular blogging platforms out there and it can provide us with an extraordinary, fun way to express ourselves in the online world. Not only is it Blogger a very large blogging website, but it's also full of categories that you can blog on. You have complete control over what you want to blog, and that does make Blogger an amazing platform to begin with. Yet you do have to wonder how to create a blog on Blogger! We are here to help you understand all of that and so much more as fast as possible, thanks to a detailed guide that will showcase all the necessary instructions in a very easy to read manner.

    Creating a Google account

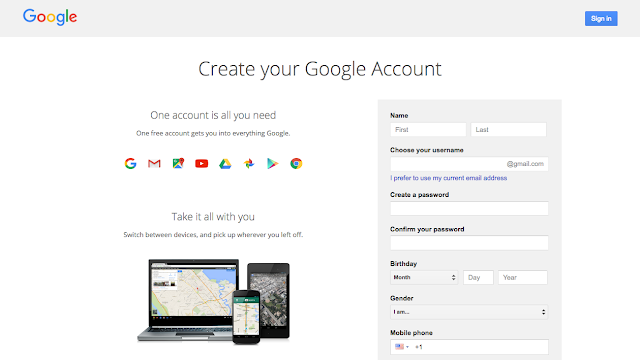
    What you need to know here is that Google owns Blogger, and because of that you will need to use a Google account to sign in to this platform. You can create a Google account now and then you will be able to continue to the platform without a problem. By creating a Google Account you will be able to access a wide range of Google apps and services like Drive or Mail for example. Visit the page above and share all the necessary information in order to create the necessary Google Account. Thankfully, the process is very easy and it will take only a few minutes of your time. In case you already have a Google Account, you will need to sign on the Blogger page.

    create a google account

    Creating your blog

    Once you are located on the Blogger page, you will need to press the New Blog button in order to start a blog. You will receive a new window where you will learn how to create a Blogger account. This will enable you to share all the necessary information.
    • Make sure that you add a title for your blog in the Title area. This is very important because it will allow you to entice the visitor to read more about you and your content. So, try to make the title relevant and appealing
    • In order for users to find your blog, you will need to create an Address for it. Your blog will have a blogspot.com address, but you will need to choose what goes before blogspot.com. Basically, you can opt for something like abcdef.blogspot.com or anything like that. Remember that this can be modified in the long run. The great thing here is that you will immediately be able to see if that address is available or not. This means you will have the ability to check the address availability really fast.
    • The next step will require you to choose from any of the presets that are available at this point. Starting with a Template is a good idea, but do remember that this can be modified afterwards as well. So it's a good idea to just pick a template and move onward.
    create a blogger account

    Once you have the blog title, address and template ready to go, you will have to press the Create blog! button. This process will take a little bit until it's completed properly, so just wait for a few seconds as the new blog will soon be added to the blog list. So, if you were wondering how to create a blog on Blogger, this is the simplest way to do it.
    Maybe the best thing about how to create a Blogger account is that the entire process is very easy to do. Even beginners will have no problem creating and setting up an account. The customization options are plentiful here, so you shouldn't have any problem setting your account really fast!

    Starting to post

    Although the blog address will be available, you can't call that a blog unless you start writing content in there. Obviously, you will need to learn how to write a post on Blogger, and we are here to help you with that right now.

    In order to start writing, you will need to click the Create a new post link or you can press the New Post button. Once you do that, you will gain immediate access to the post editor and here you can write the blog as well as make any necessary changes to content that you already wrote.

    create new blogger post

    Write a title for your post

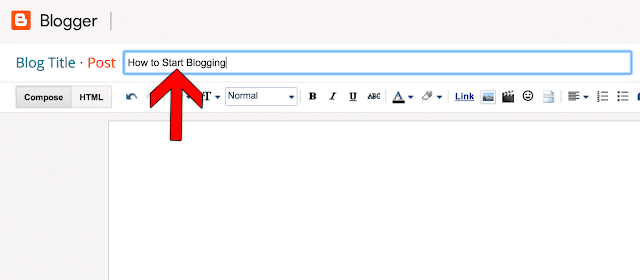
    Your post needs to have a title. Towards the top of the Blogger editor you will see that there is a Post title box. Add in the desired post title there. This shouldn't eat up a lot of your time, just try to come up with a post title that is enticing, very easy to use and a delight to read for your audience. A catchy title can be great. Don't opt for the clickbait title that you can see nowadays, make your title feel informative and fun to read as that's what you want. If you want to write a first post, you need to make it introductory. Write about the goals you have, the type of content you want to add and so on. It will not be easy to write down the first words, but if you create a good title it will be easier for you to translate thoughts into words!

    create blogger post title

    Start the writing process

    You can create a Blogger post in 2 ways. You can either write the post in HTML or you can use the word processor included here. You have a button located in the top left corner which helps you switch between any of these two writing models. The HTML editor helps you create better web content and you can also use it to insert some special web functions. On the other hand, the word processor is more than qualified to offer you all the extra help you might need here.

    blogger post compose html

    Customizing text

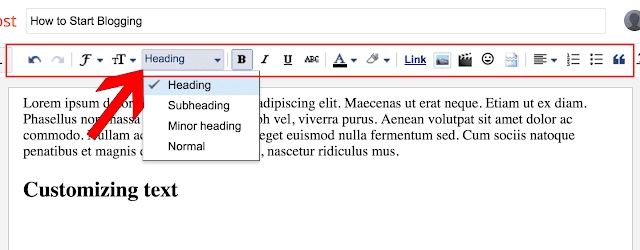
    If you want, you will be able to customize the text you want without a problem. You will have the ability to use the toolbar located on top of the editor to modify the text as you see fit. This includes formatting, color, size, alignment and so on. You have a Normal drop-down that helps you change the type of content you want to add, so you should consider changing between the desired heading type as you see fit. This also changes the way search engines process your content, so keep that in mind.  If possible, try to break the content into easy to read pieces. Use the Headings in a strategic manner.

    blogger post heading

    Add an image to your post

    If you want to make your blog post enticing, you should try to add at least an image. These images make posts a lot easier to read and it's a good idea to make the most out of images if you want to share a great experience for your audience. You will have an "Insert Image" button right above your text editor, on the toolbar. There are multiple options, you can either upload them from your PC/Mac, you can share a link or you can use your webcam to take a picture if you want. However, if you link to other websites, make sure that you showcase their copyright or just refrain from doing that to begin with. There are many sites who do not agree with the idea of having their content stolen, so try to stay away from that!

    insert image in Blogger post

    Modify the post settings

    If you look on the right side of your Post Editor, you will be able to access some Post settings. Remember that these make it easy for you to customize your post right before you choose to publish it!

    blogger post settings
    • Labels are useful if you want to group multiple posts which are very similar to one another.
    • Schedule allows you to publish your content at a later date. It can come in handy if you don't want to share multiple articles at the same time.
    • Permalink is an option that allows you to select the way your post will be linked to in the future. Usually it will maintain the title structure, but there are other link types you can choose from as well.
    • Location enables you to add a location tag for your post. It's a very good tool for those that move/travel often
    • Options allows you to modify some features like the user ability to comment on a post for example. You can also choose the way your HTML code is interpreted here as well.

    Previewing

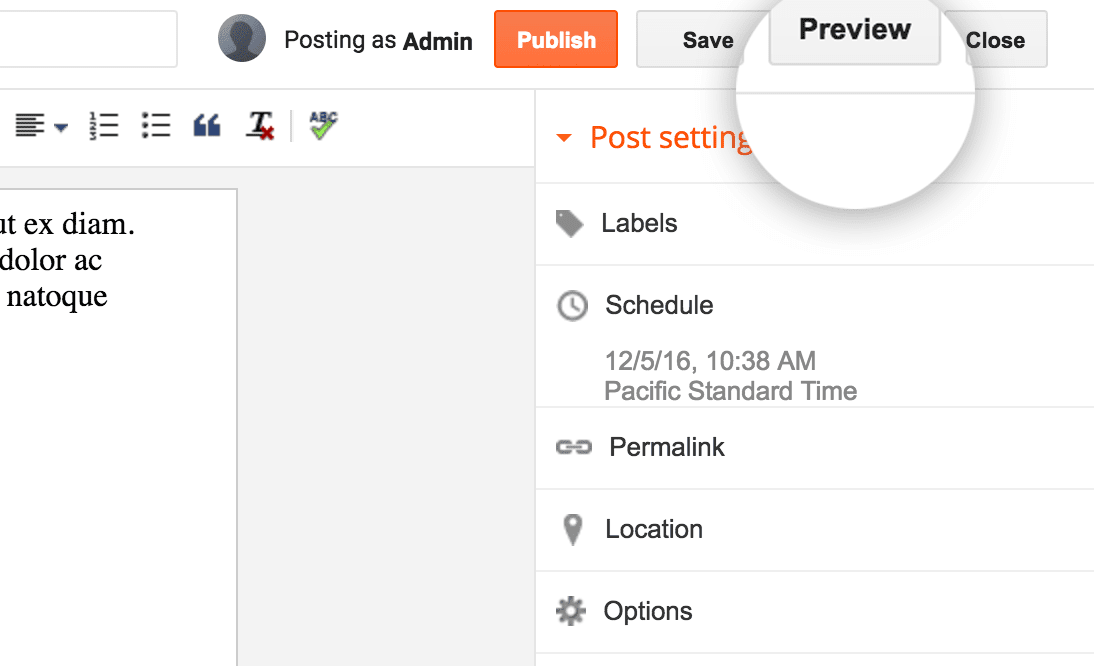
    A great thing about previewing your post is that you will be able to see how it looks when a reader will access it. This is the right time when you need to check your post for any errors, be it grammar or structural ones.

    preview blogger post

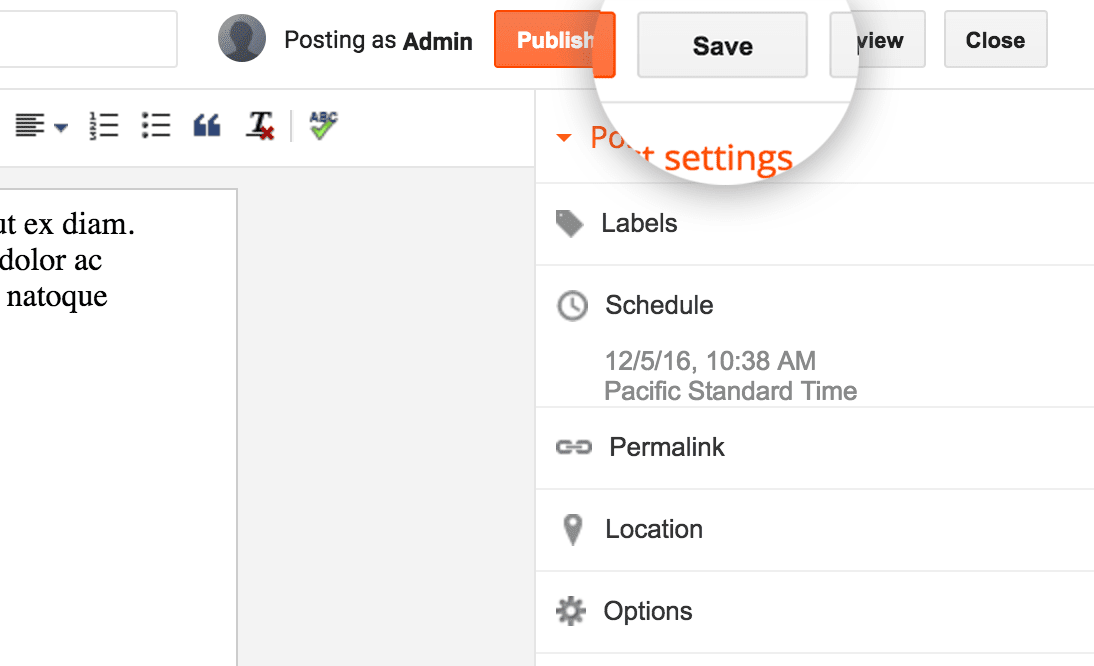
    Save the post for later

    This is not the same as scheduling. When you save the post for later, it means that the post just isn't finished at this time and you will continue to work on it at a later time. You can see this as a draft for your future post.

    save blogger post

    Publishing the post

    If you double or triple checked the post and there are no errors, then you are good to go. Still, it's a good idea to go through it at least one more time to ensure that all the content you want is there and you don't have to make any more changes. Add all the necessary labels and tags, make sure that you inserted any links, images and other information that you might need.

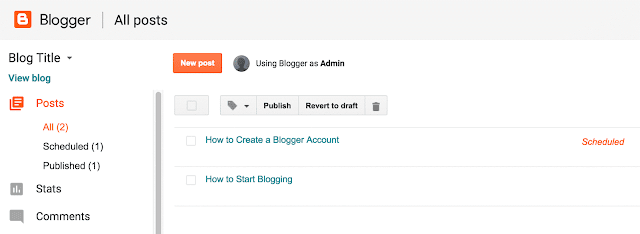
    Once everything is ready, you will just have to press the Publish button located at the top of the panel. This is when Blogger will automatically redirect you to the Posts page. Here you will see the post right on top.

    publish blogger post


    Don't believe that your work is done at this point. In fact, it's far from that. You still have a long way to go before you properly optimize and improve your blog. After all, people won't be drawn in to your blog if you have just a single one to begin with. Work hard to write great posts as they will be able to make your blog stand out in the long haul.

    Of course, you do need patience. Writing a good blog does require time and you shouldn't rush the content creation. Prioritize quality over quantity all the time. If you don't do that, the experience will be very well worth it in the end.

    How can you expand your blog?

    As we mentioned earlier, writing a single post is great but it won't draw in a lot of traffic. If you want to write a good post, one that will bring in lots of readers and views, you want to post as often as possible.

    Quality content will always bring in traffic. Update the blog as often as you can. If you can share at least a post per week, you should do that. A good stream of posts will always come in handy, so make sure that you always write some good, enticing content that will help populate your blog.

    If possible, we recommend you to create a post Schedule as this will help you better optimize the way you post. This way you will be able to prepare your content beforehand, so you can have it ready when you want to create a new post. The best approach is to write more than 1 post at a time. One can be posted and the others can be kept for a later date if you so desire.

    create blogger posts

    Write for a niche

    Generalized content works but it won't really deliver good results for your audience. If you want to get the best results, we recommend you to find a niche as fast as possible. Not only does a niche help you target specific users, but it will also help you become an authority on that topic. We recommend you to research a niche and become an expert on it. This is the best way to create a large audience for a niche and from here to reaching success in blogging will be just a small step.

    Don't rush the content creation process, especially if you write for a niche. Creating redundant content will just keep people away. As long as you take your time and focus on results for your audience, the experience will be an amazing one. Of course, use the proper content structure in order to cater to the needs of search engines, all while maintaining the content relevant for humans as well!

    Reader interaction

    Once you learn how to create a blog on Blogger you can create more than a blog in order to reach multiple audiences. But the idea here still remains, you will need to interact with the audience. The community will grow more and more as you put out content, so make sure that you always interact with the audience.

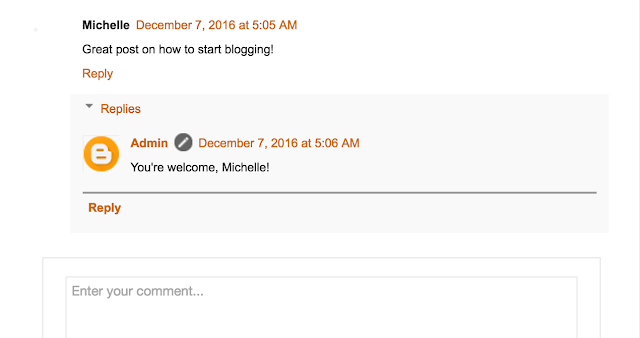
    Read the comments and moderate them, make sure that you remove spam. Also, reply to people that are interested in what you write. This will help create and nurture a community around your content, which can be very interesting to do!

    blogger comments

    Advertising your blog

    Your blog will need advertising if you want it to grow really fast. One of the best ways you can do that is by sharing it with people anywhere you can. From social networks to social media or any other location, all of these are great places where you can share your blog. We recommend you to try and do the following:
    • Post a short headline and a link to your article on Twitter
    • Single Blogger is a Google Product, make sure that you use the Google buttons in order to share on Google Plus and perform other similar actions.
    • Encourage readers and friends to share your Blogger posts on Facebook and anywhere they can. This will help you reach a large audience really fast.
    • Make sure that you comment on forums and other blogs. Link to your post there if it's meaningful for that particular topic. This type of practice is called backlinking and it's very good for SEO.

    Place ads

    Ads are very important if you want to monetize the blog. You won't be able to monetize your blog with AdSense unless you have a blog active for around 6 months, so keep that in mind. You also need to have at least 18 years of age and you also have to obey the TOS. AdSense allows you to receive payments based on the amount of impressions generated by your blog.

    sign up for AdSense

    Blog customization

    You can modify just about anything you want on Blogger, it all comes down to you to make the right changes! For example, you will be able to press Layout and then you can modify the block content for each section of your blog. You also have the ability to Add a Gadget if you want. Blogger has lots of add-ons to choose from, all of which can help you better define your blog!

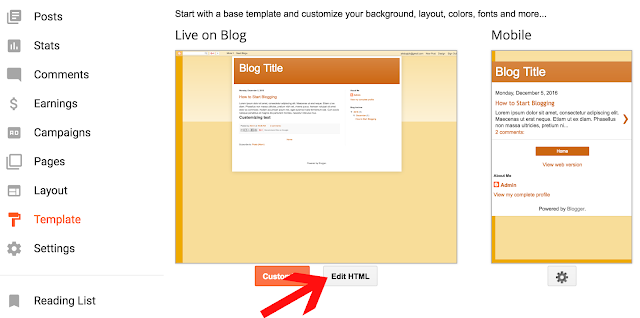
    If you want to customize your Template, keep in mind that there are multiple customization options to choose from. You can also keep the template you have now. Programmers can press the Edit HTML button so they can modify the CSS and HTML code.

    blogger template edit HTML

    Stat tracking

    Blogger has a dedicated option named Stats where you have the ability to monitor the blog performance. Here you have the ability to see the amount of views you get. This way you can identify what posts are performing better than others. As a result, you know what content works great for your audience in the longer term!

    Learning how to create a Blogger account is really easy and you can feel free to create multiple blogs if you want. Just make sure that you write content for all of them. Plus, you can also monetize each one of your blogs if you so desire. Take your time and make sure that you provide valid information for your readers. This should be the main reason to create a Blogger account in the first place!