Windows Live Writer Stopped Support For Blogger "Permanently"!

Windows Live Writer Stops  Support for BloggerSad but true! Blogger users will no longer be able to publish blog posts using Windows Live Writer.

UPDATE: Open Live Writer Connection Error has been fixed. Read how to fix the blogger login errors and other formatting issues. 


Microsoft has finally stopped support for its Blog-Publishing tool Windows Live Writer but fortunately it was kind enough to Open-Source the project by allowing the online community to continue its development. On 9th Dec, 2015, Microsoft's employee, "Scott Hanselman" announced that some engineers within Microsoft has successfully open sourced and forked Windows Live Writer and gave it a new name entitled as Open Live Writer (aka OLW) and it is now part of the .NET Foundation and managed by this group of independent volunteers from Microsoft. Windows Live Writer will continue working but due to no future updates since 2012 it has shut down its support for Blogger blogs permanently due to Google's modern OAuth 2 authentication system. Scott said it in clear words that WLW will never support this new OAuth 2 authentication system, so if you are a Blogger.com user, you'll have no choice but to switch to Open Live Writer. WLW will no longer work with blogspot blogs but it will continue working with WordPress and other blogging platforms. None of our Forum Tricks for fixing the 2 step authentication will work now.

Note: Click the Button below to see full list of topics under discussion.

OLW Topics List

Blogger Users Will See These Errors

Windows Live Writer will return the error "NotFound: Not Found" for Blogger Blogs from now onwards and there is currently no solution or fix for this bug and there will never be one as per the Microsoft employee: Scott Hanselman.
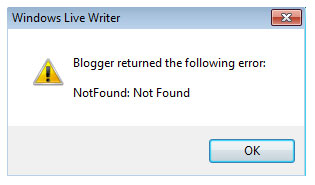
Windows Live Writer error for blogger blogs

Unfortunately currently even "Open Live Writer" uses the old authentication endpoint and does not support connection to Blogger accounts. OLW throws an error "The username or password is incorrect. Please try again".

The following error is shown when you try to connect your blogspot blog with OLW.

Open Live Writer throws Error for Blogger blogs


The good news is that Scott has confirmed that in recent days OLW will be updated to support OAuth2 so that blogger users could continue using it without errors. He mentioned this OLW-Blogger connection issue in his blog post:

Google runs the excellent Blogger blog service. We've worked with the Blogger Team within Google on this project, and they've been kind enough to keep an older authentication endpoint running for many months while we work on Open Live Writer. Soon, Google and Blogger will finally shut down this older authentication system. Blogger will use the more modern OAuth 2 and Open Live Writer will be updated to support OAuth 2.

Google has also confirmed that Windows Live Writer will no longer work with Blogger.com:

A few months ago, the Windows Live Writer and Blogger integration stopped working for a few days due to improvements in Google’s authentication systems. We agreed to keep the old authentication systems for a few more months but starting December 11th, they will be retired and Windows Live Writer will stop working.

This means if you use Windows Live Writer and would like to keep using it to post on Blogger, you will need to migrate to Open Live Writer since Windows Live Writer will not ever support our new authentication system. However, we would like to warn you the connection between the Blogger and Open Live Writer might not work for a while.

Download  Open Live Writer!

Open Live Writer is surely the next big blog editor that will allow you to create blog posts, add photos and videos then publish to your website. You can also compose blogs posts offline and then publish on your return just like you did using WLW. Open Live Writer works with many popular blog service providers that were previously supported by WLW. Platforms include WordPress, SharePoint, Blogger, TypePad, Moveable Type, DasBlog and many more.

Note: Blogspot accounts are currently facing authentication issues and OLW team has promised to fix this issue as soon as possible through a github thread.  I will keep you updated with all latest developments.

Open Live Writer is NOT a Microsoft product

Scott made it quite clear that OLW is an open source project under the .NET Foundation and is managed and coded by volunteers. Although Open Live Writer may look like an exact clone of WLW but it is not a Microsoft product. Some of the volunteers work for Microsoft and are doing this work in their spare time.

Do not delete Windows Live Writer

You must not delete WLW, Open Live Writer installation will not override your WLW files. They both will act as different tools in your Windows PC. I wrote this blogger post offline using Windows Live Writer and I simply copied the Source HTML and pasted inside blogger editor to publish the blog post. So you can continue using WLW to format your posts. OLW currently have no Spell Check support for Windows 7 so if you are a Win7 user, WLW could still prove a lot useful to write quality posts offline with no grammatical mistakes.

Your Views?

Open Live Writer is surely going to make content generation methods a lot more easier and advanced. I just hope they will soon fix existing issues and technical errors related BlogSpot blogs. I also tweeted Scott and have shared blogger users concerns with him. Do you really think you will miss "Windows Live Writer" when you have a better open source alternative which in other words is WLW itself but with a new name and management? =)
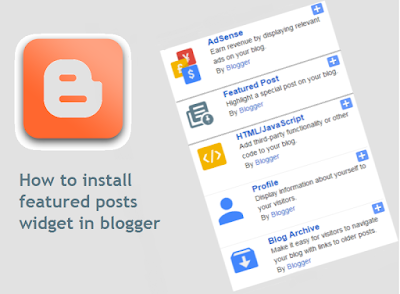
How To Install Blogger "Featured Posts" Widget

featured posts widget

In the recent update blogger has added a new gadget to help bloggers highlight the posts that matter the most. So with this gadget you can highlight your featured posts or highlight the posts which are too older and don't get enough views and you prefer to tell your blog readers about them so they would get views and your visitors will also be able to reach the posts which you recommend to read. Though this is a good gadget but not better than 101Helper's Featured Posts Widget because you can display only single featured post and 101Helper's Featured Posts Widget lets you to show as many posts as you need. So this post is to show you how to install blogger featured posts widget. Follow below steps to begin!

How To Install Blogger "Featured Posts" Gadget?

Step 1: Go to blogger dashboard.

Step 2: Go to Layout and click on add a gadget.

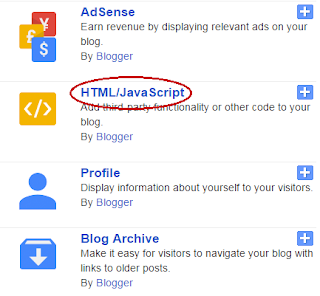
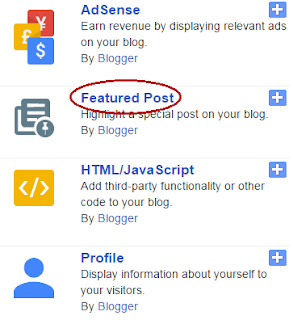
Step 3: Click on Featured Post below Adsense.


how to install blogger featured posts widget

Step 4:
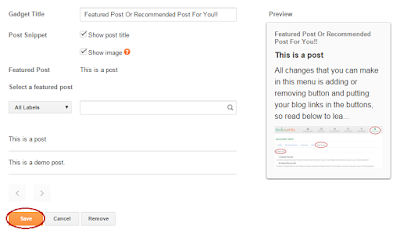
Make following customizations, you can see a preview of your widget on right side or below widget options:

how to install blogger featured posts widget 101helper

(1). Give A Title To You Gadget: 

Type a title for your widget e.g: featured posts or posts recommended for you.

(2). Post Snippets:

Choose posts snippet options e.g show post title or show post image. Check or uncheck to enable or disable showing post title or image.

(3). Search A Post:

Search for a post or choose labels from which you want to show featured post.

(4). Choose Post:

Click on the post which you want to display.

Step 5: Click on save and you are done! open your blog to see your featured post widget.

You can show your widget vertically as well as horizontally. To show it vertically drag it to sidebar and to show it horizontally drag it above blog post.

Note: This gadget grabs the first image of your post so you can't choose a custom image.

I hope you like this gadget and this post was helpful to you. If you found it helpful share it with others. Like 101Helper on Facebook or follow on twitter to get updates about new blogger gadgets.

Search tags: New blogger gadget,Featured Posts widget, Blogger featured posts widget, show featured posts widget on blogspot,recommended post widget for blogger, 101Helper blogger gadgets.

Blogger Sitemap Generator - Version 2016

Blogger Sitemap Generator and Pinger

Blogger XML Sitemap Generator and Pinger was our first PHP tool that we released back in 2012. We received great feedback from all of you and based on that precious comments we are releasing the updated version of this online tool to help you build both Dynamic Sitemaps and Atom Feed Sitemaps. Lets call it version 2016! This tool is much more advanced due to a better optimized algorithm and its capability to create sitemaps for unlimited posts. It will also help you ping your multiple sitemaps to Bing Webmaster tools for faster indexing. Since Blogger has decreased the number of items or entries from 500 URLS to just 150, we needed a quick update to help you encounter this sitemap indexing bug.

It's the complete toolkit required to create correct XML sitemaps for BlogSpot blogs. The tool does the hectic mathematical calculation on your behalf that we discussed earlier in the following post:

How To Use it?

The UI is extremely easy to understand. I have mentioned all details. All you need to do is to submit your Blog URL and total number of your Published Posts.

Blogger Sitemap Generator Tool

Your blog URL must end with a forward slash. For example:

Correct URL

http://www.YourBlog.blogspot.com/

Incorrect URL

http://www.YourBlog.blogspot.com

Reason: No forward slash at the end.

To find published posts count go to Blogger > Posts > Published

Published posts in blogger

  1. Type both URL and Post count inside the text boxes and click the submit button.
  2. The page will load to generate Dynamic Sitemaps and Atom Feed sitemaps along with Ping links for Bing.
  3. Finally go to Google Search Console and submit the sitemaps one by one. For doing this just follow this tutorial: submit Multiple sitemaps to Google
  4. To learn how to submit your blog sitemaps to Yahoo and Bing then Please read Submit sitemap to Yahoo and Bing without errors.

Your Feedback!

Do share your feedback about this latest update and let us know what needs to be done to make it even better. I hope this tool may help you create better xml sitemaps for your blogspot blogs and help you encounter the ongoing traffic drop issues that you are facing due to incomplete sitemap index file. Enjoy using it and remember me in your prayers. Peace and blessings buddies!  =)

Why Blogger Sitemap Submits only 20 Pages & 3000 URLS?

Blogger Sitemap.xml Not Indexing Blogger Dynamic sitemap.xml due to some technical cache problem, is generating only 20 sub-pages where each page contains only 150 links (i.e. 20 X 150 = 3000 urls). That means, your blogspot Sitemap Index File  will only submit a maximum of 3000 Posts to Google Webmaster Search Console due to this technical bug. Upon exploring the organization of sitemap pages inside the index file (i.e. Parent Sitemap.xml), I came to discover that the blogger server is successfully generating sitemap pages in sequential order, the reason why they are not listed inside the Sitemap Index is because the Parent page is not pinged or refreshed after 20 pages are registered.  I am sure I may be sounding a little confusing at this moment to newbies but the illustrations and solutions below will help you understand and fix this ongoing problem where most users complained that webmaster is indexing only 3000 URLS and not indexing the remaining of your blog posts.

If you just heard about Blogger Dynamic sitemaps that I strongly recommend that you first read the following post:

Calculate the number of Sitemaps Pages Your Blog Needs

The Blogger Sitemap Index File groups your blog posts into subpages where each page contains a total of 150 Posts. A new page is created each time your post count inside an existing page exceeds 150. 

For example if your blog contains a total of 600 published posts then your sitemap index file will create a total of 4 pages where each page will contain 150 links (i.e. 600/150 = 4 Pages). The pages will be listed inside sitemap.xml in this order:

Note: Your Sitemap Index file is located at Your-Blog.blogspot.com/sitemap.xml

<loc>http://www.Your-Blog.blogspot.com/sitemap.xml?page=1</loc>

<loc>http://www.Your-Blog.blogspot.com/sitemap.xml?page=2</loc>

<loc>http://www.Your-Blog.blogspot.com/sitemap.xml?page=3</loc>

<loc>http://www.Your-Blog.blogspot.com/sitemap.xml?page=4</loc>

Now suppose you have around 717 published blog posts. In this case if you apply old school math then you need to create ( 717/150 = 4.78 ~ 5 Pages ). Always take one page extra if you get a divisional result in decimals. We would have considered only 4 pages if the result would have been exactly 4.00.

Sitemap index will automatically create these pages as long as your posts does not exceed a maximum of 3000. It creates only 20 pages to accommodate those 3000 posts (i.e. 20x150 = 3000). The remaining pages are not listed though created by the server and we will discuss here how to generate those extra pages manually and submit them separately to Google search console.

We need to submit the dynamic sitemap in two ways which are discussed below:

1. Submit Sitemap if your Posts are less than 3000

If your published posts are less than 3000 articles in all then you just need to submit the following sitemap to Google search console and Bing webmaster tools:

http://www.Your-Blog.blogspot.com/sitemap.xml

2. Submit Sitemap if your Posts are greater than 3000

If the count of your published posts is greater than 3,000 then you need to manually submit the subpages using the calculation we did earlier.

Follow this formula:

1 Suppose you have published up to 4,127 posts. Then you need to create subpages for only (4,127 - 3,000 = 1127) Posts. We will call them the leftover posts.

2 Divide the leftover posts by 150 to find how much sitemap pages you need to submit.

1127 / 150 = 7.513 ~ 8 Pages

3 Start the page count from 21 because 20 pages are already included inside the Parent sitemap.xml. So the sitemap pages that we need to submit along with the index sitemap are:

http://www.Your-Blog.blogspot.com/sitemap.xml

http://www.Your-Blog.blogspot.com/sitemap.xml?page=21

http://www.Your-Blog.blogspot.com/sitemap.xml?page=22

http://www.Your-Blog.blogspot.com/sitemap.xml?page=23

http://www.Your-Blog.blogspot.com/sitemap.xml?page=24

http://www.Your-Blog.blogspot.com/sitemap.xml?page=25

http://www.Your-Blog.blogspot.com/sitemap.xml?page=26

http://www.Your-Blog.blogspot.com/sitemap.xml?page=27

http://www.Your-Blog.blogspot.com/sitemap.xml?page=28

Submitting Blogger Sitemap subPages to Google

The above is a screenshot of the sitemaps I submitted for one of our clients who had more than 11,147 posts. I need to create a total of 55 Pages.

Good news!

If the above method seems quite a lot like elementary math to you then wait for just 6 hours and I will release a PHP tool that will automatically create sitemaps for you. I will release this tool today inshAllah.

Need Help?

Let me know if you need any further clarification or help in calculating your sitemap subpages. I would love to help in this case. Do post your comments below. I hope all those who were encountering the traffic drop issue due to sitemap indexing problems may find this tutorial helpful.

Peace and blessings buddies! =)

Extract YouTube Thumbnails From Blog Posts via JSON

Extract YouTube Thumbnails from Blog posts

Today's tutorial is first time shared online Alhamdulillah that will discuss the most advanced and unique technique of extracting thumbnails from a YouTube Video Iframe embedded inside your blog posts. Our technique is unique because it will ignore all images inside the post and will only pull out the Iframe Image provided by YouTube and will display it as the featured thumbnail. If no video Iframe was found only then the existing third party images inside the blog post will be considered to play a thumbnail role. We have already discussed the manual method of displaying YouTube thumbnails in blogspot posts and today we will discuss the dynamic method to automatically do the job for you. Although Blogger now provides a default link to YouTube thumbnail in its JSON feed API but due to its low resolution we still need a better dynamic method to do the job for us. Lets get to work!

Note: Click the Button below to see full list of topics under discussion.

Topics List

Location of Thumbnail URL

We will use the second method that we discussed in part#9 to extract an image from inside the post content using the path:

json.feed.entry[i].content.$t

Kindly go through part#9 to know the basic technical details

Display YouTube Featured Thumbnails in Recent Posts Widget

Now comes the coding part. We will use the exact same script that we have shared in part#10. Major modifications made have been highlighted in Purple with white text.

<!-- ######### Writing Callback Function ############# -->
<script type="text/javascript">
//----------------------------Defaults
var ListBlogLink = window.location.hostname;
var ListCount = 5;
var TitleCount = 70;
var ListLabel =" ";
var ChrCount = 80;

var ImageSize = 100;

//----------------------------Function Start
function mbtlist(json) {
document.write('<ul class="mbtlist">');
for (var i = 0; i < ListCount; i++)
{

//-----------------------------Variables Declared
var listing= ListUrl = ListTitle = ListConten = ListContent =ListImage =thumbUrl =sk = "";
//----------------------------- Title URL
for (var j = 0; j < json.feed.entry[i].link.length; j++) {
if (json.feed.entry[i].link[j].rel == 'alternate') {
break;
}
}
ListUrl= "'" + json.feed.entry[i].link[j].href + "'";
//----------------------------------- Title Stirng
if (json.feed.entry[i].title!= null)
{
ListTitle= json.feed.entry[i].title.$t.substr(0, TitleCount);
}

//----------------------------------- Content Check

ListConten = json.feed.entry[i].content.$t;
ListContent= ListConten.replace(/(<([^>]+)>)/ig,"").substr(0, ChrCount);

//------------------------------------ Thumbnail Check

// YouTube Thumbnail Search

if (json.feed.entry[i].content.$t.match(/youtube\.com.*(\?v=|\/embed\/)(.{11})/) != null)
{
var youtube_id = json.feed.entry[i].content.$t.match(/youtube\.com.*(\?v=|\/embed\/)(.{11})/).pop();
if (youtube_id.length == 11) {
        var ListImage = "'//img.youtube.com/vi/"+youtube_id+"/0.jpg'";
        }
}

// Blogger Default Thumbnail Search

else if (json.feed.entry[i].media$thumbnail)
{
thumbUrl = json.feed.entry[i].media$thumbnail.url;

sk= thumbUrl.replace("/s72-c/","/s"+ImageSize+"/");
ListImage= "'" + sk.replace("?imgmax=800","") + "'";
}

// Support For 3rd Party Images
else if (json.feed.entry[i].content.$t.match(/src=(.+?[\.jpg|\.gif|\.png]")/) != null)
{
ListImage json.feed.entry[i].content.$t.match(/src=(.+?[\.jpg|\.gif|\.png]")/)[1];
}

else
{
ListImage= "'https://blogger.googleusercontent.com/img/b/R29vZ2xl/AVvXsEgpRQIe1EQg0y15xByop7yj0G0FRV1ctes1TTk2cgtzWHtMpNMtIe74r4DO388l3wwTHR9q6ha8KLHidnfRt8Slh2FPJz5-1yVVVPnFK8MsCkChTQl7dgSLRhAey53meqSTuMzG3RKjUTY/s200/Icon.png'";
}


//----------------------------------- Printing List
var listing = "<li><a href="
+ ListUrl+
  "><img src="
+ListImage+
"/></a>
<a class='mbttitle' href="
+ListUrl+
"target='_blank'>"
+ListTitle+
"</a><span class='icontent'>"
+ListContent+
" ...  <a href="
+ListUrl+
" class='imore'>»</a></span>
</li>";
document.write(listing);
}
document.write("</ul>");
}
</script>
<!-- ######### Invoking the Callback Function ############# -->
<script>
ListBlogLink = "http://www.mybloggertricks.com";
ListCount = 4;
TitleCount = 70;
ListLabel = "Video";
ChrCount = 100;

document.write("<script src='"+ListBlogLink+"/feeds/posts/default/-/"+ListLabel+"?alt=json-in-script&callback=mbtlist'></"+"script>");
</script>
<!-- ######### Styles for Look ############# -->
<link href='http://fonts.googleapis.com/css?family=Oswald' rel='stylesheet' type='text/css'/>
<style>
.mbtlist {list-style-type:none;overflow:hidden}
.mbtlist li {margin:0px auto 20px auto; clear:both; color:#666; font-family:Helvetica; font-size:12px; border-bottom:1px dotted #ddd;padding-bottom:10px;}
.mbtlist .mbttitle {font-family:oswald; font-size:16px; color:#0080ff; font-weight:normal; text-decoration:none;}
.mbtlist .mbttitle:hover {color:#00A5FF;}
font-family:georgia; font-size:15px; font-weight:bold}
.mbtlist div span{margin:0 10px 0 0; display:inline-block;}
.mbtlist span {display:block; margin:5px 0px 0px; padding-right:5px;}
.mbtlist .imore {font-size:16px; font-weight:bold; text-decoration:none; color:#666; line-height: 0.7em;}

.mbtlist img {float:left; margin:0px 10px 10px 0px; border:6px solid #fff; padding:0px; width:100px; height:65px; box-shadow:-1px -1px 4px #777; }
.mbtlist .icontent {text-align:justify;}

</style>

OUTPUT:

YouTube Featured Thumbnails in blog list 
Note:

If you visit our Label Video, you will notice that the posts also contain images and our blog is displaying those images as thumbnails and not displaying the youTube thumbnail. But with the above advanced widget, you will actually display youTube thumbnails. I will update the Summary plugin that our blog is using shortly.

How it works?

  • First we ran a loop to check if a YouTube Iframe actually exists.
  • Next we stored the 11 Characters Video ID inside the variable youtube_id using the .pop() method.  .pop() method returns the last group match of the regular expression i.e. {11} - the video ID
  • Finally we inserted the Video ID inside the standard URL structure of YouTube Thumbnails. We stored the Image URL inside ListImage and passed this value for printing.
  • That's it!

How to use it?

To use this plugin for your blogs, simply copy paste the code inside a HTML/Javascript widget and replace ListBlogLink and ListLabel with your Blog URL and Label respectively. For more details read part#6.

Need Help?

Let me know if you ran through any problems in understanding the interesting concept shared above. I hope this method will take blogger to the next level and will help young developers to build better widgets for their blogspot blogs. Feel confident to ask any question by posting your comments. Your brother is here for any help needed. =)

Slideout Menu For Blogger Mobile Site With Social Buttons

Slideout Menu For Blogger Mobile Site With Social buttons

My recent post for mobile blogging was about a slide down menu which is really appreciated by visitors as it got more than 1000 views so I decided to create another menu for blogger mobile site. Slide down menu was too simple and it didn't have other features like social media buttons and search box so I decided to create a menu which have these features and an exiting look. As responsiveness is also very important for a menu so i made it responsive too. You can read its major features below. For a live demo you can visit 101Helper's mobile site. I am sure you'll like this menu. Don't forget to give your feedback by leaving a comment below.

Slideout Mobile Menu Features:

☆ Easy installation.
☆ Responsive design.
☆ Social media buttons ready.
☆ Fast(doesn't affect blog's loading speed).
☆ Low size.
☆ Responsive search box.
☆ Compatible with all smart phones.
☆ Scrollable tabs and floating on page scroll.
☆ It fits all screen sizes(ipad,iphone,tablets etc).
☆ It has space for Logo.

See Live Demo

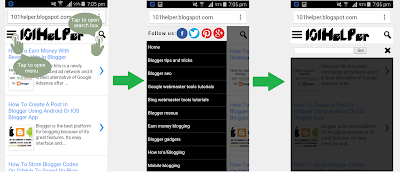
Screenshot:

slide out menu for blogger mobile site

How To Add Slide Out Menu In Blogger?

Its very easy to install this menu in your blog. You just have to follow below steps. Note that we have to hide blog header in mobile site as this menu has a space for logo so you don't need blog header in mobile site any more so we will hide the header in mobile site too while installing this menu. Lets begin!

Step 1: Go to blogger dashboard and navigate to layout.

how to add a gadget in blogger blog

Step 2: Click on add a gadget below your blog's header in the layout.

`how to add slide out menu in blogger tutorial

Step 3: Click on Html/Javascript.

how to add gadgets and ads in blogger

Step 4: Copy the below code and paste it into Html/Javascript window.
<link rel="stylesheet" type="text/css" href="https://rawgit.com/101Helper/docs/master/slideout-nav-public.css" />
<nav id="nava" role="navigation" class="sticky-nav" style="top: 0px;">
<form id="searchbox" method="get" action="/search">
<input name="q" type="text" id="search-in" size="19" required />
<input name="m" type="hidden" value="1" />
<button type="submit"  class="_54k8 _56bs _56b_ _56bw _56bu"  id="u_0_1" data-sigil="touchable"><span class="_55sr">Go!</span></button>
<img id="hide-search" src="https://blogger.googleusercontent.com/img/b/R29vZ2xl/AVvXsEjVSAjrYj8iOWwiJdhtDvQLvfLlu3vd3DxK09gmTXZLcK66vzlJk7M3-A-KZNYDCHGUlCDgmF9iRaFiZH4efPNaAmCX1mjZ4ng_M35jxcxRInvmuhTqjODkMNnSFoikcha4azxVyV1JRd4/s1600/rsz_close-icon.jpg" />
<div id="search-height"></div>
</form>
<div class="prl-container">
<div class="nav-wrapper clearfix">
<img id="show-search" src="https://blogger.googleusercontent.com/img/b/R29vZ2xl/AVvXsEh-F4KBXB1GdgenxJz-Q4XRb_GrlifxWoMvXONQnEUYBoNP5BVWttLf6zVEX8iG8VhgjbSca9wjeEarrtZ-zvPelgZuNoJ37gTvS3FuxdeKJapimW5MtpslTxbm0yROzoq1IcNUb-fNaf8/s1600/rsz_search-icon.png" />
<div style="float:left;">
<div class="nav_menu_control"><a href="#" data-prl-offcanvas="{target:'#offcanvas'}"><img src="https://blogger.googleusercontent.com/img/b/R29vZ2xl/AVvXsEgtwbF9tplNPSZZsodHXfMQItu8s2H_famOywLwsxHnYm-UL9llcAP3BD0GW0vpIWcXdmWS3foqVvizRKXcUGUe9Qvgl4jxNGx0G9b23dr1fTvg24p3d9ru1wLQGdsyx69NeNF1enIIvgk/s1600/rsz_mobile-menu-icon.png"/></a></div>
</div>
<div class="container">
<div class="left">
<a href="/?m=1"><img src="https://blogger.googleusercontent.com/img/b/R29vZ2xl/AVvXsEg2nrKb0yj-txeVUkLXtOOVcwLNHZtv1-14vkAFbGoGxI57jindJP9JLwX1QfjD8mqF7SfX0MhQ9X93GbulGNEBEl6aKxjkJ9jLIhGimV4oUlzisCXspI3kJzsgZkNyWfJHwwarm35wLqs/s1600/rsz_1101helper.png" class="logo" alt="101Helper"/></a>
</div>
<div class="clear"></div></div></div></div></nav><div style="clear: both;"></div>

 <div id="offcanvas" class="prl-offcanvas">
<div class="prl-offcanvas-bar">
<div class="social-icons" style="padding-top: 5px;background: #fff;padding-left: 5px;">
<p>Follow us:</p>
<a href="https://www.fb.com/pages/101Helper/623626157780837"><img border="0" src="https://blogger.googleusercontent.com/img/b/R29vZ2xl/AVvXsEhSjUg3ZJsKwfCW2qGLa_U-f3SDTiOcMqBDJCH4txVrkxlmULDdt8FEULl7tV3FLlnTNyGiLsz_iHGSdIIWDHkiieOKLFavO44Z3Zti0pchSvgMj_DtCIjFH9z-y1jvCO0C-BrobKdiD8M/s1600/facebook.png" /></a>
<a href="https://twitter.com/101helperblog"><img border="0" src="https://blogger.googleusercontent.com/img/b/R29vZ2xl/AVvXsEg55JuHMddBOOCBAnxCBQSnxzK1WjNIsXKfkcvVBnMeK95tecMLUlVp3ofgLI4tmW8sSYeb5qhl-bcKFo0td_VHBc6hsT-2qF4OvugiocPGtd9Dvr4uGBZernQZs2JuJff547muuf4EsrE/s1600/Twitter-Logo.png" /></a>
<a href="https://www.pinterest.com/101helper"><img border="0" src="https://blogger.googleusercontent.com/img/b/R29vZ2xl/AVvXsEg_NvELEmPBaMbytEvdq2nAHs_5L7pVF-I-znLtwLMVHXnws1FUWIOMTojAZc4rTu9tsYXLm9lX0A9-DxnCL7V1_Twqcfdsn6AfOgtMLPl7W92ToEutev5mQUGoWu8iKtiA4fDs7gd2r5I/s1600/App-Pinterest-icon.png" /></a>
<a href="https://plus.google.com/+101helperBlogspot"><img border="0" src="https://blogger.googleusercontent.com/img/b/R29vZ2xl/AVvXsEi8NuQl_U1FCP8ZkbK7kgzSN-HTOsH9tLDCNRUwYwhc-NUduiFGrqtVcRuZzun_sEQpdR7vfLro6l8lObwxpimAvD2s8CB6bh_512QBYrgfhROtXtBhADQIfRZQ_Rh28_05dFGWC-P-o44/s1600/rsz_circle-google-plus-128.png" /></a>
</div>
<nav class="side-nav">
<ul id="nav-list" class="nav-list">
<li><a href="/?m=1">Home</a></li>
<li><a href="/search/label/Blogger%20Tips%20And%20Tricks?m=1">Blogger tips and tricks</a></li>
<li><a href="/search/label/Blogger%20Seo%28Search%20Engine%20Optimization?m=1">Blogger seo</a></li>
<li><a href="/search/label/Google%20Webmaster%20Tools%20tutorials?m=1">Google webmaster tools tutorials</a></li>
<li><a href="/search/label/Bing%20Webmaster%20Tools%20Tutorials?m=1">Bing webmaster tools tutorials</a></li>
<li><a href="/search/label/Blogger%20menus?m=1">Blogger menus</a></li>
<li><a href="/search/label/earn%20money%20blogging?m=1">Earn money blogging</a></li>
<li><a href="/search/label/Blogger%20Widgets%20And%20Gadgets?m=1">Blogger gadgets</a></li>
<li><a href="/search/label/Beginner%20to%20blogging?m=1">How to's/Blogging</a></li>
<li><a href="/search/label/Mobile%20Blogging?m=1">Mobile blogging</a></li>
<li><a href="/p/menusitemap.html?m=1">Sitemap</a></li>
<a class="abt" href="https://101helper.blogspot.com/"><img src="https://blogger.googleusercontent.com/img/b/R29vZ2xl/AVvXsEgfgQbdzjspa_FL4Eot7vj1GBPlKXelQ7JMOQnxVwDVRV7f12Ba1MQUeLk44ovIy-MrwZ1Lluh612ik9ripSUTftCrGmNW5QoNQrud-cB1iKj1n9s2ldhDhrSqZCuZxNfymzblrQy4tGnII/s1600/abt.png"/>101Helper</a>
</ul>
</nav>
</div></div>
<script src="https://ajax.googleapis.com/ajax/libs/jquery/1.11.3/jquery.min.js"></script>
<script type='text/javascript' src='https://rawgit.com/101Helper/docs/master/slideout_mobile_menu.js'></script>
<script>
$(document).ready(function(){
    $("#hide-search").click(function(){
        $("#searchbox").hide();
    });
    $("#show-search").click(function(){
        $("#searchbox").show();
    });
});
</script>
<div id='menu-height'/></div>

Step 5: Replace the highlighted piece of code with your blogs info eg:
  • Replace green color links with your fan pages links.
  • Replace orange color link with your blog's logo image link.
  • Make changes in tabs e.g change links and text of your menu tabs - (Highlighted with yellow color).
Note: You can see a link in the menu highlighted with red color, don't try to remove it its against 101Helper Copyright Policy, if found your blog will be reported for copyright violation and action will be taken.

<a class="abt" href=""><img src="https://blogger.googleusercontent.com/img/b/R29vZ2xl/AVvXsEgfgQbdzjspa_FL4Eot7vj1GBPlKXelQ7JMOQnxVwDVRV7f12Ba1MQUeLk44ovIy-MrwZ1Lluh612ik9ripSUTftCrGmNW5QoNQrud-cB1iKj1n9s2ldhDhrSqZCuZxNfymzblrQy4tGnII/s1600/abt.png"/>101Helper</a> // Copyright link ---- Don't remove this!

Step 6: Click on save button.

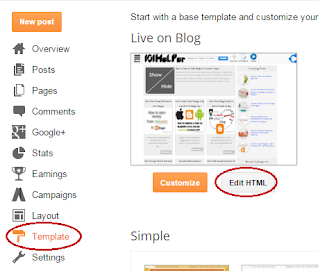
Step 7: Go to template and Edit html.

how to edit html in blogger

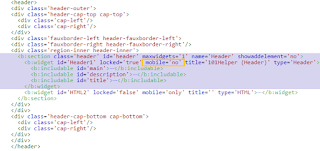
Step 8: Jump to header and type mobile='no' after locked='true' as shown in below image:

how to hide header in blogger

Step 9: Search for the id of your mobile menu gadget and find it in your template.

Check out: How to find ID of a gadget in blogger

Step 10: After finding your mobile menu gadget in your templae type mobile="only" after locked='true' as shown in below image.

how to show gadgets in blogger mobile site

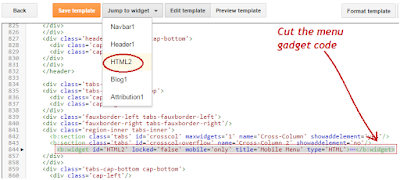
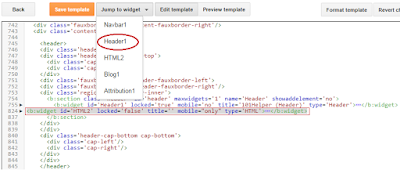
Step 11: Now cut the mobile menu gadget and paste it below header as shown in below image. This is the most important step if you skip it or don't do it right your menu tabs will be irregular. You have to do it in two steps see below images for instance.

Step A: Jump to your menu gadget by its id and cut menu gadget code:


slide out menu in blogger

Step B: Jump to header and paste the copied code below it:

slide out menu in blogger 101helper

Step 11: Click on save template and you are done!


WATCH MORE BLOGGING VIDEOS!

Open your blog in your phone and check if your menu is working fine or not. If you have any question or confusion ask me in comments or contact me at fahimraza101@gmail.com. If you found this post helpful please recommend it on Google and share it with others. Thanks for visiting 101Helper. Keep visiting us. Follow and subscribe to stay updated.

Search tags: responsive menu css,jquery,slide out menu ios,android,slide out menu for website,blogger slide out menu, mobile site navigation 101helper,menus for blogger

Slideout Menu For Blogger Mobile Site With Social Buttons

Slideout Menu For Blogger Mobile Site With Social buttons

My recent post for mobile blogging was about a slide down menu which is really appreciated by visitors as it got more than 1000 views so I decided to create another menu for blogger mobile site. Slide down menu was too simple and it didn't have other features like social media buttons and search box so I decided to create a menu which have these features and an exiting look. As responsiveness is also very important for a menu so i made it responsive too. You can read its major features below. For a live demo you can visit 101Helper's mobile site. I am sure you'll like this menu. Don't forget to give your feedback by leaving a comment below.

Slideout Mobile Menu Features:

☆ Easy installation.
☆ Responsive design.
☆ Social media buttons ready.
☆ Fast(doesn't affect blog's loading speed).
☆ Low size.
☆ Responsive search box.
☆ Compatible with all smart phones.
☆ Scrollable tabs and floating on page scroll.
☆ It fits all screen sizes(ipad,iphone,tablets etc).
☆ It has space for Logo.

See Live Demo

Screenshot:

slide out menu for blogger mobile site

How To Add Slide Out Menu In Blogger?

Its very easy to install this menu in your blog. You just have to follow below steps. Note that we have to hide blog header in mobile site as this menu has a space for logo so you don't need blog header in mobile site any more so we will hide the header in mobile site too while installing this menu. Lets begin!

Step 1: Go to blogger dashboard and navigate to layout.

how to add a gadget in blogger blog

Step 2: Click on add a gadget below your blog's header in the layout.

`how to add slide out menu in blogger tutorial

Step 3: Click on Html/Javascript.

how to add gadgets and ads in blogger

Step 4: Copy the below code and paste it into Html/Javascript window.
<link rel="stylesheet" type="text/css" href="https://rawgit.com/101Helper/docs/master/slideout-nav-public.css" />
<nav id="nava" role="navigation" class="sticky-nav" style="top: 0px;">
<form id="searchbox" method="get" action="/search">
<input name="q" type="text" id="search-in" size="19" required />
<input name="m" type="hidden" value="1" />
<button type="submit"  class="_54k8 _56bs _56b_ _56bw _56bu"  id="u_0_1" data-sigil="touchable"><span class="_55sr">Go!</span></button>
<img id="hide-search" src="https://blogger.googleusercontent.com/img/b/R29vZ2xl/AVvXsEjVSAjrYj8iOWwiJdhtDvQLvfLlu3vd3DxK09gmTXZLcK66vzlJk7M3-A-KZNYDCHGUlCDgmF9iRaFiZH4efPNaAmCX1mjZ4ng_M35jxcxRInvmuhTqjODkMNnSFoikcha4azxVyV1JRd4/s1600/rsz_close-icon.jpg" />
<div id="search-height"></div>
</form>
<div class="prl-container">
<div class="nav-wrapper clearfix">
<img id="show-search" src="https://blogger.googleusercontent.com/img/b/R29vZ2xl/AVvXsEh-F4KBXB1GdgenxJz-Q4XRb_GrlifxWoMvXONQnEUYBoNP5BVWttLf6zVEX8iG8VhgjbSca9wjeEarrtZ-zvPelgZuNoJ37gTvS3FuxdeKJapimW5MtpslTxbm0yROzoq1IcNUb-fNaf8/s1600/rsz_search-icon.png" />
<div style="float:left;">
<div class="nav_menu_control"><a href="#" data-prl-offcanvas="{target:'#offcanvas'}"><img src="https://blogger.googleusercontent.com/img/b/R29vZ2xl/AVvXsEgtwbF9tplNPSZZsodHXfMQItu8s2H_famOywLwsxHnYm-UL9llcAP3BD0GW0vpIWcXdmWS3foqVvizRKXcUGUe9Qvgl4jxNGx0G9b23dr1fTvg24p3d9ru1wLQGdsyx69NeNF1enIIvgk/s1600/rsz_mobile-menu-icon.png"/></a></div>
</div>
<div class="container">
<div class="left">
<a href="/?m=1"><img src="https://blogger.googleusercontent.com/img/b/R29vZ2xl/AVvXsEg2nrKb0yj-txeVUkLXtOOVcwLNHZtv1-14vkAFbGoGxI57jindJP9JLwX1QfjD8mqF7SfX0MhQ9X93GbulGNEBEl6aKxjkJ9jLIhGimV4oUlzisCXspI3kJzsgZkNyWfJHwwarm35wLqs/s1600/rsz_1101helper.png" class="logo" alt="101Helper"/></a>
</div>
<div class="clear"></div></div></div></div></nav><div style="clear: both;"></div>

 <div id="offcanvas" class="prl-offcanvas">
<div class="prl-offcanvas-bar">
<div class="social-icons" style="padding-top: 5px;background: #fff;padding-left: 5px;">
<p>Follow us:</p>
<a href="https://www.fb.com/pages/101Helper/623626157780837"><img border="0" src="https://blogger.googleusercontent.com/img/b/R29vZ2xl/AVvXsEhSjUg3ZJsKwfCW2qGLa_U-f3SDTiOcMqBDJCH4txVrkxlmULDdt8FEULl7tV3FLlnTNyGiLsz_iHGSdIIWDHkiieOKLFavO44Z3Zti0pchSvgMj_DtCIjFH9z-y1jvCO0C-BrobKdiD8M/s1600/facebook.png" /></a>
<a href="https://twitter.com/101helperblog"><img border="0" src="https://blogger.googleusercontent.com/img/b/R29vZ2xl/AVvXsEg55JuHMddBOOCBAnxCBQSnxzK1WjNIsXKfkcvVBnMeK95tecMLUlVp3ofgLI4tmW8sSYeb5qhl-bcKFo0td_VHBc6hsT-2qF4OvugiocPGtd9Dvr4uGBZernQZs2JuJff547muuf4EsrE/s1600/Twitter-Logo.png" /></a>
<a href="https://www.pinterest.com/101helper"><img border="0" src="https://blogger.googleusercontent.com/img/b/R29vZ2xl/AVvXsEg_NvELEmPBaMbytEvdq2nAHs_5L7pVF-I-znLtwLMVHXnws1FUWIOMTojAZc4rTu9tsYXLm9lX0A9-DxnCL7V1_Twqcfdsn6AfOgtMLPl7W92ToEutev5mQUGoWu8iKtiA4fDs7gd2r5I/s1600/App-Pinterest-icon.png" /></a>
<a href="https://plus.google.com/+101helperBlogspot"><img border="0" src="https://blogger.googleusercontent.com/img/b/R29vZ2xl/AVvXsEi8NuQl_U1FCP8ZkbK7kgzSN-HTOsH9tLDCNRUwYwhc-NUduiFGrqtVcRuZzun_sEQpdR7vfLro6l8lObwxpimAvD2s8CB6bh_512QBYrgfhROtXtBhADQIfRZQ_Rh28_05dFGWC-P-o44/s1600/rsz_circle-google-plus-128.png" /></a>
</div>
<nav class="side-nav">
<ul id="nav-list" class="nav-list">
<li><a href="/?m=1">Home</a></li>
<li><a href="/search/label/Blogger%20Tips%20And%20Tricks?m=1">Blogger tips and tricks</a></li>
<li><a href="/search/label/Blogger%20Seo%28Search%20Engine%20Optimization?m=1">Blogger seo</a></li>
<li><a href="/search/label/Google%20Webmaster%20Tools%20tutorials?m=1">Google webmaster tools tutorials</a></li>
<li><a href="/search/label/Bing%20Webmaster%20Tools%20Tutorials?m=1">Bing webmaster tools tutorials</a></li>
<li><a href="/search/label/Blogger%20menus?m=1">Blogger menus</a></li>
<li><a href="/search/label/earn%20money%20blogging?m=1">Earn money blogging</a></li>
<li><a href="/search/label/Blogger%20Widgets%20And%20Gadgets?m=1">Blogger gadgets</a></li>
<li><a href="/search/label/Beginner%20to%20blogging?m=1">How to's/Blogging</a></li>
<li><a href="/search/label/Mobile%20Blogging?m=1">Mobile blogging</a></li>
<li><a href="/p/menusitemap.html?m=1">Sitemap</a></li>
<a class="abt" href="https://101helper.blogspot.com/"><img src="https://blogger.googleusercontent.com/img/b/R29vZ2xl/AVvXsEgfgQbdzjspa_FL4Eot7vj1GBPlKXelQ7JMOQnxVwDVRV7f12Ba1MQUeLk44ovIy-MrwZ1Lluh612ik9ripSUTftCrGmNW5QoNQrud-cB1iKj1n9s2ldhDhrSqZCuZxNfymzblrQy4tGnII/s1600/abt.png"/>101Helper</a>
</ul>
</nav>
</div></div>
<script type='text/javascript' src='https://rawgit.com/101Helper/docs/master/slideout_mobile_menu.js'></script>
<script src="https://ajax.googleapis.com/ajax/libs/jquery/1.11.3/jquery.min.js"></script>
<script type='text/javascript' src='https://rawgit.com/101Helper/docs/master/slideout_mobile_menu.js'></script>
<script>
$(document).ready(function(){
    $("#hide-search").click(function(){
        $("#searchbox").hide();
    });
    $("#show-search").click(function(){
        $("#searchbox").show();
    });
});
</script>
<div id='menu-height'/></div>

Step 5: Replace the highlighted piece of code with your blogs info eg:
  • Replace green color links with your fan pages links.
  • Replace orange color link with your blog's logo image link.
  • Make changes in tabs e.g change links and text of your menu tabs - (Highlighted with yellow color).
Note: You can see a link in the menu highlighted with red color, don't try to remove it its against 101Helper Copyright Policy, if found your blog will be reported for copyright violation and action will be taken.

<a class="abt" href=""><img src="https://blogger.googleusercontent.com/img/b/R29vZ2xl/AVvXsEgfgQbdzjspa_FL4Eot7vj1GBPlKXelQ7JMOQnxVwDVRV7f12Ba1MQUeLk44ovIy-MrwZ1Lluh612ik9ripSUTftCrGmNW5QoNQrud-cB1iKj1n9s2ldhDhrSqZCuZxNfymzblrQy4tGnII/s1600/abt.png"/>101Helper</a> // Copyright link ---- Don't remove this!

Step 6: Click on save button.

Step 7: Go to template and Edit html.

how to edit html in blogger

Step 8: Jump to header and type mobile='no' after locked='true' as shown in below image:

how to hide header in blogger

Step 9: Search for the id of your mobile menu gadget and find it in your template.

Check out: How to find ID of a gadget in blogger

Step 10: After finding your mobile menu gadget in your templae type mobile="only" after locked='true' as shown in below image.

how to show gadgets in blogger mobile site

Step 11: Now cut the mobile menu gadget and paste it below header as shown in below image. This is the most important step if you skip it or don't do it right your menu tabs will be irregular. You have to do it in two steps see below images for instance.

Step A: Jump to your menu gadget by its id and cut menu gadget code:


slide out menu in blogger

Step B: Jump to header and paste the copied code below it:

slide out menu in blogger 101helper

Step 11: Click on save template and you are done!


WATCH MORE BLOGGING VIDEOS!

Open your blog in your phone and check if your menu is working fine or not. If you have any question or confusion ask me in comments or contact me at fahimraza101@gmail.com. If you found this post helpful please recommend it on Google and share it with others. Thanks for visiting 101Helper. Keep visiting us. Follow and subscribe to stay updated.

Search tags: responsive menu css,jquery,slide out menu ios,android,slide out menu for website,blogger slide out menu, mobile site navigation 101helper,menus for blogger