However, customizing or removing the Blogger Navbar also has its downside because the admin links for "New post", "Customize" and "Log Out" will be no longer visible and navigating through the blog functions could be really frustrating sometimes. When the navbar is visible, blog administrators can easily create a new post or customize their template with just one click; however, when the navbar is hidden, many more clicks are required to access the Blogger dashboard panel again.
In this tutorial, we'll see how to add an "Admin Control Panel" menu with many cool additions such as:
- access to the Blogger's Homepage
- create a New Page or Post
- view all your posts
- read your comments
- access the Blog's layout to add or rearrange gadgets
- edit the HTML of your Template
- refresh current page or post
- open a new tab with your blog's homepage
- access the blog' settings
- view your stats
- log out
The result will look something like this:
Adding Admin Control Panel to Blogger template
The Admin Control Panel will only be visible when the blog author is logged in and will not display to blog readers, same with the Post Edit or widget pencil icons which are only visible to you while you are logged in.To add the admin panel to Blogger, follow the steps below:
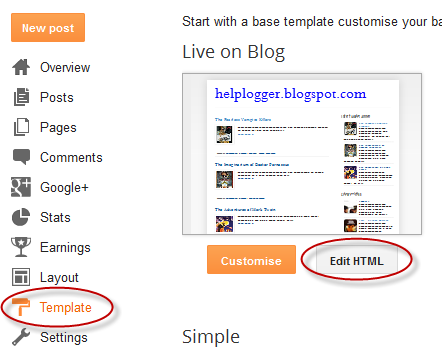
Step 1. Go to "Template" and click on the "Edit HTML" button:

Step 2. Click anywhere inside the code area and press the CTRL + F keys to open the Blogger' search box

Step 3. Paste this line inside the search box then hit Enter to find it:
<body expr:class='"loading" + data:blog.mobileClass'>Note: if you can't find this line, try to find the <body> tag.
Step 4. Just below that line or tag, add the following code:
<span class='item-control blog-admin'>Step 4. Click on the "Save template" button to save the changes.
<style>
.control-panel ul{z-index: 20; position: absolute; margin: 0px auto; background-color: #F6F6F6; width: 100%; }
.control-panel ul li{display: inline-block; float: left; padding: 7px 0px;}
.control-panel ul li a {color:#686868;padding: 7px 15px;border-right: 1px solid #E3E3E3;font-weight: bold;font-size: 13px;}
.control-panel a:hover {text-decoration:none; color:#FC8F44;}
</style>
<div class='control-panel'>
<ul>
<li><a href='http://www.blogger.com/home'>My Blogs</a></li>
<li><a expr:href='"http://www.blogger.com/blogger.g?blogID=" + data:blog.blogId + "#editor/src=sidebar"' rel='nofollow'>New Post</a></li>
<li><a expr:href='"http://www.blogger.com/blogger.g?blogID=" + data:blog.blogId + "#editor/target=page"' rel='nofollow'>New Page</a></li>
<li><a expr:href='"http://www.blogger.com/blogger.g?blogID=" + data:blog.blogId + "#posts"' rel='nofollow'>All Posts</a></li>
<li><a expr:href='"http://www.blogger.com/blogger.g?blogID=" + data:blog.blogId + "#comments"' rel='nofollow'>Comments</a></li>
<li><a expr:href='"http://www.blogger.com/blogger.g?blogID=" + data:blog.blogId + "#pageelements"' rel='nofollow'>Layout</a></li>
<li><a expr:href='"http://www.blogger.com/blogger.g?blogID=" + data:blog.blogId + "#templatehtml"' rel='nofollow'>Edit HTML</a></li>
<li><a href='#' onclick='location.reload(true); return false;'>Refresh</a></li>
<li><a href='/' target='_blank'>New Tab</a></li>
<li><a expr:href='"http://www.blogger.com/blogger.g?blogID=" + data:blog.blogId + "#basicsettings"' rel='nofollow'>Settings</a></li>
<li><a expr:href='"http://www.blogger.com/blogger.g?blogID=" + data:blog.blogId + "#overviewstats"' rel='nofollow'>Stats</a></li>
<li><a href='http://www.blogger.com/logout.g'>Logout</a></li>
</ul>
</div>
</span>
Now take a look on your blog. While you are logged in to Blogger, you should notice your control panel appear on top of your blog. Enjoy!
With this admin control panel for Blogger you can easily access the functions of the blog and you will not have to always open your blog page and the Blogger homepage at the same time.


